2009 CHEVROLET UPLANDER seats
[x] Cancel search: seatsPage 187 of 464

Rear Window Defogger
The rear window defogger uses a warming grid to
remove fog from the rear window.
when the rear window defogger is on.
The rear window defogger turns off about 15 minutes
after the button is pressed. If turned on again, the
defogger will only run for about �ve minutes before
turning off. The defogger can also be turned off
by turning off the engine.
Notice:Do not use anything sharp on the inside of
the rear window. If you do, you could cut or damage
the warming grid, and the repairs would not be
covered by the vehicle warranty. Do not attach a
temporary vehicle license, tape, a decal or anything
similar to the defogger grid.
((Heated Seats):Press to turn on the heated seats.
SeeHeated Seats on page 1-3for additional
information.
Outlet Adjustment
Use the louvers located on the air outlets to change the
direction of the air�ow.
Use the thumbwheels on the driver side and passenger
side air outlets to open or close the air�ow from
these outlets.
Operation Tips
Clear away any ice, snow, or leaves from the air
inlets at the base of the vehicle that could block
the �ow of air into the vehicle.
Do not use any non-GM approved hood de�ectors
that could adversely affect the performance of the
system.
Keep the path under the front seats clear of objects
to help circulate the air inside of the vehicle more
effectively.
3-27
Page 189 of 464

Press eitherqgorrlto increase or decrease
fan speed. The on screen display disappears after
a few seconds.
Press
9btwice to enable temperature adjustment.
After pressing
9b, the current temperature settings
are highlighted and appear in the on screen display. The
arrows indicate that to increase or decrease
temperature, press either the
qgorrlbutton.
The on screen display disappears after a few seconds.
Press
9ba third time to turn off the on screen
display.
QR:Press to toggle between the fan and
temperature settings.
Rear Air Outlets
The outlet behind the driver side rear seat is for the cold
air return. Be sure to keep it free from obstructions.
Also, keep the area around the base of the center
instrument panel console, between and under the front
seats, free of objects that could also obstruct air�ow
to the rear seating area.
SeeClimate Control System on page 3-22orDual
Climate Control System on page 3-25for more
information on the main climate control system.
SeeOutlet Adjustment on page 3-27for information on
ventilation.
Passenger Compartment Air Filter
Both outside and recirculated air are routed through a
passenger compartment �lter. Pollen, dust particles and
other contaminants are removed by the �lter. Air
reductions indicate that the �lter needs to be replaced.
SeeScheduled Maintenance on page 6-4for
replacement intervals.
The access panel for the passenger compartment air
�lter is located in the back of the glove box. To replace
the �lter:
1. Pull the tab located on the outer access panel
up and out.
3-29
Page 210 of 464

Compass Calibration
The compass can be manually calibrated. Only calibrate
the compass in a magnetically clean and safe location,
such as an open parking lot, where driving the vehicle in
circles is not a danger. It is suggested to calibrate away
from tall buildings, utility wires, manhole covers, or other
industrial structures, if possible.
If CAL should ever appear in the DIC display, the
compass should be calibrated.
If the DIC display does not show a heading, for
example, N for North, or the heading does not change
after making turns, there may be a strong magnetic �eld
interfering with the compass. Such interference may be
caused by a magnetic CB or cell phone antenna mount, a
magnetic emergency light, magnetic note pad holder, or
any other magnetic item. Turn off the vehicle, move the
magnetic item, then turn on the vehicle and calibrate the
compass.To calibrate the compass, use the following procedure:Compass Calibration Procedure
1. Before calibrating the compass, make sure the
compass zone is set to the variance zone in
which the vehicle is located. See “Compass
Variance (Zone) Procedure” earlier in this section.
Do not operate any switches such as window,
sunroof, climate controls, seats, etc. during
the calibration procedure.
2. Press the menu button until COMPASS
CALIBRATION displays.
3. Press the set/reset button to start the compass
calibration.
4. The DIC will display CALIBRATION BEGUN DRIVE
UNTIL DONE. Drive the vehicle in tight circles at
less than 5 mph (8 km/h) to complete the calibration.
The DIC will display CALIBRATION FINISHED
for a few seconds when the calibration is complete.
3-50
Page 297 of 464

The Certi�cation/Tire label also tells you the
maximum weights for the front and rear axles,
called the Gross Axle Weight Rating (GAWR).
To �nd out the actual loads on your front and rear
axles, you need to go to a weigh station and
weigh your vehicle. Your dealer/retailer can help
you with this. Be sure to spread out your load
equally on both sides of the centerline.
Never exceed the GVWR for your vehicle or the
GAWR for either the front or rear axle.
{CAUTION:
Do not load the vehicle any heavier than the
Gross Vehicle Weight Rating (GVWR), or
either the maximum front or rear Gross Axle
Weight Rating (GAWR). If you do, parts on
the vehicle can break, and it can change the
way your vehicle handles. These could cause
you to lose control and crash. Also,
overloading can shorten the life of the
vehicle.
Notice
:Overloading your vehicle may cause
damage. Repairs would not be covered by your
warranty. Do not overload your vehicle.If you put things inside your vehicle — like
suitcases, tools, packages, or anything else, they
will go as fast as the vehicle goes. If you have
to stop or turn quickly, or if there is a crash, they
will keep going.
{CAUTION:
Things you put inside your vehicle can strike
and injure people in a sudden stop or turn, or
in a crash.
Put things in the cargo area of your
vehicle. Try to spread the weight evenly.
Never stack heavier things, like
suitcases, inside the vehicle so that some
of them are above the tops of the seats.
Do not leave an unsecured child restraint
in your vehicle.
When you carry something inside the
vehicle, secure it whenever you can.
Do not leave a seat folded down unless
you need to.
4-23
Page 361 of 464

(C) Aspect Ratio:A two-digit number that
indicates the tire height-to-width measurements.
For example, if the tire size aspect ratio is 60, as
shown in item C of the illustration, it would mean
that the tire’s sidewall is 60 percent as high as it
is wide.
(D) Construction Code
:A letter code is used to
indicate the type of ply construction in the tire. The
letter R means radial ply construction; the letter D
means diagonal or bias ply construction; and the
letter B means belted-bias ply construction.
(E) Rim Diameter
:Diameter of the wheel in
inches.
(F) Service Description
:These characters
represent the load range and speed rating of the
tire. The load index represents the load carry
capacity a tire is certi�ed to carry. The load index
can range from 1 to 279. The speed rating is
the maximum speed a tire is certi�ed to carry
a load. Speed ratings range from A to Z.
Tire Terminology and De�nitions
Air Pressure:The amount of air inside the
tire pressing outward on each square inch of the
tire. Air pressure is expressed in pounds per
square inch (psi) or kilopascal (kPa).
Accessory Weight
:This means the combined
weight of optional accessories. Some examples of
optional accessories are, automatic transmission,
power steering, power brakes, power windows,
power seats, and air conditioning.
Aspect Ratio
:The relationship of a tire’s height
to its width.
Belt
:A rubber coated layer of cords that is
located between the plies and the tread. Cords
may be made from steel or other reinforcing
materials.
Bead
:The tire bead contains steel wires wrapped
by steel cords that hold the tire onto the rim.
Bias Ply Tire
:A pneumatic tire in which the plies
are laid at alternate angles less than 90 degrees
to the centerline of the tread.
5-51
Page 409 of 464

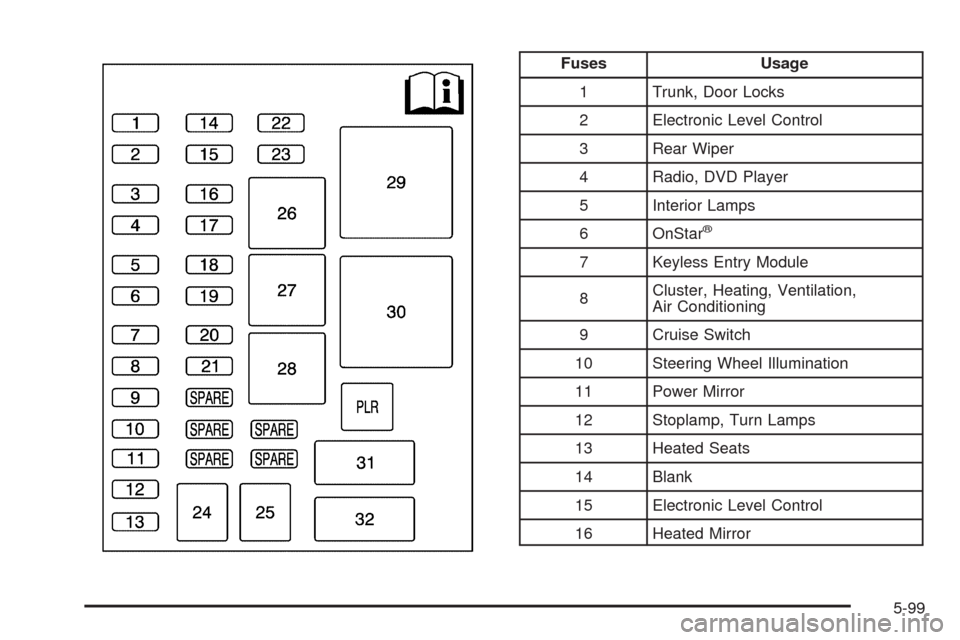
Fuses Usage
1 Trunk, Door Locks
2 Electronic Level Control
3 Rear Wiper
4 Radio, DVD Player
5 Interior Lamps
6 OnStar
®
7 Keyless Entry Module
8Cluster, Heating, Ventilation,
Air Conditioning
9 Cruise Switch
10 Steering Wheel Illumination
11 Power Mirror
12 Stoplamp, Turn Lamps
13 Heated Seats
14 Blank
15 Electronic Level Control
16 Heated Mirror
5-99
Page 410 of 464

Fuses Usage
17Center High-Mounted Stoplamp,
Back-up Lamps
18 Blank
19 Canister Vent Solenoid
20 Park Lamps
21 Power Sliding Door
22 Blank
23 Blank
24 Left Power Sliding Door
25 Right Power Sliding Door
Relays Usage
26 Blank
27 Blank
28 Park Lamps, Taillamps
Relays Usage
29 Retained Accessory Power
30 Rear Defog
PLR Fuse Puller
Circuit
BreakersUsage
31 Power Seats
32 Power Window
Underhood Fuse Block
The underhood fuse block is located in the engine
compartment. For more information on location
seeEngine Compartment Overview on page 5-14.
Notice:Spilling liquid on any electrical components
on the vehicle may damage it. Always keep the
covers on any electrical component.
Your vehicle may not have all the fuses listed.
5-100
Page 421 of 464

Maintenance Footnotes
#Lubricate the suspension, steering linkage, and the
underbody contact points and linkage.
(a)Visually inspect brake lines and hoses for proper
hook-up, binding, leaks, cracks, chafing, etc. Inspect
disc brake pads for wear and rotors for surface
condition. Inspect other brake parts, including calipers,
parking brake, etc. Check parking brake adjustment.
(b)Visually inspect front and rear suspension and
steering system for damaged, loose, or missing parts,
signs of wear, or lack of lubrication. Inspect power
steering lines and hoses for proper hook-up, binding,
leaks, cracks, chafing, etc.
(c)Visually inspect hoses and have them replaced if
they are cracked, swollen, or deteriorated. Inspect all
pipes, fittings and clamps; replace with genuine parts as
needed. To help ensure proper operation, a pressure test
of the cooling system and pressure cap and cleaning the
outside of the radiator and air conditioning condenser is
recommended at least once a year.
(d)Inspect wiper blades for wear, cracking, or
contamination. Clean the windshield and wiper blades,
if contaminated. Replace wiper blades that are worn
or damaged. See Windshield Wiper Blade Replacement
on page 5-46 and Windshield, Backglass, and Wiper
Blades on page 5-94 for more information.(e)Make sure the safety belt reminder light and safety
belt assemblies are working properly. If your vehicle has
a built-in child restraint, make sure the harness straps,
latch plates, buckle, clip, child head restraint, and
anchorages are working properly. Look for any other
loose or damaged safety belt system parts. If you see
anything that might keep a safety belt system from doing
its job, have it repaired. Have any torn or frayed safety
belts replaced. Also see Checking the Restraint Systems
on page 1-92.
(f)Lubricate all key lock cylinders, hood latch
assemblies, secondary latches, pivots, spring anchor
and release pawl, hood and door hinges, rear folding
seats, liftgate hinges, fuel door hinge, power sliding
door cable, and sliding door track(s). More frequent
lubrication may be required when exposed to a corrosive
environment. Applying silicone grease on weatherstrips
with a clean cloth will make them last longer, seal
better, and not stick or squeak.
(g)If you drive regularly under dusty conditions, inspect
the filter at each engine oil change.
6-7