Page 477 of 574

Make certain that all wheel nuts are properly
tightened. See “Wheel Nut Torque” under
Capacities and Specifications on page 5-121.
{CAUTION:
Rust or dirt on a wheel, or on the parts to
which it is fastened, can make wheel nuts
become loose after time. The wheel could
come off and cause an accident. When you
change a wheel, remove any rust or dirt from
places where the wheel attaches to the
vehicle. In an emergency, you can use a
cloth or a paper towel to do this; but be sure
to use a scraper or wire brush later, if
needed, to get all the rust or dirt off. See
Changing a Flat Tire on page 5-86.
Make sure the spare tire is stored securely. Push,
pull, and then try to rotate or turn the tire. If it
moves, tighten the cable. SeeStoring a Flat or
Spare Tire and Tools on page 5-101.
When It Is Time for New Tires
Various factors, such as maintenance, temperatures,
driving speeds, vehicle loading, and road conditions,
in�uence when you need new tires.
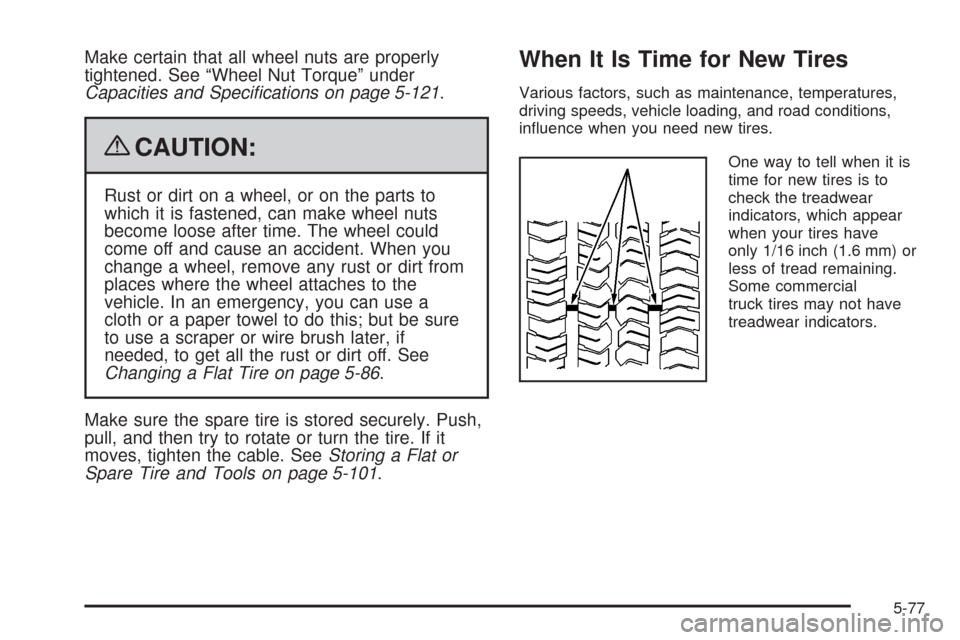
One way to tell when it is
time for new tires is to
check the treadwear
indicators, which appear
when your tires have
only 1/16 inch (1.6 mm) or
less of tread remaining.
Some commercial
truck tires may not have
treadwear indicators.
5-77
Page 485 of 574

If a Tire Goes Flat
It is unusual for a tire to blowout while you are driving,
especially if you maintain your vehicle’s tires properly.
If air goes out of a tire, it is much more likely to leak out
slowly. But if you should ever have a blowout, here
are a few tips about what to expect and what to do:
If a front tire fails, the �at tire creates a drag that pulls
the vehicle toward that side. Take your foot off the
accelerator pedal and grip the steering wheel �rmly.
Steer to maintain lane position, and then gently brake to
a stop well out of the traffic lane.
A rear blowout, particularly on a curve, acts much like a
skid and may require the same correction you would
use in a skid. In any rear blowout remove your foot from
the accelerator pedal. Get the vehicle under control
by steering the way you want the vehicle to go. It may
be very bumpy and noisy, but you can still steer.
Gently brake to a stop, well off the road if possible.{CAUTION:
Lifting a vehicle and getting under it to do
maintenance or repairs is dangerous without the
appropriate safety equipment and training. If a jack
is provided with the vehicle, it is designed only for
changing a �at tire. If it is used for anything else,
you or others could be badly injured or killed if the
vehicle slips off the jack. If a jack is provided with
the vehicle, only use it for changing a �at tire.
If a tire goes �at, the next part shows how to use the
jacking equipment to change a �at tire safely.
5-85
Page 490 of 574
4. Insert the open end
of the extension (J)
through the hole in the
rear bumper (I) (hoist
shaft access hole).
Be sure the hoist end (J) of the extension (D)
connects to the hoist shaft (B). The ribbed square
end of the extension is used to lower the spare tire.5. Turn the wheel wrench (E) counterclockwise to
lower the spare tire (H) to the ground. Continue
to turn the wheel wrench until the spare tire can be
pulled out from under the vehicle.
If the spare tire does not lower to the ground, the
secondary latch is engaged causing the tire
not to lower. SeeSecondary Latch System on
page 5-98for more information.
6. Use the wheel wrench
hook that allows you
to pull the hoist cable
towards you, to assist in
reaching the spare tire.
5-90
Page 491 of 574
7. Tilt the tire toward the vehicle with some slack in
the cable to access the tire/wheel retainer.
Separate the retainer from the guide pin by sliding
the retainer up the pin while pressing down on
the latch.Once the retainer is separated from the guide pin,
tilt the retainer and pull it through the center of
the wheel along with the cable and latch.
8. Put the spare tire near the �at tire.
5-91
Page 496 of 574
5. Remove all of the
wheel nuts.
6. Take off the �at tire.
7. Remove any rust or dirt
from the wheel bolts,
mounting surfaces, and
spare wheel.
{CAUTION:
Rust or dirt on a wheel, or on the parts to which it
is fastened, can make wheel nuts become loose
after time. The wheel could come off and cause
an accident. When changing a wheel, remove any
rust or dirt from places where the wheel attaches
to the vehicle. In an emergency, use a cloth or a
paper towel to do this; but be sure to use a
scraper or wire brush later, if needed, to get all the
rust or dirt off. SeeChanging a Flat Tire on
page 5-86.
8. Put the wheel nuts back on with the rounded end
of the nuts toward the wheel after mounting the
spare tire.
{CAUTION:
Never use oil or grease on bolts or nuts because
the nuts might come loose. The vehicle’s wheel
could fall off, causing a crash.
5-96
Page 499 of 574
5. If the spare does not lower, turn the wrench
counterclockwise until approximately 6 inches
(15 cm) of cable is exposed.
6. Stand the wheel blocks on their shortest ends, with
the backs facing each other.
7. Place the bottom edge
of the jack (A) on the
wheel blocks (B),
separating them so
that the jack is
balanced securely.
8. Attach the jack handle, extension, and wheel wrench
to the jack and place it (with the wheel blocks) under
the vehicle toward the front of the rear bumper.
5-99
Page 501 of 574
Storing a Flat or Spare Tire and
Tools
{CAUTION:
Storing a jack, a tire, or other equipment in the
passenger compartment of the vehicle could
cause injury. In a sudden stop or collision, loose
equipment could strike someone. Store all these in
the proper place.
Notice:Storing an aluminum wheel with a �at tire
under your vehicle for an extended period of time or
with the valve stem pointing up can damage the
wheel. Always stow the wheel with the valve stem
pointing down and have the wheel/tire repaired
as soon as possible.
Store the tire under the rear of the vehicle in the spare
tire carrier. Refer to the following graphics and
instructions to help you:A. Hoist Assembly
B. Hoist Shaft
C. Hoist Shaft Access
Cover/Hole
D. Jack Handle
Extensions
E. Wheel Wrench
F. Hoist Cable
G. Tire/Wheel RetainerH. Spare Tire/Flat Tire
(Valve Stem
Pointed Down)
I. Hoist Shaft
Access Hole
J. Hoist End of
Extension Tool
K. Spare Tire Lock
5-101
Page 502 of 574
1. Put the tire (H) on the ground at the rear of the
vehicle with the valve stem pointed down, and to
the rear.
2. Tilt the tire toward the vehicle. Separate the
tire/wheel retainer (G) from the guide pin. Pull
the pin through the center of the wheel. Tilt
the retainer down through the center wheel opening.
Make sure the retainer is fully seated across the
underside of the wheel.3. Assemble the two jack handle extensions (D) and
wheel wrench (E) as shown.
5-102