2009 CHEVROLET SUBURBAN transmission
[x] Cancel search: transmissionPage 149 of 578
Shifting Out of Four-Wheel Drive Low
To shift from Four-Wheel Drive Low to Four-Wheel
Drive High, AUTO, or Two-Wheel Drive High, the vehicle
must be stopped or moving less than 3 mph (5 km/h)
with the transmission in N (Neutral) and the ignition
in ON/RUN. The preferred method for shifting out of
Four-Wheel Drive Low is to have your vehicle moving
1 to 2 mph (1.6 to 3.2 km/h). Turn the knob to the
Four-Wheel Drive High, AUTO, or Two-Wheel Drive High
position. You must wait for the Four-Wheel Drive High,
AUTO, or Two-Wheel Drive High indicator light to stop
�ashing and remain on before shifting the transmission
into gear.
Notice:Shifting the transmission into gear before
the Four-Wheel Drive Low indicator light has
stopped �ashing could damage the transfer case.
To help avoid damaging the vehicle, always wait for
the Four-Wheel Drive Low indicator light to stop
�ashing before shifting the transmission into gear.
The vehicle may have signi�cant engagement noise
and bump when shifting between Four-Wheel Drive Low
and Four-Wheel Drive High ranges or from N (Neutral)
while the engine is running.If the knob is turned to the Four-Wheel Drive High,
AUTO, or Two-Wheel Drive High switch position when
the vehicle is in gear and/or moving, the Four-Wheel
Drive High, AUTO or Two-Wheel Drive High indicator
light will �ash for 30 seconds but will not complete
the shift unless the vehicle is moving less than 3 mph
(5 km/h) and the transmission is in N (Neutral).
Shifting into Neutral
To shift the transfer case to N (Neutral) do the following:
1. Make sure the vehicle is parked so that it will
not roll.
2. Set the parking brake and apply the regular brake
pedal. SeeParking Brake on page 2-45for more
information.
3. Start the vehicle or turn the ignition to ON/RUN.
4. Put the transmission in N (Neutral).
5. Shift the transfer case to Two-Wheel Drive High.
6. Turn the transfer case dial clockwise to N (Neutral)
until it stops and hold it there until the N (Neutral)
light starts blinking. This will take at least
10 seconds. Then slowly release the dial to the
Four-Wheel Drive Low position. The N (Neutral)
light will come on when the transfer case shift to
N (Neutral) is complete.
2-43
Page 150 of 578
7. If the engine is running, verify that the transfer case
is in N (Neutral) by shifting the transmission to
R (Reverse) for one second, then shift the
transmission to D (Drive) for one second.
8. Turn the ignition to ACC/ACCESSORY, which will
turn the engine off.
9. Place the transmission shift lever in P (Park).
10. Release the parking brake prior to moving the
vehicle.
11. Turn the ignition to LOCK/OFF.
Shifting Out of Neutral
To shift out of N Neutral do the following:
1. Set the parking brake and apply the regular brake
pedal.
2. Turn the ignition to ON/RUN with the engine off,
and shift the transmission to N (Neutral).3. Turn the transfer case dial to the desired transfer
case shift position (Two-Wheel Drive High,
Four-Wheel Drive High, AUTO).
After the transfer case has shifted out of N (Neutral),
the N (Neutral) light will go out.
4. Release the parking brake prior to moving the
vehicle.
Notice:Shifting the transmission into gear before
the Four-Wheel Drive Low indicator light has
stopped �ashing could damage the transfer case.
To help avoid damaging the vehicle, always wait for
the Four-Wheel Drive Low indicator light to stop
�ashing before shifting the transmission into gear.
5. Start the engine and shift the transmission to
the desired position.
Excessively shifting the transfer case into or out of the
different modes may cause the transfer case to enter the
shift protection mode. This will protect the transfer case
from possible damage and will only allow the transfer
case to respond to one shift per 10 seconds. The transfer
case may stay in this mode for up to three minutes.
2-44
Page 154 of 578
Leaving the Vehicle With the Engine
Running
{CAUTION:
It can be dangerous to leave the vehicle with the
engine running. The vehicle could move suddenly
if the shift lever is not fully in P (Park) with the
parking brake �rmly set.
If you have four-wheel drive and the transfer case is
in N (Neutral), the vehicle will be free to roll, even if
the shift lever is in P (Park). So be sure the transfer
case is in a drive gear — not in N (Neutral).
And, if you leave the vehicle with the engine
running, it could overheat and even catch �re.
You or others could be injured. Do not leave the
vehicle with the engine running unless you have to.If you have to leave the vehicle with the engine running,
be sure your vehicle is in P (Park) and the parking brake
is �rmly set before you leave it. After you move the shift
lever into P (Park), hold the regular brake pedal down.
Then, see if you can move the shift lever away from
P (Park) without �rst pulling it toward you. If you can, it
means that the shift lever was not fully locked into
P (Park).
Torque Lock
If you are parking on a hill and you do not shift your
transmission into P (Park) properly, the weight of
the vehicle may put too much force on the parking pawl
in the transmission. You may �nd it difficult to pull the
shift lever out of P (Park). This is called torque lock.
To prevent torque lock, set the parking brake and
then shift into P (Park) properly before you leave the
driver seat. To �nd out how, seeShifting Into Park
on page 2-47.
When you are ready to drive, move the shift lever out of
P (Park) before you release the parking brake.
If torque lock does occur, you may need to have another
vehicle push yours a little uphill to take some of the
pressure from the parking pawl in the transmission, then
you will be able to pull the shift lever out of P (Park).
2-48
Page 157 of 578
Running the Vehicle While Parked
It is better not to park with the engine running. But if you
ever have to, here are some things to know.
{CAUTION:
Idling a vehicle in an enclosed area with poor
ventilation is dangerous. Engine exhaust may
enter the vehicle. Engine exhaust contains Carbon
Monoxide (CO) which cannot be seen or smelled.
It can cause unconsciousness and even death.
Never run the engine in an enclosed area that has
no fresh air ventilation. For more information, see
Engine Exhaust on page 2-50.
{CAUTION:
It can be dangerous to get out of the vehicle if the
automatic transmission shift lever is not fully in
P (Park) with the parking brake �rmly set.
CAUTION: (Continued)
CAUTION: (Continued)
The vehicle can roll. Do not leave the vehicle
when the engine is running unless you have to.
If you have left the engine running, the vehicle
can move suddenly. You or others could be
injured. To be sure the vehicle will not move, even
when you are on fairly level ground, always set
the parking brake and move the shift lever to
P (Park).
{CAUTION:
Four-wheel drive vehicles with the transfer case in
N (Neutral) will allow the vehicle to roll, even if the
automatic transmission shift lever is in P (Park). So,
be sure the transfer case is in a drive gear — not in
N (Neutral). Always set the parking brake.
Follow the proper steps to be sure the vehicle will not
move. SeeShifting Into Park on page 2-47.
If pulling a trailer, seeTowing a Trailer on page 4-50.
2-51
Page 193 of 578
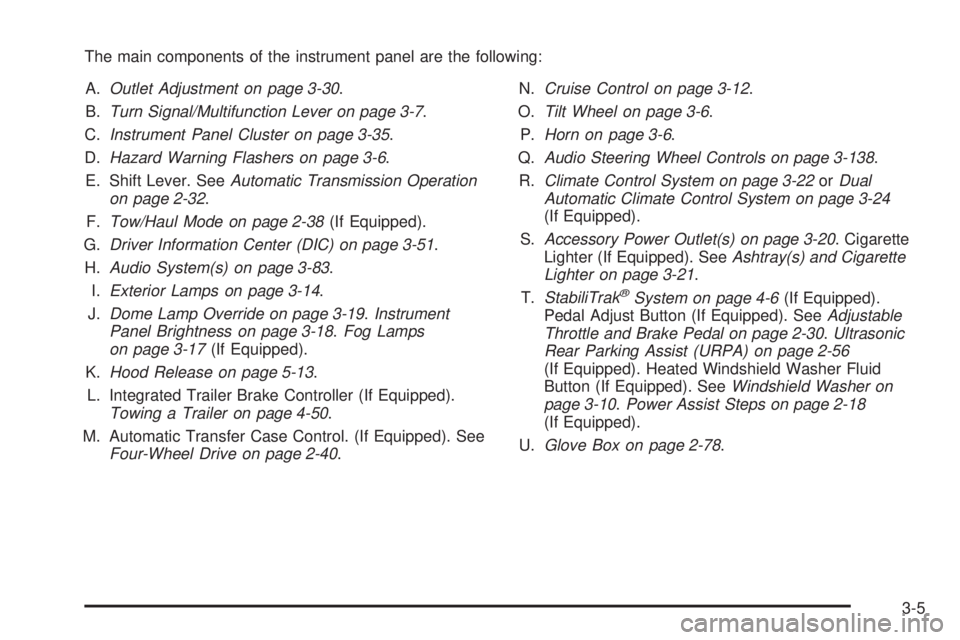
The main components of the instrument panel are the following:
A.Outlet Adjustment on page 3-30.
B.Turn Signal/Multifunction Lever on page 3-7.
C.Instrument Panel Cluster on page 3-35.
D.Hazard Warning Flashers on page 3-6.
E. Shift Lever. SeeAutomatic Transmission Operation
on page 2-32.
F.Tow/Haul Mode on page 2-38(If Equipped).
G.Driver Information Center (DIC) on page 3-51.
H.Audio System(s) on page 3-83.
I.Exterior Lamps on page 3-14.
J.Dome Lamp Override on page 3-19.Instrument
Panel Brightness on page 3-18.Fog Lamps
on page 3-17(If Equipped).
K.Hood Release on page 5-13.
L. Integrated Trailer Brake Controller (If Equipped).
Towing a Trailer on page 4-50.
M. Automatic Transfer Case Control. (If Equipped). See
Four-Wheel Drive on page 2-40.N.Cruise Control on page 3-12.
O.Tilt Wheel on page 3-6.
P.Horn on page 3-6.
Q.Audio Steering Wheel Controls on page 3-138.
R.Climate Control System on page 3-22orDual
Automatic Climate Control System on page 3-24
(If Equipped).
S.Accessory Power Outlet(s) on page 3-20. Cigarette
Lighter (If Equipped). SeeAshtray(s) and Cigarette
Lighter on page 3-21.
T.StabiliTrak
®System on page 4-6(If Equipped).
Pedal Adjust Button (If Equipped). SeeAdjustable
Throttle and Brake Pedal on page 2-30.Ultrasonic
Rear Parking Assist (URPA) on page 2-56
(If Equipped). Heated Windshield Washer Fluid
Button (If Equipped). SeeWindshield Washer on
page 3-10.Power Assist Steps on page 2-18
(If Equipped).
U.Glove Box on page 2-78.
3-5
Page 204 of 578
Daytime Running Lamps (DRL)
Daytime Running Lamps (DRL) can make it easier for
others to see the front of your vehicle during the
day. Fully functional daytime running lamps are required
on all vehicles �rst sold in Canada.
The DRL system will come on when the following
conditions are met:
The ignition is on.
The exterior lamps control is in AUTO.
The transmission is not in P (Park).
The light sensor determines it is daytime.
When the DRL are on, only the DRL lamps will be on.
The taillamps, sidemarker, instrument panel lights,
and other lamps will not be on.
When it begins to get dark, the automatic headlamp
system will switch from DRL to the headlamps.
To turn off the DRL lamps, turn the exterior lamps
control to the OFF position and then release. For
vehicles �rst sold in Canada, the transmission must be
in the P (Park) position, before the DRL lamps can
be turned off.
Automatic Headlamp System
When it is dark enough outside, the automatic headlamp
system turns on the headlamps at the normal brightness,
along with the taillamps, sidemarker, parking lamps,
and the instrument panel lights. The radio lights will also
be dim.
To turn off the automatic headlamp system, turn the
exterior lamps switch to the off position and then release
it. For vehicles �rst sold in Canada, the transmission
must be in the P (Park) position, before the automatic
headlamp system can be turned off.
The vehicle has a light sensor located on the top of the
instrument panel in the defroster grille that regulates
when the automatic headlamps turn on. Do not cover the
sensor or the headlamps will come on whenever the
ignition is on.
The system may also turn on the headlamps when
driving through a parking garage, heavy overcast
weather, or a tunnel. This is normal.
3-16
Page 232 of 578
This light should come on
when the ignition is on, but
the engine is not running,
as a check to show it
is working. If it does not,
have the vehicle serviced
by your dealer/retailer.
If the check engine light comes on and stays on, while
the engine is running, this indicates that there is an
OBD II problem and service is required.
Malfunctions often are indicated by the system before
any problem is apparent. Being aware of the light
can prevent more serious damage to the vehicle. This
system assists the service technician in correctly
diagnosing any malfunction.
Notice:If the vehicle is continually driven with this
light on, after a while, the emission controls might
not work as well, the vehicle’s fuel economy might
not be as good, and the engine might not run as
smoothly. This could lead to costly repairs that might
not be covered by the vehicle warranty.Notice:Modi�cations made to the engine,
transmission, exhaust, intake, or fuel system of the
vehicle or the replacement of the original tires with
other than those of the same Tire Performance
Criteria (TPC) can affect the vehicle’s emission
controls and can cause this light to come on.
Modi�cations to these systems could lead to costly
repairs not covered by the vehicle warranty. This
could also result in a failure to pass a required
Emission Inspection/Maintenance test. See
Accessories and Modifications on page 5-3.
This light comes on during a malfunction in one of
two ways:
Light Flashing:A mis�re condition has been detected.
A mis�re increases vehicle emissions and could
damage the emission control system on the vehicle.
Diagnosis and service might be required.
To prevent more serious damage to the vehicle:
Reduce vehicle speed.
Avoid hard accelerations.
Avoid steep uphill grades.
If towing a trailer, reduce the amount of cargo being
hauled as soon as it is possible.
3-44
Page 240 of 578

DIC Operation and Displays (With
DIC Buttons)
If your vehicle has DIC buttons, the information below
explains the operation of this system.
The DIC has different displays which can be accessed
by pressing the DIC buttons located on the instrument
panel, next to the steering wheel.
The DIC displays trip, fuel, and vehicle system
information, and warning messages if a system problem
is detected.
The DIC also allows some features to be customized.
SeeDIC Vehicle Customization (With DIC Buttons)
on page 3-74for more information.
If your vehicle has DIC buttons, you can also use the
trip odometer reset stem to view some of the DIC
displays. See “DIC Operation and Displays (Without DIC
Buttons)” later in this section.
DIC Buttons
The buttons are the
trip/fuel, vehicle
information, customization,
and set/reset buttons. The
button functions are
detailed in the following
pages.
3(Trip/Fuel):Press this button to display the
odometer, trip odometer, fuel range, average economy,
fuel used, timer, and transmission temperature. The
compass and outside air temperature will also be shown
in the display. The temperature will be shown in °F or
°C depending on the units selected.
3-52