2009 CHEVROLET SILVERADO tow
[x] Cancel search: towPage 157 of 600
{CAUTION:
Four-wheel drive vehicles with the transfer
case in N (Neutral) will allow the vehicle to roll,
even if the automatic transmission shift lever is in
P (Park). So, be sure the transfer case is in a
drive gear — not in N (Neutral). Always set the
parking brake.
Follow the proper steps to be sure the vehicle will not
move. SeeShifting Into Park on page 2-52.
If pulling a trailer, seeTowing a Trailer on page 4-51.
Mirrors
Manual Rearview Mirror
Hold the inside rearview mirror in the center to move it
for a clearer view behind your vehicle. Adjust the
mirror to avoid glare from the headlamps behind you.
Push the tab forward for daytime use and pull it for
nighttime use.
Automatic Dimming Rearview Mirror
The vehicle may have an automatic dimming inside
rearview mirror.
Vehicles with OnStar
®have three additional control
buttons for the OnStar®system. See your dealer/retailer
for more information about OnStar®and how to
subscribe to it. SeeOnStar®System on page 2-71for
more information about the services OnStar®provides.
O(On/Off):Press to turn the dimming feature on
or off.
The vehicle may also have a Rear Vision Camera
(RVC). SeeRear Vision Camera (RVC) on page 2-65
for more information.
If the vehicle has RVC, the
O(On/Off) button for
turning the automatic dimming feature on or off will not
be available.
Automatic Dimming Mirror Operation
Automatic dimming reduces the glare from the
headlamps of the vehicle behind you. The dimming
feature comes on and the indicator light illuminates each
time the ignition is turned to start.
2-57
Page 158 of 600
Cleaning the Mirror
Do not spray glass cleaner directly on the mirror. Use a
soft towel dampened with water.
Outside Manual Mirrors
Adjust the outside mirrors to see the side of the vehicle
and have a clear view of objects behind you.
Manually fold the mirrors inward to prevent damage
when going through an automatic car wash. To
fold, push the mirror toward the vehicle. Push the mirror
outward, to return to its original position.
Using hood-mounted air de�ectors and add-on convex
mirror attachments could decrease mirror performance.
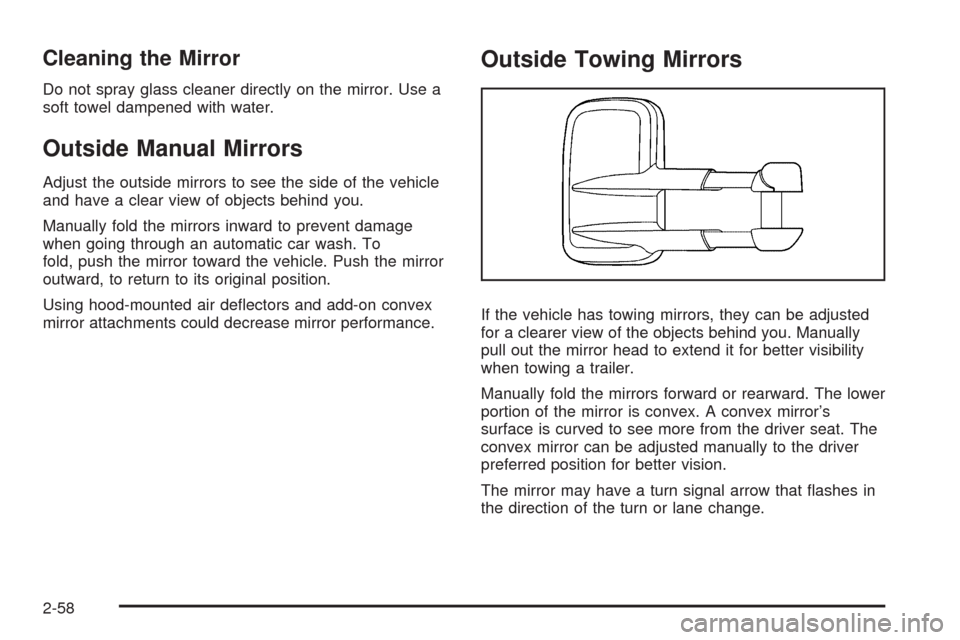
Outside Towing Mirrors
If the vehicle has towing mirrors, they can be adjusted
for a clearer view of the objects behind you. Manually
pull out the mirror head to extend it for better visibility
when towing a trailer.
Manually fold the mirrors forward or rearward. The lower
portion of the mirror is convex. A convex mirror’s
surface is curved to see more from the driver seat. The
convex mirror can be adjusted manually to the driver
preferred position for better vision.
The mirror may have a turn signal arrow that �ashes in
the direction of the turn or lane change.
2-58
Page 159 of 600
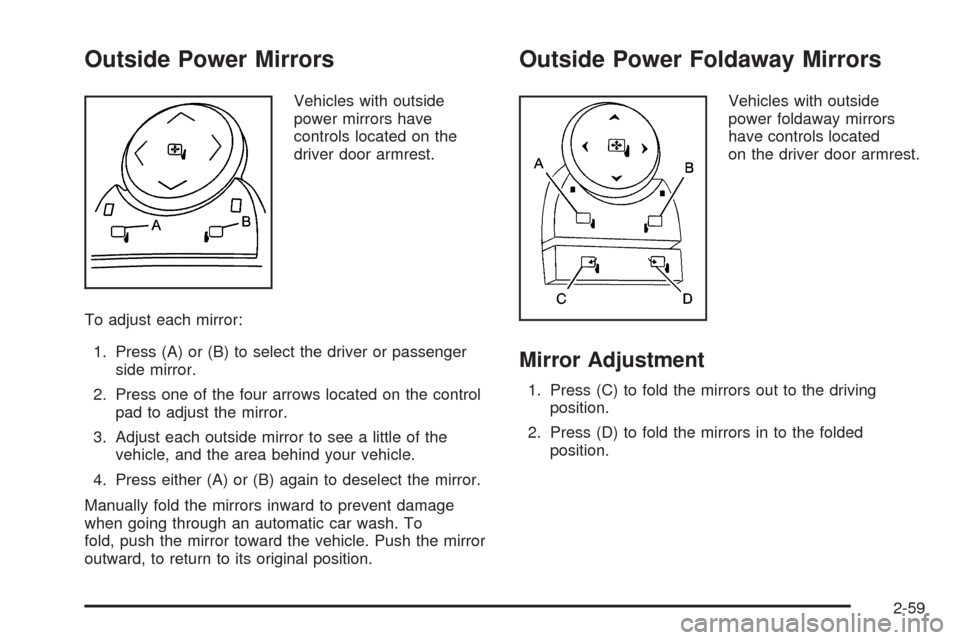
Outside Power Mirrors
Vehicles with outside
power mirrors have
controls located on the
driver door armrest.
To adjust each mirror:
1. Press (A) or (B) to select the driver or passenger
side mirror.
2. Press one of the four arrows located on the control
pad to adjust the mirror.
3. Adjust each outside mirror to see a little of the
vehicle, and the area behind your vehicle.
4. Press either (A) or (B) again to deselect the mirror.
Manually fold the mirrors inward to prevent damage
when going through an automatic car wash. To
fold, push the mirror toward the vehicle. Push the mirror
outward, to return to its original position.
Outside Power Foldaway Mirrors
Vehicles with outside
power foldaway mirrors
have controls located
on the driver door armrest.
Mirror Adjustment
1. Press (C) to fold the mirrors out to the driving
position.
2. Press (D) to fold the mirrors in to the folded
position.
2-59
Page 164 of 600

The system can be
disabled by pressing the
rear park aid disable button
located next to the radio.
The indicator light will come on and PARK ASSIST OFF
displays on the Driver Information Center (DIC) to
indicate that URPA is off, seeDIC Warnings and
Messages on page 3-66for information about clearing
the message.
Notice:If you use URPA while the tailgate is
lowered, it may not detect an object behind your
vehicle, and you might back into the object and
damage your vehicle. Always verify the tailgate is
closed when using URPA or turn off URPA when
driving with the tailgate lowered.When the System Does Not Seem to
Work Properly
If the URPA system will not activate due to a temporary
condition, the message PARK ASSIST OFF will be
displayed on the DIC and a red light will be shown on
the rear URPA display when the shift lever is moved into
R (Reverse). This occurs under the following conditions:
The driver disables the system.
The ultrasonic sensors are not clean. Keep the
vehicle’s rear bumper free of mud, dirt, snow, ice and
slush. For cleaning instructions, seeWashing Your
Vehicle on page 5-118.
A trailer was attached to the vehicle, or a bicycle or
an object was hanging out of the tailgate during the
last drive cycle, the red light may illuminate in the
rear display. Once the attached object is removed,
URPA will return to normal operation.
A tow bar is attached to the vehicle.
The vehicle’s bumper is damaged. Take the vehicle
to your dealer/retailer to repair the system.
Other conditions may affect system performance,
such as vibrations from a jackhammer or the
compression of air brakes on a very large truck.
If the system is still disabled, after driving forward at
least 15 mph (25 km/h), take the vehicle to your
dealer/retailer.
2-64
Page 184 of 600
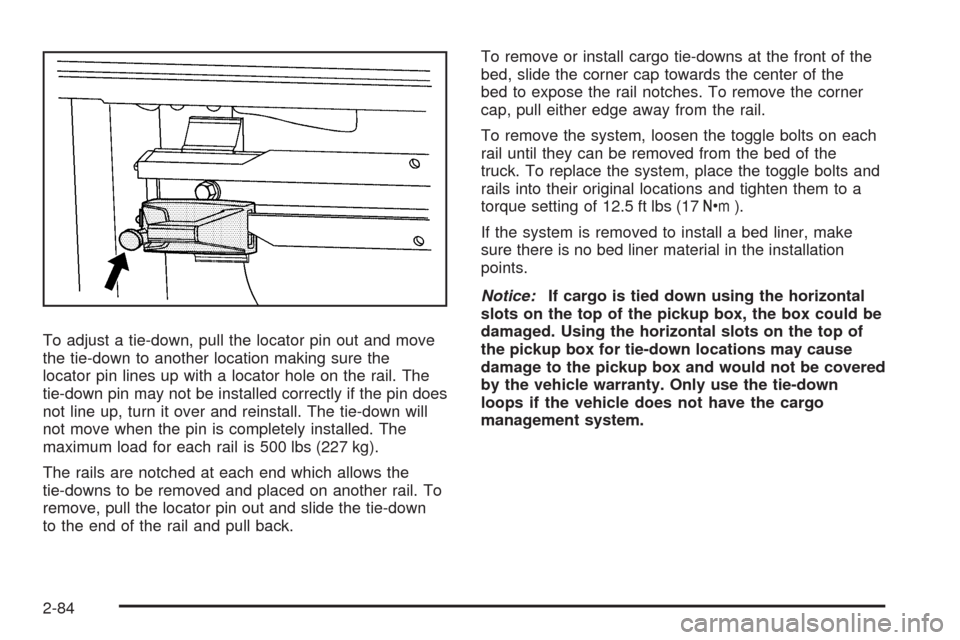
To adjust a tie-down, pull the locator pin out and move
the tie-down to another location making sure the
locator pin lines up with a locator hole on the rail. The
tie-down pin may not be installed correctly if the pin does
not line up, turn it over and reinstall. The tie-down will
not move when the pin is completely installed. The
maximum load for each rail is 500 lbs (227 kg).
The rails are notched at each end which allows the
tie-downs to be removed and placed on another rail. To
remove, pull the locator pin out and slide the tie-down
to the end of the rail and pull back.To remove or install cargo tie-downs at the front of the
bed, slide the corner cap towards the center of the
bed to expose the rail notches. To remove the corner
cap, pull either edge away from the rail.
To remove the system, loosen the toggle bolts on each
rail until they can be removed from the bed of the
truck. To replace the system, place the toggle bolts and
rails into their original locations and tighten them to a
torque setting of 12.5 ft lbs (17Y).
If the system is removed to install a bed liner, make
sure there is no bed liner material in the installation
points.
Notice:If cargo is tied down using the horizontal
slots on the top of the pickup box, the box could be
damaged. Using the horizontal slots on the top of
the pickup box for tie-down locations may cause
damage to the pickup box and would not be covered
by the vehicle warranty. Only use the tie-down
loops if the vehicle does not have the cargo
management system.
2-84
Page 188 of 600
StabiliTrak®Indicator Light.............................3-44
Engine Coolant Temperature Gage..................3-44
Tire Pressure Light.......................................3-45
Malfunction Indicator Lamp.............................3-45
Oil Pressure Gage........................................3-48
Oil Pressure Light.........................................3-49
Security Light...............................................3-50
Fog Lamp Light............................................3-50
Cruise Control Light......................................3-50
Highbeam On Light.......................................3-50
Four-Wheel-Drive Light..................................3-51
Tow/Haul Mode Light....................................3-51
Fuel Gage...................................................3-51
Low Fuel Warning Light.................................3-52
Driver Information Center (DIC).......................3-53
DIC Operation and Displays
(With DIC Buttons)....................................3-53
DIC Operation and Displays
(Without DIC Buttons)................................3-59
DIC Compass..............................................3-63DIC Warnings and Messages.........................3-66
DIC Vehicle Customization
(With DIC Buttons)....................................3-76
Audio System(s).............................................3-85
Setting the Clock..........................................3-86
Radio(s)......................................................3-88
Using an MP3 (Radio with CD or
Six-Disc CD Player).................................3-108
Using an MP3 (Radio with CD and DVD
Player)...................................................3-113
XM Radio Messages...................................3-118
Navigation/Radio System..............................3-119
Bluetooth
®.................................................3-119
Rear Seat Entertainment (RSE) System.........3-129
Rear Seat Audio (RSA)................................3-139
Theft-Deterrent Feature................................3-140
Audio Steering Wheel Controls......................3-141
Radio Reception.........................................3-141
Fixed Mast Antenna....................................3-142
XM™ Satellite Radio Antenna System..............3-142
Section 3 Instrument Panel
3-2
Page 191 of 600
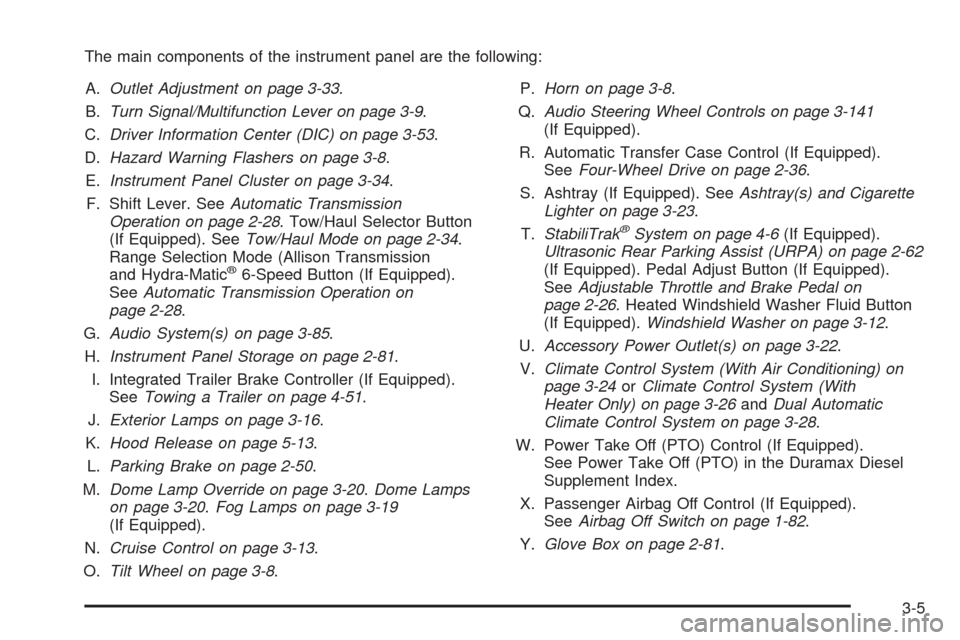
The main components of the instrument panel are the following:
A.Outlet Adjustment on page 3-33.
B.Turn Signal/Multifunction Lever on page 3-9.
C.Driver Information Center (DIC) on page 3-53.
D.Hazard Warning Flashers on page 3-8.
E.Instrument Panel Cluster on page 3-34.
F. Shift Lever. SeeAutomatic Transmission
Operation on page 2-28. Tow/Haul Selector Button
(If Equipped). SeeTow/Haul Mode on page 2-34.
Range Selection Mode (Allison Transmission
and Hydra-Matic
®6-Speed Button (If Equipped).
SeeAutomatic Transmission Operation on
page 2-28.
G.Audio System(s) on page 3-85.
H.Instrument Panel Storage on page 2-81.
I. Integrated Trailer Brake Controller (If Equipped).
SeeTowing a Trailer on page 4-51.
J.Exterior Lamps on page 3-16.
K.Hood Release on page 5-13.
L.Parking Brake on page 2-50.
M.Dome Lamp Override on page 3-20.Dome Lamps
on page 3-20.Fog Lamps on page 3-19
(If Equipped).
N.Cruise Control on page 3-13.
O.Tilt Wheel on page 3-8.P.Horn on page 3-8.
Q.Audio Steering Wheel Controls on page 3-141
(If Equipped).
R. Automatic Transfer Case Control (If Equipped).
SeeFour-Wheel Drive on page 2-36.
S. Ashtray (If Equipped). SeeAshtray(s) and Cigarette
Lighter on page 3-23.
T.StabiliTrak
®System on page 4-6(If Equipped).
Ultrasonic Rear Parking Assist (URPA) on page 2-62
(If Equipped). Pedal Adjust Button (If Equipped).
SeeAdjustable Throttle and Brake Pedal on
page 2-26. Heated Windshield Washer Fluid Button
(If Equipped).Windshield Washer on page 3-12.
U.Accessory Power Outlet(s) on page 3-22.
V.Climate Control System (With Air Conditioning) on
page 3-24orClimate Control System (With
Heater Only) on page 3-26andDual Automatic
Climate Control System on page 3-28.
W. Power Take Off (PTO) Control (If Equipped).
See Power Take Off (PTO) in the Duramax Diesel
Supplement Index.
X. Passenger Airbag Off Control (If Equipped).
SeeAirbag Off Switch on page 1-82.
Y.Glove Box on page 2-81.
3-5
Page 193 of 600
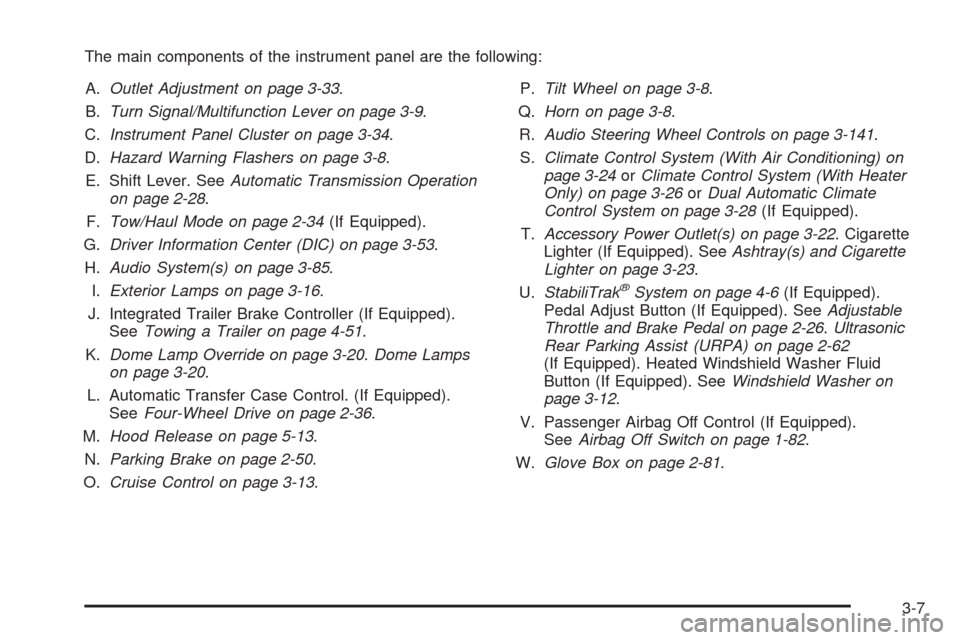
The main components of the instrument panel are the following:
A.Outlet Adjustment on page 3-33.
B.Turn Signal/Multifunction Lever on page 3-9.
C.Instrument Panel Cluster on page 3-34.
D.Hazard Warning Flashers on page 3-8.
E. Shift Lever. SeeAutomatic Transmission Operation
on page 2-28.
F.Tow/Haul Mode on page 2-34(If Equipped).
G.Driver Information Center (DIC) on page 3-53.
H.Audio System(s) on page 3-85.
I.Exterior Lamps on page 3-16.
J. Integrated Trailer Brake Controller (If Equipped).
SeeTowing a Trailer on page 4-51.
K.Dome Lamp Override on page 3-20.Dome Lamps
on page 3-20.
L. Automatic Transfer Case Control. (If Equipped).
SeeFour-Wheel Drive on page 2-36.
M.Hood Release on page 5-13.
N.Parking Brake on page 2-50.
O.Cruise Control on page 3-13.P.Tilt Wheel on page 3-8.
Q.Horn on page 3-8.
R.Audio Steering Wheel Controls on page 3-141.
S.Climate Control System (With Air Conditioning) on
page 3-24orClimate Control System (With Heater
Only) on page 3-26orDual Automatic Climate
Control System on page 3-28(If Equipped).
T.Accessory Power Outlet(s) on page 3-22. Cigarette
Lighter (If Equipped). SeeAshtray(s) and Cigarette
Lighter on page 3-23.
U.StabiliTrak
®System on page 4-6(If Equipped).
Pedal Adjust Button (If Equipped). SeeAdjustable
Throttle and Brake Pedal on page 2-26.Ultrasonic
Rear Parking Assist (URPA) on page 2-62
(If Equipped). Heated Windshield Washer Fluid
Button (If Equipped). SeeWindshield Washer on
page 3-12.
V. Passenger Airbag Off Control (If Equipped).
SeeAirbag Off Switch on page 1-82.
W.Glove Box on page 2-81.
3-7