2009 CHEVROLET SILVERADO transmission
[x] Cancel search: transmissionPage 153 of 600
Leaving the Vehicle With the Engine
Running
{CAUTION:
It can be dangerous to leave the vehicle with the
engine running. The vehicle could move suddenly
if the shift lever is not fully in P (Park) with the
parking brake �rmly set.
If you have four-wheel drive and the transfer case
is in Neutral, the vehicle will be free to roll, even if
the shift lever is in P (Park). So be sure the
transfer case is in a drive gear — not in Neutral.
And, if you leave the vehicle with the engine
running, it could overheat and even catch �re.
You or others could be injured. Do not leave
the vehicle with the engine running unless you
have to.If you have to leave the vehicle with the engine running,
be sure your vehicle is in P (Park) and the parking
brake is �rmly set before you leave it. After you move
the shift lever into P (Park), hold the regular brake pedal
down. Then, see if you can move the shift lever away
from P (Park) without �rst pulling it toward you. If
you can, it means that the shift lever was not fully locked
into P (Park).
Torque Lock
If you are parking on a hill and you do not shift your
transmission into P (Park) properly, the weight of
the vehicle may put too much force on the parking pawl
in the transmission. You may �nd it difficult to pull the
shift lever out of P (Park). This is called torque lock. To
prevent torque lock, set the parking brake and then
shift into P (Park) properly before you leave the driver
seat. To �nd out how, seeShifting Into Park on
page 2-52.
When you are ready to drive, move the shift lever out of
P (Park) before you release the parking brake.
If torque lock does occur, you may need to have another
vehicle push yours a little uphill to take some of the
pressure from the parking pawl in the transmission, then
you will be able to pull the shift lever out of P (Park).
2-53
Page 156 of 600
Running the Vehicle While Parked
It is better not to park with the engine running. But if you
ever have to, here are some things to know.
{CAUTION:
Idling a vehicle in an enclosed area with poor
ventilation is dangerous. Engine exhaust may
enter the vehicle. Engine exhaust contains Carbon
Monoxide (CO) which cannot be seen or smelled.
It can cause unconsciousness and even death.
Never run the engine in an enclosed area that has
no fresh air ventilation. For more information, see
Engine Exhaust on page 2-55.
{CAUTION:
It can be dangerous to get out of the vehicle if the
automatic transmission shift lever is not fully in
P (Park) with the parking brake �rmly set. The
vehicle can roll. Do not leave the vehicle when the
engine is running unless you have to. If you have
left the engine running, the vehicle can move
suddenly. You or others could be injured. To be
sure the vehicle will not move, even when you are
on fairly level ground, always set the parking
brake and move the shift lever to P (Park).
2-56
Page 157 of 600
{CAUTION:
Four-wheel drive vehicles with the transfer
case in N (Neutral) will allow the vehicle to roll,
even if the automatic transmission shift lever is in
P (Park). So, be sure the transfer case is in a
drive gear — not in N (Neutral). Always set the
parking brake.
Follow the proper steps to be sure the vehicle will not
move. SeeShifting Into Park on page 2-52.
If pulling a trailer, seeTowing a Trailer on page 4-51.
Mirrors
Manual Rearview Mirror
Hold the inside rearview mirror in the center to move it
for a clearer view behind your vehicle. Adjust the
mirror to avoid glare from the headlamps behind you.
Push the tab forward for daytime use and pull it for
nighttime use.
Automatic Dimming Rearview Mirror
The vehicle may have an automatic dimming inside
rearview mirror.
Vehicles with OnStar
®have three additional control
buttons for the OnStar®system. See your dealer/retailer
for more information about OnStar®and how to
subscribe to it. SeeOnStar®System on page 2-71for
more information about the services OnStar®provides.
O(On/Off):Press to turn the dimming feature on
or off.
The vehicle may also have a Rear Vision Camera
(RVC). SeeRear Vision Camera (RVC) on page 2-65
for more information.
If the vehicle has RVC, the
O(On/Off) button for
turning the automatic dimming feature on or off will not
be available.
Automatic Dimming Mirror Operation
Automatic dimming reduces the glare from the
headlamps of the vehicle behind you. The dimming
feature comes on and the indicator light illuminates each
time the ignition is turned to start.
2-57
Page 191 of 600
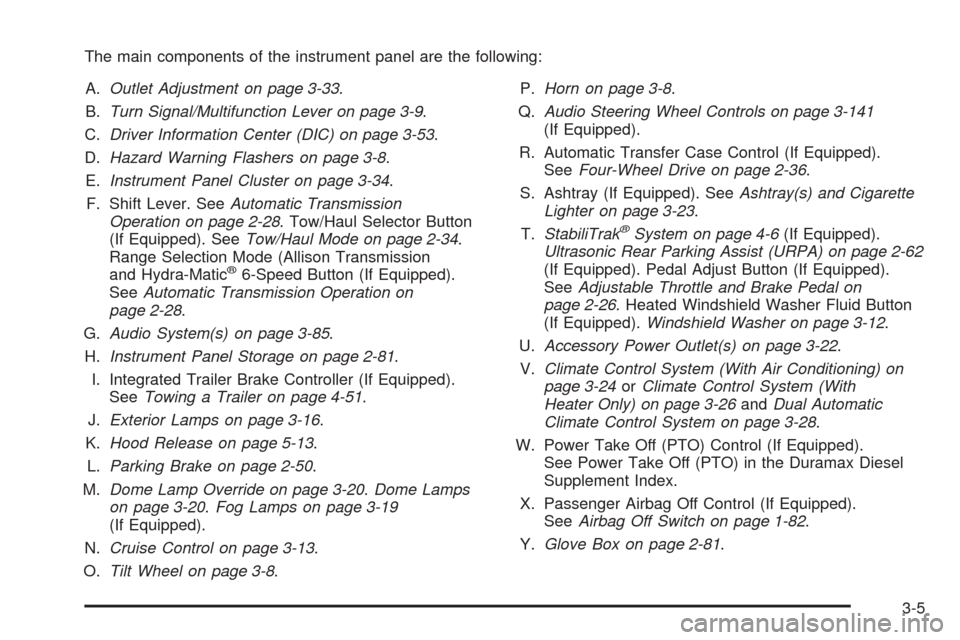
The main components of the instrument panel are the following:
A.Outlet Adjustment on page 3-33.
B.Turn Signal/Multifunction Lever on page 3-9.
C.Driver Information Center (DIC) on page 3-53.
D.Hazard Warning Flashers on page 3-8.
E.Instrument Panel Cluster on page 3-34.
F. Shift Lever. SeeAutomatic Transmission
Operation on page 2-28. Tow/Haul Selector Button
(If Equipped). SeeTow/Haul Mode on page 2-34.
Range Selection Mode (Allison Transmission
and Hydra-Matic
®6-Speed Button (If Equipped).
SeeAutomatic Transmission Operation on
page 2-28.
G.Audio System(s) on page 3-85.
H.Instrument Panel Storage on page 2-81.
I. Integrated Trailer Brake Controller (If Equipped).
SeeTowing a Trailer on page 4-51.
J.Exterior Lamps on page 3-16.
K.Hood Release on page 5-13.
L.Parking Brake on page 2-50.
M.Dome Lamp Override on page 3-20.Dome Lamps
on page 3-20.Fog Lamps on page 3-19
(If Equipped).
N.Cruise Control on page 3-13.
O.Tilt Wheel on page 3-8.P.Horn on page 3-8.
Q.Audio Steering Wheel Controls on page 3-141
(If Equipped).
R. Automatic Transfer Case Control (If Equipped).
SeeFour-Wheel Drive on page 2-36.
S. Ashtray (If Equipped). SeeAshtray(s) and Cigarette
Lighter on page 3-23.
T.StabiliTrak
®System on page 4-6(If Equipped).
Ultrasonic Rear Parking Assist (URPA) on page 2-62
(If Equipped). Pedal Adjust Button (If Equipped).
SeeAdjustable Throttle and Brake Pedal on
page 2-26. Heated Windshield Washer Fluid Button
(If Equipped).Windshield Washer on page 3-12.
U.Accessory Power Outlet(s) on page 3-22.
V.Climate Control System (With Air Conditioning) on
page 3-24orClimate Control System (With
Heater Only) on page 3-26andDual Automatic
Climate Control System on page 3-28.
W. Power Take Off (PTO) Control (If Equipped).
See Power Take Off (PTO) in the Duramax Diesel
Supplement Index.
X. Passenger Airbag Off Control (If Equipped).
SeeAirbag Off Switch on page 1-82.
Y.Glove Box on page 2-81.
3-5
Page 193 of 600
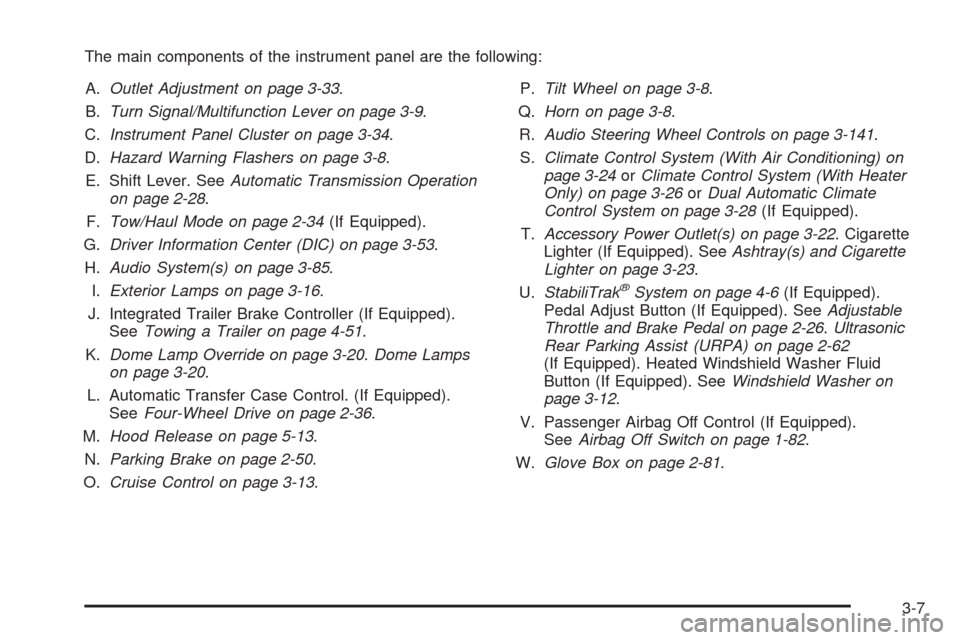
The main components of the instrument panel are the following:
A.Outlet Adjustment on page 3-33.
B.Turn Signal/Multifunction Lever on page 3-9.
C.Instrument Panel Cluster on page 3-34.
D.Hazard Warning Flashers on page 3-8.
E. Shift Lever. SeeAutomatic Transmission Operation
on page 2-28.
F.Tow/Haul Mode on page 2-34(If Equipped).
G.Driver Information Center (DIC) on page 3-53.
H.Audio System(s) on page 3-85.
I.Exterior Lamps on page 3-16.
J. Integrated Trailer Brake Controller (If Equipped).
SeeTowing a Trailer on page 4-51.
K.Dome Lamp Override on page 3-20.Dome Lamps
on page 3-20.
L. Automatic Transfer Case Control. (If Equipped).
SeeFour-Wheel Drive on page 2-36.
M.Hood Release on page 5-13.
N.Parking Brake on page 2-50.
O.Cruise Control on page 3-13.P.Tilt Wheel on page 3-8.
Q.Horn on page 3-8.
R.Audio Steering Wheel Controls on page 3-141.
S.Climate Control System (With Air Conditioning) on
page 3-24orClimate Control System (With Heater
Only) on page 3-26orDual Automatic Climate
Control System on page 3-28(If Equipped).
T.Accessory Power Outlet(s) on page 3-22. Cigarette
Lighter (If Equipped). SeeAshtray(s) and Cigarette
Lighter on page 3-23.
U.StabiliTrak
®System on page 4-6(If Equipped).
Pedal Adjust Button (If Equipped). SeeAdjustable
Throttle and Brake Pedal on page 2-26.Ultrasonic
Rear Parking Assist (URPA) on page 2-62
(If Equipped). Heated Windshield Washer Fluid
Button (If Equipped). SeeWindshield Washer on
page 3-12.
V. Passenger Airbag Off Control (If Equipped).
SeeAirbag Off Switch on page 1-82.
W.Glove Box on page 2-81.
3-7
Page 199 of 600
Cruise Control
{CAUTION:
Cruise control can be dangerous where you cannot
drive safely at a steady speed. So, do not use the
cruise control on winding roads or in heavy traffic.
Cruise control can be dangerous on slippery roads.
On such roads, fast changes in tire traction can
cause excessive wheel slip, and you could lose
control. Do not use cruise control on slippery roads.
With cruise control, a speed of about 25 mph (40 km/h)
or more can be maintained without keeping your foot
on the accelerator. Cruise control does not work
at speeds below about 25 mph (40 km/h).When the brakes are applied, cruise control is turned off.
For vehicles with an Allison
®or Hydra-Matic 6-speed
automatic transmission, see “Grade Braking and Cruise
Grade Braking (Allison Transmission) underTow/Haul
Mode on page 2-34for an explanation of how cruise
control interacts with the Range Selection Mode,
tow/haul and grade braking systems.
For vehicles with the StabiliTrak
®system that begins
to limit wheel spin while you are using cruise control,
the cruise control will automatically disengage.
SeeStabiliTrak
®System on page 4-6. When road
conditions allow the cruise control to be safely used
again, it can be turned back on.
3-13
Page 203 of 600
2(Headlamps):Turns on the headlamps together
with the following:
Parking Lamps
Instrument Panel Lights
Taillamps
License Plate Lamps
When the headlamps are turned on while the vehicle is
on, the headlamps turn off automatically 10 minutes
after the ignition is turned off. When the headlamps are
turned on while the vehicle is off, the headlamps will
stay on for 10 minutes before automatically turning off
to prevent the battery from being drained. Turn the
headlamp control to off and then back to the headlamp
on position to make the headlamps stay on for an
additional 10 minutes.
Push the turn signal/multifunction lever toward the
instrument panel to change the headlamps from low
beam to high beam.
Headlamps on Reminder
A reminder chime will sound when the headlamps or
parking lamps are manually turned on and the ignition is
off and a door is open. To disable the chime, turn the
light off.
Daytime Running Lamps (DRL)
Daytime Running Lamps (DRL) can make it easier for
others to see the front of your vehicle during the day.
Fully functional daytime running lamps are required on
all vehicles �rst sold in Canada.
The DRL system will come on when the following
conditions are met:
The ignition is on.
The exterior lamps control is in AUTO.
The transmission is not in P (Park).
The light sensor determines it is daytime.
When the DRL are on, only the DRL lamps will be on.
The taillamps, sidemarker, instrument panel lights,
and other lamps will not be on.
When it begins to get dark, the automatic headlamp
system will switch from DRL to the headlamps.
To turn off the DRL lamps, turn the exterior lamps
control to the OFF position and then release.
For vehicles �rst sold in Canada, the transmission
must be in the P (Park) position, before the DRL lamps
can be turned off.
3-17
Page 204 of 600
Automatic Headlamp System
When it is dark enough outside, the automatic
headlamp system turns on the headlamps at the
normal brightness, along with the taillamps, sidemarker,
parking lamps, and the instrument panel lights.
The radio lights will also be dim.
To turn off the automatic headlamp system, turn the
exterior lamps switch to the off position and then release
it. For vehicles �rst sold in Canada, the transmission
must be in the P (Park) position, before the automatic
headlamp system can be turned off.
The vehicle has a light sensor located on the top of the
instrument panel in the defroster grille that regulates
when the automatic headlamps turn on. Do not cover the
sensor or the headlamps will come on whenever the
ignition is on.
The system may also turn on the headlamps when
driving through a parking garage, heavy overcast
weather, or a tunnel. This is normal.
There is a delay in the transition between the daytime
and nighttime operation of the Daytime Running
Lamps (DRL) and the automatic headlamp systems so
that driving under bridges or bright overhead streetlights does not affect the system. The DRL and
automatic headlamp system is only affected when the
light sensor detects a change in lighting lasting
longer than the delay.
If the vehicle is started in a dark garage, the automatic
headlamp system will come on immediately. Once
the vehicle leaves the garage, it takes approximately
one minute for the automatic headlamp system to
change to DRL if it is bright enough outside. During that
delay, the instrument panel cluster may not be as
bright as usual. Make sure the instrument panel
brightness control is in the full bright position.
SeeInstrument Panel Brightness on page 3-20.
To idle the vehicle with the automatic headlamp
system off, turn the control to the off position.
The headlamps will also stay on after you exit the
vehicle. This feature can be programmed using the
Driver Information Center (DIC). SeeDIC Vehicle
Customization (With DIC Buttons) on page 3-76.
The regular headlamp system can be turned on
when needed.
3-18