2009 CHEVROLET SILVERADO battery
[x] Cancel search: batteryPage 256 of 600
OIL PRESSURE LOW STOP ENGINE
Notice:If you drive your vehicle while the engine
oil pressure is low, severe engine damage may
occur. If a low oil pressure warning appears on the
Driver Information Center (DIC), stop the vehicle
as soon as possible. Do not drive the vehicle until
the cause of the low oil pressure is corrected.
SeeEngine Oil on page 5-15for more information.
This message displays if low oil pressure levels
occur. Stop the vehicle as soon as safely possible and
do not operate it until the cause of the low oil pressure
has been corrected. Check the oil as soon as possible
and have your vehicle serviced by your dealer/retailer.
SeeEngine Oil on page 5-15.
PARK ASSIST OFF
If your vehicle has the Ultrasonic Rear Parking Assist
(URPA) system, after the vehicle has been started, this
message displays to remind the driver that the URPA
system has been turned off. Press the set/reset button
or the trip odometer reset stem to acknowledge this
message and clear it from the DIC display. To turn the
URPA system back on, seeUltrasonic Rear Parking
Assist (URPA) on page 2-62.
PASSENGER DOOR OPEN
This message displays and a chime sounds if the front
passenger door is not fully closed and the vehicle is
shifted out of P (Park). Stop and turn off the vehicle,
check the door for obstructions, and close the door
again. Check to see if the message still appears on
the DIC.
REMOTE KEY LEARNING ACTIVE
This message displays while you are matching a
Remote Keyless Entry (RKE) transmitter to your vehicle.
See “Matching Transmitter(s) to Your Vehicle” under
Remote Keyless Entry (RKE) System Operation
on page 2-4andDIC Operation and Displays (With DIC
Buttons) on page 3-53orDIC Operation and Displays
(Without DIC Buttons) on page 3-59for more
information.
REPLACE BATTERY IN REMOTE KEY
This message displays if a Remote Keyless Entry (RKE)
transmitter battery is low. The battery needs to be
replaced in the transmitter. See “Battery Replacement”
underRemote Keyless Entry (RKE) System Operation
on page 2-4.
3-70
Page 257 of 600
RIGHT REAR DOOR OPEN (Crew Cab)
This message displays and a chime sounds if the
passenger side rear door is not fully closed and the
vehicle is shifted out of P (Park). Stop and turn off the
vehicle, check the door for obstructions, and close
the door again. Check to see if the message still
appears on the DIC.
SERVICE 4 WHEEL DRIVE
This message displays if a problem occurs with the
four-wheel-drive system. If this message appears, stop
as soon as possible and turn off the vehicle. Make
sure the key is in the LOCK/OFF position for at least
one minute and then restart the vehicle and check
for the message on the DIC display. If the message
is still displayed or appears again when you begin
driving, the four-wheel-drive system needs service.
See your dealer/retailer.
SERVICE AIR BAG
This message displays if there is a problem with the
airbag system. Have your dealer/retailer inspect
the system for problems. SeeAirbag Readiness Light
on page 3-37andAirbag System on page 1-74for
more information.
SERVICE BATTERY CHARGING
SYSTEM
On some vehicles, this message displays if there is a
problem with the battery charging system. Under certain
conditions, the charging system light may also turn
on in the instrument panel cluster. SeeCharging System
Light on page 3-41. Driving with this problem could
drain the battery. Turn off all unnecessary accessories.
Have the electrical system checked as soon as
possible. See your dealer/retailer.
SERVICE BRAKE SYSTEM
This message displays along with the brake system
warning light if there is a problem with the brake system.
SeeBrake System Warning Light on page 3-42. If this
message appears, stop as soon as possible and turn off
the vehicle. Restart the vehicle and check for the
message on the DIC display. If the message is still
displayed or appears again when you begin driving,
the brake system needs service as soon as possible.
See your dealer/retailer.
3-71
Page 262 of 600
DIC Vehicle Customization
(With DIC Buttons)
Your vehicle may have customization capabilities that
allow you to program certain features to one preferred
setting. Customization features can only be programmed
to one setting on the vehicle and cannot be programmed
to a preferred setting for two different drivers.
All of the customization options may not be available
on your vehicle. Only the options available will be
displayed on the DIC.
The default settings for the customization features were
set when your vehicle left the factory, but may have
been changed from their default state since then.
The customization preferences are automatically
recalled.
To change customization preferences, use the following
procedure.
Entering the Feature Settings Menu
1. Turn the ignition on and place the vehicle in
P (Park).
To avoid excessive drain on the battery, it is
recommended that the headlamps are turned off.
2. Press the customization button to scroll through the
available customizable options.
Feature Settings Menu Items
The following are customization features that allow you
to program settings to the vehicle:
DISPLAY IN ENGLISH
This feature will only display if a language other than
English has been set. This feature allows you to change
the language in which the DIC messages appear to
English.
Press the customization button until the PRESS
VTO
DISPLAY IN ENGLISH screen appears on the DIC
display. Press the set/reset button once to display all
DIC messages in English.
3-76
Page 293 of 600
Using the Auxiliary Input Jack
The radio system has an auxiliary input jack located on
the lower right side of the faceplate. This is not an
audio output; do not plug the headphone set into the
front auxiliary input jack. An external audio device such
as an iPod, laptop computer, MP3 player, CD player,
etc. can be connected to the auxiliary input jack for use
as another source for audio listening.
Drivers are encouraged to set up any auxiliary device
while the vehicle is in P (Park). SeeDefensive Driving on
page 4-2for more information on driver distraction.
To use a portable audio player, connect a 3.5 mm
(1/8 inch) cable to the radio’s front auxiliary input jack.
When a device is connected, press the radio CD/AUX
button to begin playing audio from the device over
the vehicle speakers.
For optimal sound quality, increase the portable audio
device’s volume to the loudest level.
It is always best to power the portable audio device
through its own battery while playing.
O(Power/Volume):Turn clockwise or counterclockwise
to increase or decrease the volume of the portable player.
Additional volume adjustments might have to be made
from the portable device if the volume is not loud or soft
enough.BAND:Press to listen to the radio when a portable
audio device is playing. The portable audio device
continues playing.
CD/AUX (CD/Auxiliary):Press to play a CD when a
portable audio device is playing. Press again and
the system begins playing audio from the connected
portable audio player. If a portable audio player is
not connected, “No Input Device Found” displays.
DVD/CD AUX (CD/Auxiliary):Press to cycle through
DVD, CD, or Auxiliary when listening to the radio.
The DVD/CD text label and a message showing track or
chapter number displays when a disc is in either slot.
Press again and the system automatically searches
for an auxiliary input device, such as a portable audio
player. If a portable audio player is not connected,
“No Aux Input Device” displays. If a disc is in both the
DVD slot and the CD slot the DVD/CD AUX button
cycles between the two sources and not indicate
“No Aux Input Device”. If a front auxiliary device is
connected, the DVD/CD AUX button cycles through
all available options, such as: DVD slot, CD slot,
Front Auxiliary, and Rear Auxiliary (if available).
See “Using the Auxiliary Input Jack(s)” later in this
section, or “Audio/Video (A/V) Jacks” under,Rear Seat
Entertainment (RSE) System on page 3-129for
more information.
3-107
Page 317 of 600
Push the power button to turn on the headphones.
An indicator light located on the headphones comes on.
If the light comes on but, there is intermittent sound
and/or static on the headphones, or if the indicator light
does not come on, the batteries might need to be
replaced. See “Battery Replacement” later in this section
for more information. Switch the headphones to Off
when not in use.
Infrared transmitters are located at the rear of the
overhead console. The headphones shut off
automatically to save the battery power if the RSE
system and RSA are shut off or if the headphones
are out of range of the transmitters for more than
three minutes. If you move too far forward or step out
of the vehicle, the headphones lose the audio signal.
The headphones automatically turns off after four hours
of continuous use.
To adjust the volume on the headphones, use the
volume control located on the right side.
For optimal audio performance, the headphones must
be worn correctly. The symbol L (Left) appears on
the upper left side, above the ear pad and should be
positioned on the left ear. The symbol R (Right) appears
on the upper right side, above the ear pad and should
be positioned on the right ear.Notice:Do not store the headphones in heat or
direct sunlight. This could damage the headphones
and repairs will not be covered by the warranty.
Storage in extreme cold can weaken the batteries.
Keep the headphones stored in a cool, dry place.
If the foam ear pads attached to the headphones
become worn or damaged, the pads can be replaced
separately from the headphone set. Refer to your
dealer/retailer for more information.
Battery Replacement
To change the batteries on the headphones, do the
following:
1. Turn the screw to loosen the battery door located
on the left side of the headphones. Slide the
battery door open.
2. Replace the two batteries in the compartment.
Make sure that they are installed correctly,
using the diagram on the inside of the battery
compartment.
3. Replace the battery door and tighten the
door screw.
If the headphones are to be stored for a long period of
time, remove the batteries and keep them in a cool,
dry place.
3-131
Page 320 of 600
Remote Control
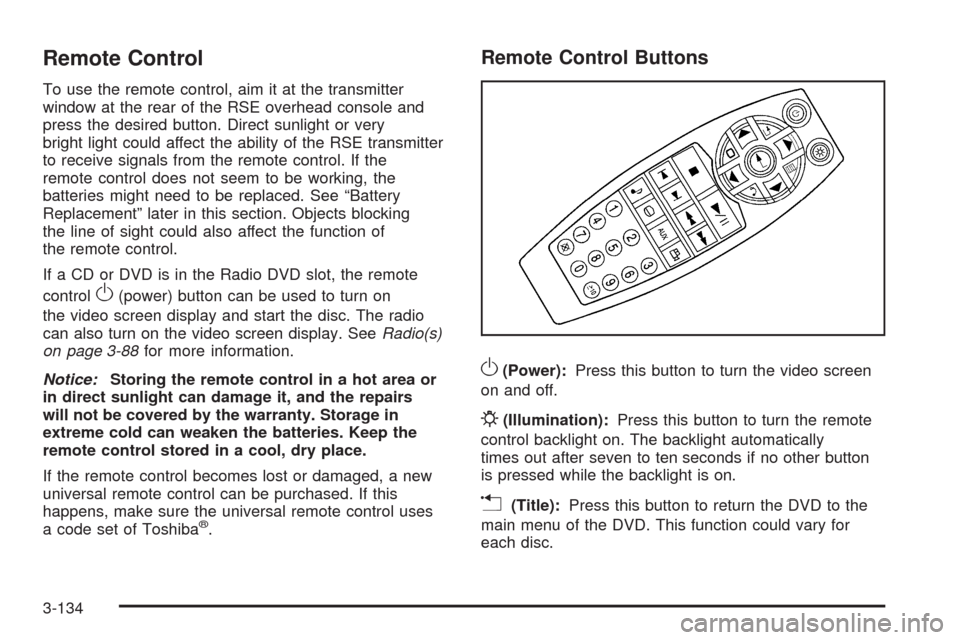
To use the remote control, aim it at the transmitter
window at the rear of the RSE overhead console and
press the desired button. Direct sunlight or very
bright light could affect the ability of the RSE transmitter
to receive signals from the remote control. If the
remote control does not seem to be working, the
batteries might need to be replaced. See “Battery
Replacement” later in this section. Objects blocking
the line of sight could also affect the function of
the remote control.
If a CD or DVD is in the Radio DVD slot, the remote
control
O(power) button can be used to turn on
the video screen display and start the disc. The radio
can also turn on the video screen display. SeeRadio(s)
on page 3-88for more information.
Notice:Storing the remote control in a hot area or
in direct sunlight can damage it, and the repairs
will not be covered by the warranty. Storage in
extreme cold can weaken the batteries. Keep the
remote control stored in a cool, dry place.
If the remote control becomes lost or damaged, a new
universal remote control can be purchased. If this
happens, make sure the universal remote control uses
a code set of Toshiba
®.
Remote Control Buttons
O(Power):Press this button to turn the video screen
on and off.
P(Illumination):Press this button to turn the remote
control backlight on. The backlight automatically
times out after seven to ten seconds if no other button
is pressed while the backlight is on.
v(Title):Press this button to return the DVD to the
main menu of the DVD. This function could vary for
each disc.
3-134
Page 322 of 600
e(Audio):Press this button to change audio tracks on
DVDs that have this feature when the DVD is playing.
The format and content of this function vary for each disc.
{(Subtitles):Press this button to turn ON/OFF
subtitles and to move through subtitle options when a
DVD is playing. The format and content of this function
vary for each disc.
AUX (Auxiliary):Press this button to switch the system
between the DVD player and an auxiliary source.
d(Camera):Press this button to change camera
angles on DVDs that have this feature while a DVD is
playing. The format and content of this function vary for
each disc.
1 through 0 (Numeric Keypad):The numeric keypad
provides the capability of direct chapter or track
number selection.
\(Clear):Press this button within three seconds after
entering a numeric selection, to clear all numerical inputs.
}10 (Double Digit Entries):Press this button to
select chapter or track numbers greater than nine.
Press this button before entering the number.
Battery Replacement
To change the remote control batteries, do the following:
1. Slide the rear cover back on the remote control.
2. Replace the two batteries in the compartment.
Make sure they are installed correctly using the
diagram on the inside of the remote control.
3. Replace the battery cover.
If the remote control is to be stored for a long period of
time, remove the batteries and keep them in a cool,
dry place.
Problem Recommended Action
No power. The ignition might not be
turned ON/RUN or in
ACC/ACCESSORY.
The picture does not �ll
the screen. There are
black borders on the
top and bottom or on
both sides or it looks
stretched out.Check the display mode
settings in the setup menu
by pressing the display
menu button on the
remote control.
In auxiliary mode, the
picture moves or scrolls.Check the auxiliary input
connections at both
devices.
3-136
Page 328 of 600
AM
The range for most AM stations is greater than for FM,
especially at night. The longer range can cause station
frequencies to interfere with each other. For better radio
reception, most AM radio stations boost the power
levels during the day, and then reduce these levels
during the night. Static can also occur when things like
storms and power lines interfere with radio reception.
When this happens, try reducing the treble on the radio.
FM Stereo
FM signals only reach about 10 to 40 miles (16 to 65 km).
Although the radio has a built-in electronic circuit that
automatically works to reduce interference, some static
can occur, especially around tall buildings or hills,
causing the sound to fade in and out.
XM™ Satellite Radio Service
XM Satellite Radio Service gives digital radio reception
from coast-to-coast in the 48 contiguous United States,
and in Canada. Just as with FM, tall buildings or hills
can interfere with satellite radio signals, causing
the sound to fade in and out. In addition, traveling or
standing under heavy foliage, bridges, garages, or
tunnels may cause loss of the XM signal for a period
of time.
Cellular Phone Usage
Cellular phone usage may cause interference with the
vehicle’s radio. This interference may occur when
making or receiving phone calls, charging the phone’s
battery, or simply having the phone on. This interference
causes an increased level of static while listening to
the radio. If static is received while listening to the radio,
unplug the cellular phone and turn it off.
Fixed Mast Antenna
The �xed mast antenna can withstand most car washes
without being damaged as long as it is securely
attached to the base. If the mast becomes slightly bent,
straighten it out by hand. If the mast is badly bent,
replace it.
Occasionally check to make sure the antenna is
tightened to its base. If tightening is required, tighten by
hand until fully seated plus one quarter turn.
XM™ Satellite Radio Antenna System
The XM Satellite Radio antenna is located on the roof of
the vehicle. Keep the antenna clear of obstructions
for clear radio reception.
If the vehicle has a sunroof, the performance of the
XM system may be affected if the sunroof is open.
3-142