2009 CHEVROLET SILVERADO rear view mirror
[x] Cancel search: rear view mirrorPage 186 of 600
Crew Cab
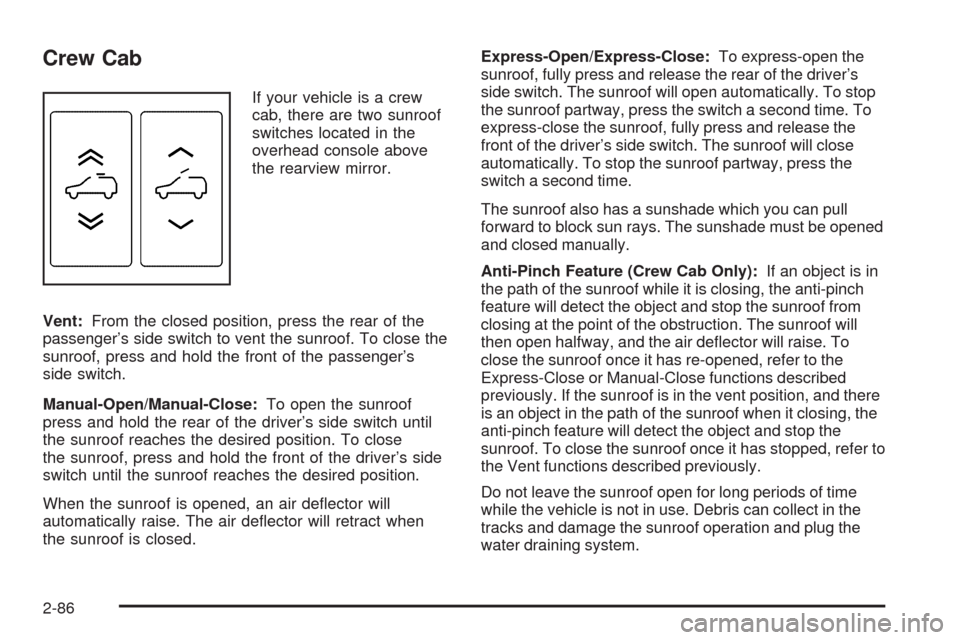
If your vehicle is a crew
cab, there are two sunroof
switches located in the
overhead console above
the rearview mirror.
Vent:From the closed position, press the rear of the
passenger’s side switch to vent the sunroof. To close the
sunroof, press and hold the front of the passenger’s
side switch.
Manual-Open/Manual-Close:To open the sunroof
press and hold the rear of the driver’s side switch until
the sunroof reaches the desired position. To close
the sunroof, press and hold the front of the driver’s side
switch until the sunroof reaches the desired position.
When the sunroof is opened, an air de�ector will
automatically raise. The air de�ector will retract when
the sunroof is closed.Express-Open/Express-Close:To express-open the
sunroof, fully press and release the rear of the driver’s
side switch. The sunroof will open automatically. To stop
the sunroof partway, press the switch a second time. To
express-close the sunroof, fully press and release the
front of the driver’s side switch. The sunroof will close
automatically. To stop the sunroof partway, press the
switch a second time.
The sunroof also has a sunshade which you can pull
forward to block sun rays. The sunshade must be opened
and closed manually.
Anti-Pinch Feature (Crew Cab Only):If an object is in
the path of the sunroof while it is closing, the anti-pinch
feature will detect the object and stop the sunroof from
closing at the point of the obstruction. The sunroof will
then open halfway, and the air de�ector will raise. To
close the sunroof once it has re-opened, refer to the
Express-Close or Manual-Close functions described
previously. If the sunroof is in the vent position, and there
is an object in the path of the sunroof when it closing, the
anti-pinch feature will detect the object and stop the
sunroof. To close the sunroof once it has stopped, refer to
the Vent functions described previously.
Do not leave the sunroof open for long periods of time
while the vehicle is not in use. Debris can collect in the
tracks and damage the sunroof operation and plug the
water draining system.
2-86
Page 197 of 600

9(Off):Turns the wipers off.
6(Delay):Turn the band to adjust the delay time.
The delay between wiping cycles becomes shorter as
the band is moved to the top of the lever. This can
be very useful in light rain or snow.
6(Low Speed):For steady wiping at low speed.
?(High Speed):For high-speed wiping.
Clear ice and snow from the wiper blades before using
them. If they are frozen to the windshield, gently
loosen or thaw them. Damaged wiper blades may not
clear the windshield well, making it harder to see
and drive safely. If the blades do become damaged,
install new blades or blade inserts. For more information,
seeWindshield Wiper Blade Replacement on page 5-64.
Heavy snow or ice can overload the wiper motor.
A circuit breaker will stop the motor until it cools down.
Clear away snow or ice to prevent an overload.
Rainsense™ II Wipers
For vehicles with Rainsense™ II windshield wipers, the
moisture sensor is located next to the inside rearview
mirror and is mounted on the windshield. When active,
these sensors are able to detect moisture on the
windshield and automatically turn on the wipers.
To turn on the Rainsense feature, the wipers must be
set to one of the �ve delay settings on the multifunction
lever. Each of the �ve settings adjusts the sensitivity
of the sensor.
Since different drivers have different setting preferences,
it is recommended that the mid-range setting (position 3)
be used initially. For more wipes, select the higher
settings; for fewer wipes, select the lower settings located
closer to the off position on the multifunction lever.
The sensor will automatically control the frequency of the
wipes from the off setting to the high speed setting
according to the weather conditions. The wipers can be
left in a rainsense mode even when it is not raining.
When Rainsense is active, the headlamps will turn on
automatically if the exterior lamp control is in the AUTO
position and the wipers are active.
Notice:Going through an automatic car wash with
the wipers on can damage them. Turn the wipers
off when going through an automatic car wash.
3-11
Page 218 of 600
Rear Window Defogger
The rear window defogger uses a warming grid to
remove fog from the rear window.
<(Rear Window Defogger):For vehicles with
this feature, press to turn the defogger on or off.
It automatically turns off several minutes after it has
been activated. The defogger can also be turned off by
turning the engine off. Do not drive the vehicle until
all the windows are clear.
Notice:Do not use a razor blade or sharp object
to clear the inside rear window. Do not adhere
anything to the defogger grid lines in the rear glass.
These actions may damage the rear defogger.
Repairs would not be covered by your warranty.
Heated Mirrors:For vehicles with heated outside
rearview mirrors, the mirrors heat to help clear fog or
frost from the surface of the mirror when the rear window
defog button is pressed. SeeOutside Power Mirrors
on page 2-59.
Sensors
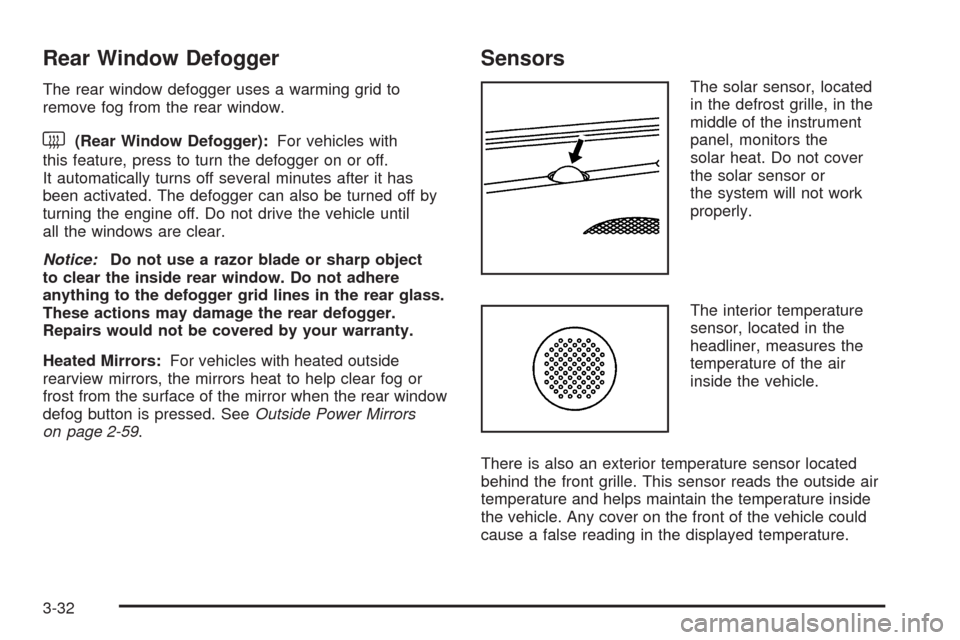
The solar sensor, located
in the defrost grille, in the
middle of the instrument
panel, monitors the
solar heat. Do not cover
the solar sensor or
the system will not work
properly.
The interior temperature
sensor, located in the
headliner, measures the
temperature of the air
inside the vehicle.
There is also an exterior temperature sensor located
behind the front grille. This sensor reads the outside air
temperature and helps maintain the temperature inside
the vehicle. Any cover on the front of the vehicle could
cause a false reading in the displayed temperature.
3-32
Page 353 of 600
Driving at Night
Night driving is more dangerous than day driving because
some drivers are likely to be impaired — by alcohol or
drugs, with night vision problems, or by fatigue.
Night driving tips include:
Drive defensively.
Do not drink and drive.
Reduce headlamp glare by adjusting the inside
rearview mirror.
Slow down and keep more space between you and
other vehicles because headlamps can only light up
so much road ahead.
Watch for animals.
When tired, pull off the road.
Do not wear sunglasses.
Avoid staring directly into approaching headlamps.
Keep the windshield and all glass on your vehicle
clean — inside and out.
Keep your eyes moving, especially during turns or
curves.
No one can see as well at night as in the daytime. But, as
we get older, these differences increase. A 50-year-old
driver might need at least twice as much light to see the
same thing at night as a 20-year-old.
Driving in Rain and on Wet Roads
Rain and wet roads can reduce vehicle traction
and affect your ability to stop and accelerate. Always
drive slower in these types of driving conditions
and avoid driving through large puddles and
deep-standing or �owing water.
{CAUTION:
Wet brakes can cause crashes. They might not
work as well in a quick stop and could cause
pulling to one side. You could lose control of the
vehicle.
After driving through a large puddle of water or a
car/vehicle wash, lightly apply the brake pedal until
the brakes work normally.
Flowing or rushing water creates strong forces.
Driving through �owing water could cause your
vehicle to be carried away. If this happens, you
and other vehicle occupants could drown. Do not
ignore police warnings and be very cautious about
trying to drive through �owing water.
4-25
Page 354 of 600
Hydroplaning
Hydroplaning is dangerous. Water can build up under
your vehicle’s tires so they actually ride on the
water. This can happen if the road is wet enough and
you are going fast enough. When your vehicle is
hydroplaning, it has little or no contact with the road.
There is no hard and fast rule about hydroplaning. The
best advice is to slow down when the road is wet.
Other Rainy Weather Tips
Besides slowing down, other wet weather driving tips
include:
Allow extra following distance.
Pass with caution.
Keep windshield wiping equipment in good shape.
Keep the windshield washer �uid reservoir �lled.
Have good tires with proper tread depth. SeeTires
on page 5-65.
Turn off cruise control.
Before Leaving on a Long Trip
To prepare your vehicle for a long trip, consider having it
serviced by your dealer/retailer before departing.
Things to check on your own include:
Windshield Washer Fluid:Reservoir full? Windows
clean — inside and outside?
Wiper Blades:In good shape?
Fuel, Engine Oil, Other Fluids:All levels checked?
Lamps:Do they all work and are lenses clean?
Tires:Are treads good? Are tires in�ated to
recommended pressure?
Weather and Maps:Safe to travel? Have
up-to-date maps?
Highway Hypnosis
Always be alert and pay attention to your surroundings
while driving. If you become tired or sleepy, �nd a safe
place to park your vehicle and rest.
Other driving tips include:
Keep the vehicle well ventilated.
Keep interior temperature cool.
Keep your eyes moving — scan the road ahead
and to the sides.
Check the rearview mirror and vehicle instruments
often.
4-26
Page 593 of 600
Locking Rear Axle............................................ 4-9
Lockout Protection..........................................2-11
Locks
Delayed Locking..........................................2-10
Door ........................................................... 2-9
Lockout Protection.......................................2-11
Power Door .................................................. 2-9
Programmable Automatic Door Locks.............2-10
Rear Door Security Locks.............................2-10
Loss of Control...............................................4-11
Low Fuel Warning Light...................................3-52
Lower Anchors and Tethers for Children.............1-49
Luggage Carrier..............................................2-82
Lumbar
Manual Controls............................................ 1-6
Power Controls............................................. 1-7
M
Maintenance Schedule
Additional Required Services........................... 6-7
At Each Fuel Fill.........................................6-11
At Least Once a Month................................6-12
At Least Once a Year..................................6-12Maintenance Schedule (cont.)
At the First 100, 1,000 and 6,000 Miles
(160, 1 600 and 10 000km).......................6-11
Introduction.................................................. 6-2
Maintenance Footnotes.................................. 6-9
Maintenance Record....................................6-19
Maintenance Replacement Parts....................6-17
Maintenance Requirements............................. 6-2
Owner Checks and Services.........................6-11
Recommended Fluids and Lubricants.............6-15
Scheduled Maintenance................................. 6-4
Using.......................................................... 6-3
Your Vehicle and the Environment................... 6-2
Malfunction Indicator Lamp...............................3-45
Manual Lumbar Controls.................................... 1-6
Manual Seats................................................... 1-4
Manual Windows............................................2-14
Memory Seat, Mirrors, and Pedals...................... 1-8
Message
DIC Warnings and Messages........................3-66
Mirrors
Automatic Dimming Rearview........................2-57
Manual Rearview Mirror................................2-57
Outside Convex Mirror.................................2-61
Outside Heated Mirrors................................2-61
9
Page 596 of 600
Rainsense™ II Wipers.....................................3-11
Reading Lamps..............................................3-21
Rear Axle......................................................5-49
Locking........................................................ 4-9
Rear Door Security Locks................................2-10
Rear Doors....................................................2-11
Rear Seat Armrest..........................................2-83
Rear Seat Audio (RSA)..................................3-139
Rear Seat Entertainment System.....................3-129
Rear Seat Operation...............................1-14, 1-15
Rear Vision Camera........................................2-65
Rearview Mirror, Automatic Dimming..................2-57
Rearview Mirrors.............................................2-57
Reclining Seatbacks........................................1-10
Recommended Fluids and Lubricants.................6-15
Recovery Hooks.............................................4-31
Recreational Vehicle Towing.............................4-46
Remote Keyless Entry (RKE) System.................. 2-4
Remote Keyless Entry (RKE) System,
Operation..................................................... 2-4
Remote Vehicle Start........................................ 2-7
Removing the Flat Tire and Installing the
Spare Tire..................................................5-99
Removing the Spare Tire and Tools...................5-94
Replacement Bulbs.........................................5-63
Replacement Parts, Maintenance......................6-17Reporting Safety Defects
Canadian Government..................................7-15
General Motors...........................................7-15
United States Government............................7-14
Restraint System Check
Checking the Restraint Systems....................1-92
Replacing Restraint System Parts After a
Crash.....................................................1-93
Retained Accessory Power...............................2-23
Roadside
Assistance Program....................................... 7-7
Rocking Your Vehicle to Get it Out....................4-30
Routing, Engine Drive Belt...............................6-18
Running the Vehicle While Parked
.....................2-56
S
Safety Belt Reminders.....................................3-36
Safety Belts
Care of ....................................................5-117
How to Wear Safety Belts Properly................1-21
Lap Belt.....................................................1-36
Lap-Shoulder Belt........................................1-30
Safety Belt Extender....................................1-37
Safety Belt Use During Pregnancy.................1-36
Safety Belts Are for Everyone.......................1-16
12