2009 CHEVROLET EXPRESS tires
[x] Cancel search: tiresPage 352 of 440
Temperature – A, B, C
The temperature grades are A (the highest), B,
and C, representing the tire’s resistance to the
generation of heat and its ability to dissipate heat
when tested under controlled conditions on a
specified indoor laboratory test wheel. Sustained
high temperature can cause the material of the tire
to degenerate and reduce tire life, and excessive
temperature can lead to sudden tire failure.
The grade C corresponds to a level of performance
which all passenger car tires must meet under the
Federal Motor Vehicle Safety Standard No. 109.
Grades B and A represent higher levels of
performance on the laboratory test wheel than the
minimum required by law. It should be noted that
the temperature grade for this tire is established for
a tire that is properly inflated and not overloaded.
Excessive speed, underinflation, or excessive
loading, either separately or in combination, can
cause heat buildup and possible tire failure.
Wheel Alignment and Tire Balance
The tires and wheels on your vehicle were aligned and
balanced carefully at the factory to give you the longest
tire life and best overall performance. Adjustments to
wheel alignment and tire balancing will not be necessary
on a regular basis. However, if you notice unusual tire
wear or your vehicle pulling to one side or the other, the
alignment might need to be checked. If you notice your
vehicle vibrating when driving on a smooth road, the tires
and wheels might need to be rebalanced. See your
dealer/retailer for proper diagnosis.
Wheel Replacement
Replace any wheel that is bent, cracked, or badly rusted
or corroded. If wheel nuts keep coming loose, the wheel,
wheel bolts and wheel nuts should be replaced. If the
wheel leaks air, replace it (except some aluminum
wheels, which can sometimes be repaired). See your
dealer/retailer if any of these conditions exist.
6-82
Page 353 of 440

Your dealer/retailer will know the kind of wheel
you need.
Each new wheel should have the same load-carrying
capacity, diameter, width, offset and be mounted
the same way as the one it replaces.
If you need to replace any of the wheels, wheel bolts,
wheel nuts or Tire Pressure Monitor System (TPMS)
sensors, replace them only with new GM original
equipment parts. This way, you will be sure to have
the right wheel, wheel bolts, wheel nuts, and TPMS
sensors for the vehicle.
{WARNING:
Using the wrong replacement wheels, wheel bolts,
or wheel nuts on your vehicle can be dangerous.
It could affect the braking and handling of your
vehicle, make your tires lose air and make you
lose control. You could have a collision in which
you or others could be injured. Always use the
correct wheel, wheel bolts, and wheel nuts for
replacement.Notice:The wrong wheel can also cause problems
with bearing life, brake cooling, speedometer or
odometer calibration, headlamp aim, bumper height,
vehicle ground clearance, and tire or tire chain
clearance to the body and chassis.
Whenever a wheel, wheel bolt or wheel nut is replaced
on a dual wheel setup, check the wheel nut torque after
100, 1,000 and 6,000 miles (160, 1 600 and 10 000 km)
of driving. For proper torque, see “Wheel Nut Torque”
underCapacities and Speci�cations on page 6-116.
SeeChanging a Flat Tire on page 6-86for more
information.
Used Replacement Wheels
{WARNING:
Putting a used wheel on the vehicle is dangerous.
You cannot know how it has been used or how
far it has been driven. It could fail suddenly and
cause a crash. If you have to replace a wheel,
use a new GM original equipment wheel.
6-83
Page 354 of 440
Tire Chains
{WARNING:
If your vehicle has dual wheels or P245/70R17 or
LT245/75R16 size tires, do not use tire chains.
They can damage your vehicle because there is not
enough clearance. Tire chains used on a vehicle
without the proper amount of clearance can cause
damage to the brakes, suspension, or other vehicle
parts. The area damaged by the tire chains could
cause you to lose control of your vehicle and you
or others may be injured in a crash.
Use another type of traction device only if its
manufacturer recommends it for use on your
vehicle and tire size combination and road
conditions. Follow that manufacturer’s instructions.
WARNING: (Continued)
WARNING: (Continued)
To help avoid damage to your vehicle, drive
slowly, readjust, or remove the device if it is
contacting your vehicle, and do not spin the
vehicle’s wheels.
If you do find traction devices that will fit, install
them on the rear tires.
Notice:If your vehicle does not have dual wheels
and has a tire size other than P245/70R17 or
LT245/75R16, use tire chains only where legal and
only when you must. Use chains that are the proper
size for your tires. Install them on the tires of the
rear axle. Do not use chains on the tires of the front
axle. Tighten them as tightly as possible with the
ends securely fastened. Drive slowly and follow the
chain manufacturer’s instructions. If you can
hear the chains contacting your vehicle, stop and
retighten them. If the contact continues, slow down
until it stops. Driving too fast or spinning the
wheels with chains on will damage your vehicle.
6-84
Page 355 of 440
If a Tire Goes Flat
It is unusual for a tire to blowout while you are driving,
especially if you maintain your vehicle’s tires properly.
If air goes out of a tire, it is much more likely to leak out
slowly. But if you should ever have a blowout, here
are a few tips about what to expect and what to do:
If a front tire fails, the flat tire creates a drag that pulls
the vehicle toward that side. Take your foot off the
accelerator pedal and grip the steering wheel firmly.
Steer to maintain lane position, and then gently brake
to a stop well out of the traffic lane.
A rear blowout, particularly on a curve, acts much like a
skid and may require the same correction you would use
in a skid. In any rear blowout remove your foot from the
accelerator pedal. Get the vehicle under control by
steering the way you want the vehicle to go. It may be
very bumpy and noisy, but you can still steer. Gently
brake to a stop, well off the road if possible.{WARNING:
Lifting a vehicle and getting under it to do
maintenance or repairs is dangerous without the
appropriate safety equipment and training. If a jack
is provided with the vehicle, it is designed only for
changing a flat tire. If it is used for anything else,
you or others could be badly injured or killed if the
vehicle slips off the jack. If a jack is provided with
the vehicle, only use it for changing a flat tire.
If a tire goes flat, the next part shows how to use the
jacking equipment to change a flat tire safely.
6-85
Page 359 of 440
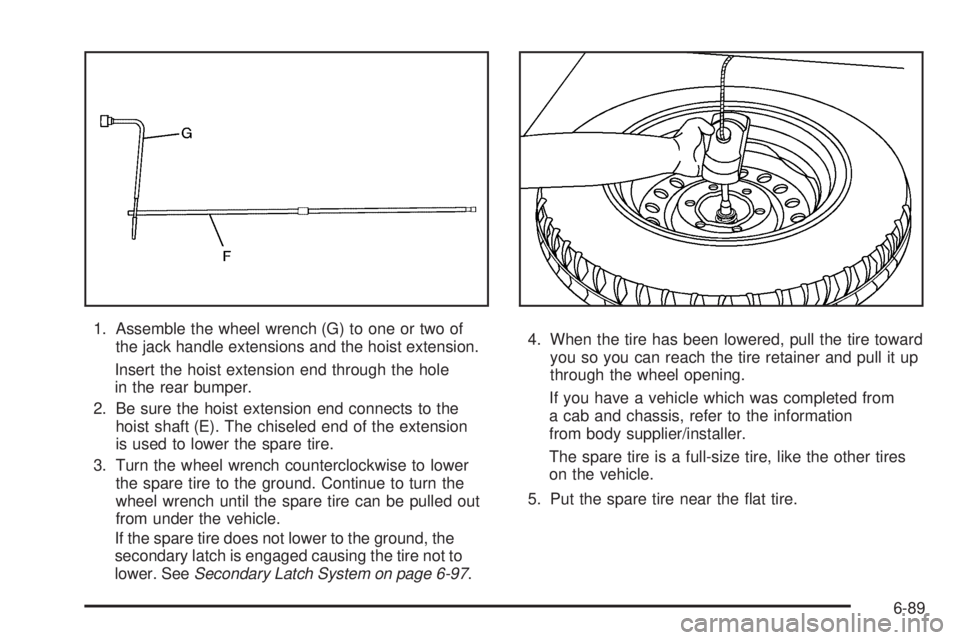
1. Assemble the wheel wrench (G) to one or two of
the jack handle extensions and the hoist extension.
Insert the hoist extension end through the hole
in the rear bumper.
2. Be sure the hoist extension end connects to the
hoist shaft (E). The chiseled end of the extension
is used to lower the spare tire.
3. Turn the wheel wrench counterclockwise to lower
the spare tire to the ground. Continue to turn the
wheel wrench until the spare tire can be pulled out
from under the vehicle.
If the spare tire does not lower to the ground, the
secondary latch is engaged causing the tire not to
lower. SeeSecondary Latch System on page 6-97.4. When the tire has been lowered, pull the tire toward
you so you can reach the tire retainer and pull it up
through the wheel opening.
If you have a vehicle which was completed from
a cab and chassis, refer to the information
from body supplier/installer.
The spare tire is a full-size tire, like the other tires
on the vehicle.
5. Put the spare tire near the flat tire.
6-89
Page 371 of 440
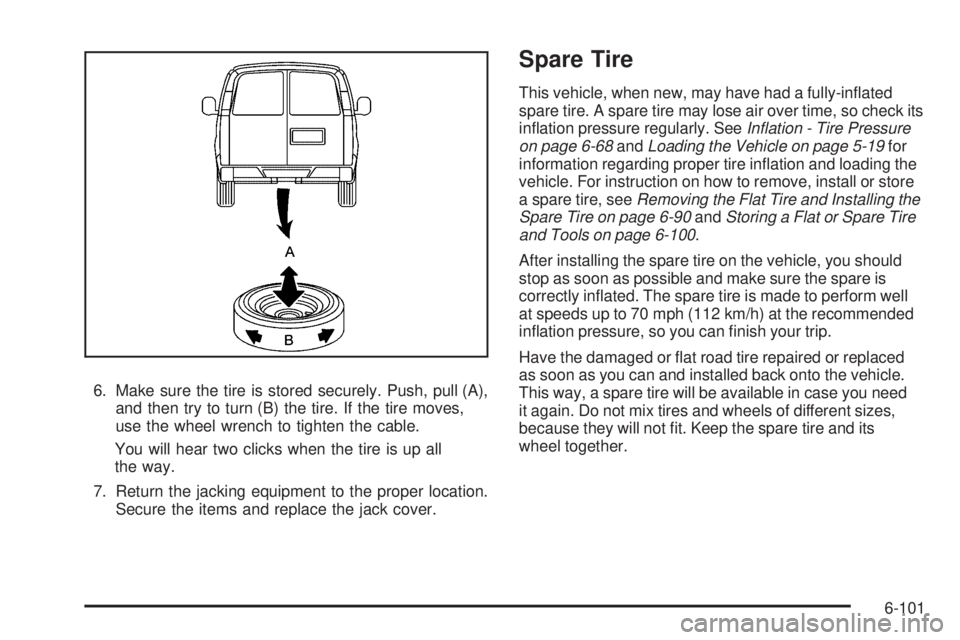
6. Make sure the tire is stored securely. Push, pull (A),
and then try to turn (B) the tire. If the tire moves,
use the wheel wrench to tighten the cable.
You will hear two clicks when the tire is up all
the way.
7. Return the jacking equipment to the proper location.
Secure the items and replace the jack cover.
Spare Tire
This vehicle, when new, may have had a fully-inflated
spare tire. A spare tire may lose air over time, so check its
inflation pressure regularly. SeeIn�ation - Tire Pressure
on page 6-68andLoading the Vehicle on page 5-19for
information regarding proper tire inflation and loading the
vehicle. For instruction on how to remove, install or store
a spare tire, seeRemoving the Flat Tire and Installing the
Spare Tire on page 6-90andStoring a Flat or Spare Tire
and Tools on page 6-100.
After installing the spare tire on the vehicle, you should
stop as soon as possible and make sure the spare is
correctly inflated. The spare tire is made to perform well
at speeds up to 70 mph (112 km/h) at the recommended
inflation pressure, so you can finish your trip.
Have the damaged or flat road tire repaired or replaced
as soon as you can and installed back onto the vehicle.
This way, a spare tire will be available in case you need
it again. Do not mix tires and wheels of different sizes,
because they will not fit. Keep the spare tire and its
wheel together.
6-101
Page 377 of 440
Aluminum Wheels
Notice:Using strong soaps, chemicals, abrasive
polishes, cleaners, brushes, or cleaners that contain
acid on aluminum or chrome-plated wheels, could
damage the surface of the wheel(s). The repairs
would not be covered by the vehicle warranty.
Use only approved cleaners on aluminum or
chrome-plated wheels.
Keep the wheels clean using a soft clean cloth with mild
soap and water. Rinse with clean water. After rinsing
thoroughly, dry with a soft clean towel. A wax may then
be applied.
Notice:Using chrome polish on aluminum wheels
could damage the wheels. The repairs would not
be covered by the vehicle warranty. Use chrome
polish on chrome wheels only.
The surface of these wheels is similar to the painted
surface of the vehicle. Do not use strong soaps,
chemicals, abrasive polishes, abrasive cleaners,
cleaners with acid, or abrasive cleaning brushes
on them because the surface could be damaged.
Do not use chrome polish on aluminum wheels.Notice:Driving the vehicle through an automatic car
wash that has silicone carbide tire cleaning brushes,
could damage the aluminum or chrome-plated
wheels. The repairs would not be covered by the
vehicle warranty. Never drive a vehicle that has
aluminum or chrome-plated wheels through an
automatic car wash that uses silicone carbide tire
cleaning brushes.
Tires
To clean the tires, use a stiff brush with tire cleaner.
Notice:Using petroleum-based tire dressing
products on the vehicle may damage the paint �nish
and/or tires. When applying a tire dressing, always
wipe off any overspray from all painted surfaces
on the vehicle.
Sheet Metal Damage
If the vehicle is damaged and requires sheet metal
repair or replacement, make sure the body repair shop
applies anti-corrosion material to parts repaired or
replaced to restore corrosion protection.
Original manufacturer replacement parts will provide
the corrosion protection while maintaining the vehicle
warranty.
6-107
Page 391 of 440

At your General Motors dealer/retailer, you can be
certain that you will receive the highest level of service
available. Your dealer /retailer has specially trained
service technicians, uses genuine GM replacement
parts, as well as, up to date tools and equipment
to ensure fast and accurate diagnostics.
The proper replacement parts, fluids, and lubricants to
use are listed inRecommended Fluids and Lubricants
on page 7-12andMaintenance Replacement Parts
on page 7-14. We recommend the use of genuine parts
from your dealer/retailer.
Rotation of New Tires
To maintain ride, handling, and performance of the
vehicle, it is important that the first rotation service
for new tires be performed when they have 8 000 to
13 000 km (5,000 to 8,000 miles). SeeTire Inspection
and Rotation on page 6-75.
Scheduled Maintenance
When the Change Engine Oil Soon
Message Displays
Change engine oil and filter. SeeEngine Oil on
page 6-15.An Emission Control Service.
When the Change Engine Oil Soon message displays,
service is required for the vehicle as soon as possible,
within the next 1 000 km/600 miles. If driving under the
best conditions, the engine oil life system might not
indicate the need for vehicle service for more than a year.
The engine oil and filter must be changed at least once a
year and the oil life system must be reset. Your dealer/
retailer has trained service technicians who will perform
this work and reset the system. If the engine oil life
system is reset accidentally, service the vehicle within
5 000 km/3,000 miles since the last service. Reset the oil
life system whenever the oil is changed. SeeEngine Oil
Life System on page 6-18.
7-3