Page 359 of 440

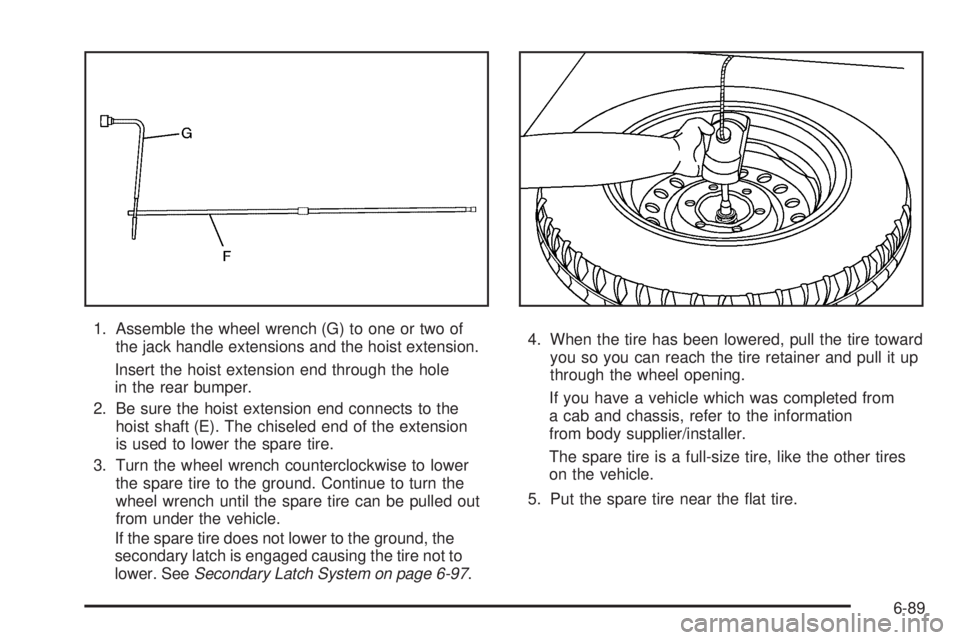
1. Assemble the wheel wrench (G) to one or two of
the jack handle extensions and the hoist extension.
Insert the hoist extension end through the hole
in the rear bumper.
2. Be sure the hoist extension end connects to the
hoist shaft (E). The chiseled end of the extension
is used to lower the spare tire.
3. Turn the wheel wrench counterclockwise to lower
the spare tire to the ground. Continue to turn the
wheel wrench until the spare tire can be pulled out
from under the vehicle.
If the spare tire does not lower to the ground, the
secondary latch is engaged causing the tire not to
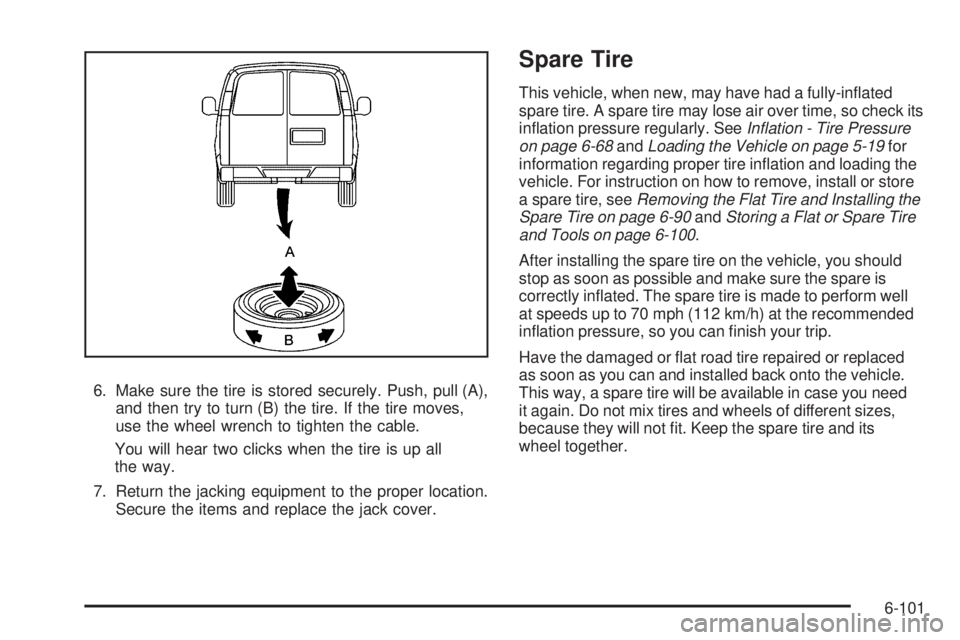
lower. SeeSecondary Latch System on page 6-97.4. When the tire has been lowered, pull the tire toward
you so you can reach the tire retainer and pull it up
through the wheel opening.
If you have a vehicle which was completed from
a cab and chassis, refer to the information
from body supplier/installer.
The spare tire is a full-size tire, like the other tires
on the vehicle.
5. Put the spare tire near the flat tire.
6-89
Page 371 of 440

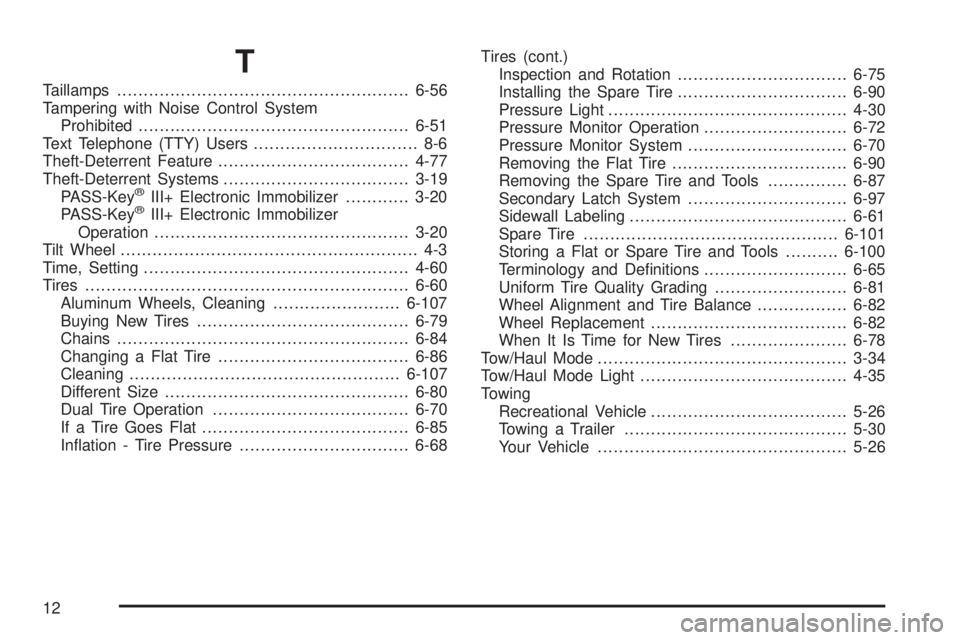
6. Make sure the tire is stored securely. Push, pull (A),
and then try to turn (B) the tire. If the tire moves,
use the wheel wrench to tighten the cable.
You will hear two clicks when the tire is up all
the way.
7. Return the jacking equipment to the proper location.
Secure the items and replace the jack cover.
Spare Tire
This vehicle, when new, may have had a fully-inflated
spare tire. A spare tire may lose air over time, so check its
inflation pressure regularly. SeeIn�ation - Tire Pressure
on page 6-68andLoading the Vehicle on page 5-19for
information regarding proper tire inflation and loading the
vehicle. For instruction on how to remove, install or store
a spare tire, seeRemoving the Flat Tire and Installing the
Spare Tire on page 6-90andStoring a Flat or Spare Tire
and Tools on page 6-100.
After installing the spare tire on the vehicle, you should
stop as soon as possible and make sure the spare is
correctly inflated. The spare tire is made to perform well
at speeds up to 70 mph (112 km/h) at the recommended
inflation pressure, so you can finish your trip.
Have the damaged or flat road tire repaired or replaced
as soon as you can and installed back onto the vehicle.
This way, a spare tire will be available in case you need
it again. Do not mix tires and wheels of different sizes,
because they will not fit. Keep the spare tire and its
wheel together.
6-101
Page 438 of 440

T
Taillamps.......................................................6-56
Tampering with Noise Control System
Prohibited...................................................6-51
Text Telephone (TTY) Users............................... 8-6
Theft-Deterrent Feature....................................4-77
Theft-Deterrent Systems...................................3-19
PASS-Key
®III+ Electronic Immobilizer............3-20
PASS-Key®III+ Electronic Immobilizer
Operation................................................3-20
Tilt Wheel........................................................ 4-3
Time, Setting..................................................4-60
Tires.............................................................6-60
Aluminum Wheels, Cleaning........................6-107
Buying New Tires........................................6-79
Chains.......................................................6-84
Changing a Flat Tire....................................6-86
Cleaning...................................................6-107
Different Size..............................................6-80
Dual Tire Operation.....................................6-70
If a Tire Goes Flat.......................................6-85
Inflation - Tire Pressure................................6-68Tires (cont.)
Inspection and Rotation................................6-75
Installing the Spare Tire................................6-90
Pressure Light.............................................4-30
Pressure Monitor Operation...........................6-72
Pressure Monitor System..............................6-70
Removing the Flat Tire.................................6-90
Removing the Spare Tire and Tools...............6-87
Secondary Latch System..............................6-97
Sidewall Labeling.........................................6-61
Spare Tire................................................6-101
Storing a Flat or Spare Tire and Tools..........6-100
Terminology and Definitions...........................6-65
Uniform Tire Quality Grading.........................6-81
Wheel Alignment and Tire Balance.................6-82
Wheel Replacement.....................................6-82
When It Is Time for New Tires......................6-78
Tow/Haul Mode ...............................................3-34
Tow/Haul Mode Light.......................................4-35
Towing
Recreational Vehicle.....................................5-26
Towing a Trailer..........................................5-30
Your Vehicle
...............................................5-26
12
Page 439 of 440

Traction
StabiliTrak®System....................................... 5-5
Transmission
Fluid, Automatic..................................6-21, 6-24
Transmission Operation, Automatic............3-27, 3-32
Transportation Program, Courtesy......................8-11
Trip Odometer................................................4-22
Turn and Lane-Change Signals.......................... 4-4
Turn Signal/Multifunction Lever........................... 4-4
U
Uniform Tire Quality Grading............................6-81
V
Vehicle
Control........................................................ 5-3
Loading......................................................5-19
Remote Start................................................ 3-7
Running While Parked..................................3-41
Symbols......................................................... ivVehicle Customization, DIC..............................4-52
Vehicle Data Recording and Privacy..................8-18
Vehicle Identification
Number (VIN)............................................6-109
Service Parts Identification Label..................6-109
Ventilation Adjustment......................................4-17
Visors...........................................................3-19
Voltmeter Gage..............................................4-27
W
Warning Lights, Gages, and Indicators...............4-20
Warnings
DIC Warnings and Messages........................4-44
Hazard Flashers............................................ 4-3
Safety and Symbols......................................... iv
Wheels
Alignment and Tire Balance..........................6-82
Different Size..............................................6-80
Replacement...............................................6-82
When It Is Time for New Tires..........................6-78
Where to Put the Child Restraint.......................2-40
13
Page:
< prev 1-8 9-16 17-24