2009 CHEVROLET EXPRESS AUX
[x] Cancel search: AUXPage 221 of 440

CD Messages
REMOVE/CHECK DISC:Radios with a Single CD player
or radios with a Six-Disc player displays CHECK DISC
and/or ejects the CD if an error occurs.
ERR (Error):If this message displays and/or the CD
comes out, it could be for one of the following reasons:
•It is very hot. When the temperature returns to
normal, the CD should play.
•You are driving on a very rough road. When the
road becomes smoother, the CD should play.
•The CD is dirty, scratched, wet, or upside down.
•The air is very humid. If so, wait about an hour and
try again.
•There could have been a problem while burning the
CD-R or CD-RW.
•The label could be caught in the CD player.NO:This message displays if the EJECT or CD/AUX
buttons are pressed and a CD has not been inserted into
the player.
If the CD is not playing correctly, for any other reason,
try a known good CD.
If any error occurs repeatedly or if an error cannot be
corrected, contact your dealer/retailer. If the radio
displays an error message, write it down and provide it
to your dealer/retailer while reporting the problem.
Using the Auxiliary Input Jack
Your radio system has an auxiliary input jack located
on the lower right side of the faceplate. This is not an
audio output; do not plug the headphone set into the front
auxiliary input jack. An external audio device such as an
iPod, laptop computer, MP3 player, CD changer, etc. can
be connected to the auxiliary input jack for use as another
source for audio listening.
4-71
Page 222 of 440

Drivers are encouraged to set up any auxiliary device
while the vehicle is in P (Park). SeeDefensive
Driving on page 5-2for more information on driver
distraction.
To use a portable audio player, connect a 3.5 mm
(1/8 inch) cable to the radio’s front auxiliary input jack.
When a device is connected, press the radio CD/AUX
button to begin playing audio from the device over
the vehicle speakers.
O(Power/Volume):Turn clockwise or counterclockwise
to increase or decrease the volume of the portable
player. You might need to do additional volume
adjustments from the portable device if the volume
is not loud or soft enough.
BAND:Press to listen to the radio while a portable
audio device is playing. The portable audio device
continues playing, so you might want to stop it or turn
it off.
CD/AUX (CD/Auxiliary):Press to play a CD while a
portable audio device is playing. Press again and
the system begins playing audio from the connected
portable audio player. If a portable audio player is
not connected, the message No Aux Input Device
displays.
Using an MP3
MP3 CD-R or CD-RW Disc
The radio plays MP3 files that were recorded on a
CD-R or CD-RW disc. The files can be recorded with
the following fixed bit rates: 32 kbps, 40 kbps, 56 kbps,
64 kbps, 80 kbps, 96 kbps, 112 kbps, 128 kbps,
160 kbps, 192 kbps, 224 kbps, 256 kbps, and 320 kbps
or a variable bit rate. Song title, artist name, and
album are available for display by the radio when
recorded using ID3 tags version 1 and 2.
Compressed Audio
The radio also plays discs that contain both
uncompressed CD audio (.CDA files) and MP3 files.
By default the radio shows the MP3 label on the left side
of the screen but plays both file formats in the order
in which they were recorded to the disc.
MP3 Format
If you burn your own MP3 disc on a personal computer:
•Make sure the MP3 files are recorded on a CD-R
or CD-RW disc.
•Do not mix standard audio and MP3 files on
one disc.
4-72
Page 226 of 440

h(Music Navigator):Use the music navigator
feature to play MP3 files on the CD-R or CD-RW in order
by artist or album. Press the pushbutton located below
the music navigator label. The player scans the disc to
sort the files by artist and album ID3 tag information. It
could take several minutes to scan the disc depending on
the number of MP3 files recorded to the CD-R or CD-RW.
The radio can begin playing while it is scanning the disc
in the background. When the scan is finished, the CD-R
or CD-RW begins playing again.
Once the disc has scanned, the player defaults to playing
MP3 files in order by artist. The current artist playing is
shown on the second line of the display between the
arrows. Once all songs by that artist are played, the
player moves to the next artist in alphabetical order on
the CD-R/CD-RW and begins playing MP3 files by that
artist. If you want to listen to MP3 files by another artist,
press the pushbutton located below either arrow button.
You will go to the next or previous artist in alphabetical
order. Continue pressing either button until the desired
artist is displayed.To change from playback by artist to playback by album,
press the pushbutton located below the Sort By label.
From the sort screen, push one of the buttons below the
album button. Press the pushbutton below the back label
to return to the main music navigator screen. Now the
album name is displayed on the second line between the
arrows and songs from the current album begins to play.
Once all songs from that album are played, the player
moves to the next album in alphabetical order on the
CD-R/CD-RW and begins playing MP3 files from that
album.
To exit music navigator mode, press the pushbutton
below the Back label to return to normal MP3 playback.
BAND:Press this button to listen to the radio when a
CD is playing. The inactive CD remains inside the radio
for future listening.
CD/AUX (CD/Auxiliary):Press this button to play a CD
when listening to the radio. The CD icon and a message
showing disc and/or track number displays when a CD is
in the player. Press this button again and the system
automatically searches for an auxiliary input device such
as a portable audio player. If a portable audio player is
not connected, “No Input Device Found” displays.
4-76
Page 228 of 440

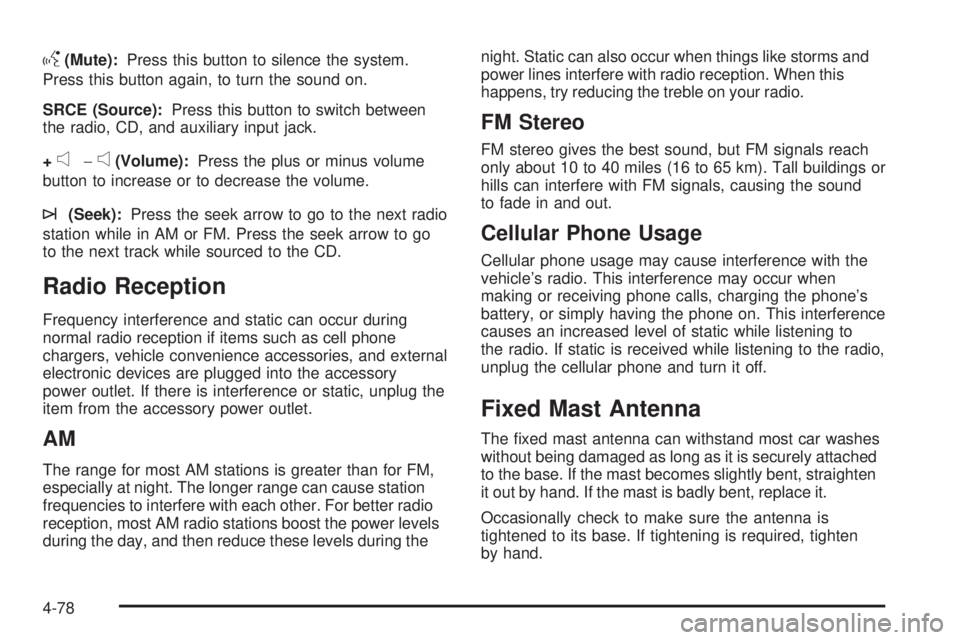
g(Mute):Press this button to silence the system.
Press this button again, to turn the sound on.
SRCE (Source):Press this button to switch between
the radio, CD, and auxiliary input jack.
+
e−e(Volume):Press the plus or minus volume
button to increase or to decrease the volume.
¨(Seek):Press the seek arrow to go to the next radio
station while in AM or FM. Press the seek arrow to go
to the next track while sourced to the CD.
Radio Reception
Frequency interference and static can occur during
normal radio reception if items such as cell phone
chargers, vehicle convenience accessories, and external
electronic devices are plugged into the accessory
power outlet. If there is interference or static, unplug the
item from the accessory power outlet.
AM
The range for most AM stations is greater than for FM,
especially at night. The longer range can cause station
frequencies to interfere with each other. For better radio
reception, most AM radio stations boost the power levels
during the day, and then reduce these levels during thenight. Static can also occur when things like storms and
power lines interfere with radio reception. When this
happens, try reducing the treble on your radio.
FM Stereo
FM stereo gives the best sound, but FM signals reach
only about 10 to 40 miles (16 to 65 km). Tall buildings or
hills can interfere with FM signals, causing the sound
to fade in and out.
Cellular Phone Usage
Cellular phone usage may cause interference with the
vehicle’s radio. This interference may occur when
making or receiving phone calls, charging the phone’s
battery, or simply having the phone on. This interference
causes an increased level of static while listening to
the radio. If static is received while listening to the radio,
unplug the cellular phone and turn it off.
Fixed Mast Antenna
The fixed mast antenna can withstand most car washes
without being damaged as long as it is securely attached
to the base. If the mast becomes slightly bent, straighten
it out by hand. If the mast is badly bent, replace it.
Occasionally check to make sure the antenna is
tightened to its base. If tightening is required, tighten
by hand.
4-78
Page 381 of 440

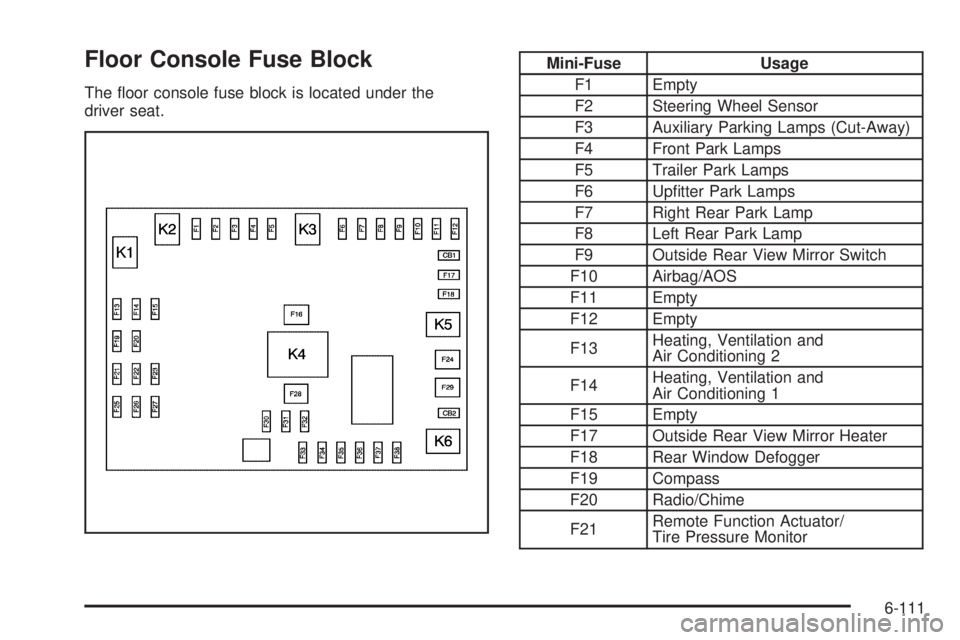
Floor Console Fuse Block
The floor console fuse block is located under the
driver seat.
Mini-Fuse Usage
F1 Empty
F2 Steering Wheel Sensor
F3 Auxiliary Parking Lamps (Cut-Away)
F4 Front Park Lamps
F5 Trailer Park Lamps
F6 Upfitter Park Lamps
F7 Right Rear Park Lamp
F8 Left Rear Park Lamp
F9 Outside Rear View Mirror Switch
F10 Airbag/AOS
F11 Empty
F12 Empty
F13Heating, Ventilation and
Air Conditioning 2
F14Heating, Ventilation and
Air Conditioning 1
F15 Empty
F17 Outside Rear View Mirror Heater
F18 Rear Window Defogger
F19 Compass
F20 Radio/Chime
F21Remote Function Actuator/
Tire Pressure Monitor
6-111
Page 382 of 440

Mini-Fuse Usage
F22Ignition Switch/Discrete Logic
Ignition Sensor (PK3)
F23 Instrument Panel Cluster
F25Heating, Ventilation and
Air Conditioning Control
F26 Auxiliary/Trailer Backup
F27 Tail Lamps Backup
F30 Upfitter Courtesy Lamps
F31 Front Door Lock
F32 Rear Door Lock
F33 Cargo Door Unlock
F34 Passenger Door Unlock
F35 Rear Passenger Door Unlock
F36 Driver Door Unlock
F37 Empty
F38 Empty
J-Case Fuse Usage
F16 Upfitter Auxiliary 1
F24 Empty
F28 Upfitter Auxiliary 2 Reading Lamps
F29 Rear Blower
Relays Usage
K1 Run (High Current Micro)
K2 Empty (High Current Micro)
K3 Park Lamps (High Current Micro)
K4Upfitter Auxiliary 2
(High Current Mini)
K5 Rear Defogger (High Current Micro)
K6Retained Accessory Power (RAP)
(High Current Micro)
Circuit Breaker Usage
CB1 Power Seats
CB2 Power Windows
Engine Compartment Fuse Block
The fuse block is located in the engine compartment on
the driver side of the vehicle.
Notice:Spilling liquid on any electrical components
on the vehicle may damage it. Always keep the
covers on any electrical component.
6-112
Page 383 of 440

Mini Fuse Usage
3 Right Stop/Turn Trailer
4 Spare
5 Spare
6 Fuel System Control Module Ignition
7 Body Control Module 5
8 Body Control Module 7
9 Body Control Module 4
10 Instrument Panel Cluster
11 Trailer Wiring
12 Spare
13 Brake Switch
14 Windshield Washer
16 Horn
17 Transmission
18 Air Conditioning Compressor
19 Engine Control Module Battery
20 Spare
21 Left Stop/Turn Trailer
22 Spare
23 Spare
24 Fuel Pump
25 Auxiliary Power Outlet
26 Body Control Module 3
6-113
Page 384 of 440

Mini Fuse Usage
27 Special Equipment Option
28 Airbag
29 Steering Wheel Sensor
30Engine Control Module Ignition/
Glow Plug Module
31Transmission Control Module
Ignition
32Transmission Control Module
Battery
33 Spare
34 Spare
35 Fuel Operated Heater Module
36 Spare
51 Left high Beam Headlamp
52 Right High Beam Headlamp
53 Left Low Beam Headlamp
54 Right Low Beam Headlamp
55 Wiper
56 Canister Vent Solenoid
58 Body Control Module 2
59 Body Control Module 1Mini Fuse Usage
61 Spare
62 Oxygen Sensor 2 (Post)
63 Fan Clutch (EV)
64 Mass Air Flow/Canister/LAMBDA
65 Odd Ignition/Injectors
66Daytime Running Lamps 2
(LOLVL-V22)
67Daytime Running Lamps 1
(LOLVL-V22)
68 Auxiliary Stop Lamps
69 Spare
70 Spare
71 Fuel Heater
72 Body Control Module 6
73 Lighter/Data Link Connection
75 V6 Fuel Injectors
76 Spare
77 Oxygen Sensor 2 (Pre)
78 Engine Control Module Powertrain
79 Even Ignition/Injectors
6-114