Page 371 of 440

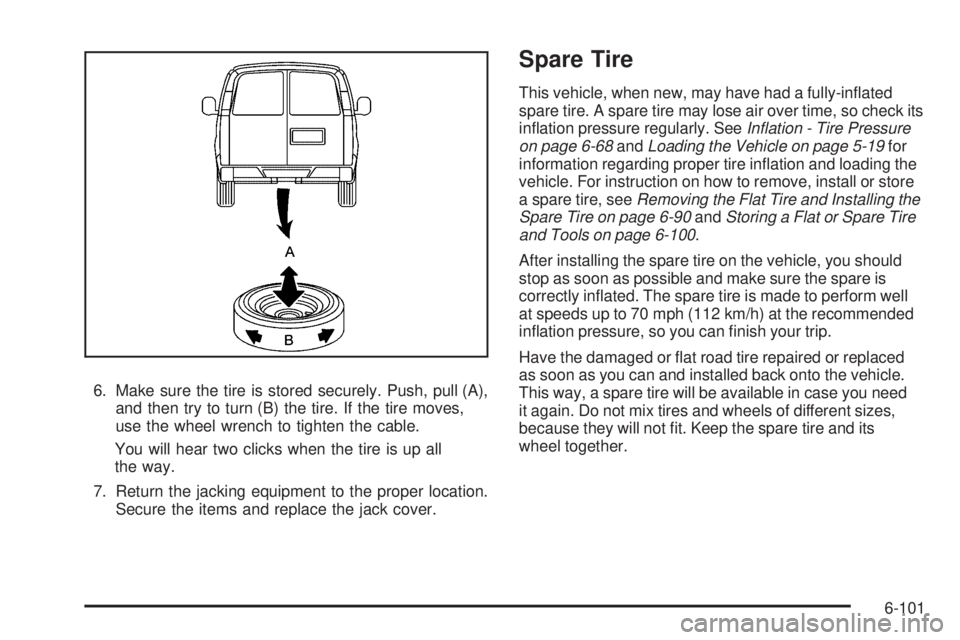
6. Make sure the tire is stored securely. Push, pull (A),
and then try to turn (B) the tire. If the tire moves,
use the wheel wrench to tighten the cable.
You will hear two clicks when the tire is up all
the way.
7. Return the jacking equipment to the proper location.
Secure the items and replace the jack cover.
Spare Tire
This vehicle, when new, may have had a fully-inflated
spare tire. A spare tire may lose air over time, so check its
inflation pressure regularly. SeeIn�ation - Tire Pressure
on page 6-68andLoading the Vehicle on page 5-19for
information regarding proper tire inflation and loading the
vehicle. For instruction on how to remove, install or store
a spare tire, seeRemoving the Flat Tire and Installing the
Spare Tire on page 6-90andStoring a Flat or Spare Tire
and Tools on page 6-100.
After installing the spare tire on the vehicle, you should
stop as soon as possible and make sure the spare is
correctly inflated. The spare tire is made to perform well
at speeds up to 70 mph (112 km/h) at the recommended
inflation pressure, so you can finish your trip.
Have the damaged or flat road tire repaired or replaced
as soon as you can and installed back onto the vehicle.
This way, a spare tire will be available in case you need
it again. Do not mix tires and wheels of different sizes,
because they will not fit. Keep the spare tire and its
wheel together.
6-101
Page 377 of 440

Aluminum Wheels
Notice:Using strong soaps, chemicals, abrasive
polishes, cleaners, brushes, or cleaners that contain
acid on aluminum or chrome-plated wheels, could
damage the surface of the wheel(s). The repairs
would not be covered by the vehicle warranty.
Use only approved cleaners on aluminum or
chrome-plated wheels.
Keep the wheels clean using a soft clean cloth with mild
soap and water. Rinse with clean water. After rinsing
thoroughly, dry with a soft clean towel. A wax may then
be applied.
Notice:Using chrome polish on aluminum wheels
could damage the wheels. The repairs would not
be covered by the vehicle warranty. Use chrome
polish on chrome wheels only.
The surface of these wheels is similar to the painted
surface of the vehicle. Do not use strong soaps,
chemicals, abrasive polishes, abrasive cleaners,
cleaners with acid, or abrasive cleaning brushes
on them because the surface could be damaged.
Do not use chrome polish on aluminum wheels.Notice:Driving the vehicle through an automatic car
wash that has silicone carbide tire cleaning brushes,
could damage the aluminum or chrome-plated
wheels. The repairs would not be covered by the
vehicle warranty. Never drive a vehicle that has
aluminum or chrome-plated wheels through an
automatic car wash that uses silicone carbide tire
cleaning brushes.
Tires
To clean the tires, use a stiff brush with tire cleaner.
Notice:Using petroleum-based tire dressing
products on the vehicle may damage the paint �nish
and/or tires. When applying a tire dressing, always
wipe off any overspray from all painted surfaces
on the vehicle.
Sheet Metal Damage
If the vehicle is damaged and requires sheet metal
repair or replacement, make sure the body repair shop
applies anti-corrosion material to parts repaired or
replaced to restore corrosion protection.
Original manufacturer replacement parts will provide
the corrosion protection while maintaining the vehicle
warranty.
6-107
Page 381 of 440
Floor Console Fuse Block
The floor console fuse block is located under the
driver seat.
Mini-Fuse Usage
F1 Empty
F2 Steering Wheel Sensor
F3 Auxiliary Parking Lamps (Cut-Away)
F4 Front Park Lamps
F5 Trailer Park Lamps
F6 Upfitter Park Lamps
F7 Right Rear Park Lamp
F8 Left Rear Park Lamp
F9 Outside Rear View Mirror Switch
F10 Airbag/AOS
F11 Empty
F12 Empty
F13Heating, Ventilation and
Air Conditioning 2
F14Heating, Ventilation and
Air Conditioning 1
F15 Empty
F17 Outside Rear View Mirror Heater
F18 Rear Window Defogger
F19 Compass
F20 Radio/Chime
F21Remote Function Actuator/
Tire Pressure Monitor
6-111
Page 384 of 440
Mini Fuse Usage
27 Special Equipment Option
28 Airbag
29 Steering Wheel Sensor
30Engine Control Module Ignition/
Glow Plug Module
31Transmission Control Module
Ignition
32Transmission Control Module
Battery
33 Spare
34 Spare
35 Fuel Operated Heater Module
36 Spare
51 Left high Beam Headlamp
52 Right High Beam Headlamp
53 Left Low Beam Headlamp
54 Right Low Beam Headlamp
55 Wiper
56 Canister Vent Solenoid
58 Body Control Module 2
59 Body Control Module 1Mini Fuse Usage
61 Spare
62 Oxygen Sensor 2 (Post)
63 Fan Clutch (EV)
64 Mass Air Flow/Canister/LAMBDA
65 Odd Ignition/Injectors
66Daytime Running Lamps 2
(LOLVL-V22)
67Daytime Running Lamps 1
(LOLVL-V22)
68 Auxiliary Stop Lamps
69 Spare
70 Spare
71 Fuel Heater
72 Body Control Module 6
73 Lighter/Data Link Connection
75 V6 Fuel Injectors
76 Spare
77 Oxygen Sensor 2 (Pre)
78 Engine Control Module Powertrain
79 Even Ignition/Injectors
6-114
Page 387 of 440
ApplicationCapacities
Metric English
Fuel Tank
Cutaway (Optional Tank)* 215.7 L 57.0 gal
Cutaway (Standard Tank) 124.9 L 33.0 gal
Passenger and Cargo 117.3 L 31.0 gal
* 159 inch (4 039 mm) wheelbase or 177 inch (4 496 mm) wheelbase only
Transmission Fluid (Pan Removal and Filter Replacement)
4-SPD 4L60-E 4.7 L 5.0 qt
6-SPD 6L90 6.0 L 6.3 qt
Wheel Nut Torque 190Y140 ft lb
All capacities are approximate. When adding, be sure to fill to the approximate level, as recommended in this
manual. Recheck fluid level after filling.
Engine Speci�cations
Engine VIN Code Transmission Spark Plug Gap
4.3L V6 X Automatic 1.52 mm (0.060 in)
4.8L V8 A Automatic 1.01 mm (0.040 in)
5.3L V8 4 Automatic 1.01 mm (0.040 in)
6.0L V8 G Automatic 1.01 mm (0.040 in)
6-117
Page 393 of 440

MaintenanceII
•Perform all services described in MaintenanceI.
•Steering and suspension inspection. Visual
inspection for damaged, loose, or missing parts or
signs of wear.
•Lubricate the front suspension, kingpin bushings,
steering linkage, and rear driveline center splines.
•Engine cooling system inspection. Visual inspection
of hoses, pipes, fittings, and clamps and
replacement, if needed.
•Windshield wiper blade inspection for wear,
cracking, or contamination and windshield and wiper
blade cleaning, if contaminated. SeeWindshield
and Wiper Blades on page 6-106. Worn or damaged
wiper blade replacement. SeeWindshield Wiper
Blade Replacement on page 6-59.
•Body hinges and latches, key lock cylinders, folding
seat hardware, and rear compartment hinges,
linkage, and handle pivot points lubrication. See
Recommended Fluids and Lubricants on page 7-12.
More frequent lubrication may be required when
vehicle is exposed to a corrosive environment.
Applying silicone grease on weatherstrips with a
clean cloth makes them last longer, seal better, and
not stick or squeak.
•Restraint system component check. SeeChecking
the Restraint Systems on page 2-80.
•Automatic transmission fluid level check and adding
fluid, if needed. SeeAutomatic Transmission Fluid
(4-Speed Transmission) on page 6-21orAutomatic
Transmission Fluid (6-Speed Transmission) on
page 6-24.
•All-wheel drive vehicles: Transfer case fluid level
check and adding fluid, if needed.
7-5
Page 394 of 440

•Engine air cleaner filter inspection. SeeEngine Air
Cleaner/Filter on page 6-20.
•Vehicles with diesel engine or GVWR above
4 536 kg (10,000 lbs) only: Shields inspection
for damage or looseness. Adjust or replace as
required. This is a Noise Emission Control Service.
Applicable to vehicles sold in the United States
and recommended for vehicles sold in Canada.
Additional Required Services
At the First 160 km/100 Miles,
1 600 km/1,000 Miles, and 10 000 km/
6,000 Miles
•
For vehicles with dual wheels: Check dual wheel
nut torque. For proper torque, seeCapacities
and Speci�cations on page 6-116.
At Each Fuel Stop
•
Engine oil level check. SeeEngine Oil on
page 6-15.
•Engine coolant level check. SeeEngine Coolant on
page 6-29.
•Windshield washer fluid level check. SeeWindshield
Washer Fluid on page 6-39.
Once a Month
•
Tire inflation check. SeeIn�ation - Tire Pressure on
page 6-68.
•Tire wear inspection. SeeTire Inspection and
Rotation on page 6-75.
Once a Year
•
Starter switch check. SeeOwner Checks and
Services on page 7-10.
•Parking brake and automatic transmission P (Park)
mechanism check. SeeOwner Checks and
Services on page 7-10.
•Automatic transmission shiftlock control system
check. SeeOwner Checks and Services on
page 7-10.
•Ignition transmission lock check. SeeOwner
Checks and Services on page 7-10.
•Engine cooling system and pressure cap pressure
check. Radiator and air conditioning condenser
outside cleaning. SeeCooling System on
page 6-28.
7-6
Page 395 of 440

•Exhaust system and nearby heat shields inspection
for loose or damaged components.
•Throttle system inspection for interference, binding
or for damaged or missing parts. Replace parts
as needed. Replace any components that have
high effort or excessive wear. Do not lubricate
accelerator or cruise control cables.
First Engine Oil Change After Every
40 000 km/25,000 Miles
•
Fuel system inspection for damage or leaks.
First Engine Oil Change After Every
80 000 km/50,000 Miles
•
Engine air cleaner filter replacement. SeeEngine
Air Cleaner/Filter on page 6-20.
•Automatic transmission fluid change (severe
service) for vehicles mainly driven in heavy
city traffic in hot weather, in hilly or mountainous
terrain, when frequently towing a trailer, or used
for taxi, police, or delivery service. SeeAutomatic
Transmission Fluid (4-Speed Transmission) on
page 6-21orAutomatic Transmission Fluid
(6-Speed Transmission) on page 6-24.
•All-wheel drive only: Transfer case fluid change
(severe service) for vehicles mainly driven when
frequently towing a trailer, or used for taxi, police, or
delivery service. Check vent hose at transfer case for
kinks and proper installation. Check to be sure vent
hose is unobstructed, clear, and free of debris.
During any maintenance, if a power washer is used
to clean mud and dirt from the underbody, care
should be taken to not directly spray the transfer
case output seals. High pressure water can
overcome the seals and contaminate the transfer
case fluid. Contaminated fluid will decrease the life
of the transfer case and should be replaced.
•Evaporative control system inspection. Check all
fuel and vapor lines and hoses for proper hook-up,
routing, and condition. Check that the purge valve, if
the vehicle has one, works properly. Replace as
needed.An Emission Control Service. The U.S.
Environmental Protection Agency or the California
Air Resources Board has determined that the failure
to perform this maintenance item will not nullify the
emission warranty or limit recall liability prior to the
completion of the vehicle’s useful life. We, however,
urge that all recommended maintenance services
be performed at the indicated intervals and the
maintenance be recorded.
7-7