2009 CHEVROLET EXPRESS CARGO VAN turn signal
[x] Cancel search: turn signalPage 174 of 408
TIGHTEN GAS CAP
This message may display and a chime may be heard
along with the check engine light on the instrument
panel cluster if the vehicle’s fuel cap is not tightened
properly. SeeMalfunction Indicator Lamp on page 3-34.
Reinstall the fuel cap fully. SeeFilling the Tank on
page 5-10. The diagnostic system can determine if the
fuel cap has been left off or improperly installed. A loose
or missing fuel cap allows fuel to evaporate into the
atmosphere. A few driving trips with the cap properly
installed should turn this light and message off.
TIRE LEARNING ACTIVE
If your vehicle has the Tire Pressure Monitor
System (TPMS), this message displays when the
system is re-learning the tire positions on your vehicle.
SeeDIC Operation and Displays on page 3-41for more
information. The tire positions must be re-learned after
rotating the tires or after replacing a tire or sensor. See
Tire Inspection and Rotation on page 5-69,Tire Pressure
Monitor System on page 5-64, andInflation - Tire
Pressure on page 5-62for more information.
TRACTION CONTROL OFF
If your vehicle has StabiliTrak, this message displays
when the Traction Control System (TCS) is turned
off. Adjust your driving accordingly. SeeStabiliTrak
®
System on page 4-5for more information.
TRANSMISSION HOT IDLE ENGINE
Notice:If you drive your vehicle while the
transmission �uid is overheating and the
transmission temperature warning is displayed
on the instrument panel cluster and/or DIC, you
can damage the transmission. This could lead to
costly repairs that would not be covered by your
warranty. Do not drive your vehicle with overheated
transmission �uid or while the transmission
temperature warning is displayed.
This message displays along with a chime if the
transmission fluid in the vehicle gets hot. Driving with
the transmission fluid temperature high can cause
damage to the vehicle. Stop the vehicle and let it idle
to allow the transmission to cool. This message
clears and the chime stops when the fluid temperature
reaches a safe level.
TURN SIGNAL ON
This message displays and a chime sounds if a turn
signal is left on for 3/4 of a mile (1.2 km). Move the turn
signal/multifunction lever to the off position.
3-56
Page 182 of 408
To minimize taking your eyes off the road while driving,
do the following while the vehicle is parked:
•Become familiar with the operation and controls of
the audio system.
•Set up the tone, speaker adjustments, and preset
radio stations.
For more information, seeDefensive Driving on
page 4-2.
Notice:Contact your dealer/retailer before adding
any equipment.
Adding audio or communication equipment could
interfere with the operation of the vehicle’s engine,
radio, or other systems, and could damage them.
Follow federal rules covering mobile radio and
telephone equipment.
Notice:The chime signals related to safety belts,
parking brake, and other functions of your vehicle
operate through the radio/entertainment system.
If that equipment is replaced or additional equipment
is added to your vehicle, the chimes may not work.
Make sure that replacement or additional equipment
is compatible with your vehicle before installing it.
SeeAccessories and Modifications on page 5-3.
The vehicle has Retained Accessory Power (RAP).
With RAP, the audio system can be played even after
the ignition is turned off. SeeRetained Accessory Power
(RAP) on page 2-20for more information.
Setting the Clock
AM/FM Radio with Optional CD Player
If your vehicle has an AM/FM radio with an optional CD
player, it has a
Hbutton for setting the time. With these
types of radios, the clock can be set with either the radio
turned on or off.
Set the time by following these steps:
1. Press
Huntil the hour begins flashing on display.
Press this button a second time and the minutes
begin flashing on display.
Press
Ha third time and the 12HR or 24HR time
format begins flashing.
2. While either the hour or the minutes are flashing,
turn the
fknob, located on the upper right side of
the radio, clockwise or counterclockwise to increase
or decrease the time. While the 12HR or 24HR time
format is flashing, turn the
fknob clockwise or
counterclockwise to select the default time settings.
3. Press
Hagain until the clock display stops flashing
to set the currently displayed time; otherwise, the
flashing stops after five seconds and the current
time displayed is automatically set.
3-64
Page 187 of 408
Speed Compensated Volume (SCV):Radios with
Speed Compensated Volume (SCV) automatically
adjusts the radio volume to compensate for road and
wind noise as you speed up or slow down while driving.
That way, the volume level should sound about the
same as you drive.
To activate SCV:
1. Set the radio volume to the desired level.
2. Press the MENU button to display the radio
setup menu.
3. Press the pushbutton under the AUTO VOLUM
label on the radio display.
4. Press the pushbutton under the desired Speed
Compensated Volume setting (OFF, Low, Med,
or High) to select the level of radio volume
compensation. The display times out after
approximately 10 seconds. Each higher setting
allows for more radio volume compensation at
faster vehicle speeds.Finding a Station
BAND:Press to switch between FM1 and FM2 and
AM. The selection displays.
f(Tune):Turn clockwise or counterclockwise to
increase or decrease the station frequency.
©SEEK¨:Press the arrows to go to the previous
or to the next station and stay there.
To scan stations, press and hold either arrow for
two seconds until a beep sounds. The radio goes to a
station, plays for a few seconds, then goes to the next
station. For AM-FM Radio and Radio with CD (Base), the
station frequency flashes while the radio is in the scan
mode. Press either arrow again to stop scanning.
The radio seeks and scans stations only with a strong
signal that are in the selected band.
For AM-FM Radio and Radio with CD (Base), scan
presets within the current selected band by pressing and
holding either SEEK arrow for four seconds until a double
beep sounds. The radio goes to a stored preset, plays for
a few seconds if a strong signal is present, then goes to
the next stored preset. The station frequency flashes
while the radio is in the scan mode.
3-69
Page 201 of 408
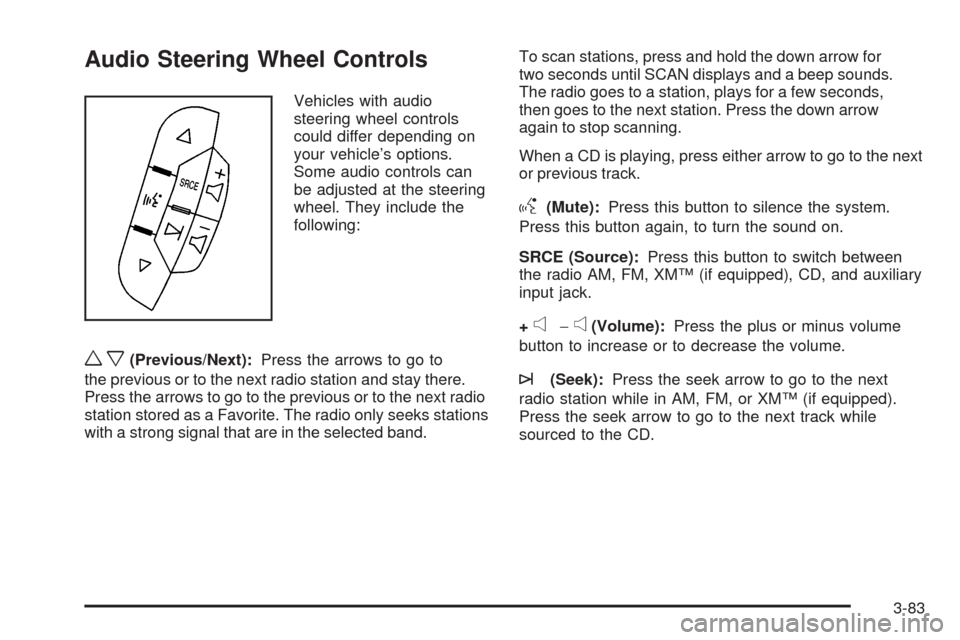
Audio Steering Wheel Controls
Vehicles with audio
steering wheel controls
could differ depending on
your vehicle’s options.
Some audio controls can
be adjusted at the steering
wheel. They include the
following:
wx(Previous/Next):Press the arrows to go to
the previous or to the next radio station and stay there.
Press the arrows to go to the previous or to the next radio
station stored as a Favorite. The radio only seeks stations
with a strong signal that are in the selected band.To scan stations, press and hold the down arrow for
two seconds until SCAN displays and a beep sounds.
The radio goes to a station, plays for a few seconds,
then goes to the next station. Press the down arrow
again to stop scanning.
When a CD is playing, press either arrow to go to the next
or previous track.
g(Mute):Press this button to silence the system.
Press this button again, to turn the sound on.
SRCE (Source):Press this button to switch between
the radio AM, FM, XM™ (if equipped), CD, and auxiliary
input jack.
+
e−e(Volume):Press the plus or minus volume
button to increase or to decrease the volume.
¨(Seek):Press the seek arrow to go to the next
radio station while in AM, FM, or XM™ (if equipped).
Press the seek arrow to go to the next track while
sourced to the CD.
3-83
Page 202 of 408
Radio Reception
Frequency interference and static can occur during
normal radio reception if items such as cell phone
chargers, vehicle convenience accessories, and external
electronic devices are plugged into the accessory power
outlet. If there is interference or static, unplug the item
from the accessory power outlet.
AM
The range for most AM stations is greater than for FM,
especially at night. The longer range can cause station
frequencies to interfere with each other. For better radio
reception, most AM radio stations boost the power levels
during the day, and then reduce these levels during the
night. Static can also occur when things like storms and
power lines interfere with radio reception. When this
happens, try reducing the treble on your radio.
FM Stereo
FM stereo gives the best sound, but FM signals reach
only about 10 to 40 miles (16 to 65 km). Tall buildings or
hills can interfere with FM signals, causing the sound
to fade in and out.
Cellular Phone Usage
Cellular phone usage may cause interference with the
vehicle’s radio. This interference may occur when making
or receiving phone calls, charging the phone’s battery,
or simply having the phone on. This interference causes
an increased level of static while listening to the radio.
If static is received while listening to the radio, unplug the
cellular phone and turn it off.
Fixed Mast Antenna
The fixed mast antenna can withstand most car washes
without being damaged as long as it is securely attached
to the base. If the mast becomes slightly bent, straighten
it out by hand. If the mast is badly bent, replace it.
Occasionally check to make sure the antenna is
tightened to its base. If tightening is required, tighten
by hand.
3-84
Page 220 of 408
If it takes some time for help to arrive, now and then
when you run the engine, push the accelerator
pedal slightly so the engine runs faster than the idle
speed. This keeps the battery charged to restart
the vehicle and to signal for help with the headlamps.
Do this as little as possible to save fuel.
If Your Vehicle is Stuck in Sand,
Mud, Ice, or Snow
Slowly and cautiously spin the wheels to free the
vehicle when stuck in sand, mud, ice, or snow.
SeeRocking Your Vehicle to Get It Out on page 4-19.
If the vehicle has a traction system, it can often help
to free a stuck vehicle. Refer to the vehicle’s traction
system in the Index. If stuck too severely for the traction
system to free the vehicle, turn the traction system off
and use the rocking method.
{CAUTION:
If you let your vehicle’s tires spin at high speed,
they can explode, and you or others could be
injured. The vehicle can overheat, causing an
engine compartment fire or other damage. Spin
the wheels as little as possible and avoid going
above 35 mph (55 km/h) as shown on the
speedometer.
For information about using tire chains on the vehicle,
seeTire Chains on page 5-78.
4-18
Page 240 of 408
Following Distance
Stay at least twice as far behind the vehicle ahead as
you would when driving the vehicle without a trailer.
This can help to avoid situations that require heavy
braking and sudden turns.
Passing
More passing distance is needed when towing a trailer.
Because the rig is longer, it is necessary to go much
farther beyond the passed vehicle before returning to
the lane.
Backing Up
Hold the bottom of the steering wheel with one hand.
Then, to move the trailer to the left, move that hand
to the left. To move the trailer to the right, move your
hand to the right. Always back up slowly and, if possible,
have someone guide you.
Making Turns
Notice:Making very sharp turns while trailering
could cause the trailer to come in contact with the
vehicle. The vehicle could be damaged. Avoid
making very sharp turns while trailering.
When turning with a trailer, make wider turns than
normal. Do this so the trailer will not strike soft
shoulders, curbs, road signs, trees or other objects.
Avoid jerky or sudden maneuvers. Signal well in
advance.
Turn Signals When Towing a Trailer
The arrows on the instrument panel flash whenever
signaling a turn or lane change. Properly hooked up, the
trailer lamps also flash, telling other drivers the vehicle
is turning, changing lanes or stopping.
When towing a trailer, the arrows on the instrument panel
flash for turns even if the bulbs on the trailer are burned
out. For this reason you may think other drivers are
seeing the signal when they are not. It is important to
check occasionally to be sure the trailer bulbs are still
working.
4-38
Page 243 of 408
The seven-wire harness connector contains the following
trailer circuits:
•Light Green: Back-up Lamps (10A fuse)**
•White: Ground
•Dark Blue: Trailer Brake Signal
•Dark Green: Right Rear Stop and Turn Signal*
•Red/Black Stripe: Battery Feed (30A Fuse)
•Brown: Trailer Park Lamp Supply Voltage
(15A fuse)**
•Yellow: Left Rear Stop and Turn Signal *The four-wire harness (without connector) contains the
following circuits:
•Black: Ground
•Red/White: Battery Feed
•Dark Blue: Trailer Brake Signal
•Light Blue: CHMSL/Stoplamp Supply Voltage
* If the vehicle is a cutaway with trailer provisions, a
15 amp fuse will be shared for both left/stop trailer turn
and right/stop trailer turn signals. However, the cutaway
lighting connector will have a 10 amp fuse for each
signal.
** If the vehicle is a cutaway with trailer provisions,
a 15 amp fuse will be shared for trailer park lamps and
cutaway rear lighting connector park lamps. Also, a
10 amp fuse will be shared for trailer back-up lamps
and cutaway rear lighting connector back-up lamps.
4-41