Page 301 of 442
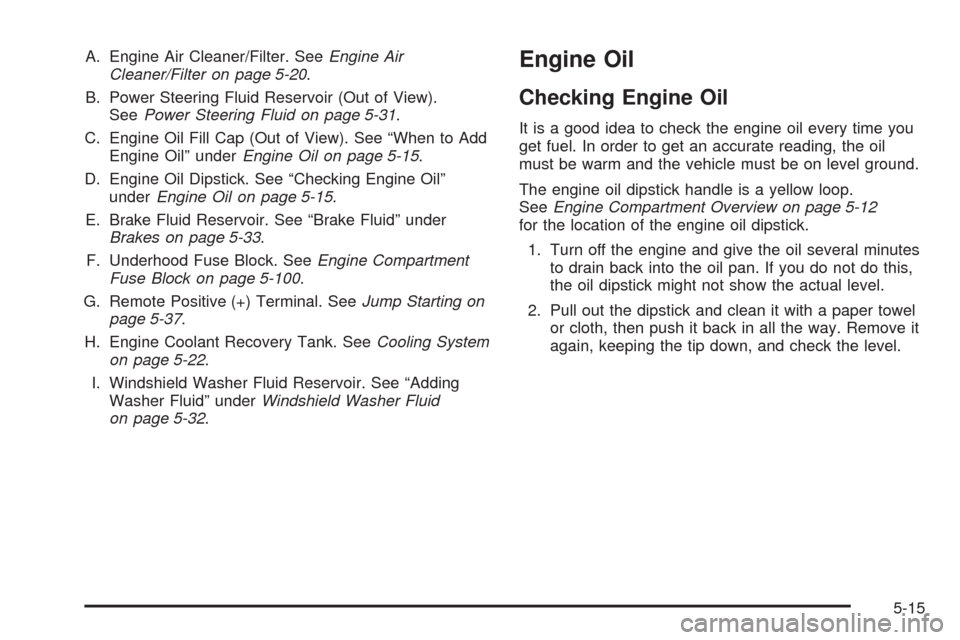
A. Engine Air Cleaner/Filter. SeeEngine Air
Cleaner/Filter on page 5-20.
B. Power Steering Fluid Reservoir (Out of View).
SeePower Steering Fluid on page 5-31.
C. Engine Oil Fill Cap (Out of View). See “When to Add
Engine Oil” underEngine Oil on page 5-15.
D. Engine Oil Dipstick. See “Checking Engine Oil”
underEngine Oil on page 5-15.
E. Brake Fluid Reservoir. See “Brake Fluid” under
Brakes on page 5-33.
F. Underhood Fuse Block. SeeEngine Compartment
Fuse Block on page 5-100.
G. Remote Positive (+) Terminal. SeeJump Starting on
page 5-37.
H. Engine Coolant Recovery Tank. SeeCooling System
on page 5-22.
I. Windshield Washer Fluid Reservoir. See “Adding
Washer Fluid” underWindshield Washer Fluid
on page 5-32.Engine Oil
Checking Engine Oil
It is a good idea to check the engine oil every time you
get fuel. In order to get an accurate reading, the oil
must be warm and the vehicle must be on level ground.
The engine oil dipstick handle is a yellow loop.
SeeEngine Compartment Overview on page 5-12
for the location of the engine oil dipstick.
1. Turn off the engine and give the oil several minutes
to drain back into the oil pan. If you do not do this,
the oil dipstick might not show the actual level.
2. Pull out the dipstick and clean it with a paper towel
or cloth, then push it back in all the way. Remove it
again, keeping the tip down, and check the level.
5-15
Page 315 of 442
If Steam Is Coming From The Engine
Compartment
{CAUTION:
Steam from an overheated engine can burn you
badly, even if you just open the hood. Stay away
from the engine if you see or hear steam coming
from it. Turn it off and get everyone away from the
vehicle until it cools down. Wait until there is no sign
of steam or coolant before you open the hood.
If you keep driving when the vehicles engine is
overheated, the liquids in it can catch �re. You or
others could be badly burned. Stop the engine if
it overheats, and get out of the vehicle until the
engine is cool.
SeeOverheated Engine Protection Operating
Mode on page 5-30for information on driving
to a safe place in an emergency.
If No Steam Is Coming From The
Engine Compartment
If an engine overheat warning is displayed but no steam
can be seen or heard, the problem may not be too
serious. Sometimes the engine can get a little too
hot when the vehicle:
Climbs a long hill on a hot day.
Stops after high-speed driving.
Idles for long periods in traffic.
Tows a trailer.
If the overheat warning is displayed with no sign of
steam:
1. Turn the air conditioner off.
2. Turn the heater on to the highest temperature and
to the highest fan speed. Open the windows as
necessary.
3. If in a traffic jam, try to minimize engine load. Shift
to N (Neutral); otherwise, shift to the highest gear
while driving.
5-29
Page 316 of 442
If the temperature overheat gage is no longer in the
overheat zone or an overheat warning no longer
displays, the vehicle can be driven. Continue to drive
the vehicle slow for about 10 minutes. Keep a safe
vehicle distance from the car in front of you. If the
warning does not come back on, continue to drive
normally.
If the warning continues, pull over, stop, and park the
vehicle right away.
If there is no sign of steam, idle the engine for three
minutes while parked. If the warning is still displayed,
turn off the engine until it cools down. Also, see
“Overheated Engine Protection Operating Mode”
later in this section.Overheated Engine Protection
Operating Mode
This emergency operating mode lets the vehicle
be driven to a safe place in an emergency situation.
If an overheated engine condition exists, an overheat
protection mode which alternates �ring groups of
cylinders helps prevent engine damage. In this
mode, there is a signi�cant loss in power and engine
performance. The temperature gage indicates an
overheat condition exists. Driving extended distances
and/or towing a trailer in the overheat protection mode
should be avoided.
Notice:After driving in the overheated engine
protection operating mode, to avoid engine damage,
allow the engine to cool before attempting any
repair. The engine oil will be severely degraded.
Repair the cause of coolant loss, change the oil
and reset the oil life system. SeeEngine Oil
on page 5-15.
5-30
Page 332 of 442
3. Gently pull the radiator
cover/front grill toward
you and pull the front
grill trim bar away from
the headlamp lens.
The front grill bar is attached to the headlamp lens
with a hidden clip.
4. Remove the three headlamp assembly attachment
screws.
5. Pull the radiator cover/front grill toward you and
pull the headlamp assembly up and out from the
vehicle.
5-46
Page 337 of 442
Windshield Wiper Blade
Replacement
Windshield wiper blades should be inspected for wear
and cracking. SeeScheduled Maintenance on page 6-4
for more information.
Replacement blades come in different types and are
removed in different ways. For proper type and length,
seeMaintenance Replacement Parts on page 6-13.
To replace the windshield wiper blade assembly:
1. Lift the wiper arm away from the windshield.2. Push the release lever (B) to disengage the hook
and push the wiper arm (A) out of the blade (C).
3. Push the new wiper blade securely on the wiper
arm until you hear the release lever click into place.
To replace the rear window wiper blade:
1. Lift the wiper blade arm straight toward you.
2. Push the blade release button and slide the whole
blade to the right to remove.
3. Install the new blade.
4. Push the wiper blade arm back into place.
5-51
Page 353 of 442
Reset the Tire Pressure Monitor System. SeeTire
Pressure Monitor Operation on page 5-63.
Make certain that all wheel nuts are properly
tightened. See “Wheel Nut Torque” under
Capacities and Specifications on page 5-104.
{CAUTION:
Rust or dirt on a wheel, or on the parts to
which it is fastened, can make wheel nuts
become loose after time. The wheel could
come off and cause an accident. When you
change a wheel, remove any rust or dirt from
places where the wheel attaches to the
vehicle. In an emergency, you can use a cloth
or a paper towel to do this; but be sure to use a
scraper or wire brush later, if needed, to get all
the rust or dirt off. SeeChanging a Flat Tire on
page 5-76.
When It Is Time for New Tires
Various factors, such as maintenance, temperatures,
driving speeds, vehicle loading, and road conditions,
in�uence when you need new tires.
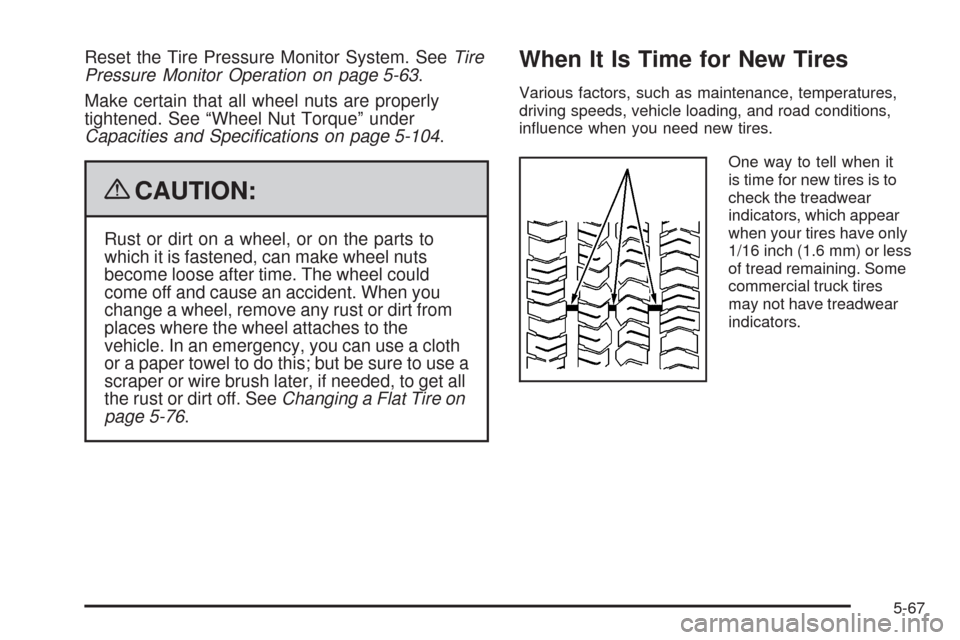
One way to tell when it
is time for new tires is to
check the treadwear
indicators, which appear
when your tires have only
1/16 inch (1.6 mm) or less
of tread remaining. Some
commercial truck tires
may not have treadwear
indicators.
5-67
Page 361 of 442
If a Tire Goes Flat
It is unusual for a tire to blowout while you are driving,
especially if you maintain your vehicle’s tires properly.
If air goes out of a tire, it is much more likely to leak out
slowly. But if you should ever have a blowout, here
are a few tips about what to expect and what to do:
If a front tire fails, the �at tire creates a drag that pulls
the vehicle toward that side. Take your foot off the
accelerator pedal and grip the steering wheel �rmly.
Steer to maintain lane position, and then gently brake
to a stop well out of the traffic lane.
A rear blowout, particularly on a curve, acts much like
a skid and may require the same correction you would
use in a skid. In any rear blowout remove your foot from
the accelerator pedal. Get the vehicle under control by
steering the way you want the vehicle to go. It may be
very bumpy and noisy, but you can still steer. Gently
brake to a stop, well off the road if possible.{CAUTION:
Lifting a vehicle and getting under it to do
maintenance or repairs is dangerous without the
appropriate safety equipment and training. If a jack
is provided with the vehicle, it is designed only for
changing a �at tire. If it is used for anything else,
you or others could be badly injured or killed if the
vehicle slips off the jack. If a jack is provided with
the vehicle, only use it for changing a �at tire.
If a tire goes �at, the next part shows how to use the
jacking equipment to change a �at tire safely.
5-75
Page 368 of 442
10. Remove all of the
wheel nuts.
11. Remove the �at tire.
{CAUTION:
Rust or dirt on a wheel, or on the parts to which
it is fastened, can make wheel nuts become loose
after time. The wheel could come off and cause an
accident. When changing a wheel, remove any rust
or dirt from places where the wheel attaches to the
vehicle. In an emergency, use a cloth or a paper
towel to do this; but be sure to use a scraper or wire
brush later, if needed, to get all the rust or dirt off.
SeeChanging a Flat Tire on page 5-76.
12. Remove any rust or dirt
from the wheel bolts,
mounting surfaces,
and spare wheel.
5-82