2009 CHEVROLET COLORADO seats
[x] Cancel search: seatsPage 51 of 420

Some child restraints that have a top tether are designed
for use with or without the top tether being attached.
Others require the top tether always to be attached.
In Canada, the law requires that forward-facing
child restraints have a top tether, and that the tether
be attached. Be sure to read and follow the instructions
for your child restraint.
If the child restraint does not have a top tether, one
can be obtained, in kit form, for many child restraints.
Ask the child restraint manufacturer whether or not a kit
is available.
Lower Anchor and Top Tether Anchor
Locations
i(Top Tether Anchor):
Seating positions with top
tether anchors.
j(Lower Anchor): Seating
positions with two lower
anchors.
i(Top Tether Anchor):
Seating positions with
top tether anchors.
j(Lower Anchor): Seating
positions with two lower
anchors.
i(Top Tether Anchor):
Seating positions with
top tether anchors.
Crew Cab — Rear Seat
Extended
Cab — Rear Seat
Front Seat — Regular
and Extended Cab
without Rear Seats
1-47
Page 52 of 420

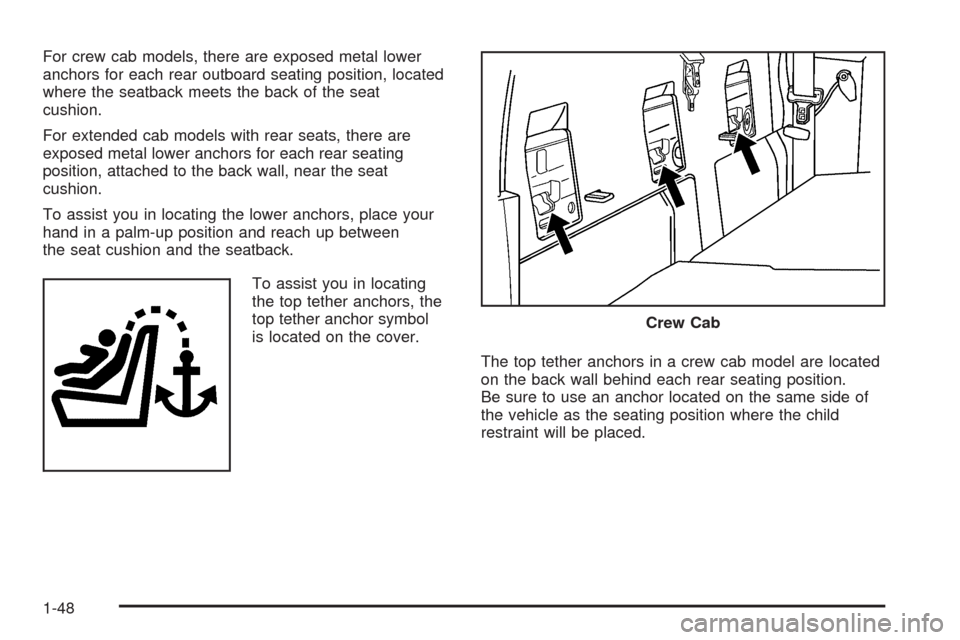
For crew cab models, there are exposed metal lower
anchors for each rear outboard seating position, located
where the seatback meets the back of the seat
cushion.
For extended cab models with rear seats, there are
exposed metal lower anchors for each rear seating
position, attached to the back wall, near the seat
cushion.
To assist you in locating the lower anchors, place your
hand in a palm-up position and reach up between
the seat cushion and the seatback.
To assist you in locating
the top tether anchors, the
top tether anchor symbol
is located on the cover.
The top tether anchors in a crew cab model are located
on the back wall behind each rear seating position.
Be sure to use an anchor located on the same side of
the vehicle as the seating position where the child
restraint will be placed.
Crew Cab
1-48
Page 53 of 420

The top tether anchors in an extended cab model are
located on the center of the back wall behind a removable
cover for the rear seating positions. Be sure to use an
anchor located nearest to the seating position where the
child restraint will be placed.For regular and extended cab models without rear
seats, there is a top tether anchor located behind a
removable cover on the back wall behind the right front
passenger seat. You may have to pull the seatback
forward to access the anchor.
Do not secure a child restraint in a position without a
top tether anchor if a national or local law requires that
the top tether be attached, or if the instructions that
come with the child restraint say that the top tether
must be attached.
Accident statistics show that children are safer if they
are restrained in the rear rather than the front seat.
SeeWhere to Put the Restraint on page 1-44for
additional information. Extended Cab — Rear Seat
Regular and Extended Cab without Rear Seats
1-49
Page 58 of 420

1.3. Attach the lower attachments on the child
restraint to the lower anchors (D) in the
vehicle. The child restraint instructions will
show you how.
2. If the child restraint manufacturer recommends that
the top tether be attached, attach and tighten the top
tether to the top tether anchor (C). Refer to the child
restraint instructions and the following steps:
2.1. Pull on the �nger access tab to remove the
cover to access the top tether anchors (C).
2.2. Route the top tether (A) through the loop (B)
at the top of the seatback to attach the top
tether to the nearest top tether anchor (C).3. Tighten the lower anchor attachments and the top
tether. The child restraint instructions will show
you how.
4. Push and pull the child restraint in different
directions to be sure it is secure.
Front Seat — Regular/Extended Cab
without Rear Seats
Your vehicle has a right front passenger’s airbag and a
passenger sensing system. The passenger sensing
system is designed to turn off the right front passenger’s
frontal airbag when an infant in a rear-facing infant seat or
a small child in a forward-facing child restraint or booster
seat is detected. SeeSecuring a Child Restraint in the
Right Front Seat Position on page 1-58andPassenger
Sensing System on page 1-70for important safety
information and additional information on installing a
child restraint in the right front seat position.
1. SeeSecuring a Child Restraint in the Right Front
Seat Position on page 1-58for instructions on
installing the child restraint using the safety belts.
1-54
Page 80 of 420

Adding Equipment to Your
Airbag-Equipped Vehicle
Q:Is there anything I might add to or change
about the vehicle that could keep the airbags
from working properly?
A:Yes. If you add things that change the vehicle’s
frame, bumper system, height, front end or side
sheet metal, they may keep the airbag system from
working properly. Changing or moving any parts
of the front seats, safety belts, the airbag sensing
and diagnostic module, steering wheel, instrument
panel, roof-rail airbag modules, ceiling headliner
or pillar garnish trim, front sensors, or airbag wiring
can affect the operation of the airbag system.
In addition, the vehicle has a passenger sensing
system for the right front passenger position, which
includes sensors that are part of the passenger’s
seat. The passenger sensing system may not
operate properly if the original seat trim is replaced
with non-GM covers, upholstery or trim, or with GM
covers, upholstery or trim designed for a different
vehicle. Any object, such as an aftermarket seat
heater or a comfort enhancing pad or device,installed under or on top of the seat fabric, could also
interfere with the operation of the passenger sensing
system. This could either prevent proper deployment
of the passenger airbag(s) or prevent the passenger
sensing system from properly turning off the
passenger airbag(s). SeePassenger Sensing
System on page 1-70.
If you have any questions, call Customer
Assistance. The phone numbers and addresses
for Customer Assistance are in Step Two of
the Customer Satisfaction Procedure in this manual.
SeeCustomer Satisfaction Procedure on page 7-2.
Q:Because I have a disability, I have to get
my vehicle modi�ed. How can I �nd out whether
this will affect my airbag system?
A:If you have questions, call Customer Assistance.
The phone numbers and addresses for Customer
Assistance are in Step Two of the Customer
Satisfaction Procedure in this manual. See
Customer Satisfaction Procedure on page 7-2.
In addition, your dealer/retailer and the service manual
have information about the location of the airbag
sensors, sensing and diagnostic module and airbag
wiring.
1-76
Page 128 of 420

OnStar service cannot work unless the vehicle is in a
place where OnStar has an agreement with a wireless
service provider for service in that area. OnStar service
also cannot work unless the vehicle is in a place where
the wireless service provider OnStar has hired for that
area has coverage, network capacity and reception when
the service is needed, and technology that is compatible
with the OnStar service. Not all services are available
everywhere, particularly in remote or enclosed areas, or
at all times.
Location information about the vehicle is only available
if the GPS satellite signals are unobstructed and
available.
The vehicle must have a working electrical system,
including adequate battery power, for the OnStar
equipment to operate. There are other problems OnStar
cannot control that may prevent OnStar from providing
OnStar service at any particular time or place. Some
examples are damage to important parts of the vehicle in
a crash, hills, tall buildings, tunnels, weather or wireless
phone network congestion.
Your Responsibility
Increase the volume of the radio if the OnStar advisor
cannot be heard. If the light next to the OnStar buttons is
red, the system may not be functioning properly. Press
the OnStar button and request a vehicle diagnostic.If the light appears clear (no light is appearing), your
OnStar subscription has expired and all services have
been deactivated. Press the OnStar button to con�rm that
the OnStar equipment is active.
Storage Areas
Glove Box
Lift up on the glove box lever to open it.
Cupholders
This vehicle may have two cupholders located on the
lower part of the front doors as well as two cupholders
located at the front end of the console. Vehicles
with bench seats may have cupholders attached to the
front of the center seat.
For vehicles that are an extended cab or crew cab
model, the vehicle also has two rear cupholders. On
crew cab models, the cupholders are located at the front
end of the rear center seat cushion. On extended cab
models, the rear seat cupholders are located on
top of the rear center console.
Vehicles with ashtrays will use one of the cupholders.
2-46
Page 129 of 420

Center Console Storage
For vehicles with bench seats, there may be a center
armrest storage area. Lift up on the upper tab located at
the front of the armrest to release the latch. Lift the lid
to open the storage area.
For vehicles with bucket seats or uplevel packages, the
vehicle may have a two-tiered center armrest storage
area. Lift up on the upper tab located at the front of the
armrest to release the latch. Lift the lid to the top
storage area. A second tab is located below the top one
and allows you to access the bottom storage area.
Lift up on the lower tab to release the latch. Then, raise
the lid of the lower storage area. The upper storage
area will lift up with the lid of the lower storage area.
To close the storage area(s), lower the lid(s) until
you feel the latch close.
Assist Handles
This vehicle may have assist handles to be used when
getting out of the vehicle. The assist handles are
located above the doors.
If the vehicle has roof-mounted side impact air bags,
there are assist handles located above both the
driver and front passenger doors.
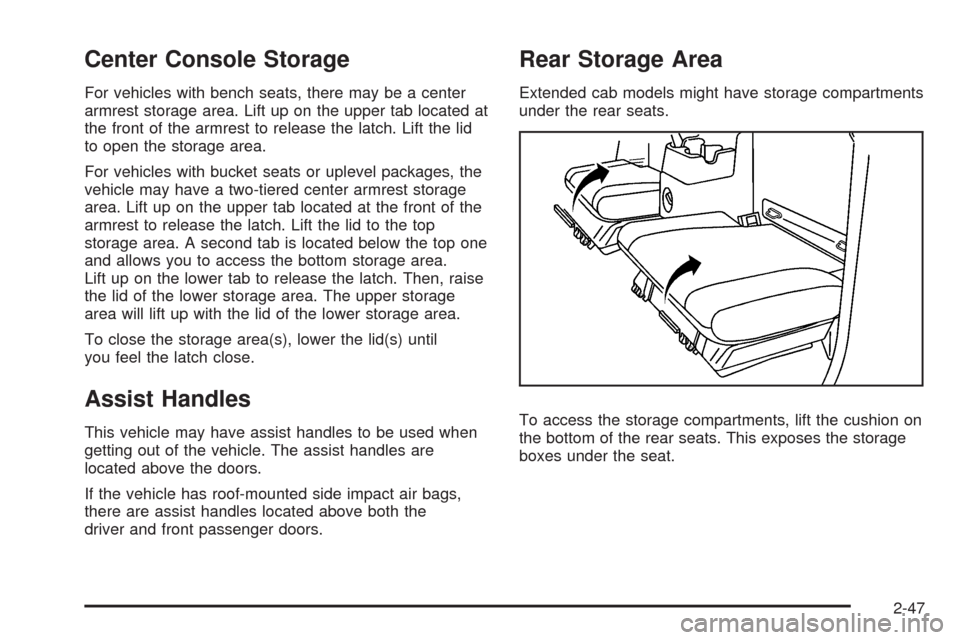
Rear Storage Area
Extended cab models might have storage compartments
under the rear seats.
To access the storage compartments, lift the cushion on
the bottom of the rear seats. This exposes the storage
boxes under the seat.
2-47
Page 149 of 420

Dome Lamp Override
The dome lamp override button is located below the
exterior lamps control.
E(Dome Lamp Override):Press this button in to
make the dome lamps remain off when the doors
are open. To return the lamps to automatic operation,
press
Eagain and return it to the out position.
Exit Lighting
The interior lamps will come on when the key is
removed from the ignition. The lamps will not come
on if the dome override button is pressed in.
Electric Power Management
The vehicle has Electric Power Management (EPM)
that estimates the battery’s temperature and state
of charge. It then adjusts the voltage for best
performance and extended life of the battery.
When the battery’s state of charge is low, the voltage
is raised slightly to quickly bring the charge back
up. When the state of charge is high, the voltage is
lowered slightly to prevent overcharging. If the vehicle
has a voltmeter gage or a voltage display on theDriver Information Center (DIC), you may see the
voltage move up or down. This is normal. If there
is a problem, an alert will be displayed.
The battery can be discharged at idle if the electrical
loads are very high. This is true for all vehicles.
This is because the generator (alternator) may not
be spinning fast enough at idle to produce all the
power that is needed for very high electrical loads.
A high electrical load occurs when several of the
following are on: headlamps, high beams, fog lamps,
rear window defogger, climate control fan at high speed,
heated seats, engine cooling fans, trailer loads, and
loads plugged into accessory power outlets.
EPM works to prevent excessive discharge of the
battery. It does this by balancing the generator’s output
and the vehicle’s electrical needs. It can increase
engine idle speed to generate more power, whenever
needed. It can temporarily reduce the power demands
of some accessories.
Normally, these actions occur in steps or levels, without
being noticeable. In rare cases at the highest levels of
corrective action, this action may be noticeable to the
driver. If so, a Driver Information Center (DIC) message
might be displayed, such as BATTERY SAVER ACTIVE,
BATTERY VOLTAGE LOW, or LOW BATTERY. If this
message is displayed, it is recommended that the driver
reduce the electrical loads as much as possible. SeeDIC
Warnings and Messages on page 3-39.
3-17