2009 CHEVROLET AVEO headlamp
[x] Cancel search: headlampPage 135 of 354

Fog Lamps
For vehicles with fog lamps, they are controlled by
the
#band located on the middle of the turn signal/
multifunction lever.
To use the fog lamps, the ignition must be turned to
ON/RUN and the low-beam headlamps or parking lamps
must be on.
Turn the band to
#to turn the fog lamps on. The band
automatically returns to its starting position when
released. The fog lamp indicator light comes on in the
instrument panel cluster. SeeFog Lamp Light on
page 3-35.
To turn the fog lamps off, turn the band to
#again.
The fog lamp indicator light will go off.
The fog lamps will also turn off when the high-beam
headlamps are turned on. When the high-beam
headlamps are turned off, the fog lamps will turn on
again.
Some localities have laws that require the headlamps
to be on along with the fog lamps.
Instrument Panel Brightness
This feature controls the brightness of the instrument
panel lights.
The thumbwheel for this feature is located on the
instrument panel to the left of the steering column.
Turn the thumbwheel to brighten or dim the lights.
3-15
Page 156 of 354

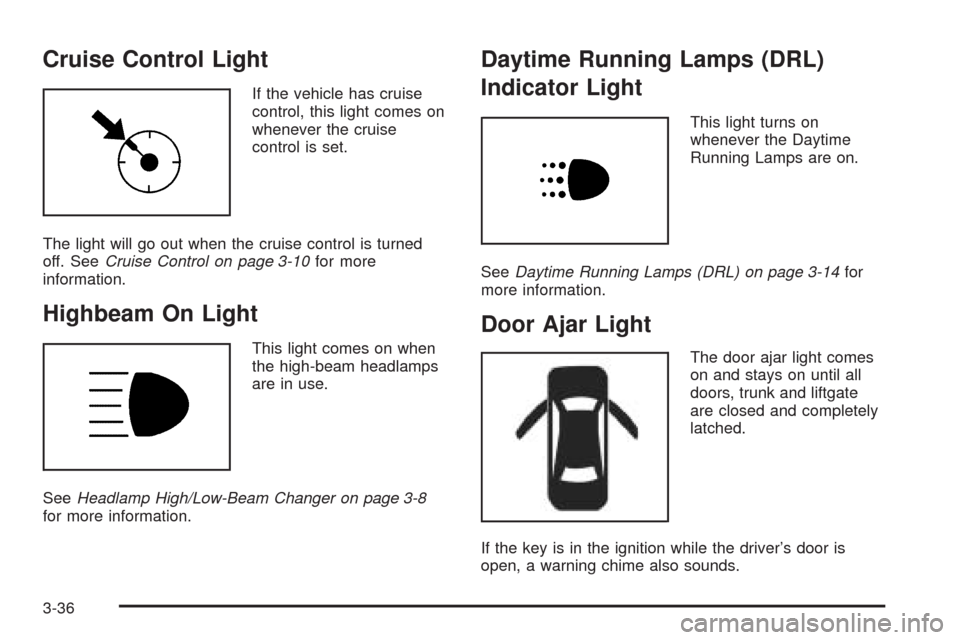
Cruise Control Light
If the vehicle has cruise
control, this light comes on
whenever the cruise
control is set.
The light will go out when the cruise control is turned
off. SeeCruise Control on page 3-10for more
information.
Highbeam On Light
This light comes on when
the high-beam headlamps
are in use.
SeeHeadlamp High/Low-Beam Changer on page 3-8
for more information.
Daytime Running Lamps (DRL)
Indicator Light
This light turns on
whenever the Daytime
Running Lamps are on.
SeeDaytime Running Lamps (DRL) on page 3-14for
more information.
Door Ajar Light
The door ajar light comes
on and stays on until all
doors, trunk and liftgate
are closed and completely
latched.
If the key is in the ignition while the driver’s door is
open, a warning chime also sounds.
3-36
Page 190 of 354

Driving at Night
Night driving is more dangerous than day driving because
some drivers are likely to be impaired — by alcohol or
drugs, with night vision problems, or by fatigue.
Night driving tips include:
Drive defensively.
Do not drink and drive.
Reduce headlamp glare by adjusting the inside
rearview mirror.
Slow down and keep more space between you and
other vehicles because headlamps can only light up
so much road ahead.
Watch for animals.
When tired, pull off the road.
Do not wear sunglasses.
Avoid staring directly into approaching headlamps.
Keep the windshield and all glass on your vehicle
clean — inside and out.
Keep your eyes moving, especially during turns or
curves.
No one can see as well at night as in the daytime.
But, as we get older, these differences increase.
A 50-year-old driver might need at least twice as much
light to see the same thing at night as a 20-year-old.
Driving in Rain and on Wet Roads
Rain and wet roads can reduce vehicle traction
and affect your ability to stop and accelerate. Always
drive slower in these types of driving conditions
and avoid driving through large puddles and
deep-standing or �owing water.
{CAUTION:
Wet brakes can cause crashes. They might not
work as well in a quick stop and could cause
pulling to one side. You could lose control of the
vehicle.
After driving through a large puddle of water or a
car/vehicle wash, lightly apply the brake pedal until
the brakes work normally.
Flowing or rushing water creates strong forces.
Driving through �owing water could cause your
vehicle to be carried away. If this happens, you
and other vehicle occupants could drown. Do not
ignore police warnings and be very cautious about
trying to drive through �owing water.
4-10
Page 195 of 354

Run the engine for short periods only as needed to
keep warm, but be careful.
To save fuel, run the engine for only short periods as
needed to warm the vehicle and then shut the engine off
and close the window most of the way to save heat.
Repeat this until help arrives but only when you feel
really uncomfortable from the cold. Moving about
to keep warm also helps.
If it takes some time for help to arrive, now and then
when you run the engine, push the accelerator
pedal slightly so the engine runs faster than the idle
speed. This keeps the battery charged to restart
the vehicle and to signal for help with the headlamps.
Do this as little as possible to save fuel.If Your Vehicle is Stuck in Sand,
Mud, Ice, or Snow
Slowly and cautiously spin the wheels to free the
vehicle when stuck in sand, mud, ice, or snow.
SeeRocking Your Vehicle to Get It Out on page 4-16.
{CAUTION:
If you let your vehicle’s tires spin at high speed,
they can explode, and you or others could be
injured. The vehicle can overheat, causing an
engine compartment �re or other damage.
Spin the wheels as little as possible and avoid
going above 35 mph (55 km/h) as shown on the
speedometer.
For information about using tire chains on the vehicle,
seeTire Chains on page 5-68.
4-15
Page 209 of 354

Service............................................................5-3
Accessories and Modi�cations..........................5-3
California Proposition 65 Warning.....................5-4
California Perchlorate Materials Requirements.....5-4
Doing Your Own Service Work.........................5-4
Adding Equipment to the Outside of
the Vehicle.................................................5-5
Fuel................................................................5-5
Gasoline Octane............................................5-5
Gasoline Speci�cations....................................5-5
California Fuel...............................................5-6
Additives.......................................................5-6
Fuels in Foreign Countries...............................5-7
Filling the Tank..............................................5-8
Filling a Portable Fuel Container.....................5-11
Checking Things Under the Hood....................5-11
Hood Release..............................................5-12
Engine Compartment Overview.......................5-14
Engine Oil...................................................5-16
Engine Oil Life System..................................5-18
Engine Air Cleaner/Filter................................5-19
Automatic Transmission Fluid.........................5-21
Manual Transmission Fluid.............................5-23
Hydraulic Clutch...........................................5-23
Cooling System............................................5-24
Engine Coolant.............................................5-25Engine Overheating.......................................5-30
Power Steering Fluid.....................................5-32
Windshield Washer Fluid................................5-33
Brakes........................................................5-34
Battery........................................................5-37
Jump Starting...............................................5-38
Headlamp Aiming...........................................5-43
Bulb Replacement..........................................5-43
Halogen Bulbs
..............................................5-43
Headlamps..................................................5-44
Front Turn Signal, Sidemarker and
Parking Lamps..........................................5-45
Center High-Mounted Stoplamp (CHMSL)
(Hatchback)..............................................5-47
Center High-Mounted Stoplamp (CHMSL)
(Sedan)...................................................5-47
Taillamps, Turn Signal, Sidemarker,
Stoplamps and Back-up Lamps...................5-48
License Plate Lamp......................................5-49
Replacement Bulbs.......................................5-49
Windshield Wiper Blade Replacement..............5-50
Tires..............................................................5-51
Tire Sidewall Labeling...................................5-52
Tire Terminology and De�nitions.....................5-54
In�ation - Tire Pressure.................................5-57
Tire Pressure Monitor System.........................5-59
Section 5 Service and Appearance Care
5-1
Page 210 of 354

Tire Pressure Monitor Operation.....................5-60
Tire Inspection and Rotation...........................5-62
When It Is Time for New Tires.......................5-63
Buying New Tires.........................................5-64
Different Size Tires and Wheels......................5-65
Uniform Tire Quality Grading..........................5-66
Wheel Alignment and Tire Balance..................5-67
Wheel Replacement......................................5-67
Tire Chains..................................................5-68
If a Tire Goes Flat........................................5-69
Changing a Flat Tire.....................................5-70
Removing the Spare Tire and Tools................5-71
Removing the Flat Tire and Installing the
Spare Tire................................................5-73
Storing a Flat or Spare Tire and Tools............5-78
Compact Spare Tire......................................5-78
Appearance Care............................................5-79
Interior Cleaning...........................................5-79
Fabric/Carpet...............................................5-80
Leather.......................................................5-81
Instrument Panel, Vinyl, and Other Plastic
Surfaces..................................................5-81
Care of Safety Belts......................................5-82
Weatherstrips...............................................5-82Washing Your Vehicle...................................5-82
Cleaning Exterior Lamps/Lenses.....................5-83
Finish Care..................................................5-83
Windshield and Wiper Blades.........................5-84
Aluminum Wheels.........................................5-84
Tires...........................................................5-85
Sheet Metal Damage.....................................5-85
Finish Damage.............................................5-85
Underbody Maintenance................................5-85
Chemical Paint Spotting.................................5-85
Vehicle Identi�cation......................................5-86
Vehicle Identi�cation Number (VIN).................5-86
Service Parts Identi�cation Label.....................5-86
Electrical System............................................5-86
Add-On Electrical Equipment..........................5-86
Headlamp Wiring..........................................5-87
Windshield Wiper Fuses................................5-87
Power Windows and Other Power Options.......5-87
Fuses and Circuit Breakers............................5-87
Instrument Panel Fuse Block..........................5-88
Engine Compartment Fuse Block....................5-89
Capacities and Speci�cations..........................5-93
Section 5 Service and Appearance Care
5-2
Page 251 of 354

To disconnect the jumper cables from both vehicles, do
the following:
1. Disconnect the black negative (−) cable from the
vehicle that had the dead battery.
2. Disconnect the black negative (−) cable from the
vehicle with the good battery.
3. Disconnect the red positive (+) cable from the
vehicle with the good battery.
4. Disconnect the red positive (+) cable from the other
vehicle.
Headlamp Aiming
Headlamp aim has been preset at the factory and
should need no further adjustment.
However, if your vehicle is damaged in a crash, the
headlamp aim may be affected. Aim adjustment to the
low-beam headlamps may be necessary if oncoming
drivers �ash their high-beam headlamps at you
(for vertical aim).
If the headlamps need to be re-aimed, it is recommended
that you take the vehicle to your dealer/retailer for
service.
Bulb Replacement
For the proper type of replacement bulbs, see
Replacement Bulbs on page 5-49.
For any bulb changing procedure not listed in this
section, contact your dealer/retailer.
Halogen Bulbs
{CAUTION:
Halogen bulbs have pressurized gas inside and
can burst if you drop or scratch the bulb. You or
others could be injured. Be sure to read and follow
the instructions on the bulb package.
5-43
Page 252 of 354

Headlamps
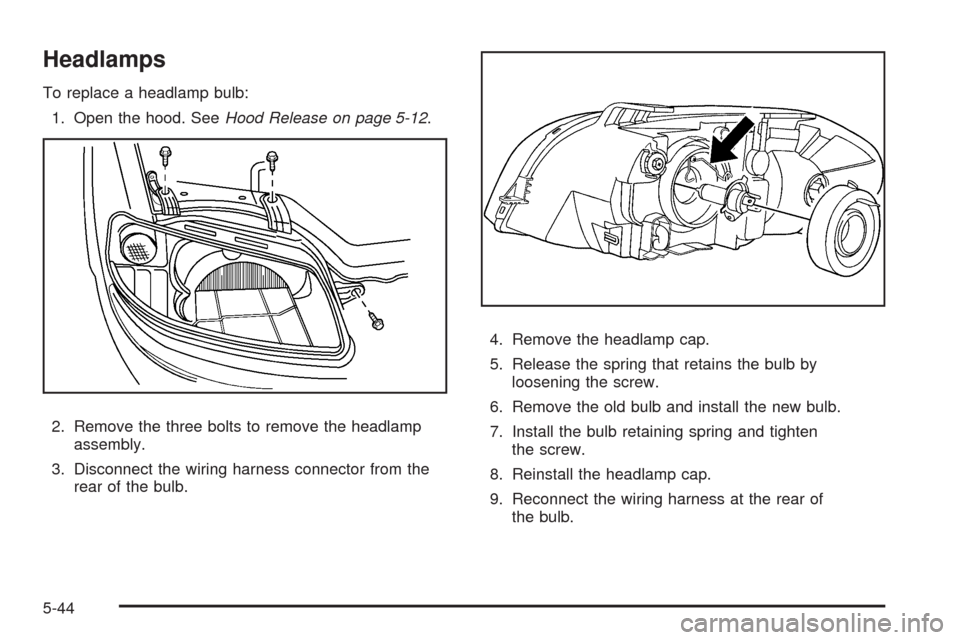
To replace a headlamp bulb:
1. Open the hood. SeeHood Release on page 5-12.
2. Remove the three bolts to remove the headlamp
assembly.
3. Disconnect the wiring harness connector from the
rear of the bulb.4. Remove the headlamp cap.
5. Release the spring that retains the bulb by
loosening the screw.
6. Remove the old bulb and install the new bulb.
7. Install the bulb retaining spring and tighten
the screw.
8. Reinstall the headlamp cap.
9. Reconnect the wiring harness at the rear of
the bulb.
5-44