Page 450 of 550

Make certain that all wheel nuts are properly
tightened. See “Wheel Nut Torque” under
Capacities and Speci�cations on page 5-116.
{CAUTION:
Rust or dirt on a wheel, or on the parts to
which it is fastened, can make wheel nuts
become loose after time. The wheel could
come off and cause an accident. When you
change a wheel, remove any rust or dirt from
places where the wheel attaches to the
vehicle. In an emergency, you can use a
cloth or a paper towel to do this; but be sure
to use a scraper or wire brush later, if
needed, to get all the rust or dirt off. See
Changing a Flat Tire on page 5-80.
Make sure the spare tire is stored securely. Push,
pull, and then try to rotate or turn the tire. If it
moves, tighten the cable. SeeStoring a Flat or
Spare Tire and Tools on page 5-95.
When It Is Time for New Tires
Various factors, such as maintenance, temperatures,
driving speeds, vehicle loading, and road conditions,
in�uence when you need new tires.
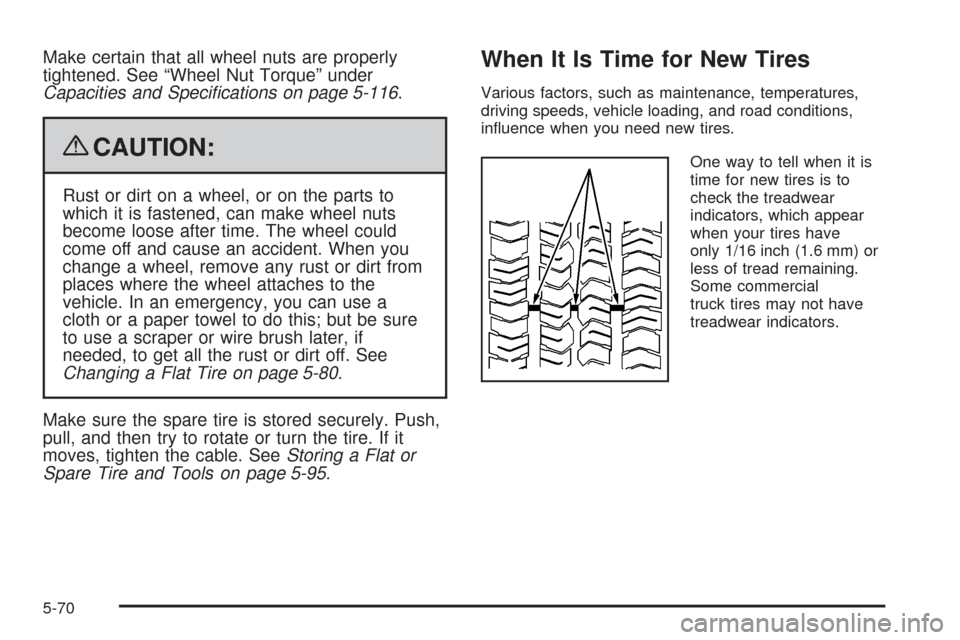
One way to tell when it is
time for new tires is to
check the treadwear
indicators, which appear
when your tires have
only 1/16 inch (1.6 mm) or
less of tread remaining.
Some commercial
truck tires may not have
treadwear indicators.
5-70
Page 451 of 550

You need new tires if any of the following statements
are true:
You can see the indicators at three or more places
around the tire.
You can see cord or fabric showing through the
tire’s rubber.
The tread or sidewall is cracked, cut, or snagged
deep enough to show cord or fabric.
The tire has a bump, bulge, or split.
The tire has a puncture, cut, or other damage that
cannot be repaired well because of the size or
location of the damage.
The rubber in tires degrades over time, even if they are
not being used. This is also true for the spare tire, if
your vehicle has one. Multiple conditions affect how fast
this aging takes place, including temperatures, loading
conditions, and in�ation pressure maintenance. With
proper care and maintenance tires will typically wear out
before they degrade due to age. If you are unsure
about the need to replace your tires as they get older,
consult the tire manufacturer for more information.
Buying New Tires
GM has developed and matched speci�c tires for your
vehicle. The original equipment tires installed on
your vehicle, when it was new, were designed to meet
General Motors Tire Performance Criteria Speci�cation
(TPC spec) system rating. If you need replacement
tires, GM strongly recommends that you get tires with
the same TPC Spec rating. This way, your vehicle
will continue to have tires that are designed to give the
same performance and vehicle safety, during normal
use, as the original tires.
GM’s exclusive TPC Spec system considers over a
dozen critical speci�cations that impact the overall
performance of your vehicle, including brake system
performance, ride and handling, traction control, and tire
pressure monitoring performance. GM’s TPC Spec
number is molded onto the tire’s sidewall near the tire
size. If the tires have an all-season tread design,
the TPC spec number will be followed by an MS for
mud and snow. SeeTire Sidewall Labeling on page 5-56
for additional information.
5-71
Page 452 of 550

GM recommends replacing tires in sets of four. This is
because uniform tread depth on all tires will help
keep your vehicle performing most like it did when the
tires were new. Replacing less than a full set of tires can
affect the braking and handling performance of your
vehicle. SeeTire Inspection and Rotation on page 5-69
for information on proper tire rotation.
{CAUTION:
Mixing tires could cause you to lose control while
driving. If you mix tires of different sizes, brands,
or types (radial and bias-belted tires), the vehicle
might not handle properly, and you could have a
crash. Using tires of different sizes, brands, or
types could also cause damage to your vehicle.
Be sure to use the same size, brand, and type
tires on all wheels.
CAUTION: (Continued)
CAUTION: (Continued)
Your vehicle may have a different size spare than
the road tires (those originally installed on your
vehicle). When new, your vehicle included a spare
tire and wheel assembly with a similar overall
diameter as your vehicle’s road tires and wheels,
so it is all right to drive on it. Because this spare
was developed for use on your vehicle, it will not
affect vehicle handling.
{CAUTION:
If you use bias-ply tires on the vehicle, the
wheel rim �anges could develop cracks after
many miles of driving. A tire and/or wheel
could fail suddenly, causing a crash. Use
only radial-ply tires with the wheels on the
vehicle.
5-72
Page 454 of 550

Uniform Tire Quality Grading
Quality grades can be found where applicable on
the tire sidewall between tread shoulder and
maximum section width. For example:
Treadwear 200 Traction AA
Temperature A
The following information relates to the system
developed by the United States National Highway
Traffic Safety Administration (NHTSA), which
grades tires by treadwear, traction, and
temperature performance. This applies only to
vehicles sold in the United States. The grades are
molded on the sidewalls of most passenger car
tires. The Uniform Tire Quality Grading (UTQG)
system does not apply to deep tread, winter-type
snow tires, space-saver, or temporary use
spare tires, tires with nominal rim diameters of
10 to 12 inches (25 to 30 cm), or to some
limited-production tires.While the tires available on General Motors
passenger cars and light trucks may vary with
respect to these grades, they must also conform
to federal safety requirements and additional
General Motors Tire Performance Criteria (TPC)
standards.
Treadwear
The treadwear grade is a comparative rating
based on the wear rate of the tire when tested
under controlled conditions on a speci�ed
government test course. For example, a tire
graded 150 would wear one and a half (1.5) times
as well on the government course as a tire
graded 100. The relative performance of tires
depends upon the actual conditions of their use,
however, and may depart signi�cantly from
the norm due to variations in driving habits, service
practices, and differences in road characteristics
and climate.
5-74
Page 461 of 550
When the vehicle has a �at tire (B), use the following
example as a guide to assist you in the placement
of wheel blocks (A).
A. Wheel Block
B. Flat Tire
The following information explains how to use the jack
and change a tire.Removing the Spare Tire and Tools
The jack and the wheel blocks are located under a
cover near the passenger side rear seat.
1. Remove the jack cover by turning the two wing nuts
one-quarter turn counterclockwise and pulling the
jack cover off.
Rear Seat (Passenger Side) Jack Cover
5-81
Page 462 of 550
A. Wheel Blocks
B. Jack Knob
C. Wing NutD. Retaining Hook
E. Jack
F. Mounting Bracket
2. Release the jack (E) from the mounting bracket (F)
by turning the jack knob (B) on the jack
counterclockwise to release the jack from the
mounting bracket.3. Remove the wheel blocks (A) attached to the
jack (E) by turning the wing nut (C)
counterclockwise. Place the wheel blocks where
needed as indicated in previously in this section.
The tools for changing a �at tire are located in the
passenger’s side top-box storage unit.
To remove the tools, do the following:
1. Open the top door on the passenger’s side top-box
storage unit. Use the ignition/door key to unlock it if
it is locked. SeeTop-Box Storage on page 2-92
for more information.
2. Remove the black pouch from the storage box.
You now have all of the tools you will need to
lower the spare tire and change a �at.
5-82
Page 463 of 550
To access the spare tire:
A. Spare Tire
(Valve Stem
Pointed Down)
B. Hoist Assembly
C. Hoist Cable
D. Tire/Wheel
Retainer
E. Hoist ShaftF. Hoist End of
Extension Tool
G. Hoist Shaft
Access Hole
H. Wheel Wrench
I. Jack Handle
Extension(s)
J. Spare Tire Lock1. Open the hoist shaft access cover on the bumper to
access the spare tire lock (J).
2. To remove the spare tire lock, insert the ignition
key, turn it clockwise and pull it straight out.
3. Assemble the two jack handle extensions (I) and
wheel wrench (H) as shown.
5-83
Page 464 of 550
4. Insert the open end of
the extension (F)
through the hole in the
rear bumper (G) (hoist
shaft access hole).
Be sure the hoist end (F) of the extension connects
to the hoist shaft (E). The ribbed square end of
the extension is used to lower the spare tire.
Do not use the chiseled end of the wheel wrench.
5. Turn the wheel wrench counterclockwise to lower
the spare tire to the ground. Continue to turn the
wheel wrench until the spare tire can be pulled out
from under the vehicle.
If the spare tire does not lower to the ground, the
secondary latch is engaged causing the tire
not to lower. SeeSecondary Latch System on
page 5-92for more information.6. Use the wheel wrench
hook that allows you to
pull the hoist cable
towards you, to assist
in reaching the
spare tire.
5-84