2009 CHEVROLET AVALANCHE wheel
[x] Cancel search: wheelPage 382 of 550
Tire Pressure Monitor System.........................5-64
Tire Pressure Monitor Operation.....................5-66
Tire Inspection and Rotation...........................5-69
When It Is Time for New Tires.......................5-70
Buying New Tires.........................................5-71
Different Size Tires and Wheels......................5-73
Uniform Tire Quality Grading..........................5-74
Wheel Alignment and Tire Balance..................5-76
Wheel Replacement......................................5-76
Tire Chains..................................................5-78
If a Tire Goes Flat........................................5-79
Changing a Flat Tire.....................................5-80
Removing the Spare Tire and Tools................5-81
Removing the Flat Tire and Installing the
Spare Tire................................................5-86
Secondary Latch System...............................5-92
Storing a Flat or Spare Tire and Tools............5-95
Spare Tire...................................................5-99
Appearance Care..........................................5-100
Interior Cleaning.........................................5-100
Fabric/Carpet..............................................5-101
Leather......................................................5-102
Instrument Panel, Vinyl, and Other Plastic
Surfaces.................................................5-102
Care of Safety Belts....................................5-102Weatherstrips.............................................5-103
Washing Your Vehicle..................................5-103
Cleaning Exterior Lamps/Lenses....................5-103
Finish Care................................................5-104
Windshield and Wiper Blades.......................5-104
Aluminum or Chrome-Plated Wheels
and Trim................................................5-105
Tires.........................................................5-105
Sheet Metal Damage...................................5-106
Finish Damage...........................................5-106
Underbody Maintenance..............................
.5-106
Chemical Paint Spotting...............................5-106
Vehicle Identi�cation.....................................5-107
Vehicle Identi�cation Number (VIN)................5-107
Service Parts Identi�cation Label...................5-107
Electrical System..........................................5-107
Add-On Electrical Equipment.........................5-107
Windshield Wiper Fuses...............................5-108
Power Windows and Other Power Options......5-108
Fuses and Circuit Breakers..........................5-108
Instrument Panel Fuse Block........................5-109
Center Instrument Panel Fuse Block..............5-111
Underhood Fuse Block................................5-112
Capacities and Speci�cations........................5-116
Section 5 Service and Appearance Care
5-2
Page 393 of 550
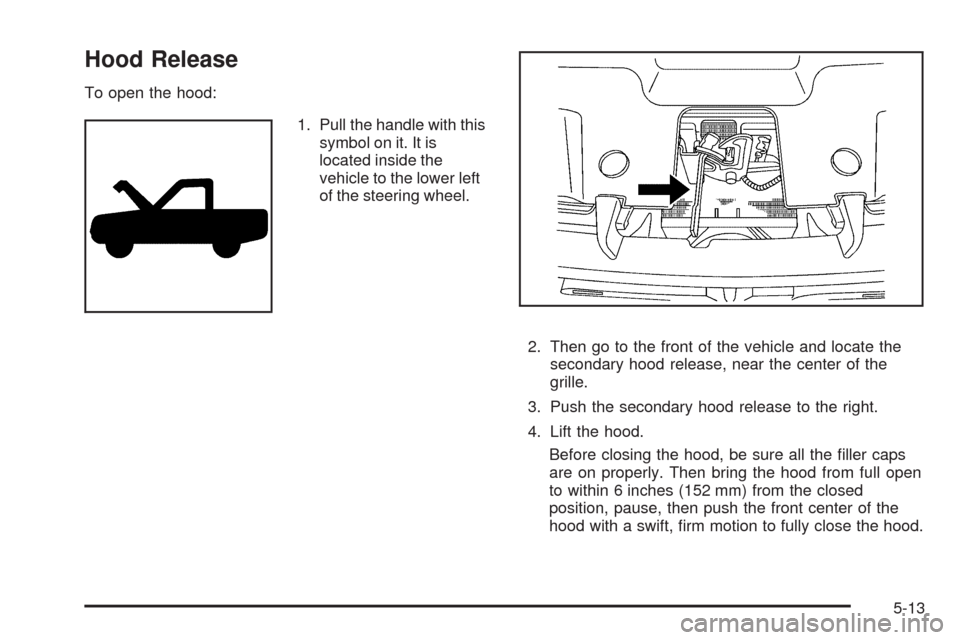
Hood Release
To open the hood:
1. Pull the handle with this
symbol on it. It is
located inside the
vehicle to the lower left
of the steering wheel.
2. Then go to the front of the vehicle and locate the
secondary hood release, near the center of the
grille.
3. Push the secondary hood release to the right.
4. Lift the hood.
Before closing the hood, be sure all the �ller caps
are on properly. Then bring the hood from full open
to within 6 inches (152 mm) from the closed
position, pause, then push the front center of the
hood with a swift, �rm motion to fully close the hood.
5-13
Page 418 of 550
Brake Wear
This vehicle has disc brakes. Disc brake pads have
built-in wear indicators that make a high-pitched warning
sound when the brake pads are worn and new pads
are needed. The sound can come and go or be heard all
the time the vehicle is moving, except when applying
the brake pedal �rmly.
{CAUTION:
The brake wear warning sound means that soon
the brakes will not work well. That could lead to an
accident. When the brake wear warning sound is
heard, have the vehicle serviced.
Notice:Continuing to drive with worn-out brake
pads could result in costly brake repair.
Some driving conditions or climates can cause a brake
squeal when the brakes are �rst applied or lightly
applied. This does not mean something is wrong with
the brakes.Properly torqued wheel nuts are necessary to help
prevent brake pulsation. When tires are rotated, inspect
brake pads for wear and evenly tighten wheel nuts in
the proper sequence to torque speci�cations in
Capacities and Speci�cations on page 5-116.
Brake linings should always be replaced as complete
axle sets.
Brake Pedal Travel
See your dealer/retailer if the brake pedal does not
return to normal height, or if there is a rapid increase in
pedal travel. This could be a sign that brake service
might be required.
Brake Adjustment
Every brake stop, the disc brakes adjust for wear.
5-38
Page 420 of 550
Jump Starting
If the vehicle’s battery (or batteries) has run down, you
may want to use another vehicle and some jumper
cables to start your vehicle. Be sure to use the following
steps to do it safely.
{CAUTION:
Batteries can hurt you. They can be dangerous
because:
They contain acid that can burn you.
They contain gas that can explode or ignite.
They contain enough electricity to burn you.
If you do not follow these steps exactly, some or
all of these things can hurt you.Notice:Ignoring these steps could result in costly
damage to the vehicle that would not be covered
by the warranty.
Trying to start the vehicle by pushing or pulling it
will not work, and it could damage the vehicle.
1. Check the other vehicle. It must have a 12-volt
battery with a negative ground system.
Notice:If the other vehicle’s system is not a 12-volt
system with a negative ground, both vehicles can
be damaged. Only use vehicles with 12-volt systems
with negative grounds to jump start your vehicle.
2. Get the vehicles close enough so the jumper cables
can reach, but be sure the vehicles are not touching
each other. If they are, it could cause a ground
connection you do not want. You would not be able
to start your vehicle, and the bad grounding
could damage the electrical systems.
To avoid the possibility of the vehicles rolling, set
the parking brake �rmly on both vehicles involved in
the jump start procedure. Put the automatic
transmission in P (Park) or a manual transmission
in Neutral before setting the parking brake. If
you have a four-wheel-drive vehicle, be sure the
transfer case is in a drive gear, not in Neutral.
5-40
Page 426 of 550
What to Use
Refer to the Maintenance Schedule to determine what
kind of lubricant to use. SeeRecommended Fluids
and Lubricants on page 6-13.
Four-Wheel Drive
Lubricant checks in this section also apply to these
vehicles. There are two additional systems that need
lubrication.
Transfer Case
When to Check Lubricant
It is not necessary to regularly check transfer case �uid
unless you suspect there is a leak, or you hear an
unusual noise. A �uid loss could indicate a problem.
Have it inspected and repaired.
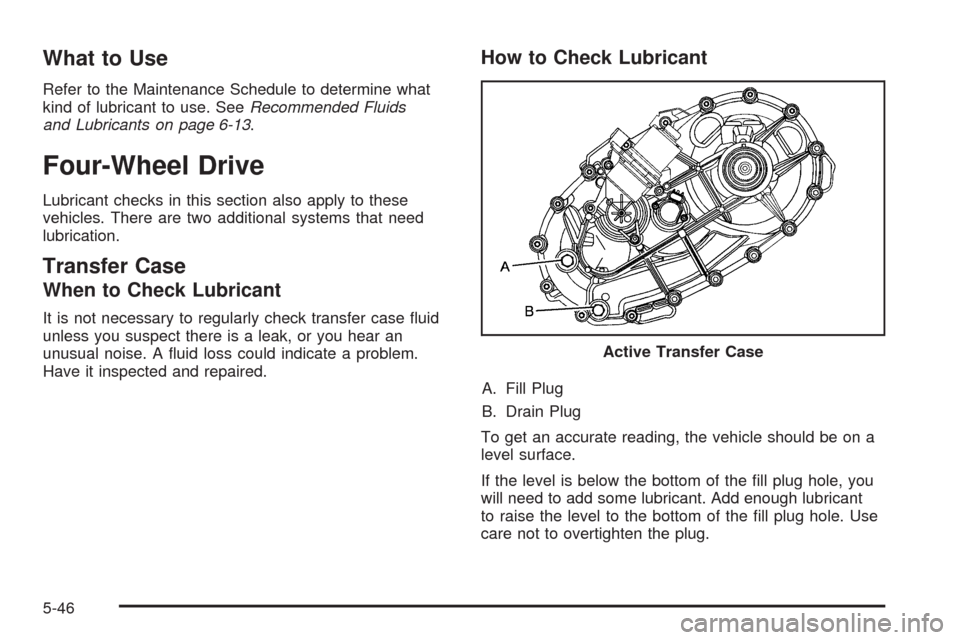
How to Check Lubricant
A. Fill Plug
B. Drain Plug
To get an accurate reading, the vehicle should be on a
level surface.
If the level is below the bottom of the �ll plug hole, you
will need to add some lubricant. Add enough lubricant
to raise the level to the bottom of the �ll plug hole. Use
care not to overtighten the plug.Active Transfer Case
5-46
Page 439 of 550
Tire Size
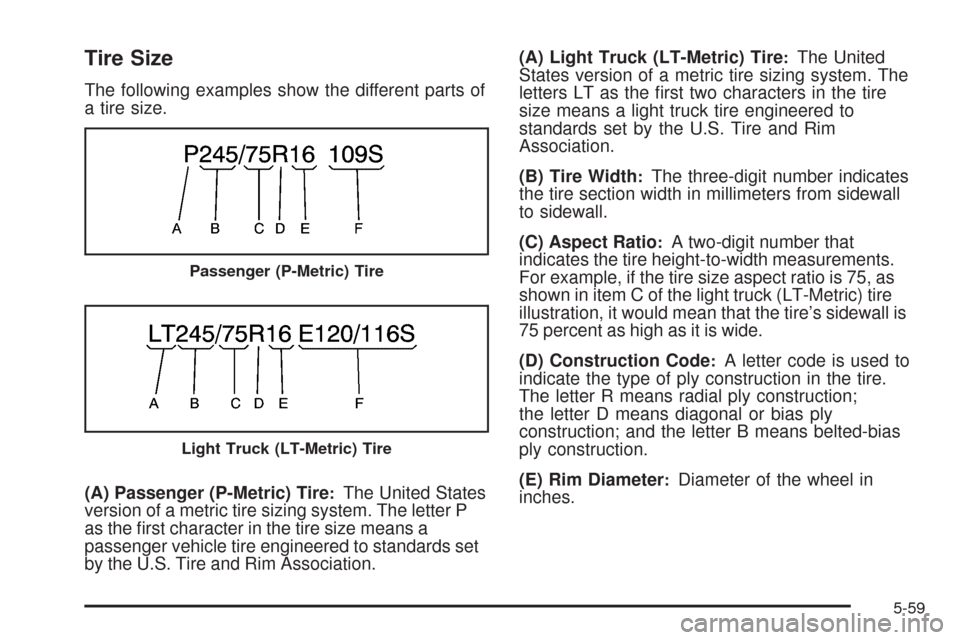
The following examples show the different parts of
a tire size.
(A) Passenger (P-Metric) Tire
:The United States
version of a metric tire sizing system. The letter P
as the �rst character in the tire size means a
passenger vehicle tire engineered to standards set
by the U.S. Tire and Rim Association.(A) Light Truck (LT-Metric) Tire
:The United
States version of a metric tire sizing system. The
letters LT as the �rst two characters in the tire
size means a light truck tire engineered to
standards set by the U.S. Tire and Rim
Association.
(B) Tire Width
:The three-digit number indicates
the tire section width in millimeters from sidewall
to sidewall.
(C) Aspect Ratio
:A two-digit number that
indicates the tire height-to-width measurements.
For example, if the tire size aspect ratio is 75, as
shown in item C of the light truck (LT-Metric) tire
illustration, it would mean that the tire’s sidewall is
75 percent as high as it is wide.
(D) Construction Code
:A letter code is used to
indicate the type of ply construction in the tire.
The letter R means radial ply construction;
the letter D means diagonal or bias ply
construction; and the letter B means belted-bias
ply construction.
(E) Rim Diameter
:Diameter of the wheel in
inches.
Passenger (P-Metric) Tire
Light Truck (LT-Metric) Tire
5-59
Page 445 of 550

Please note that the TPMS is not a substitute for proper
tire maintenance, and it is the driver’s responsibility to
maintain correct tire pressure, even if under-in�ation has
not reached the level to trigger illumination of the
TPMS low tire pressure telltale.
Your vehicle has also been equipped with a TPMS
malfunction indicator to indicate when the system is not
operating properly. The TPMS malfunction indicator
is combined with the low tire pressure telltale. When
the system detects a malfunction, the telltale will
�ash for approximately one minute and then remain
continuously illuminated. This sequence will continue
upon subsequent vehicle start-ups as long as the
malfunction exists.
When the malfunction indicator is illuminated, the
system may not be able to detect or signal low tire
pressure as intended. TPMS malfunctions may occur for
a variety of reasons, including the installation of
replacement or alternate tires or wheels on the vehicle
that prevent the TPMS from functioning properly.
Always check the TPMS malfunction telltale after
replacing one or more tires or wheels on your vehicle to
ensure that the replacement or alternate tires and
wheels allow the TPMS to continue to function properly.
SeeTire Pressure Monitor Operation on page 5-66
for additional information.Federal Communications Commission
(FCC) and Industry and Science
Canada
The Tire Pressure Monitor System (TPMS) operates on
a radio frequency and complies with Part 15 of the
FCC Rules. Operation is subject to the following
two conditions:
1. This device may not cause harmful interference.
2. This device must accept any interference received,
including interference that may cause undesired
operation.
The TPMS operates on a radio frequency and complies
with RSS-210 of Industry and Science Canada.
Operation is subject to the following two conditions:
1. This device may not cause interference.
2. This device must accept any interference received,
including interference that may cause undesired
operation of the device.
Changes or modi�cations to this system by other than
an authorized service facility could void authorization to
use this equipment.
5-65
Page 446 of 550

Tire Pressure Monitor Operation
This vehicle may have a Tire Pressure Monitor System
(TPMS). The TPMS is designed to warn the driver
when a low tire pressure condition exists. TPMS sensors
are mounted onto each tire and wheel assembly,
excluding the spare tire and wheel assembly. The TPMS
sensors monitor the air pressure in the vehicle’s tires
and transmits the tire pressure readings to a receiver
located in the vehicle.
When a low tire pressure
condition is detected, the
TPMS illuminates the
low tire pressure warning
light located on the
instrument panel cluster.
At the same time a message to check the pressure in a
speci�c tire appears on the Driver Information Center
(DIC) display. The low tire pressure warning light
and the DIC warning message come on at each ignition
cycle until the tires are in�ated to the correct in�ation
pressure. Using the DIC, tire pressure levels can
be viewed by the driver. For additional information and
details about the DIC operation and displays see
DIC Operation and Displays (With DIC Buttons) onpage 3-46orDIC Operation and Displays (Without DIC
Buttons) on page 3-52andDIC Warnings and
Messages on page 3-58.
The low tire pressure warning light may come on in cool
weather when the vehicle is �rst started, and then
turn off as you start to drive. This could be an early
indicator that the air pressure in the tire(s) are getting
low and need to be in�ated to the proper pressure.
A Tire and Loading Information label, attached to your
vehicle, shows the size of your vehicle’s original
equipment tires and the correct in�ation pressure for
your vehicle’s tires when they are cold. SeeLoading the
Vehicle on page 4-34, for an example of the Tire and
Loading Information label and its location on your
vehicle. Also seeIn�ation - Tire Pressure on page 5-63.
Your vehicle’s TPMS can warn you about a low tire
pressure condition but it does not replace normal
tire maintenance. SeeTire Inspection and Rotation on
page 5-69andTires on page 5-55.
Notice:Liquid tire sealants could damage the Tire
Pressure Monitor System (TPMS) sensors. Sensor
damage caused by using a tire sealant is not
covered by your warranty. Do not use liquid tire
sealants.
5-66