2009 BMW Z4 SDRIVE35I battery
[x] Cancel search: batteryPage 60 of 248
Driving
58
>
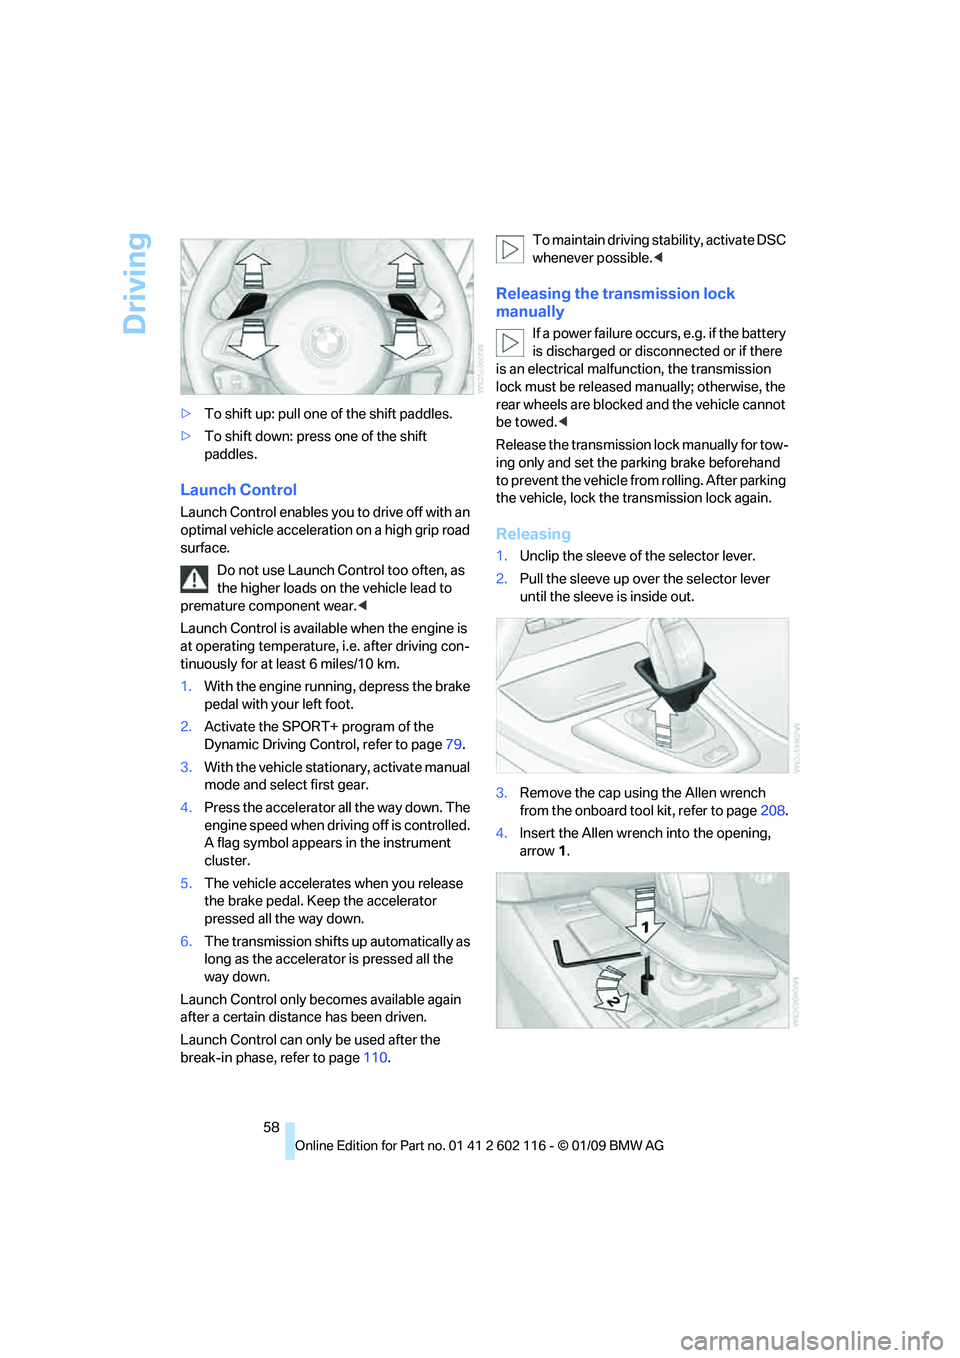
To shift up: pull one of the shift paddles.
> To shift down: press one of the shift
paddles.
Launch Control
Launch Control enables you to drive off with an
optimal vehicle acceleration on a high grip road
surface.
Do not use Launch Control too often, as
the higher loads on the vehicle lead to
premature component wear. <
Launch Control is availa ble when the engine is
at operating temperature, i.e. after driving con-
tinuously for at least 6 miles/10 km.
1. With the engine running, depress the brake
pedal with your left foot.
2. Activate the SPORT+ program of the
Dynamic Driving Control, refer to page 79.
3. With the vehicle stationary, activate manual
mode and select first gear.
4. Press the accelerator all the way down. The
engine speed when driving off is controlled.
A flag symbol appears in the instrument
cluster.
5. The vehicle accelerates when you release
the brake pedal. Keep the accelerator
pressed all the way down.
6. The transmission shifts up automatically as
long as the accelerator is pressed all the
way down.
Launch Control only be comes available again
after a certain distance has been driven.
Launch Control can only be used after the
break-in phase, refer to page 110.To maintain driving stability, activate DSC
whenever possible.
<
Releasing the transmission lock
manually
If a power failure occurs, e.g. if the battery
is discharged or disconnected or if there
is an electrical malfun ction, the transmission
lock must be released manually; otherwise, the
rear wheels are blocked and the vehicle cannot
be towed. <
Release the transmission lock manually for tow-
ing only and set the parking brake beforehand
to prevent the vehicle from rolling. After parking
the vehicle, lock the transmission lock again.
Releasing
1. Unclip the sleeve of the selector lever.
2. Pull the sleeve up over the selector lever
until the sleeve is inside out.
3. Remove the cap using the Allen wrench
from the onboard tool kit, refer to page 208.
4. Insert the Allen wrench into the opening,
arrow 1.
Page 92 of 248

Lamps
90
High beams/roadside parking
lamps
1High beams
2 Headlamp flasher
3 Roadside parking lamps
*
Roadside parking lamps, left or right*
There is an additional option of switching on the
lamps on the side of the car facing the road
when parked.
Switching on
After parking the vehicle, press the lever up or
down beyond the pressu re point for a longer
period, arrow 3.
The roadside parking lamps drain the bat-
tery. Therefore, do not leave them on for
unduly long periods of time, otherwise the bat-
tery might not have enou gh power to start the
engine. <
Switching off
Press the lever in the opposite direction to the
pressure point, arrow 3.
Instrument lighting
You can adjust the brightness of the instrument
lighting only when the parking lamps or the low
beams are switched on. 1.
Press button 1 up or down repeatedly until
the appropriate symbol appears in the dis-
play, accompanied by the brightness set-
ting and scale the word "SET".
2. Press button 2.
3. Press button 1 up or down to select the
desired brightness level.
4. Press button 2.
The display again shows the outside tem-
perature and the time.
Interior lamps
The interior lamps, footwell lamps*, entry
lamps
*, cargo bay lamp and courtesy lamps*
are controlled automatically.
The LEDs for the courtesy lamps
are set in the
door handles and illuminate the ground in front
of the doors.
To avoid draining the battery, all lamps
inside the car are switched off about
8 minutes after the ignition is switched off, refer
to Start/stop button on page 50.<
Page 95 of 248
Controls
93Reference
At a glance
Driving tips
Communications
Navigation
Entertainment
Mobility
Air conditioning system
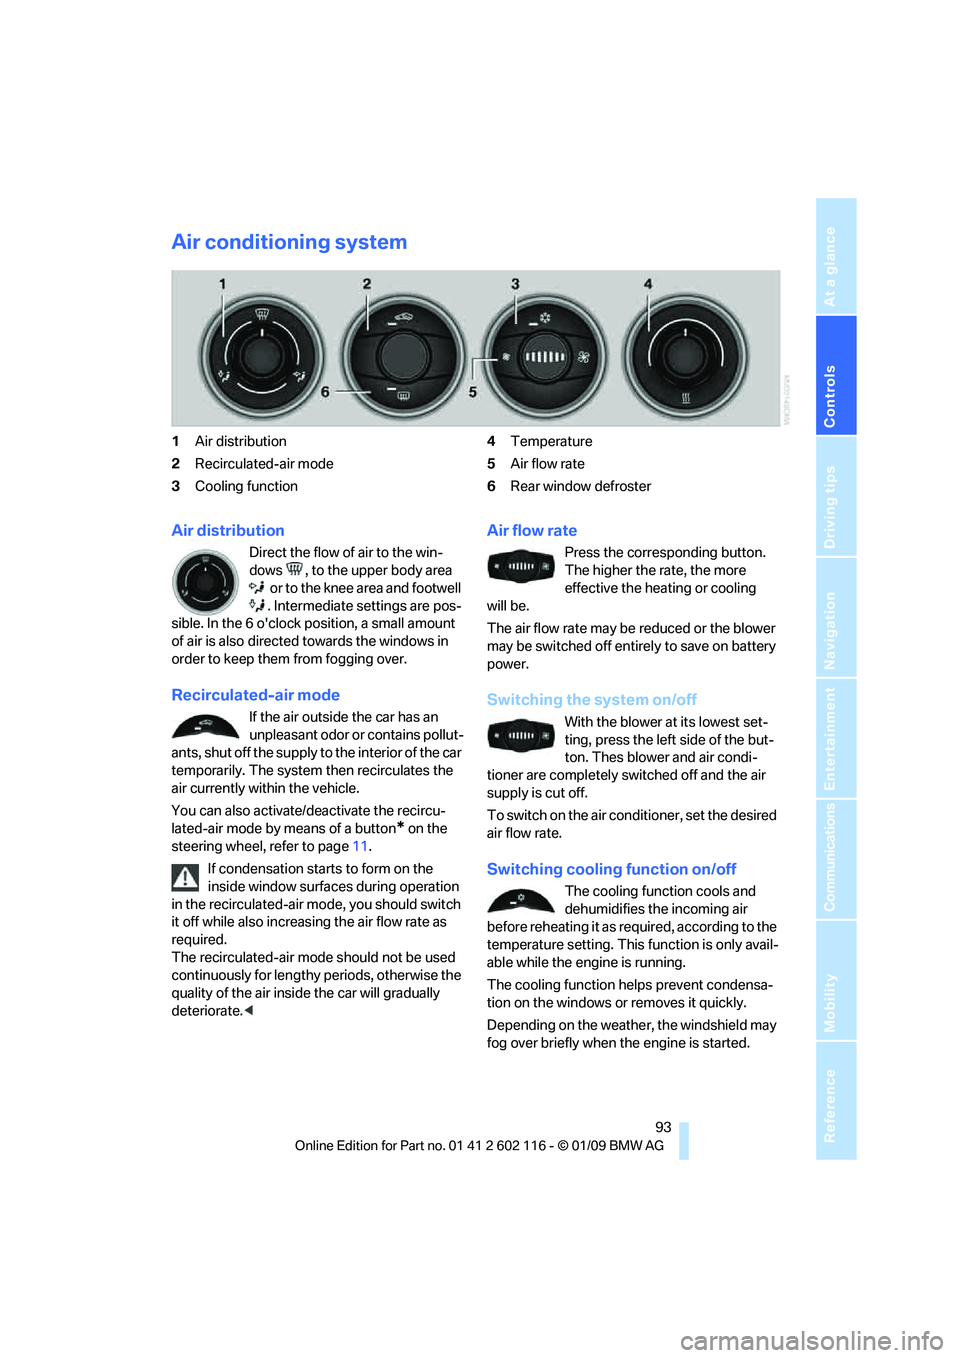
1Air distribution
2 Recirculated-air mode
3 Cooling function 4
Temperature
5 Air flow rate
6 Rear window defroster
Air distribution
Direct the flow of air to the win-
dows , to the upper body area
or to the knee area and footwell
. Intermediate settings are pos-
sible. In the 6 o'clock position, a small amount
of air is also directed towards the windows in
order to keep them from fogging over.
Recirculated-air mode
If the air outside the car has an
unpleasant odor or contains pollut-
ants, shut off the supply to the interior of the car
temporarily. The system then recirculates the
air currently within the vehicle.
You can also activate/d eactivate the recircu-
lated-air mode by means of a button
* on the
steering wheel, refer to page 11.
If condensation starts to form on the
inside window surfaces during operation
in the recirculated-air mode, you should switch
it off while also increasing the air flow rate as
required.
The recirculated-air mode should not be used
continuously for lengthy periods, otherwise the
quality of the air inside the car will gradually
deteriorate. <
Air flow rate
Press the corresponding button.
The higher the rate, the more
effective the heating or cooling
will be.
The air flow rate may be reduced or the blower
may be switched off entire ly to save on battery
power.
Switching the system on/off
With the blower at its lowest set-
ting, press the left side of the but-
ton. Thes blower and air condi-
tioner are completely switched off and the air
supply is cut off.
To switch on the air cond itioner, set the desired
air flow rate.
Switching cooling function on/off
The cooling function cools and
dehumidifies the incoming air
before reheating it as re quired, according to the
temperature setting. This function is only avail-
able while the engine is running.
The cooling function helps prevent condensa-
tion on the windows or removes it quickly.
Depending on the weathe r, the windshield may
fog over briefly when the engine is started.
Page 98 of 248
Climate
96
Switching the cooling function
on and off
The cooling function cools and
dehumidifies the incoming air
before reheating it as required,
according to the temperature set-
ting. This function is only available while the
engine is running.
The cooling function he lps prevent condensa-
tion on the windows or removes it quickly.
Depending on the weathe r, the windshield may
fog over briefly when the engine is started.
The cooling function is automatically switched
on along with the AUTO program.
Maximum cooling
Maximum cooling is achieved most
quickly at outside temperatures
above 32 7/06 and when the
engine is running.
The automatic climate control goes into recir-
culated-air mode at the lowest temperature. Air
flows at maximum rate from the vents for the
upper body area. You should therefore open the
vents for maximum cooling.
AUTO program
The AUTO program auto matically adjusts the
air distribution to the windshield and side win-
dows, towards the upper bo dy area, and into the
footwell and knee area.
The air flow rate and air distribution, in addition
to your temperature specifications, will be
adapted to outside influenc es as a result of sea-
sonal changes, e.g. sunlight or window conden-
sation.
The cooling is switched on automatically with
the AUTO program.
Switching on/off
Press the button.
Manual air distribution and air flow rate are acti-
vated when the AUTO program is deactivated.
AUTO program climate level
The climate levels can be used to vary the inten-
sity when the AUTO program is switched on.
For example, air flow is adjusted automatically
to optimize climate control.
When the AUTO program is
switched on, you ca n select the cli-
mate level of the AUTO program
using the buttons for controlling the manual air
flow rate.
The selected climate le vel is displayed by
an LED.
Convertible program
When the hardtop is open, the convertible pro-
gram is activated as well. In the convertible pro-
gram, the automatic climate control is opti-
mized for driving with the hardtop open. In
addition, the air flow rate is increased as vehicle
speed increases.
The effectiveness of the convertible pro-
gram can be enhanced considerably by
installing the wind deflector. <
Adjusting air flow rate manually
Press the left side of the button to
reduce air flow. Press the right side
of the button to increase it.
The air flow rate may be reduced to save battery
power. The display remains the same.
Switching the system on/off
With the blower at its lowest setting, press the
left side of the button to switch off the auto-
matic climate control. All displays are cleared
except for the rear window defroster if it is
switched on.
Press any button except the rear window
defroster to reactivate the automatic climate
control.
Residual heat
T h e h e a t s t o r e d i n t h e e n g i n e i s u s e d t o h e a t t h e
passenger compartment, e.g. while stopped at
a school to pick up a child.
Page 99 of 248

Controls
97Reference
At a glance
Driving tips
Communications
Navigation
Entertainment
Mobility
This function can be switched on
using the right button under the
following conditions:
> Up to 15 minutes after the engine has been
switched off
> Radio readiness is switched on.
> While the engine is at operating
temperature
> As long as battery voltage is sufficient
> At an outside temperature below
777/25 6
The middle LED is lit when the function is on.
Automatic recirculated-air control
AUC/recirculated-air mode
Switch on the desired operating
mode by pressing this button
repeatedly:
> LED off: outside air flows in continuously.
> Left-hand LED on, AUC mode: a sensor
detects pollutants in th e outside air. If nec-
essary, the system blocks the supply of out-
side air and recirculates the inside air. As
soon as the concentration of pollutants in
the outside air has decreased sufficiently,
the system automatically switches back to
outside air supply.
> Right-hand LED on, recirculated-air mode:
the supply of outside air is permanently
shut off. The system then recirculates the
air currently within the vehicle.
If condensation starts to form on the
inside window surfaces during operation
in the recirculated-air mode, you should switch
it off while also increasing the air flow rate as
required.
The recirculated-air mode should not be used
over an extended period of time, otherwise the
air quality inside the ca r will deteriorate contin-
uously. <
Defrosting windows and removing
condensation
Quickly removes ice and conden-
sation from the windshield and
front side windows.
Switch on the cooling function as well.
Rear window defroster
The defroster switches off auto-
matically after a certain time or
when the hardtop is opened.
Ventilation
1 Lever for changing the direction of the
air flow.
2 Knurled wheels for opening and closing the
air vents.
3 Knurled wheel for adju sting the amount of
cool air from the vents to the upper body
area. In this way you can optimize the air
temperature for the upper body area.
Ventilation for cooling
Adjust the vent outlets to direct the flow of cool
air in your direction, for instance if it has become
too hot in the car.
Draft-free ventilation
Set the vent outlets so that the air flows past
you and not straight at you.
Microfilter/activated-charcoal filter
The microfilter traps dust and pollen in the
incoming air. The activated-charcoal filter pro-
vides additional protection by filtering gaseous
pollutants from the outs ide air. Your BMW cen-
ter replaces this combined filter during routine
maintenance.
Page 166 of 248
Telephone
164
Telephone
The concept
Your BMW is equipped with a full preparation
package mobile phone.After pairing a suitable
mobile phone with the vehicle once, you can
operate the mobile phone via the iDrive, the
buttons on the steering wheel or using voice
commands
*.
Once a mobile phone has been paired with your
vehicle, it is automatically recognized as soon
as it is inside the vehicl e while the engine is run-
ning or the ignition is switched on. You can
store the pairing data for up to four mobile
phones simultaneously . If several mobile
phones are detected at the same time, the
mobile phone last paired can be operated via
the vehicle.
Using the telephone inside
the vehicle
Using the snap-in adapter*
The so-called snap-in adapter, a holder for
mobile phones, allows you to charge the mobile
phone's battery and connect the mobile phone
to your vehicle's outside antenna. This ensures
better network reception and consistent repro-
duction quality. Please contact your
BMW center to find ou t for which mobile
phones there are snap-in adapters available.
For your safety
A car phone makes life more convenient in
many ways, and can even save lives in an emer-
gency. While you should consult your mobile
phone's separate operating instructions for a
detailed description of safety precautions and
information, we request that you direct your
particular attention to the following:
Only make entries when the traffic situa-
tion allows you to do so. Do not hold the
mobile phone in your hand while you are driving;
use the hands-free system instead. If you do not observe this precau
tion, your being dis-
tracted can endanger vehicle occupants and
other road users. <
Suitable mobile phones
Please ask your BMW center which mobile
phones with Bluetooth interface are supported
by the mobile phone pr eparation package and
which mobile phones are compatible with the
snap-in adapter. By virtue of their particular
software versions, thes e mobile phones sup-
port the functions described in this Owner's
Manual. Malfunctions may occur with other
mobile phones.
Operating options
You can operate the mobile phone* using:
> Buttons on the steering wheel, refer to
page 10
> iDrive, refer to page 16
> Voice commands
*, refer to page 172
> Programmable memory keys, refer to
page 21
Avoid operating a mobile phone recognized by
the vehicle via the mobile phone's keypad, oth-
erwise malfunctions may result.
Start-up
Pairing the mobile phone with the
vehicle
The following prerequisites must be met:
> Compatible mobile phone: The mobile
phone is supported by the full preparation
package mobile phone. You can obtain
information on the Internet at:
www.bmw.com/bluetooth
> The mobile phone is ready to operate.
*
Page 177 of 248
175
Entertainment
Reference
At a glance
Controls
Driving tips
Communications
Navigation
Mobility
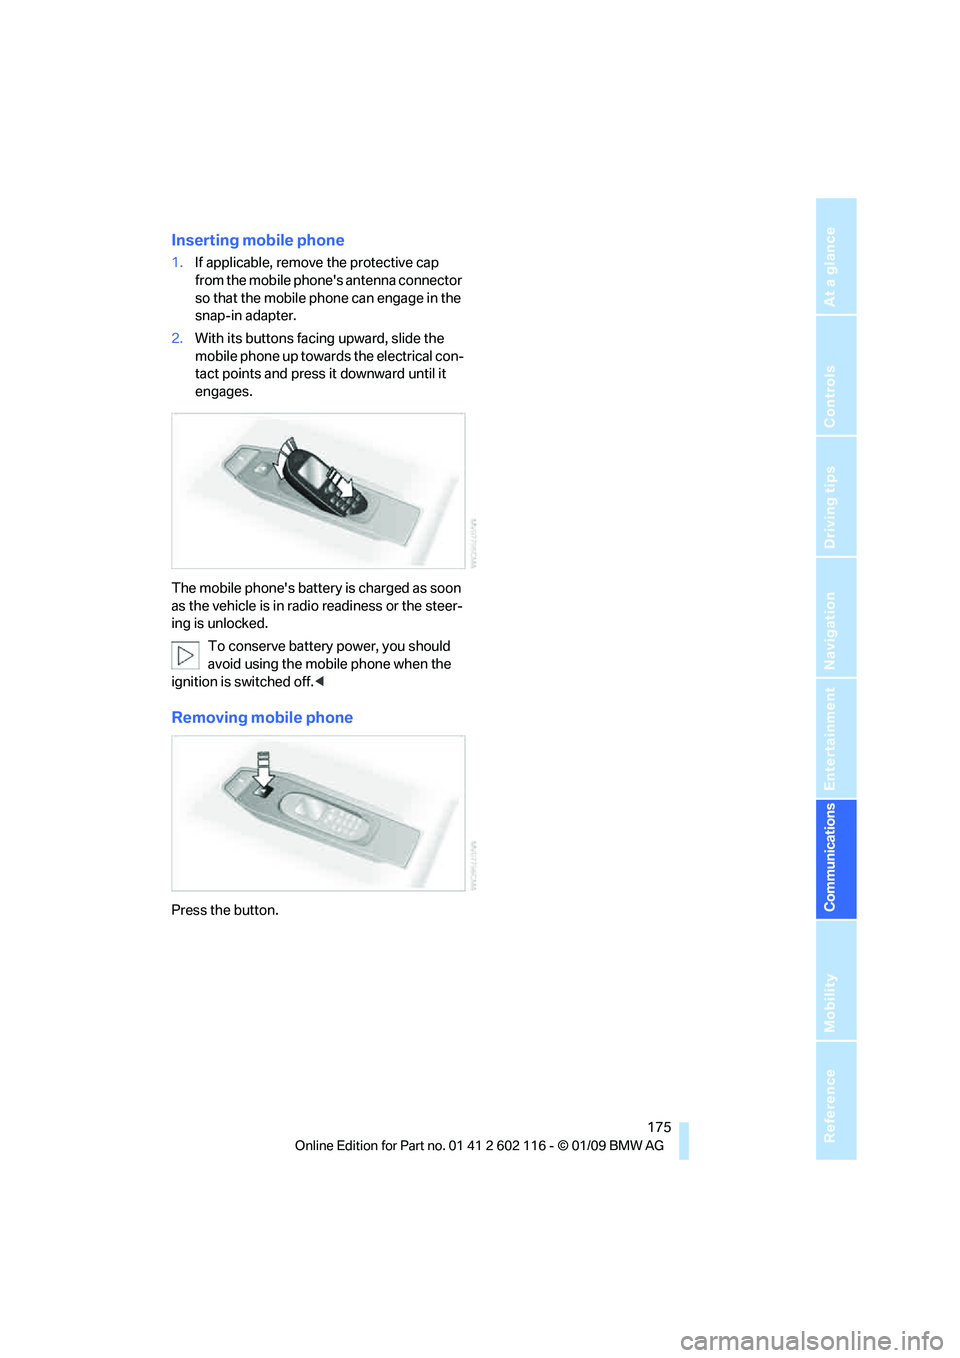
Inserting mobile phone
1. If applicable, remove the protective cap
from the mobile phone's antenna connector
so that the mobile phone can engage in the
snap-in adapter.
2. With its buttons facing upward, slide the
mobile phone up towards the electrical con-
tact points and press it downward until it
engages.
The mobile phone's battery is charged as soon
as the vehicle is in radi o readiness or the steer-
ing is unlocked.
To conserve battery power, you should
avoid using the mobile phone when the
ignition is switched off.<
Removing mobile phone
Press the button.
Page 214 of 248

Replacing components
212
Vehicle battery
Battery care
The battery is 100 % maintenance-free, the
electrolyte will last for the life of the battery
when the vehicle is operated in a temperate cli-
mate. Your BMW center will be glad to advise in
all matters concerning the battery.
Charging the battery
Only charge the battery in the vehicle via the
terminals in the engine compartment with the
engine off. Connections, refer to Jump starting
on page 214.
Disposal
Have old batteries disposed of by your
BMW center or hand them in to a recy-
cling center. Maintain th e battery in an upright
position for transport and storage. Always
secure the battery agains t tipping over during
transport. <
Power failure
After a temporary power lo ss, the functioning of
some equipment may be limited and require
reinitialization. Individual settings may likewise
have been lost and will have to be programmed:
> Time and date
These values must be updated, refer to
page 71.
> Radio
In some cases, statio ns may have to be
stored again, refer to page 142.
> Navigation system
Operability must be waited for, refer to
page 118.
> Seat and mirror memory
The positions must be stored again, refer to
page 43.
> Inside rearview mirror with digital compass
The system must be calibrated, refer to
page 101.
Fuses
Never attempt to repa ir a blown fuse and
do not replace a defective fuse with a sub-
stitute of another color or amperage rating, oth-
erwise this could lead to a circuit overload, ulti-
mately resulting in a fire in the vehicle. <
1. Remove the screws 1 using the screwdriver
from the onboard tool kit.
2. Remove the cover 2, unwinding the cable to
the footwell lamp
*, if necessary.
3. Release the shiny fastener 3.
4. Fold the current distributor 4 downward
and pull forward.
Spare fuses and a pair of plastic forceps are set
in holders on the distributor box.
See the inside of the cover for information on
fuse assignment.
The cover is reinsta lled in reverse order.