2009 BMW Z4 SDRIVE35I driving
[x] Cancel search: drivingPage 206 of 248

Care
204
Care
Care products
Regular cleaning and care contributes signifi-
cantly to the value retention of your BMW.
BMW recommends cleaning and caring for your
vehicle with products that are approved by
BMW for this purpose.
Your BMW center will be happy to advise you on
the products and services available for cleaning
and caring for your BMW.
Original BMW CareProducts have been
material tested, labo ratory checked and
proven in the field, and offer optimal care and
protection for your vehicle. <
Do not use cleaners that contain alcohol
or solvents as these may result in
damage. <
Cleaning agents can contain substances
that are dangerous or hazardous to your
health. Therefore, follow the warning and safety
instructions on the packaging. When cleaning
inside the vehicle, always open the doors or
windows of the vehicle. In enclosed areas, pro-
vide for sufficient ventilation. Only use products
designed for cleaning vehicles. <
Exterior care
Washing the vehicle
Especially during the winter months,
ensure that the vehicle is washed more
frequently. Heavy soiling and road salt can lead
to vehicle damage. <
After washing the vehicle, apply the
brakes briefly to dry them, otherwise
water can reduce braking efficiency over the
short term and brake discs can corrode. <
Automatic car washes
Preference should be given to cloth car washes.
Do not use high-pressure car washes,
otherwise water may drip into the vehicle
around the windows. <
Before driving into a car wash, ensure that it is
suitable for your BMW. Check the following:
> Dimensions of your vehicle, refer to
page 221.
> If necessary: fold in the exterior mirrors,
refer to page 45.
> Maximum permissible tire width.
Avoid car washes with guide rail heights
over 4 in/10 cm, otherwise there is danger
of damaging chassis parts. <
Preparations before driv ing into an automatic
car wash:
> Unscrew the rod antenna
*
>Deactivate the rain sensor* to avoid unin-
tentional activation of the wipers.
> Remove additional attachments, e.g.
spoiler or telephone an tennas, if there is a
possibility that they could be damaged.
Automatic transmission
Before driving into an automatic car wash, per-
form the following steps to ensure that the vehi-
cle can roll:
1. Insert the remote cont rol, even with conve-
nient access, into the ignition lock.
2. Move the selector lever to position N.
3. Release the parking brake.
4. Switch off the engine.
5. Leave the remote control in the ignition lock
so that the vehicle can roll.
Page 207 of 248

Mobility
205Reference
At a glance
Controls
Driving tips
Communications
Navigation
Entertainment
7-gear sport automatic transmission
with dual clutch
Before driving into an automatic car wash, per-
form the following steps to ensure that the vehi-
cle can roll:
1. Insert the remote control, even with conve-
nient access, into the ignition lock.
2. Engage transmission position N.
3. Release the parking brake.
4. Switch off the engine.
5. Leave the remote control in the ignition lock
so that the vehicle can roll.
Transmission position P is engaged:
> Automatically after approx. 30 minutes
> When you take the remo te control out of the
ignition lock
Steam jets / high -pressure washers
When using steam jets or high-pressure
washers, ensure that you maintain suffi-
cient clearance to the vehicle and do not exceed
a temperature of 60°C.
Insufficient clearance or excessive pressure or
temperature can lead to component damage or
water penetration. Follow the operating instruc-
tions of the high-pressure washer. <
When using high-pressure washers, do
not spray against the seals of the retract-
able hardtop, the sensor s and the cameras, e.g.
of the Park Distance Control or Rear View Cam-
era, for an extended period and maintain a dis-
tance of at least 12 in/30 cm. <
Manual car wash
When washing the vehicle by hand, use large
quantities of water and car shampoo if neces-
sary. Clean the vehicle with a sponge or wash-
ing brush, applying light pressure only.
Before cleaning the windshield, deacti-
vate the rain sensor or switch off the igni-
tion to prevent unintent ional activation of the
wipers. <
Observe local regulations pertaining to
washing vehicles by hand. <
Headlamps
Do not rub them dry and do not use abrasive or
corrosive cleaning agents.
Remove contamination, such as insects, by
soaking with shampoo or insect remover and
then rinsing with plenty of water.
Thaw ice with a windshield de-icer and do not
use an ice scraper.
Windows
Clean the inside and outside surfaces of the
windows and the mirrors with window cleaner.
Do not clean the mirrors with cleaners
containing quartz. <
Retractable hardtop
Proceed as you would in a normal car wash.
When you open a we t hardtop, water
drops may run into the cargo bay. If nec-
essary, remove items from the cargo bay
beforehand to avoid water stains or soiling. <
Paintwork care
Regular care contributes to value retention and
protects the paintwork against the long-term
effects of damaging substances.
Region-specific environmental influences can
damage the vehicle paintwork. Therefore, it is
important to adapt the frequency and scope of
car care accordingly.
Immediately remove aggressive materials such
as spilled fuel, oil, grease, brake fluid, tree sap or
bird droppings to prevent damage to the
paintwork.
Repairing paintwork damage
Immediately repair scratches or similar
damage, such as that caused by stones
hitting the vehicle, wher e necessary to prevent
rusting. <
BMW recommends having paintwork damage
repaired by a profession al paint repair work-
shop according to BMW specifications using
original BMW paint materials.
Page 209 of 248

Mobility
207Reference
At a glance
Controls
Driving tips
Communications
Navigation
Entertainment
Interior plastic parts
>Imitation leather surfaces
> Lamp glasses
> Display pane of instrument cluster
> Matt parts
Clean with water and solvent-free plastic
cleaner if necessary.
Fine wood parts
Clean fine wood trim and fine wood parts with a
damp cloth. Wipe dry with a soft cloth.
Safety belts
Dirty belt straps impede the reeling action and
thus have a negative impact on safety.
Do not clean with cleaning agents as
these may destroy the fabric. <
Use only a mild soapy solution, with the safety
belts clipped into their buckles. Do not allow the
reels to retract the safety belts until they are dry.
Interior sensors / cameras
To clean interior sensors and cameras, e.g. of
the High-Beam Assistant, use a lint-free cloth
moistened with glass cleaner.
Displays
To clean the displays, e.g. of the radio or instru-
ment cluster, use a display cleaning cloth or a
soft, non-abrasive, lint-free cloth.
Avoid applying excessive pressure when
cleaning the displays, otherwise damage
may occur. <
Do not use chemical or abrasive house-
hold cleaning agents. Keep all types of
fluid away from the device. Otherwise, surfaces
or electrical components may be corroded or
damaged. <
CD/DVD drives
Do not use a cleaning CD, as it may dam-
age parts of the drive. <
Vehicle storage
If your vehicle is to be decommissioned for
longer than three months, your BMW center or
a workshop that operates according to BMW
specifications will be glad to advise you.
Page 211 of 248

Mobility
209Reference
At a glance
Controls
Driving tips
Communications
Navigation
Entertainment
Xenon lamps
Have any work on the xenon lamp system,
including bulb replacements, performed
only by a BMW center or a workshop that works
according to BMW repair procedures with cor-
respondingly trained pers onnel. Otherwise, if
such work is carried out improperly, the high
voltage in the system presents the danger of
fatal injuries. <
Parking lamps and roadside parking
lamps, daytime running lamps
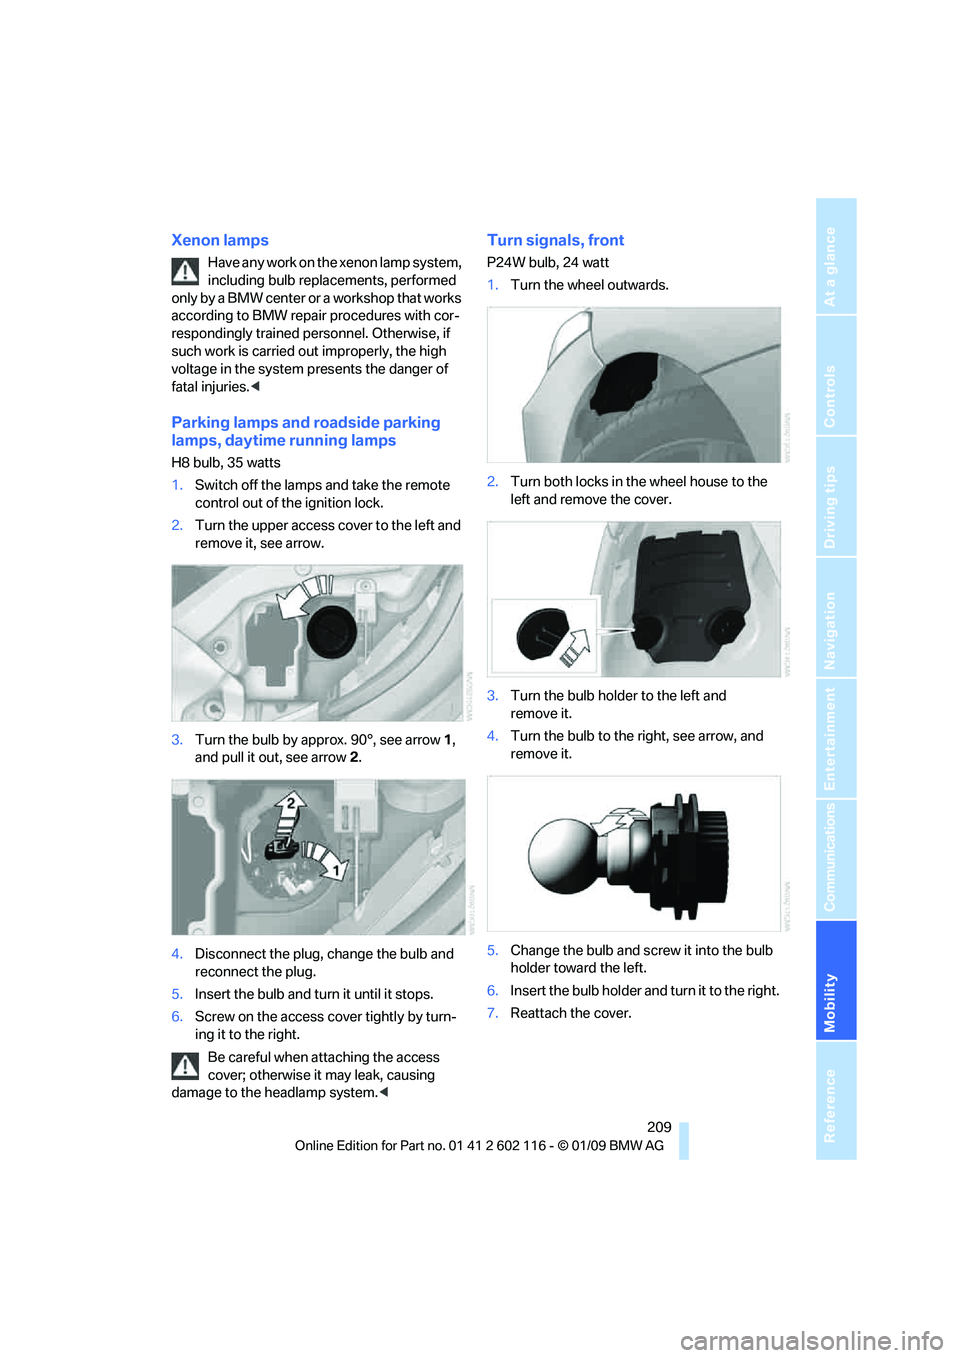
H8 bulb, 35 watts
1.Switch off the lamps and take the remote
control out of the ignition lock.
2. Turn the upper access cover to the left and
remove it, see arrow.
3. Turn the bulb by approx. 90°, see arrow 1,
and pull it out, see arrow 2.
4. Disconnect the plug, change the bulb and
reconnect the plug.
5. Insert the bulb and turn it until it stops.
6. Screw on the access co ver tightly by turn-
ing it to the right.
Be careful when attaching the access
cover; otherwise it may leak, causing
damage to the headlamp system. <
Turn signals, front
P24W bulb, 24 watt
1.Turn the wheel outwards.
2. Turn both locks in the wheel house to the
left and remove the cover.
3. Turn the bulb holder to the left and
remove it.
4. Turn the bulb to the right, see arrow, and
remove it.
5. Change the bulb and screw it into the bulb
holder toward the left.
6. Insert the bulb holder and turn it to the right.
7. Reattach the cover.
Page 213 of 248

Mobility
211Reference
At a glance
Controls
Driving tips
Communications
Navigation
Entertainment
2.Pull out the bulb holder, see arrow, and
change the bulb.
3. Attach the bulb holder.
4. Reattach the cover.
License plate lamp, rear lamp, center
brake lamp and turn signal
These lamps use LED technology for operation.
In the event of a malfunction, please contact
your BMW center or a workshop that works
according to BMW repair procedures with cor-
respondingly trained personnel.
Changing wheels
Your BMW is equipped with Run-Flat Tires as
standard. This removes the need to change a
wheel immediately in the event of a puncture.
For information on continuing to drive with a
damaged tire, refer to Indica tion of a flat tire on
page 81.
The symbol identifying Run-Flat Tires is a circle
with the letters RSC on the sidewall, refer to
Run-Flat Tires, page 195.
When mounting new tires or changing over
from summer to winter tires and vice versa,
mount Run-Flat Tires for your own safety. In the
event of a flat, no spare wheel is available. Your
BMW center will be glad to advise you. Refer
also to New wheels and tires, page 195.
The tools for changing wheels are avail-
able as optional accessories from your
BMW center. <
Jack mounting points
The jacking points are at the positions shown in
the illustration.
Lug bolt lock*
1Lug bolt for adapter
2 Adapter, in onboard tool kit
Removing the wind deflector
1.Remove the adapter 2 from the onboard
tool kit and insert it in the lug bolt.
2. Unscrew the lug bolt 1.
Remove the adapter after screwing the lug bolt
back on.
The code number is stamped on the front of the
adapter. Please note down this number and
keep it in a safe place in case the adapter should
get lost.
Page 215 of 248

Mobility
213Reference
At a glance
Controls
Driving tips
Communications
Navigation
Entertainment
Giving and receiving assistance
Emergency Request*
Conditions for an Emergency Request:
>BMW Assist is activated. Activating
BMW Assist, refer to page 180.
> Radio readiness is on.
> The BMW Assist system is logged on to a
wireless network.
> The Emergency Request system is
operable.
> Equipment version with full preparation
package mobile phone. This equipment
makes it possible to send an Emergency
Request even if no mobile phone is paired
with the vehicle.
Once your service contract for BMW Assist
expires, the BMW Assist system can be deacti-
vated by a BMW center without you having to
visit a workshop. Once the BMW Assist system
has been deactivated, Emergency Requests
are not possible. The BMW Assist system can
be reactivated by a BMW center after a new
contract has been signed.
Sending an Emergency Request
1. Briefly press the cover flap to open.
2. Press the SOS button until the LED in the
button lights up.
As soon as the voice connection to the BMW
Assist Response Center has been established,
the LED flashes.
Once the BMW Assist Response Center has
received your Emergency Request, the BMW Assist Response Center contacts you
and takes further steps to help you. Even if you
are unable to respond, the BMW Assist
Response Center will be ab
le to initiate further
steps to assist you under certain conditions.
If the circumstances allo w this, remain in the
vehicle until the connection has been estab-
lished. You will then be able to provide a
detailed description of the situation.
In a BMW Assist Emerge ncy Request, data for
determining the necessary rescue measures
are transmitted to the BMW Assist Response
Center, e.g. the current po sition of your vehicle,
if it can be determined.
If the LED is flashing but the BMW Assist
Response Center cannot be heard over the
hands-free system, it is possible that the
hands-free system is malfunctioning. You may
still be heard by the BMW Assist Response
Center, however.
Under certain conditions, an Emergency
Request is sent automati cally immediately after
a severe accident. Th is Automatic Collision
Notification is not affected by the button being
pressed.
For technical reasons, the Emergency
Request service cannot be guaranteed
for the most unfavorable conditions. <
Roadside Assistance
The BMW Roadside Assistance is there to
assist you around the clock in the event of a
breakdown, including on weekends and public
holidays.
The phone numbers of the Roadside Assis-
tance in your home country can be found in the
Contact brochure.
In vehicles equipped with BMW Assist, you can
establish contact with BMW Roadside Assis-
tance for breakdown assistance directly via
iDrive, refer to page184.
Page 217 of 248

Mobility
215Reference
At a glance
Controls
Driving tips
Communications
Navigation
Entertainment
4.Attach one terminal clamp of the minus/–
jumper cable to the nega tive terminal of the
battery or to an engine or body ground of
the assisting vehicle.
Your BMW has a special nut as body ground
or negative pole.
5. Attach the second te rminal clamp of the
minus/– jumper cable to the negative termi-
nal of the battery or to the engine or body
ground of the vehicle to be started.
Starting the engine
1. Start the engine of the donor vehicle and
allow it to run for a few minutes at slightly
increased idle speed.
2. Start the engine on the other vehicle in the
usual way.
If the first start attempt is not successful,
wait a few minutes be fore another attempt
in order to allow the discharged battery to
recharge.
3. Let the engines run for a few minutes.
4. Disconnect the jumper cables by reversing
the above connecting sequence.
If necessary, have the battery checked and
recharged.
Never use spray fluids to start the
engine. <
Tow-starting, towing away
Observe the applicable laws and regula-
tions for tow-starting and towing
vehicles. <
Do not transport any passengers other
than the driver in a vehicle that is being
towed. <
Using a tow fitting
The screw-in tow fitting must always be carried
in the car. It can be sc rewed in at the front or
rear of the BMW.
It is stored in the onboard tool kit underneath
the floor panel in the cargo bay, refer to
page 208.
Use only the towing eyelet supplied with
the vehicle and screw it in firmly until it
stops. Use the tow fitting for towing on paved
roads only. Avoid lateral loading of the tow fit-
ting, e.g. do not lift the vehicle by the tow fitting.
Otherwise the tow fitting and the vehicle could
be damaged. <
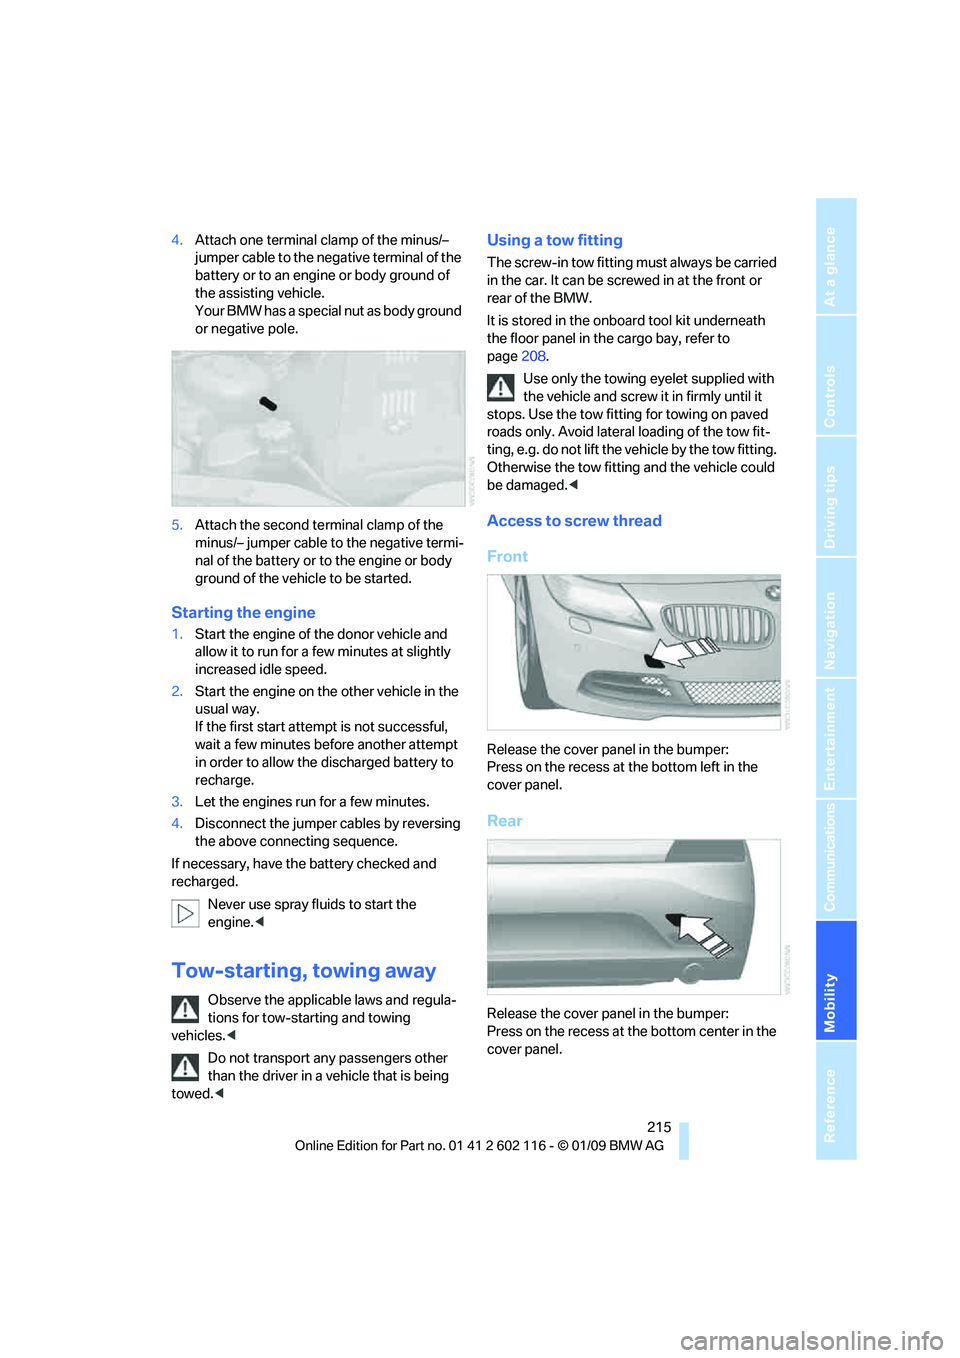
Access to screw thread
Front
Release the cover panel in the bumper:
Press on the recess at the bottom left in the
cover panel.
Rear
Release the cover panel in the bumper:
Press on the recess at the bottom center in the
cover panel.
Page 219 of 248

Mobility
217Reference
At a glance
Controls
Driving tips
Communications
Navigation
Entertainment
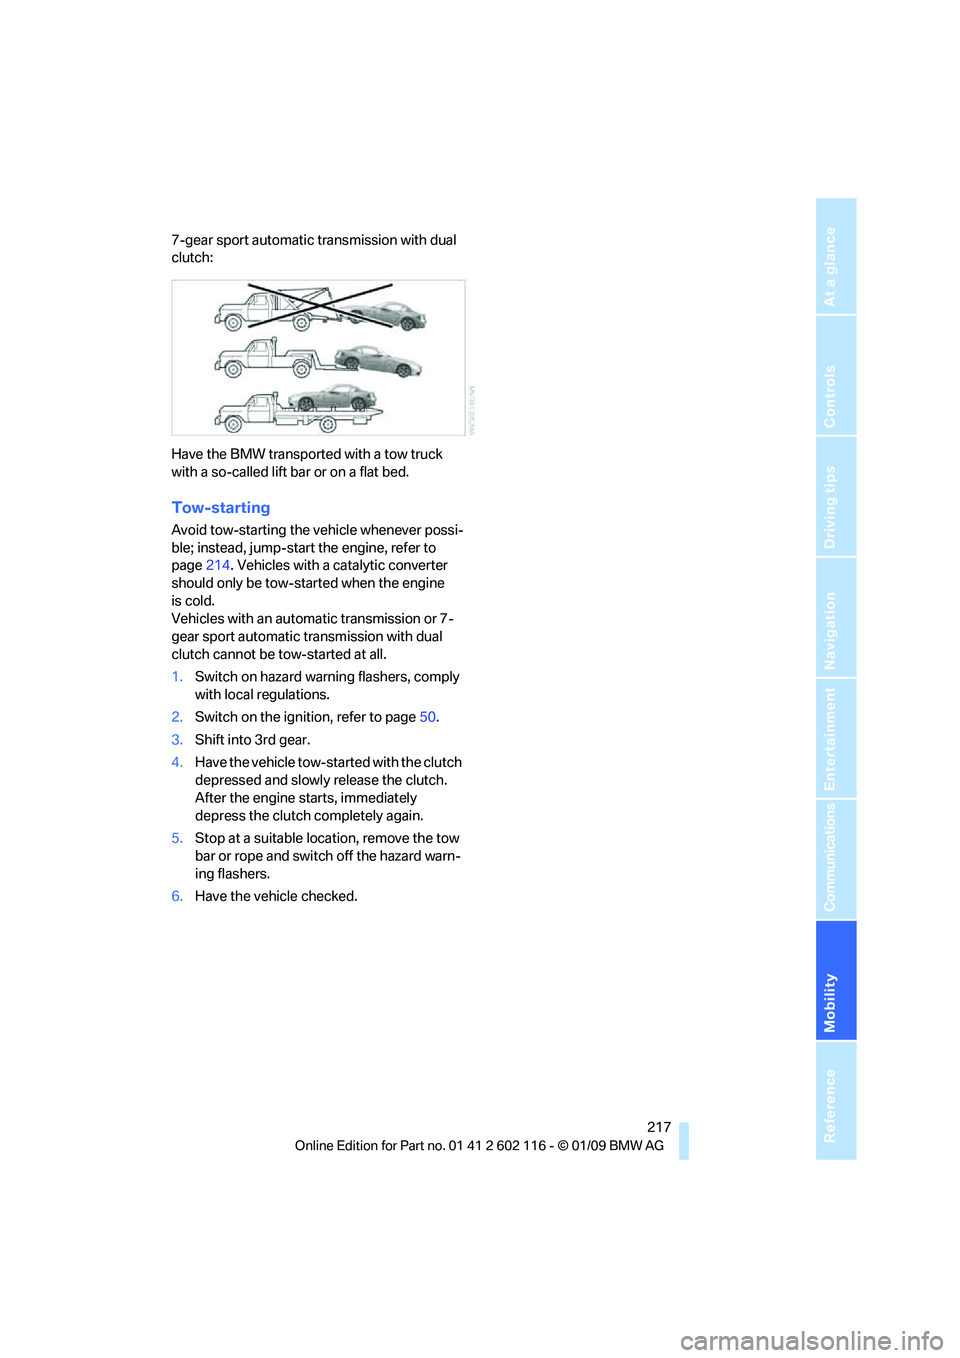
7-gear sport automatic transmission with dual
clutch:
Have the BMW transported with a tow truck
with a so-called lift bar or on a flat bed.
Tow-starting
Avoid tow-starting the vehicle whenever possi-
ble; instead, jump-start the engine, refer to
page214. Vehicles with a catalytic converter
should only be tow-st arted when the engine
is cold.
Vehicles with an automatic transmission or 7-
gear sport automatic transmission with dual
clutch cannot be tow-started at all.
1. Switch on hazard warning flashers, comply
with local regulations.
2. Switch on the ignition, refer to page 50.
3. Shift into 3rd gear.
4. Have the vehicle tow-started with the clutch
depressed and slowly release the clutch.
After the engine starts, immediately
depress the clutch completely again.
5. Stop at a suitable location, remove the tow
bar or rope and switch off the hazard warn-
ing flashers.
6. Have the vehi cle checked.