2009 BMW Z4 SDRIVE35I change time
[x] Cancel search: change timePage 22 of 248
iDrive
20
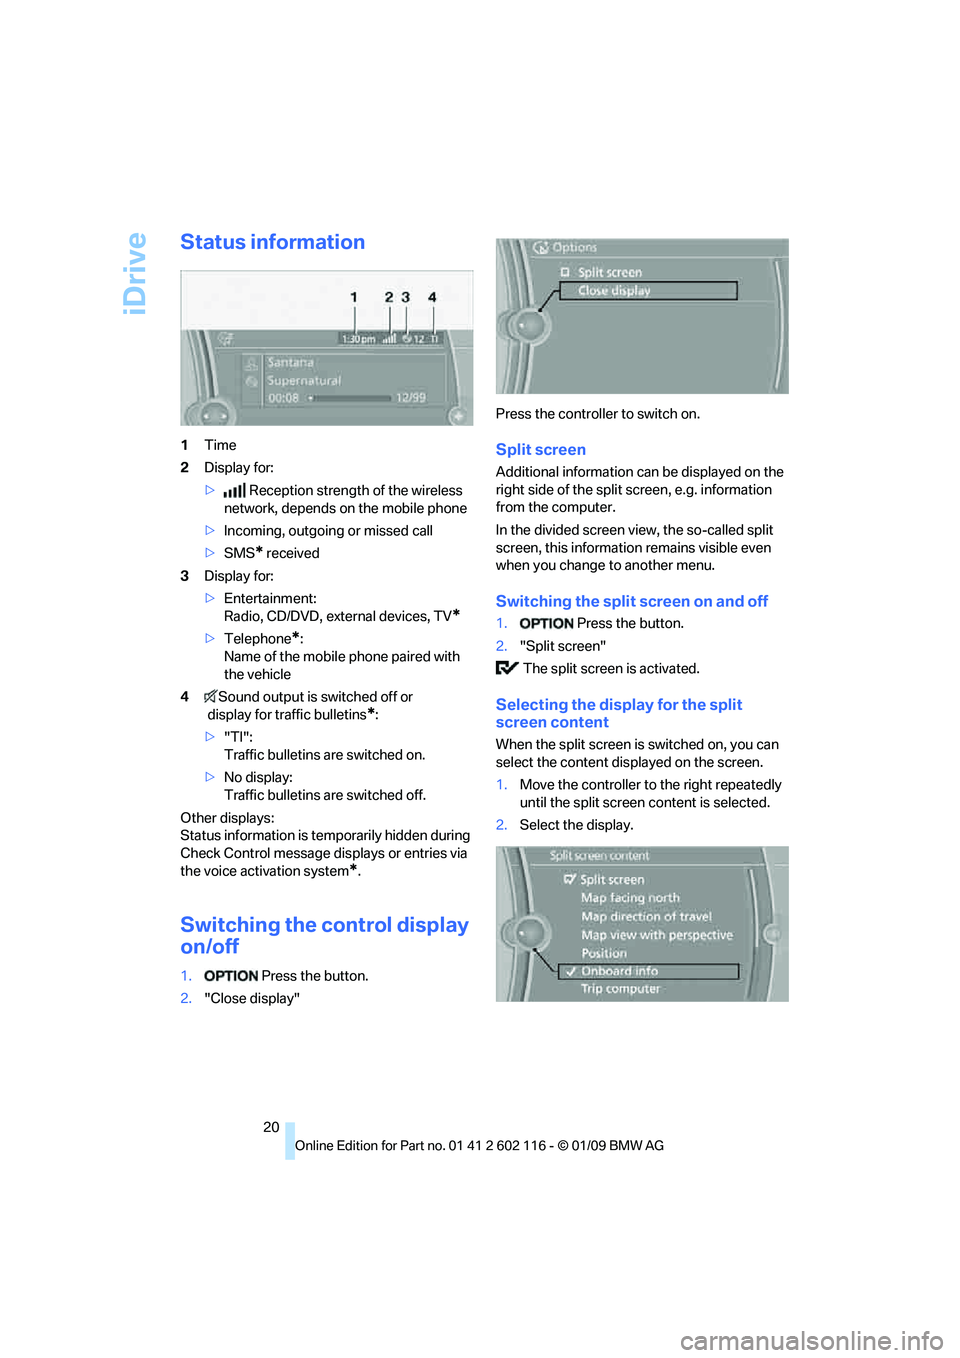
Status information
1Time
2 Display for:
> Reception strength of the wireless
network, depends on the mobile phone
> Incoming, outgoing or missed call
> SMS
* received
3 Display for:
>Entertainment:
Radio, CD/DVD, external devices, TV
*
>Telephone*:
Name of the mobile phone paired with
the vehicle
4 Sound output is switched off or
display for traffic bulletins
*:
> "TI":
Traffic bulletins are switched on.
> No display:
Traffic bulletins are switched off.
Other displays:
Status information is temporarily hidden during
Check Control message displays or entries via
the voice activation system
*.
Switching the control display
on/off
1. Press the button.
2. "Close display" Press the controller to switch on.
Split screen
Additional information can be displayed on the
right side of the split screen, e.g. information
from the computer.
In the divided screen view, the so-called split
screen, this information remains visible even
when you change to another menu.
Switching the split screen on and off
1.
Press the button.
2. "Split screen"
The split screen is activated.
Selecting the display for the split
screen content
When the split screen is switched on, you can
select the content displayed on the screen.
1. Move the controller to the right repeatedly
until the split screen content is selected.
2. Select the display.
Page 26 of 248
Voice activation system
24
Terminating or canceling voice
activation system
Press the button on the steering wheel or
In dialogs that call for a text of your choice, the
procedure can only be canceled using the but-
ton on the steering wheel.
Possible commands
The commands available in each case depend
on the menu item selected on the Control
Display.
Having the possible commands read aloud
For example, if "CD/DVD" is selected, the com-
mands for operating CD/Multimedia are read
aloud.
Calling up functions immediately via
short commands
Short commands enable yo u to perform certain
functions immediately, irrespective of which
menu item is selected, refer to page 223.
Example: selecting the track of a CD
1.If necessary, switch on entertainment audio
output.
2. Press the button on the steering wheel.
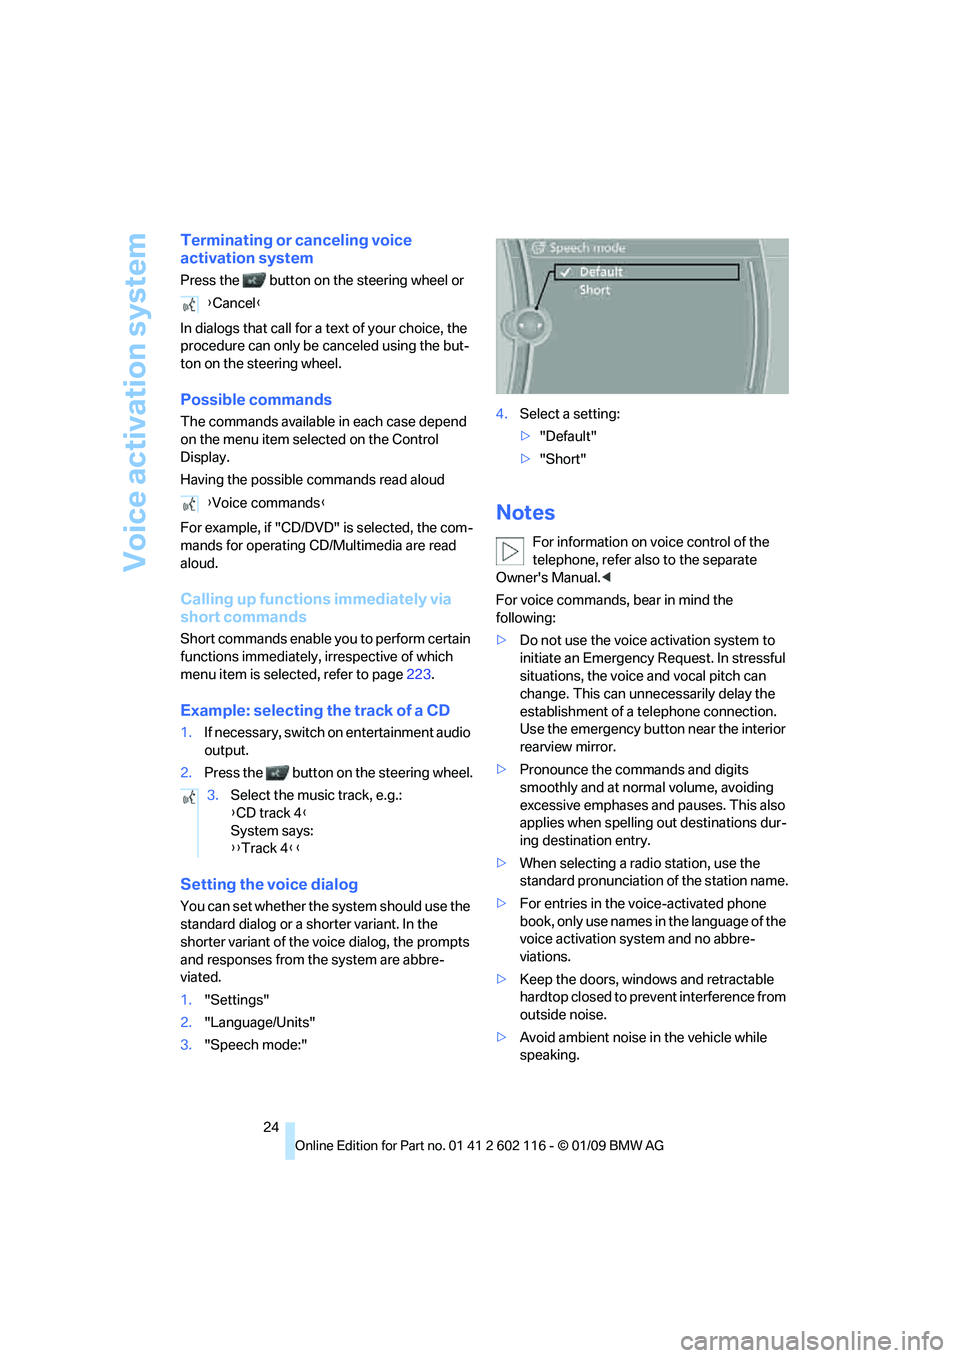
Setting the voice dialog
You can set whether the system should use the
standard dialog or a shorter variant. In the
shorter variant of the voice dialog, the prompts
and responses from the system are abbre-
viated.
1."Settings"
2. "Language/Units"
3. "Speech mode:" 4.
Select a setting:
>"Default"
> "Short"
Notes
For information on voice control of the
telephone, refer also to the separate
Owner's Manual. <
For voice commands, bear in mind the
following:
> Do not use the voice activation system to
initiate an Emergency Request. In stressful
situations, the voice and vocal pitch can
change. This can unne cessarily delay the
establishment of a telephone connection.
Use the emergency button near the interior
rearview mirror.
> Pronounce the commands and digits
smoothly and at normal volume, avoiding
excessive emphases and pauses. This also
applies when spelling out destinations dur-
ing destination entry.
> When selecting a radio station, use the
standard pronunciation of the station name.
> For entries in the voice-activated phone
book, only use names in the language of the
voice activation system and no abbre-
viations.
> Keep the doors, windows and retractable
hardtop closed to prev ent interference from
outside noise.
> Avoid ambient noise in the vehicle while
speaking.
{
Cancel }
{ Voice commands }
3. Select the music track, e.g.:
{CD track 4 }
System says:
{{ Track 4 }}
Page 35 of 248

Controls
33Reference
At a glance
Driving tips
Communications
Navigation
Entertainment
Mobility
Opening from inside
Press the button: the luggage compartment lid
opens unless it has been locked.
Opening from outside
Press on the top half of the BMW emblem or, for
approx. 1 second, on the button of the
remote control:
The luggage compartment can be opened.
Emergency release*
Pull the lever in the cargo bay. The luggage
compartment lid is unlocked.
Closing
The handle recesses on the interior trim of the
luggage compartment lid make it easier to
pull down.
Make sure that the closing path of the
luggage compartment lid is clear, other-
wise injuries may result. <
To close the luggage compartment lid,
press it down lightly. The lid is closed
automatically. <
Alarm system*
The concept
The vehicle alarm system responds:
>When a door, the hood or the luggage com-
partment lid is opened
> To movements inside the vehicle: Interior
motion sensor, refer to page 34
> When the car's inclination changes, for
instance if an attempt is made to jack it up
and steal the wheels or to raise it prior to
towing away
> When there is an interruption in the power
supply from the battery
The alarm system signals unauthorized entry
attempts for a short time by means of:
> An acoustic alarm
> Switching on the haza rd warning flashers
> Flashing the high beams
Page 57 of 248

Controls
55Reference
At a glance
Driving tips
Communications
Navigation
Entertainment
Mobility
Upshifts and downshifts are executed only
when they will result in a plausible combination
of engine and vehicle speed; thus, for example,
a downshift that would cause the engine to
overrev will not be executed by the system. The
gear selected is briefly displayed in the instru-
ment cluster, followed by the gear actually
in use.
Shifting gears via sh ift paddles* on the
steering wheel
The shift paddles allow yo u to shift gears with-
out taking your hands off of the steering wheel.
> When you use the shift paddles on the
steering wheel to shif t gears in automatic
mode, the transmission switches to
manual mode.
> If you do not accelerate or shift gears using
the shift paddles for a certain amount of
time, the transmission switches back to
automatic mode.
If the selector lever is in the M/S gear
plane, manual mode remains active. <
> To shift up: pull one of the shift paddles.
> To shift down: press one of the shift
paddles.
Upshifts and downshifts are executed only
when they will result in a plausible combination
of engine and vehicle speed; thus, for example,
a downshift that would cause the engine to
overrev will not be executed by the system. The
gear selected is briefly displayed in the instru-
ment cluster, followed by the gear actually
in use.
Overriding selector lever lock
Should the selector lever refuse to move out of
position P although the button on the selector
lever is pressed, the sele ctor lever lock can be
overridden:
1. Unclip the sleeve of the selector lever.
2. Pull the sleeve up over the selector lever
until the sleeve is inside out. 3.
Using the screwdriver from the onboard
tool kit, refer to page 208, press the red
lever while moving the selector lever to the
desired position.
7-gear sport automatic
transmission with dual
clutch*
The concept
This transmission is an automated manual
transmission with two clutches and two gear-
box components in which the gears are
changed without loss of torque.
You operate the transmission using the selector
lever and two shift paddles on the steering
wheel.
It offers the following functions:
> Selection between manual and automatic
operation: sequential mode or drive mode
> Automatic downshifting and protection
against selecting the wrong gear, even in
sequential mode
> Launch Control acceleration assistant, refer
to page 58
> Automatic double de-clutch
System limitations
This transmission is equipped with an over-
heating protection system that protects the
clutches against extremely high loads.
Page 59 of 248
Controls
57Reference
At a glance
Driving tips
Communications
Navigation
Entertainment
Mobility
R Reverse
Select this only when the vehicle is stationary.
N Neutral
You can select this in a car wash, for example.
The vehicle can roll.
N remains engaged after the engine is
switched off if you leave the remote con-
trol in the ignition lock. Use this function in an
automatic car wash, for ex ample. P is automati-
cally engaged after approx. 30 minutes. <
D drive mode
In drive mode, all forward gears are shifted auto-
matically.
Kick-down
To accelerate rapidly, e.g. when passing, press
the accelerator down past the resistance point.
This provides maximum acceleration.
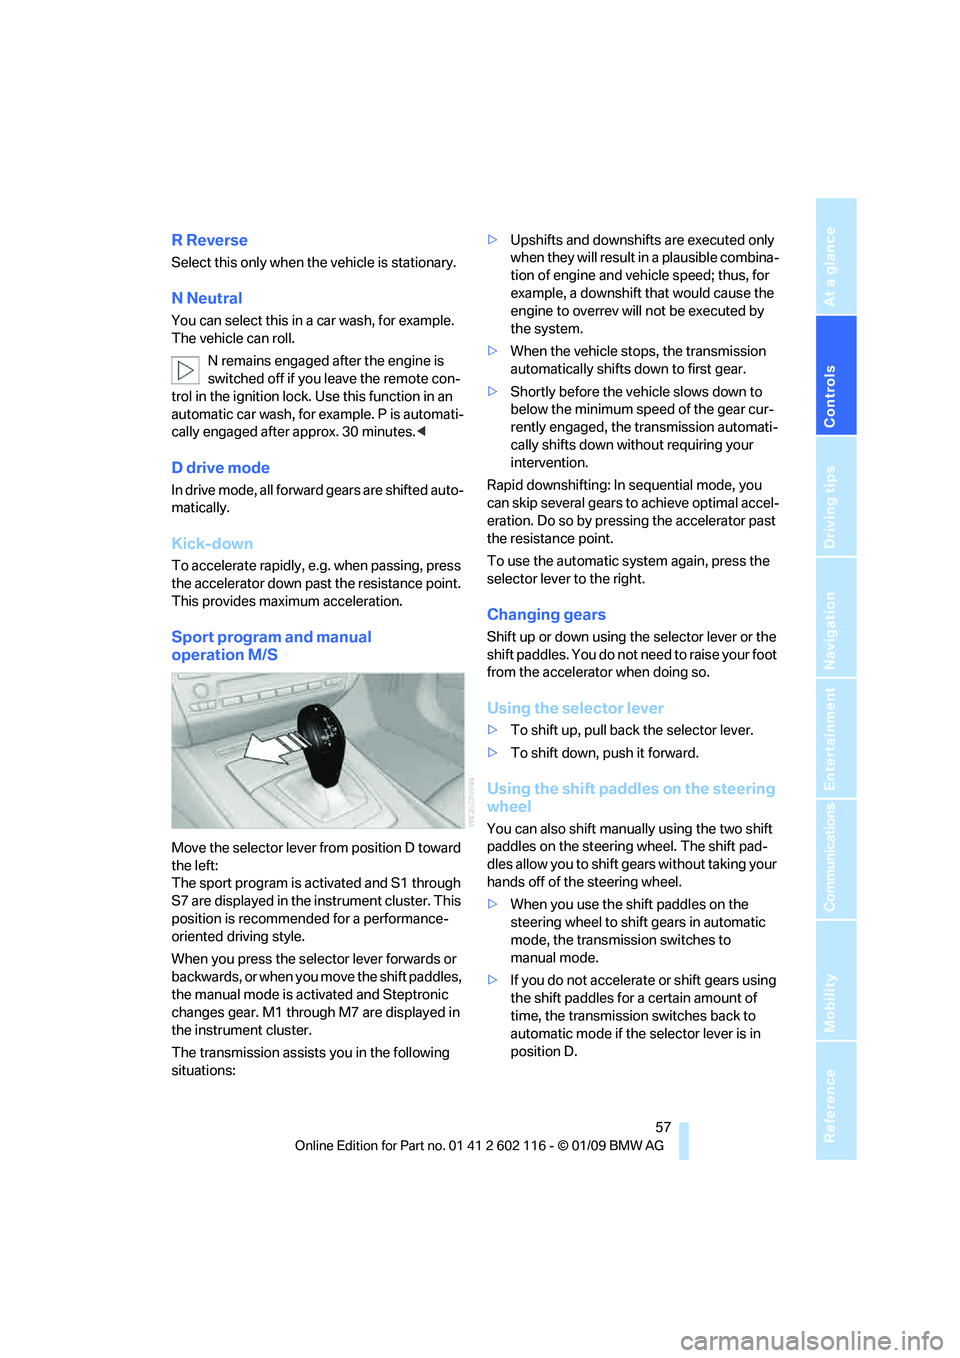
Sport program and manual
operation M/S
Move the selector lever from position D toward
the left:
The sport program is activated and S1 through
S7 are displayed in the instrument cluster. This
position is recommend ed for a performance-
oriented driving style.
When you press the selector lever forwards or
b a c k w a r d s , o r w h e n y o u m o v e t h e s h i f t p a d d l e s ,
the manual mode is ac tivated and Steptronic
changes gear. M1 through M7 are displayed in
the instrument cluster.
The transmission assists you in the following
situations: >
Upshifts and downshifts are executed only
when they will result in a plausible combina-
tion of engine and vehicle speed; thus, for
example, a downshift that would cause the
engine to overrev will not be executed by
the system.
> When the vehicle stops, the transmission
automatically shifts down to first gear.
> Shortly before the ve hicle slows down to
below the minimum speed of the gear cur-
rently engaged, the transmission automati-
cally shifts down without requiring your
intervention.
Rapid downshifting: In sequential mode, you
can skip several gears to achieve optimal accel-
eration. Do so by pressi ng the accelerator past
the resistance point.
To use the automatic system again, press the
selector lever to the right.
Changing gears
Shift up or down using th e selector lever or the
shift paddles. You do not ne ed to raise your foot
from the accelerator when doing so.
Using the selector lever
> To shift up, pull back the selector lever.
> To shift down, push it forward.
Using the shift paddles on the steering
wheel
You can also shift manually using the two shift
paddles on the steering wheel. The shift pad-
dles allow you to shift ge ars without taking your
hands off of the steering wheel.
> When you use the shift paddles on the
steering wheel to shift gears in automatic
mode, the transmission switches to
manual mode.
> If you do not accelerate or shift gears using
the shift paddles for a certain amount of
time, the transmission switches back to
automatic mode if the selector lever is in
position D.
Page 64 of 248
Driving
62
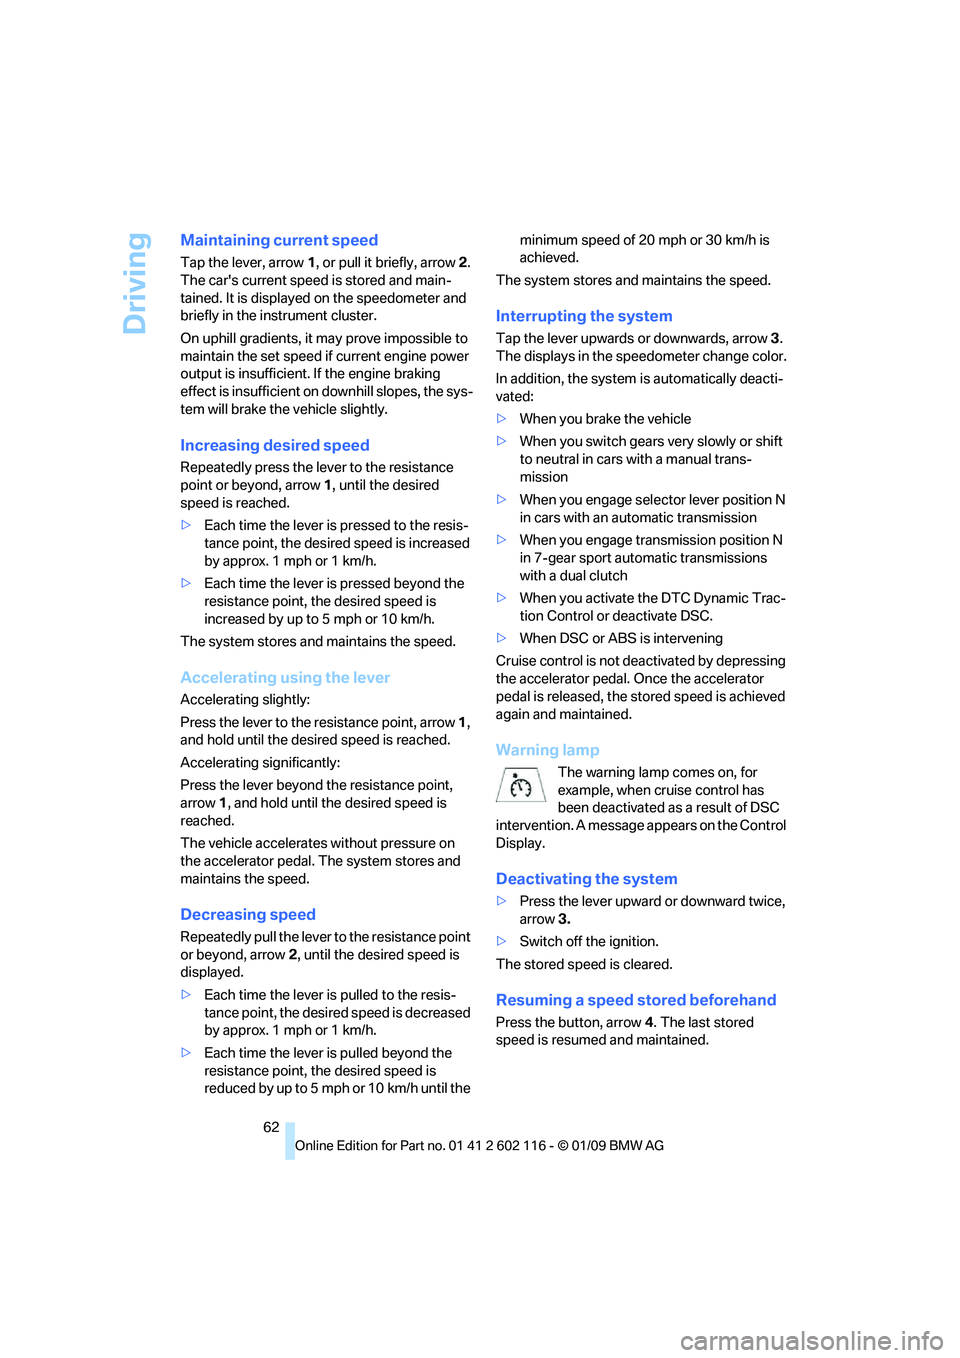
Maintaining current speed
Tap the lever, arrow 1, or pull it briefly, arrow 2.
The car's current speed is stored and main-
tained. It is displayed on the speedometer and
briefly in the instrument cluster.
On uphill gradients, it may prove impossible to
maintain the set speed if current engine power
output is insufficient. If the engine braking
effect is insufficient on downhill slopes, the sys-
tem will brake the vehicle slightly.
Increasing desired speed
Repeatedly press the lever to the resistance
point or beyond, arrow 1, until the desired
speed is reached.
> Each time the lever is pressed to the resis-
tance point, the desired speed is increased
by approx. 1 mph or 1 km/h.
> Each time the lever is pressed beyond the
resistance point, the desired speed is
increased by up to 5 mph or 10 km/h.
The system stores and maintains the speed.
Accelerating using the lever
Accelerating slightly:
Press the lever to the resistance point, arrow 1,
and hold until the desired speed is reached.
Accelerating significantly:
Press the lever beyond the resistance point,
arrow 1, and hold until the desired speed is
reached.
The vehicle accelerates without pressure on
the accelerator pedal. The system stores and
maintains the speed.
Decreasing speed
Repeatedly pull the lever to the resistance point
or beyond, arrow 2, until the desired speed is
displayed.
> Each time the lever is pulled to the resis-
tance point, the desired speed is decreased
by approx. 1 mph or 1 km/h.
> Each time the lever is pulled beyond the
resistance point, the desired speed is
reduced by up to 5 mph o r 10 km/h until the minimum speed of 20 mph or 30 km/h is
achieved.
The system stores and maintains the speed.
Interrupting the system
Tap the lever upwards or downwards, arrow 3.
The displays in the speedometer change color.
In addition, the system is automatically deacti-
vated:
> When you brake the vehicle
> When you switch gears very slowly or shift
to neutral in cars with a manual trans-
mission
> When you engage selector lever position N
in cars with an automatic transmission
> When you engage transmission position N
in 7-gear sport automatic transmissions
with a dual clutch
> When you activate the DTC Dynamic Trac-
tion Control or deactivate DSC.
> When DSC or ABS is intervening
Cruise control is not de activated by depressing
the accelerator pedal. Once the accelerator
pedal is released, the st ored speed is achieved
again and maintained.
Warning lamp
The warning lamp comes on, for
example, when cruise control has
been deactivated as a result of DSC
intervention. A message appears on the Control
Display.
Deactivating the system
> Press the lever upward or downward twice,
arrow 3.
> Switch off the ignition.
The stored speed is cleared.
Resuming a speed stored beforehand
Press the button, arrow 4. The last stored
speed is resumed and maintained.
Page 81 of 248
Controls
79Reference
At a glance
Driving tips
Communications
Navigation
Entertainment
Mobility
Dynamic Driving Control
The concept
Dynamic Driving Control can be used to adjust
the driving dynamics of the vehicle.
Several programs are available for this purpose;
they can be activated using the two Dynamic
Driving Control buttons.
The following characteristics are adapted,
depending on which program was selected:
> Engine response.
> Shift times of the automatic transmission
*.
> Power steering support
*.
> Changes in the suspension characteristics
through damping control
*.
> Vehicle stabilization through DSC Dynamic
Stability Control.
Operating the programs
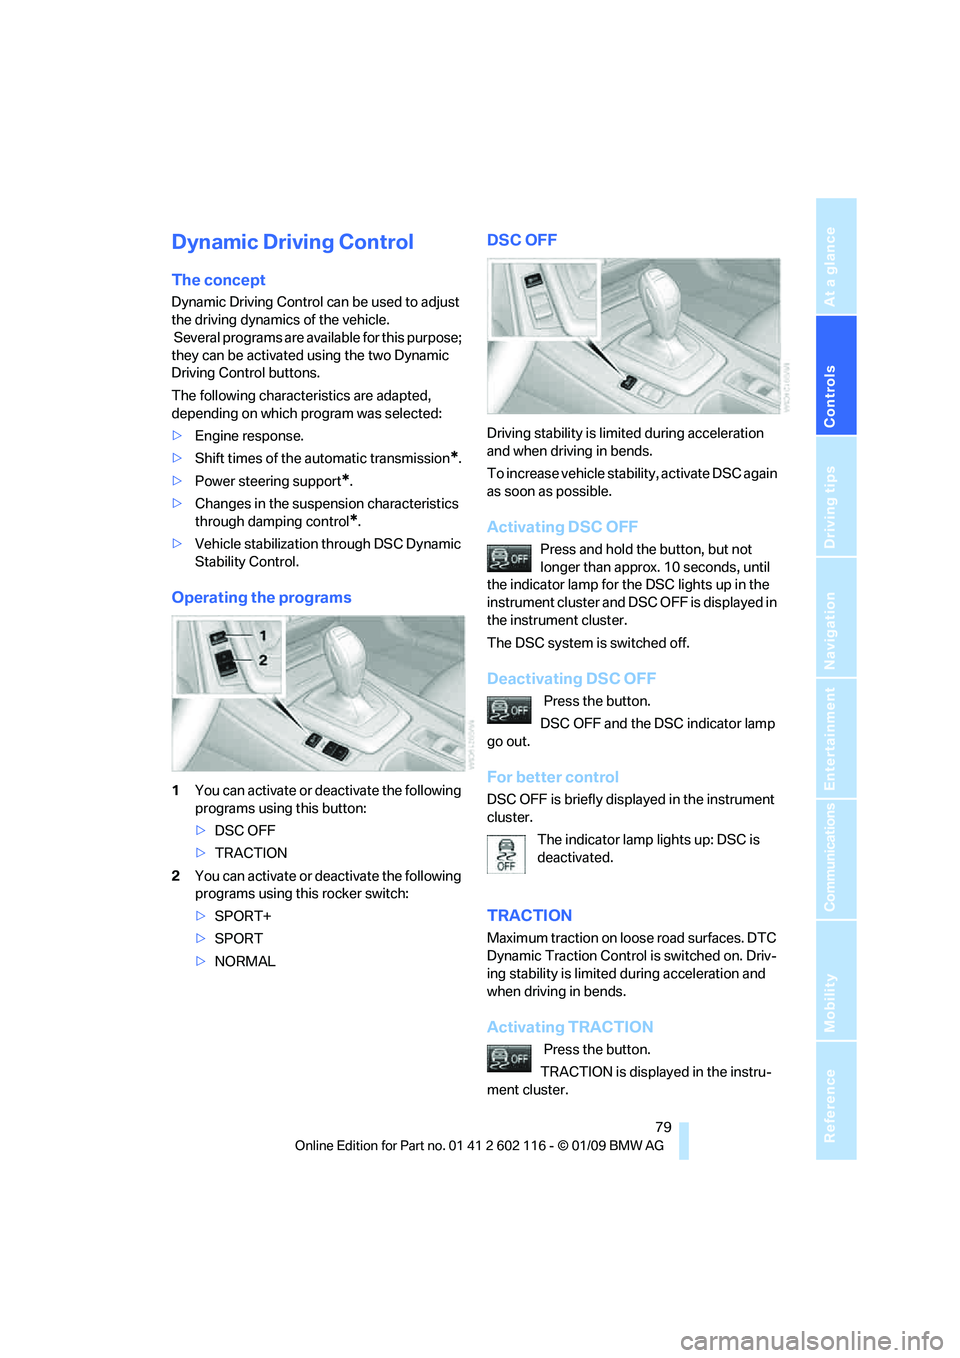
1You can activate or de activate the following
programs using this button:
> DSC OFF
> TRACTION
2 You can activate or de activate the following
programs using this rocker switch:
> SPORT+
> SPORT
> NORMAL
DSC OFF
Driving stability is limited during acceleration
and when driving in bends.
To increase vehicle stability, activate DSC again
as soon as possible.
Activating DSC OFF
Press and hold the button, but not
longer than approx. 10 seconds, until
the indicator lamp for the DSC lights up in the
instrument cluster and DSC OFF is displayed in
the instrument cluster.
The DSC system is switched off.
Deactivating DSC OFF
Press the button.
DSC OFF and the DSC indicator lamp
go out.
For better control
DSC OFF is briefly displayed in the instrument
cluster.
The indicator lamp lights up: DSC is
deactivated.
TRACTION
Maximum traction on loose road surfaces. DTC
Dynamic Traction Control is switched on. Driv-
ing stability is limited during acceleration and
when driving in bends.
Activating TRACTION
Press the button.
TRACTION is displayed in the instru-
ment cluster.
Page 83 of 248
Controls
81Reference
At a glance
Driving tips
Communications
Navigation
Entertainment
Mobility
Flat Tire Monitor FTM*
The concept
The Flat Tire Monitor detects pressure loss in a
tire by comparing the rotating speeds of the
individual tires while moving.
In the event of pressure loss, the rolling circum-
ference changes and, thus, the rotating speed
of the affected wheel. This change is detected
and is reported as a flat tire.
Functional requirement
In order to assure the reliable reporting of a flat
tire, the system must be initialized for the cor-
rect tire inflation pressure.The system must be reinitialized each
time a tire inflation pressure has been cor-
rected or a wheel or tire has been changed. <
System limitations
The Flat Tire Monitor is unable to warn
the driver of sudden, severe tire damage
caused by external factors, nor can it identify
the gradual loss of pressure that will inevitably
occur in all four tires over a lengthy period
of time. <
In the following situations, the system could be
delayed or malfunction:
> System has not been initialized
> Driving on snowy or slippery road surface
> Performance-oriented style of driving: slip
in the drive wheels, hi gh lateral acceleration
> Snow chains are attached
Initializing the system
The initialization is completed during driv-
ing, which can be interrupted at any time.
When driving resumes, the initialization is con-
tinued automatically.
Do not initialize the syst em while snow chains
are attached. <
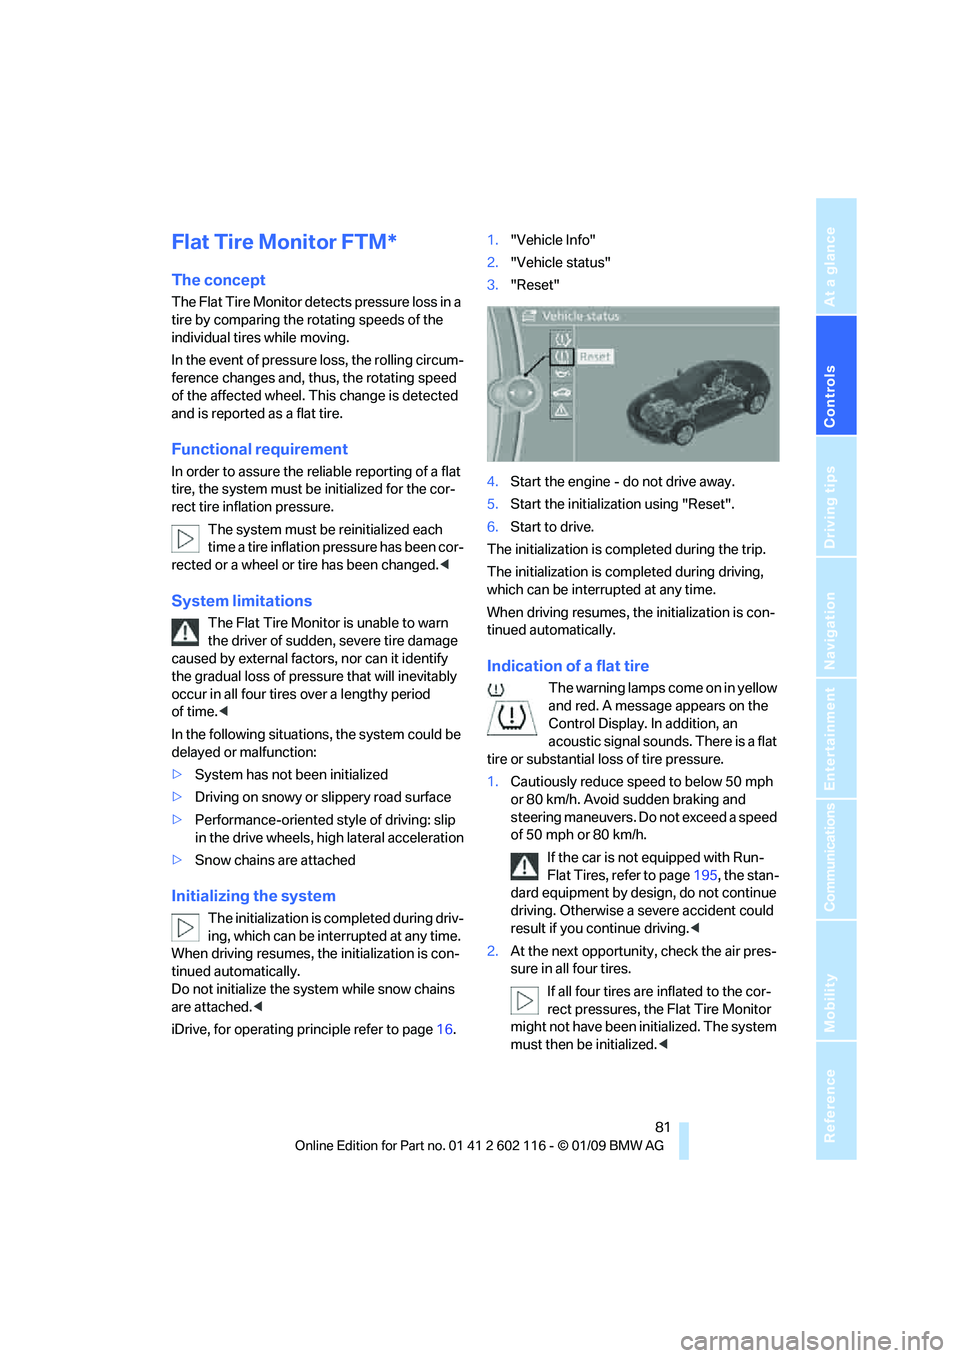
iDrive, for operating principle refer to page 16.1.
"Vehicle Info"
2. "Vehicle status"
3. "Reset"
4. Start the engine - do not drive away.
5. Start the initializat ion using "Reset".
6. Start to drive.
The initialization is completed during the trip.
The initialization is comp leted during driving,
which can be interrupted at any time.
When driving resumes, the initialization is con-
tinued automatically.
Indication of a flat tire
The warning lamps come on in yellow
and red. A message appears on the
Control Display. In addition, an
acoustic signal sounds. There is a flat
tire or substantial loss of tire pressure.
1. Cautiously reduce speed to below 50 mph
or 80 km/h. Avoid sudden braking and
steering maneuvers. Do not exceed a speed
of 50 mph or 80 km/h.
If the car is not equipped with Run-
Flat Tires, refer to page 195, the stan-
dard equipment by design, do not continue
driving. Otherwise a severe accident could
result if you continue driving. <
2. At the next opportunity, check the air pres-
sure in all four tires.
If all four tires are inflated to the cor-
rect pressures, the Flat Tire Monitor
might not have been initialized. The system
must then be initialized. <