2009 BMW Z4 SDRIVE30I ROADSTER display
[x] Cancel search: displayPage 87 of 248
Controls
85Reference
At a glance
Driving tips
Communications
Navigation
Entertainment
Mobility
The TPMS malfunction indicator is combined
with the low tire pressure telltale. When the sys-
tem detects a malfunction, the telltale will flash
for approximately one minute and then remain
continuously lit. This sequence will continue
upon subsequent vehicle startups as long as
the malfunction exists. When the malfunction
indicator is illuminated, the system may not be
able to detect or signal low tire pressure as
intended. TPMS malfunctions may occur for a
variety of reasons, including the installation of
replacement or alternate tires or wheels on the
vehicle that prevent the TPMS from functioning
properly. Always check the TPMS malfunction
telltale after replacing one or more tires or
wheels on your vehicle to ensure that the
replacement or alternate tires and wheels allow
the TPMS to continue to function properly.
Servotronic*
The concept
The Servotronic varies the steering force
required to turn the wh eels depending on the
speed at which you are driving. When you are
driving at low speeds, power steering provides
more support, i. e. little effort is needed to turn
the wheels. Power steering support lessens as
your speed increases.
The system works automatically.
Malfunction
Malfunctions are displayed via Check Control
Airbags
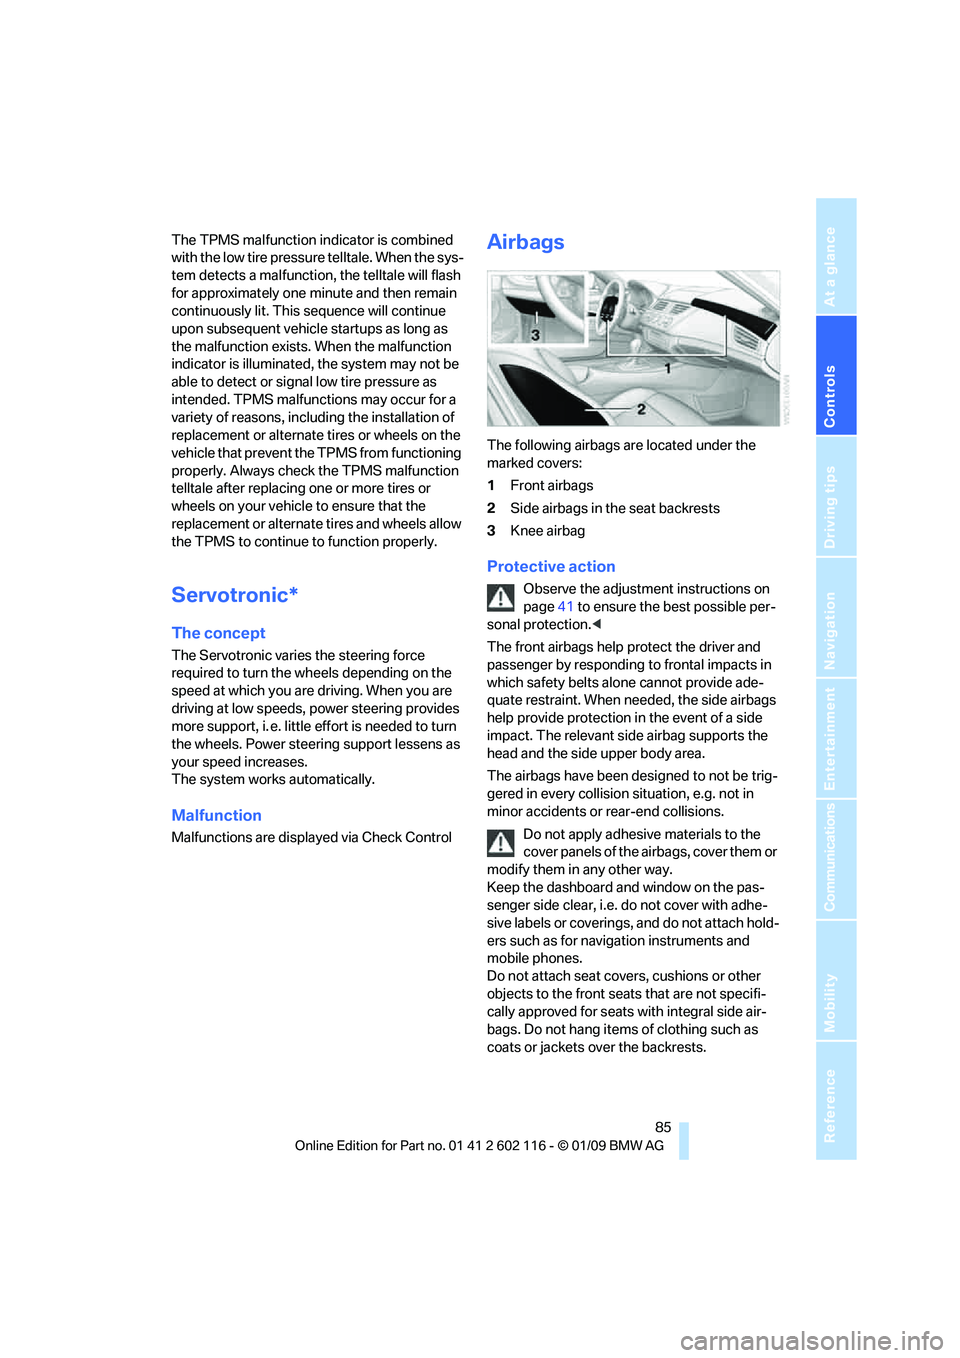
The following airbags are located under the
marked covers:
1 Front airbags
2 Side airbags in the seat backrests
3 Knee airbag
Protective action
Observe the adjustment instructions on
page 41 to ensure the best possible per-
sonal protection. <
The front airbags help protect the driver and
passenger by responding to frontal impacts in
which safety belts alone cannot provide ade-
quate restraint. When needed, the side airbags
help provide protection in the event of a side
impact. The relevant side airbag supports the
head and the side upper body area.
The airbags have been designed to not be trig-
gered in every collision situation, e.g. not in
minor accidents or rear-end collisions.
Do not apply adhesive materials to the
cover panels of the airbags, cover them or
modify them in any other way.
Keep the dashboard and window on the pas-
senger side clear, i.e. do not cover with adhe-
sive labels or coverings, and do not attach hold-
ers such as for navigation instruments and
mobile phones.
Do not attach seat cove rs, cushions or other
objects to the front seats that are not specifi-
cally approved for seats with integral side air-
bags. Do not hang items of clothing such as
coats or jackets over the backrests.
Page 91 of 248
Controls
89Reference
At a glance
Driving tips
Communications
Navigation
Entertainment
Mobility
Welcome lamps are activated and are
stored for the remote control currently in use.
Pathway lighting
If you activate the head lamp flasher after park-
ing the car, with the lig hts switched off, the
low beams come on and remain on for a
certain time.
You can adjust the operating period or deacti-
vate the function.
iDrive, for operating principle refer to page 16.
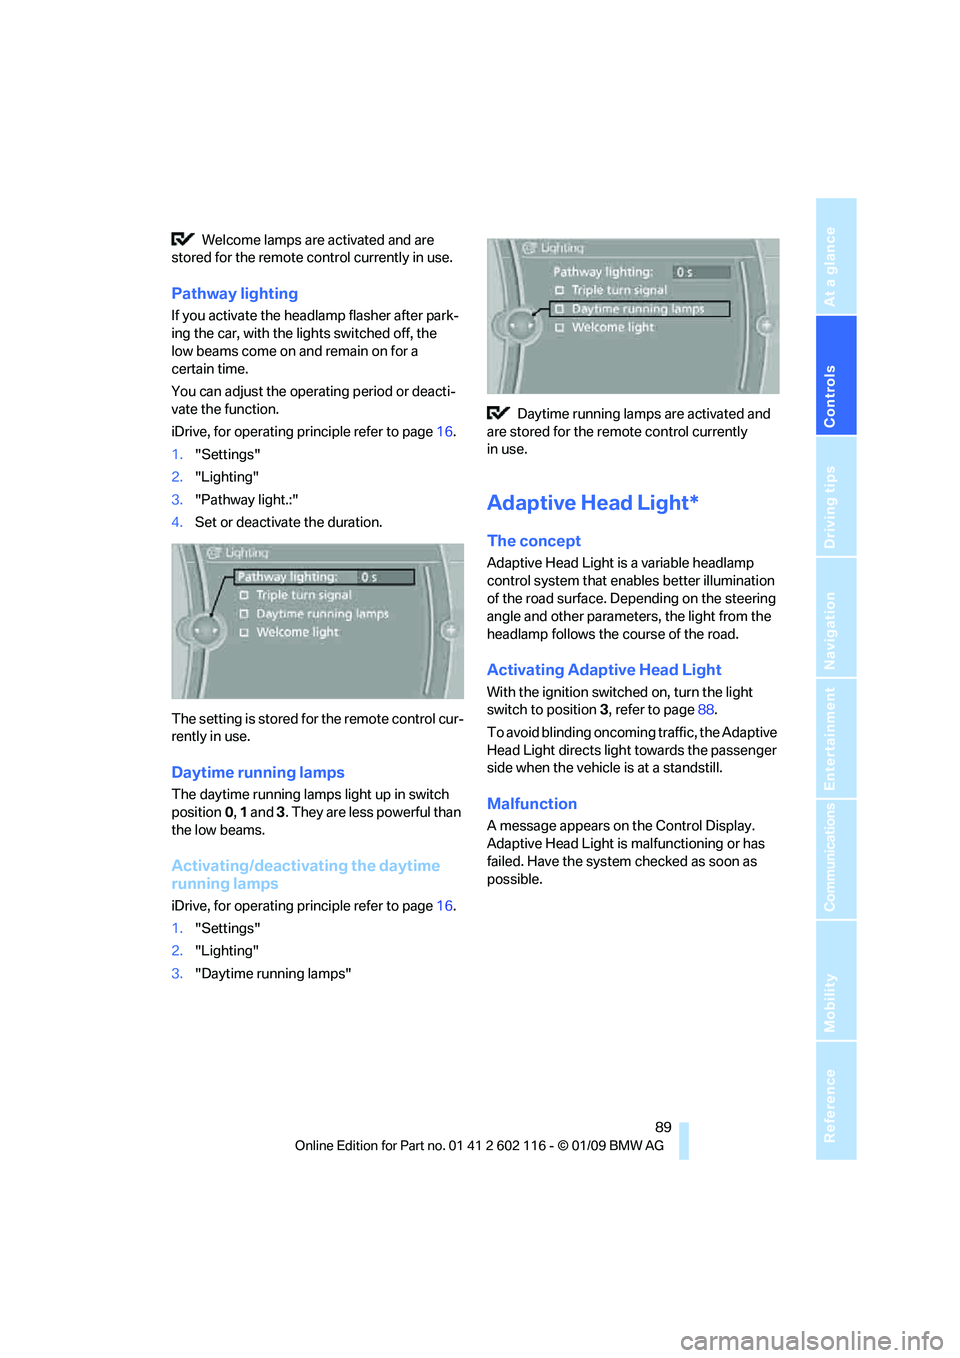
1. "Settings"
2. "Lighting"
3. "Pathway light.:"
4. Set or deactivate the duration.
The setting is stored for the remote control cur-
rently in use.
Daytime running lamps
The daytime running lamps light up in switch
position 0, 1 and 3. They are less powerful than
the low beams.
Activating/deactivating the daytime
running lamps
iDrive, for operating principle refer to page 16.
1. "Settings"
2. "Lighting"
3. "Daytime running lamps" Daytime running lamps are activated and
are stored for the remote control currently
in use.
Adaptive Head Light*
The concept
Adaptive Head Light is a variable headlamp
control system that en ables better illumination
of the road surface. Depending on the steering
angle and other parameters, the light from the
headlamp follows the course of the road.
Activating Adapti ve Head Light
With the ignition switched on, turn the light
switch to position 3, refer to page 88.
To avoid blinding oncoming traffic, the Adaptive
Head Light directs light towards the passenger
side when the vehicle is at a standstill.
Malfunction
A message appears on the Control Display.
Adaptive Head Light is malfunctioning or has
failed. Have the system checked as soon as
possible.
Page 92 of 248
Lamps
90
High beams/roadside parking
lamps
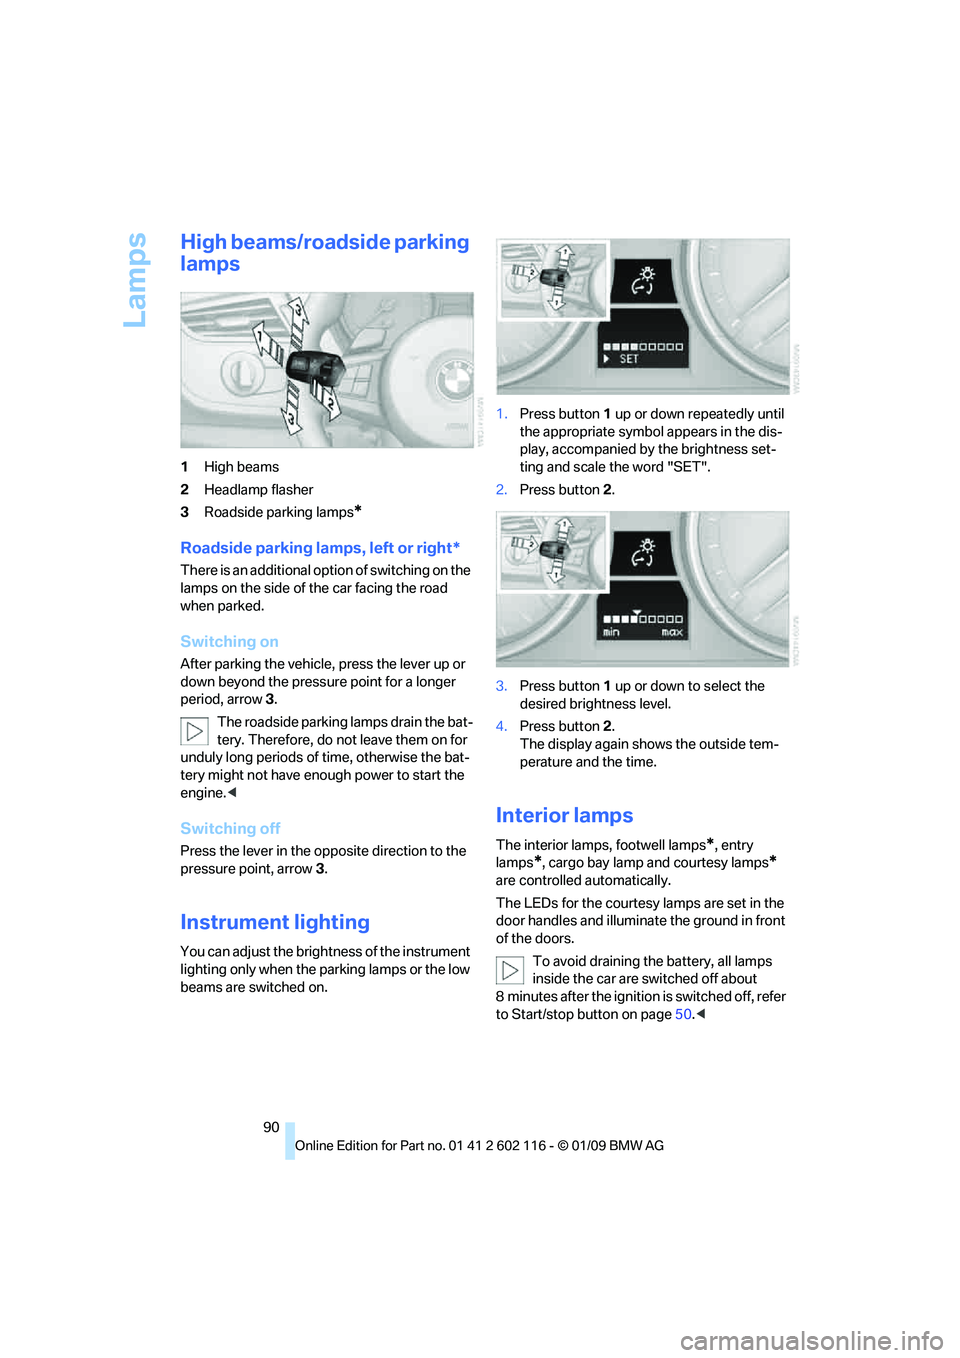
1High beams
2 Headlamp flasher
3 Roadside parking lamps
*
Roadside parking lamps, left or right*
There is an additional option of switching on the
lamps on the side of the car facing the road
when parked.
Switching on
After parking the vehicle, press the lever up or
down beyond the pressu re point for a longer
period, arrow 3.
The roadside parking lamps drain the bat-
tery. Therefore, do not leave them on for
unduly long periods of time, otherwise the bat-
tery might not have enou gh power to start the
engine. <
Switching off
Press the lever in the opposite direction to the
pressure point, arrow 3.
Instrument lighting
You can adjust the brightness of the instrument
lighting only when the parking lamps or the low
beams are switched on. 1.
Press button 1 up or down repeatedly until
the appropriate symbol appears in the dis-
play, accompanied by the brightness set-
ting and scale the word "SET".
2. Press button 2.
3. Press button 1 up or down to select the
desired brightness level.
4. Press button 2.
The display again shows the outside tem-
perature and the time.
Interior lamps
The interior lamps, footwell lamps*, entry
lamps
*, cargo bay lamp and courtesy lamps*
are controlled automatically.
The LEDs for the courtesy lamps
are set in the
door handles and illuminate the ground in front
of the doors.
To avoid draining the battery, all lamps
inside the car are switched off about
8 minutes after the ignition is switched off, refer
to Start/stop button on page 50.<
Page 98 of 248
Climate
96
Switching the cooling function
on and off
The cooling function cools and
dehumidifies the incoming air
before reheating it as required,
according to the temperature set-
ting. This function is only available while the
engine is running.
The cooling function he lps prevent condensa-
tion on the windows or removes it quickly.
Depending on the weathe r, the windshield may
fog over briefly when the engine is started.
The cooling function is automatically switched
on along with the AUTO program.
Maximum cooling
Maximum cooling is achieved most
quickly at outside temperatures
above 32 7/06 and when the
engine is running.
The automatic climate control goes into recir-
culated-air mode at the lowest temperature. Air
flows at maximum rate from the vents for the
upper body area. You should therefore open the
vents for maximum cooling.
AUTO program
The AUTO program auto matically adjusts the
air distribution to the windshield and side win-
dows, towards the upper bo dy area, and into the
footwell and knee area.
The air flow rate and air distribution, in addition
to your temperature specifications, will be
adapted to outside influenc es as a result of sea-
sonal changes, e.g. sunlight or window conden-
sation.
The cooling is switched on automatically with
the AUTO program.
Switching on/off
Press the button.
Manual air distribution and air flow rate are acti-
vated when the AUTO program is deactivated.
AUTO program climate level
The climate levels can be used to vary the inten-
sity when the AUTO program is switched on.
For example, air flow is adjusted automatically
to optimize climate control.
When the AUTO program is
switched on, you ca n select the cli-
mate level of the AUTO program
using the buttons for controlling the manual air
flow rate.
The selected climate le vel is displayed by
an LED.
Convertible program
When the hardtop is open, the convertible pro-
gram is activated as well. In the convertible pro-
gram, the automatic climate control is opti-
mized for driving with the hardtop open. In
addition, the air flow rate is increased as vehicle
speed increases.
The effectiveness of the convertible pro-
gram can be enhanced considerably by
installing the wind deflector. <
Adjusting air flow rate manually
Press the left side of the button to
reduce air flow. Press the right side
of the button to increase it.
The air flow rate may be reduced to save battery
power. The display remains the same.
Switching the system on/off
With the blower at its lowest setting, press the
left side of the button to switch off the auto-
matic climate control. All displays are cleared
except for the rear window defroster if it is
switched on.
Press any button except the rear window
defroster to reactivate the automatic climate
control.
Residual heat
T h e h e a t s t o r e d i n t h e e n g i n e i s u s e d t o h e a t t h e
passenger compartment, e.g. while stopped at
a school to pick up a child.
Page 102 of 248
Practical interior accessories
100
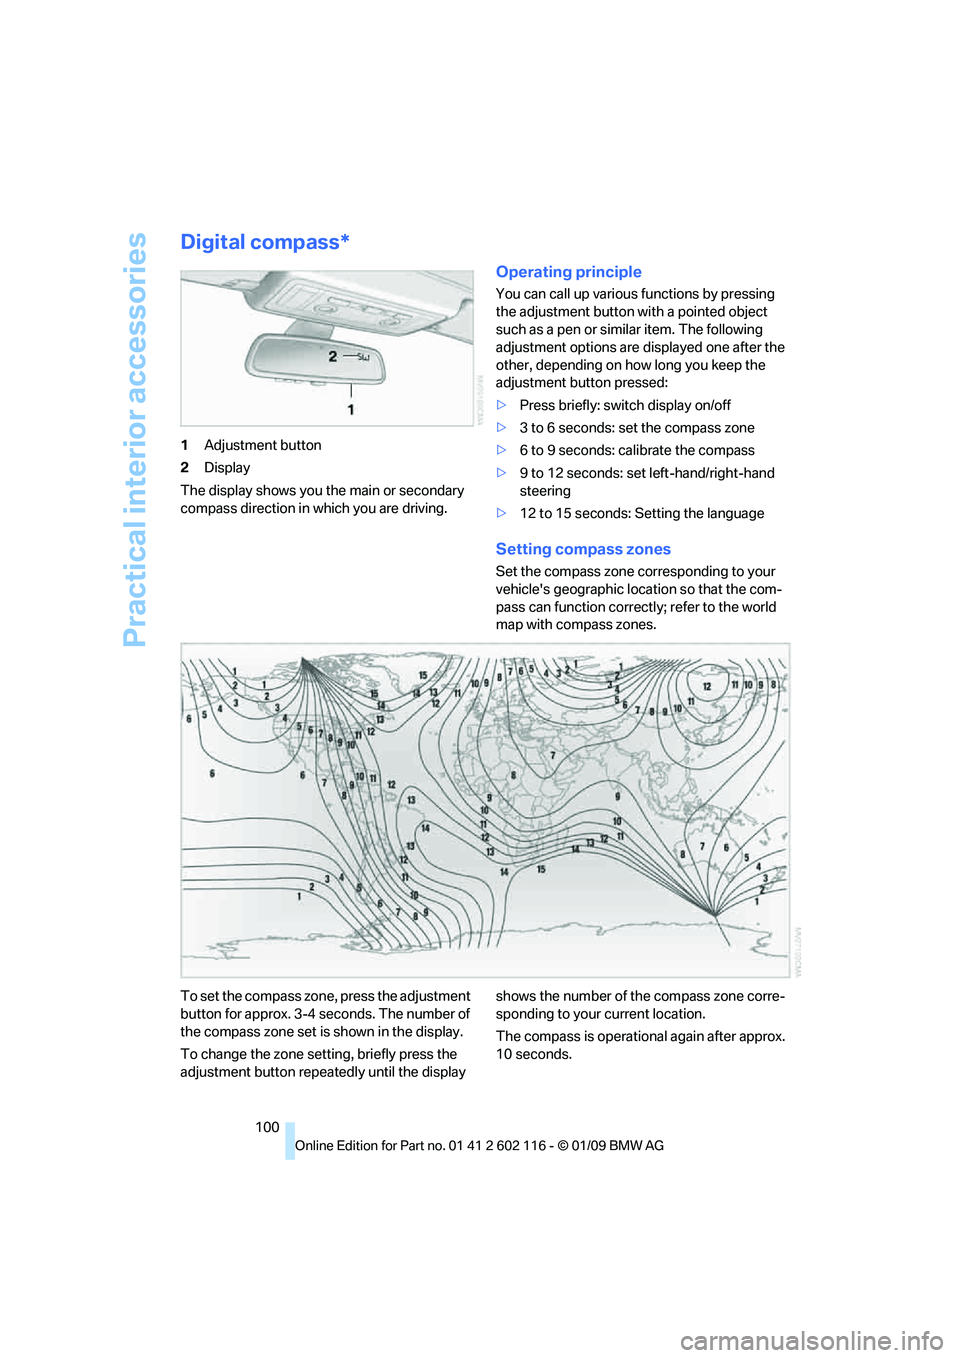
Digital compass*
1Adjustment button
2 Display
The display shows you the main or secondary
compass direction in which you are driving.
Operating principle
You can call up various functions by pressing
the adjustment button with a pointed object
such as a pen or similar item. The following
adjustment options are displayed one after the
other, depending on how long you keep the
adjustment button pressed:
> Press briefly: switch display on/off
> 3 to 6 seconds: set the compass zone
> 6 to 9 seconds: calibrate the compass
> 9 to 12 seconds: set left-hand/right-hand
steering
> 12 to 15 seconds: Setting the language
Setting compass zones
Set the compass zone corresponding to your
vehicle's geographic loca tion so that the com-
pass can function correctl y; refer to the world
map with compass zones.
To set the compass zone, press the adjustment
button for approx. 3-4 seconds. The number of
the compass zone set is shown in the display.
To change the zone se tting, briefly press the
adjustment button repeat edly until the display shows the number of the compass zone corre-
sponding to your current location.
The compass is operational again after approx.
10 seconds.
Page 103 of 248
Controls
101Reference
At a glance
Driving tips
Communications
Navigation
Entertainment
Mobility
Calibrating the digital compass
The digital compass must be calibrated in the
following situations:
> An incorrect compass direction is shown.
> The compass direction shown does not
change although the direction of
travel does.
> Not all compass directions are shown.
Procedure
1.Make sure that no la rge metal objects or
overhead power lines are in the vicinity of
your vehicle and that you have enough
space to drive in a circle.
2. Set the currently valid compass zone.
3. ensure that the retractable hardtop is fully
closed.
4. Press the adjustment button for approx.
6-7 seconds to call up C. Then drive in at
least one full circle at a speed of no more
than 4mph or 7km/h.
If calibration is successful, the display
changes from C to a compass direction.
5. Open the retractable hardtop fully and
repeat step 4.
Setting right-hand/left-hand steering
Your digital compass is factory-set to right-
hand or left-hand steeri ng, in accordance with
your vehicle.
Setting the language
You can set the language of the display:
Press the adjustment button for approx.
12-13 seconds. Briefly press the adjustment
button again to switch between English, "E",
and German, "O".
The setting is automatically saved after approx.
10 seconds.
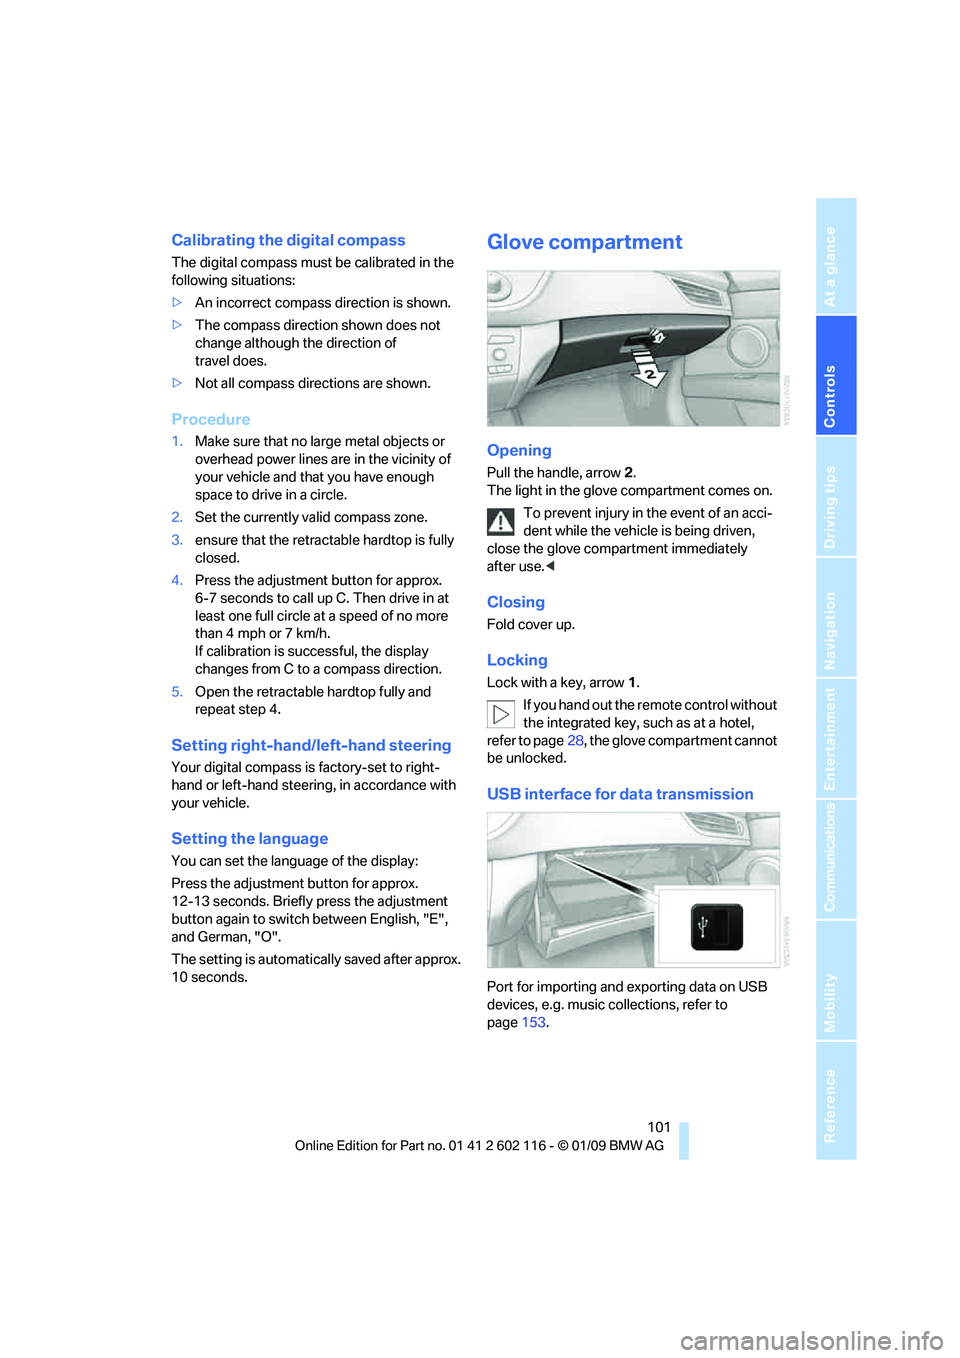
Glove compartment
Opening
Pull the handle, arrow 2.
The light in the glove compartment comes on.
To prevent injury in the event of an acci-
dent while the vehicle is being driven,
close the glove compartment immediately
after use. <
Closing
Fold cover up.
Locking
Lock with a key, arrow 1.
If you hand out the remote control without
the integrated key, such as at a hotel,
refer to page 28, the glove compartment cannot
be unlocked.
USB interface for data transmission
Port for importing and exporting data on USB
devices, e.g. music collections, refer to
page 153.
Page 120 of 248
Navigation system
118
Navigation system
General information
With the help of satellites, the navigation sys-
tem is able to ascertain the precise position of
the vehicle and guide you reliably to any desti-
nation you enter.
The navigation data is st ored in the vehicle and
can be updated using navigation DVDs.
Enter data only when the vehicle is sta-
tionary, and always give priority to the
applicable traffic regulati ons in the event of any
contradiction between traffic and road condi-
tions and the instructions issued by the naviga-
tion system. Failure to ta ke to this precaution
can place you in violation of the law and put
vehicle occupants and other road users in
danger. <
Updating the navigation data
The navigation data is st ored in the vehicle and
can be updated using a na vigation DVD. Please
contact the BMW center if you have any ques-
tions.
Inserting navigation DVD
1. Insert the navigation DVD into the DVD
player with the labe led side facing up.
2. Follow the instructio ns on the display.
3. Enter the authorization code of the naviga-
tion DVD and change the DVD if needed.
Displaying information on the version
1. "Navigation"
2. Open "Options".
3. "Navigation system version".
Information on the data version is displayed.
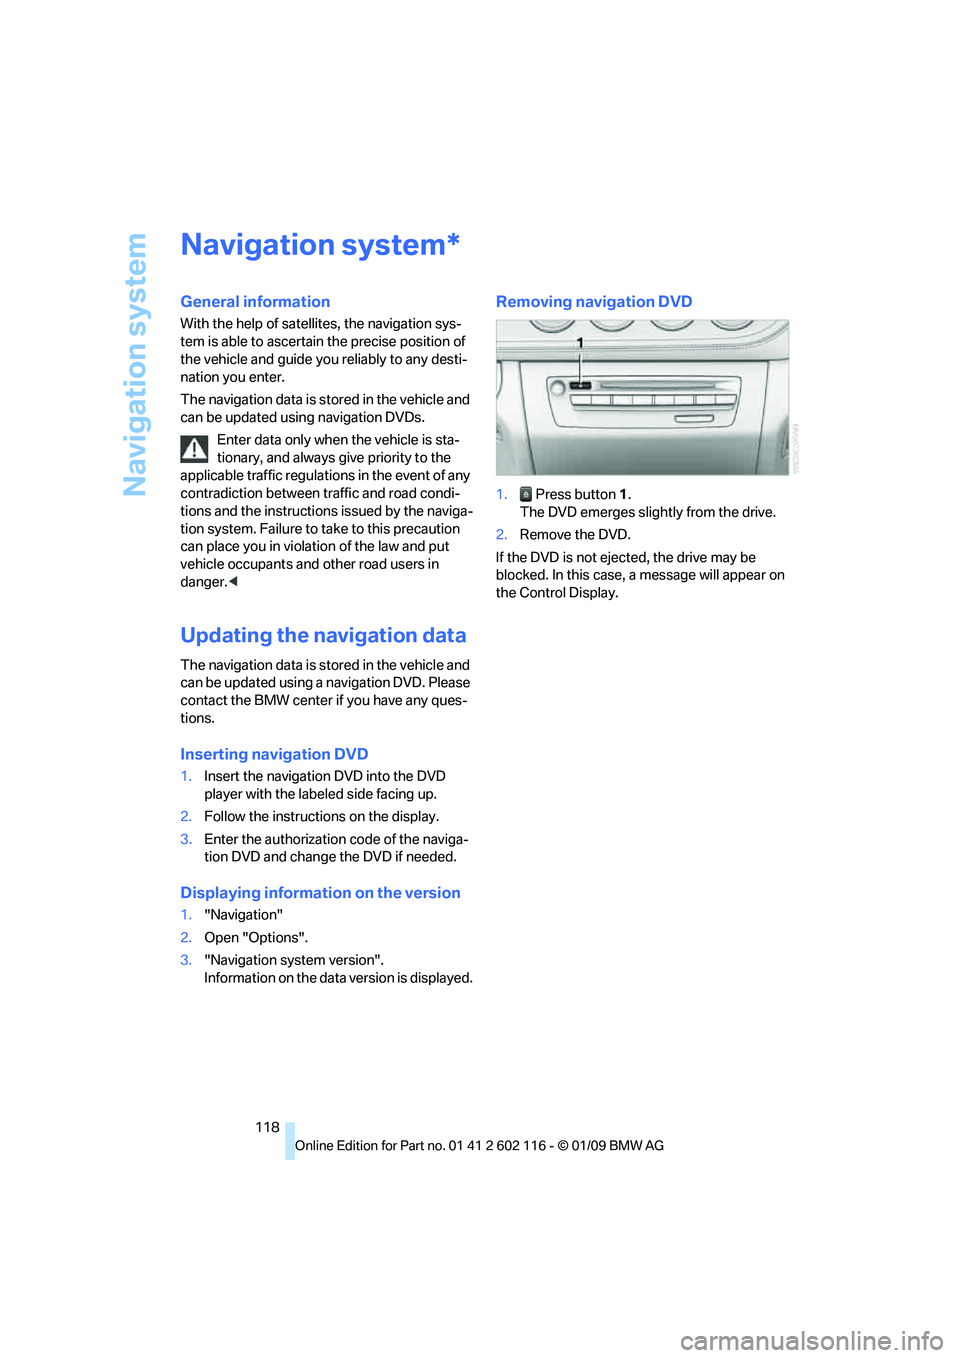
Removing navigation DVD
1. Press button 1.
The DVD emerges slightly from the drive.
2. Remove the DVD.
If the DVD is not ejected, the drive may be
blocked. In this case, a message will appear on
the Control Display.
*
Page 121 of 248
Navigation
Driving tips
119Reference
At a glance
Controls
Communications
Entertainment
Mobility
Destination entry
In entering your destination you can select from
the following options:
>Entering a destination manually, see below
> Selecting destination from the address
book, refer to page 121
> Last destinations, refer to Last destinations,
page 122
> Special destinations, refer to page 122
> Entering a destination on the map, refer to
page 124
> Selecting a home a ddress, refer to
page 122
> Entering a destination by voice com-
mands*, refer to page 125
You can also store a navigation destination on
the programmable memo ry keys, refer to
page 21.
Enter data only when the vehicle is sta-
tionary, and always give priority to the
applicable traffic regulations in the event of any
contradiction between traffic and road condi-
tions and the instructions issued by the naviga-
tion system. Otherwise, vehicle occupants and
other road users may be endangered. <
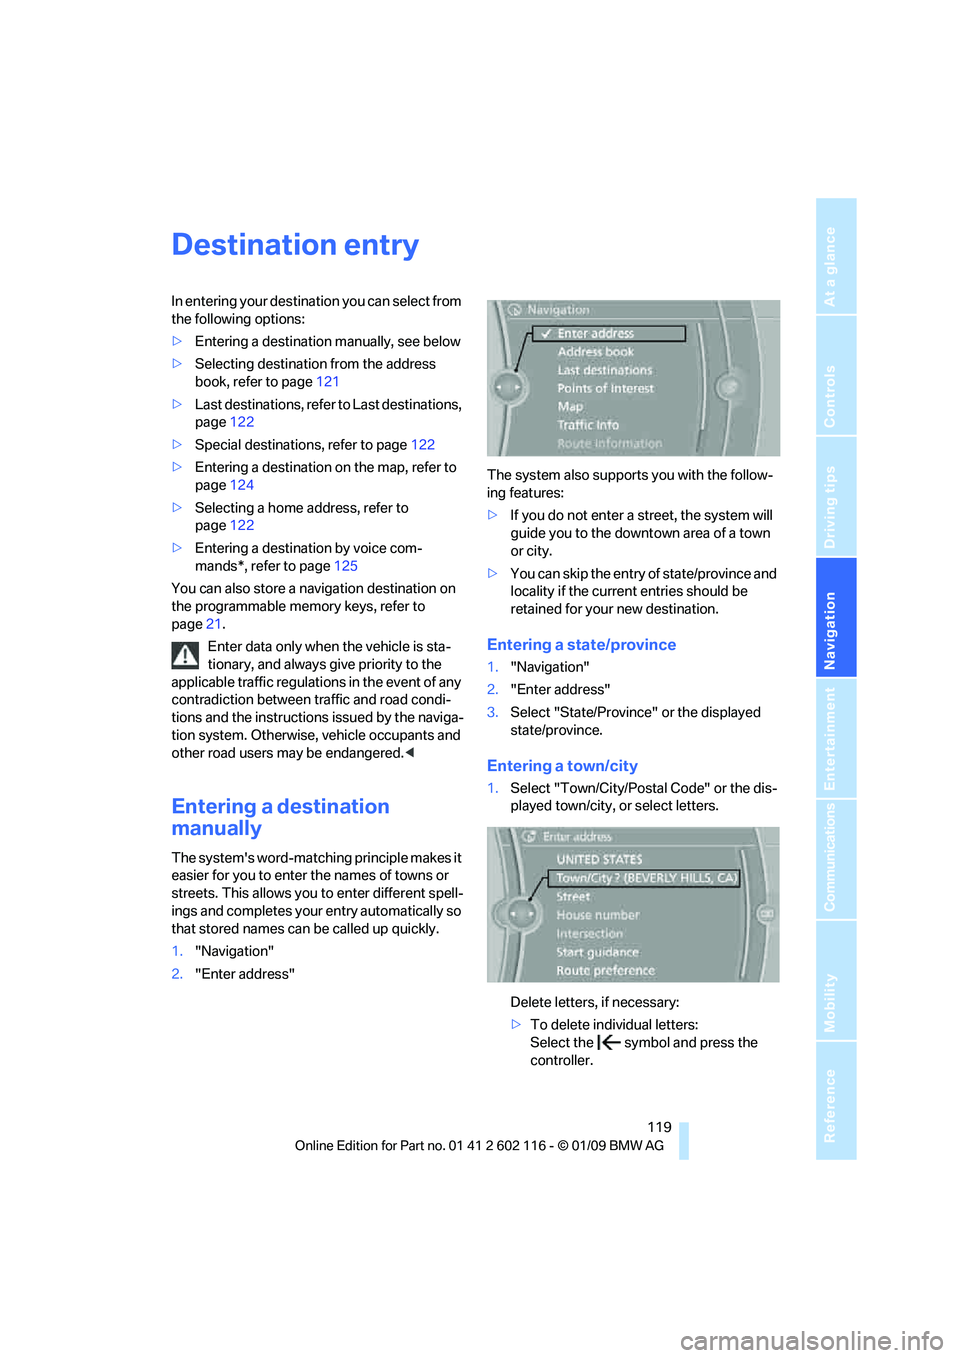
Entering a destination
manually
The system's word-matching principle makes it
easier for you to enter the names of towns or
streets. This allows you to enter different spell-
ings and completes your entry automatically so
that stored names can be called up quickly.
1. "Navigation"
2. "Enter address" The system also supports you with the follow-
ing features:
>
If you do not enter a street, the system will
guide you to the downto wn area of a town
or city.
> You can skip the entry of state/province and
locality if the current entries should be
retained for your new destination.
Entering a state/province
1."Navigation"
2. "Enter address"
3. Select "State/Province" or the displayed
state/province.
Entering a town/city
1.Select "Town/City/Postal Code" or the dis-
played town/city, or select letters.
Delete letters, if necessary:
>To delete indi vidual letters:
Select the symbol and press the
controller.