2009 BMW X6 XDRIVE steering wheel
[x] Cancel search: steering wheelPage 233 of 317
231
Entertainment
Reference
At a glance
Controls
Driving tips
Communications
Navigation
Mobility
For mobile phones that do not automatically
switch over to the handsfree mode:
> Depending on the mobile phone model
used, the conversation can be continued via
the hands-free system if necessary. Act
according to what is shown on the mobile
phone display, refer to the operating
instructions of your mobile phone.
> Press the button above the storage
compartment.
From handsfree sy stem to mobile
phone
When you telephone via the handsfree system,
you can also continue the call via the mobile
phone if necessary, depending on the mobile
phone model. Act accord ing to what is shown
on the mobile phone display, refer to the oper-
ating instructions of your mobile phone.
As an alternative, you can deactivate the Blue-
tooth link.
Depending on your mob ile phone model, poor
reception of the wireless communications net-
work can result in the system changing from the
hands-free system to the mobile phone.
Operation by voice*
The concept
You can operate your mobile phone without
having to remove your hands from the steering
wheel. When making your entries, you will be
supported by announceme nts or questions in
many cases.
The same prerequisites as for operation via
iDrive apply, refer to page 226.
Symbols in Owner's Manual Voice commands
Activating system
1.
Briefly press the button on the steering
wheel.
An acoustic signal indicates that you can
say commands.
2. Say the command.
Ending/canceling operation by voice
Press the button on the steering wheel
or
In dialogs where text is spoken, e.g. a name
rather than a command, canceling is only possi-
ble using the button on the steering wheel.
Having possible co mmands read aloud
The system understands default commands
that must be spoken word for word.
You can have the possi ble commands spoken
by the system at any point:
Using alternative commands
There are often a number of commands to run a
function, e.g.:
The system recognizes digits from zero to nine.
You can say each digit individually or group
them into a sequence to accelerate the input.
{ ...} Say the specified commands word for
word.
{{ ...}} Indicates responses of the system.
{Cancel }.
{ Help }
{ Dial name } or {Name }.
Page 234 of 317
Telephoning
232
Example: dialing phone numbers
To start the dialog:
Press the button on the steering wheel.
Adjusting volume of instructions
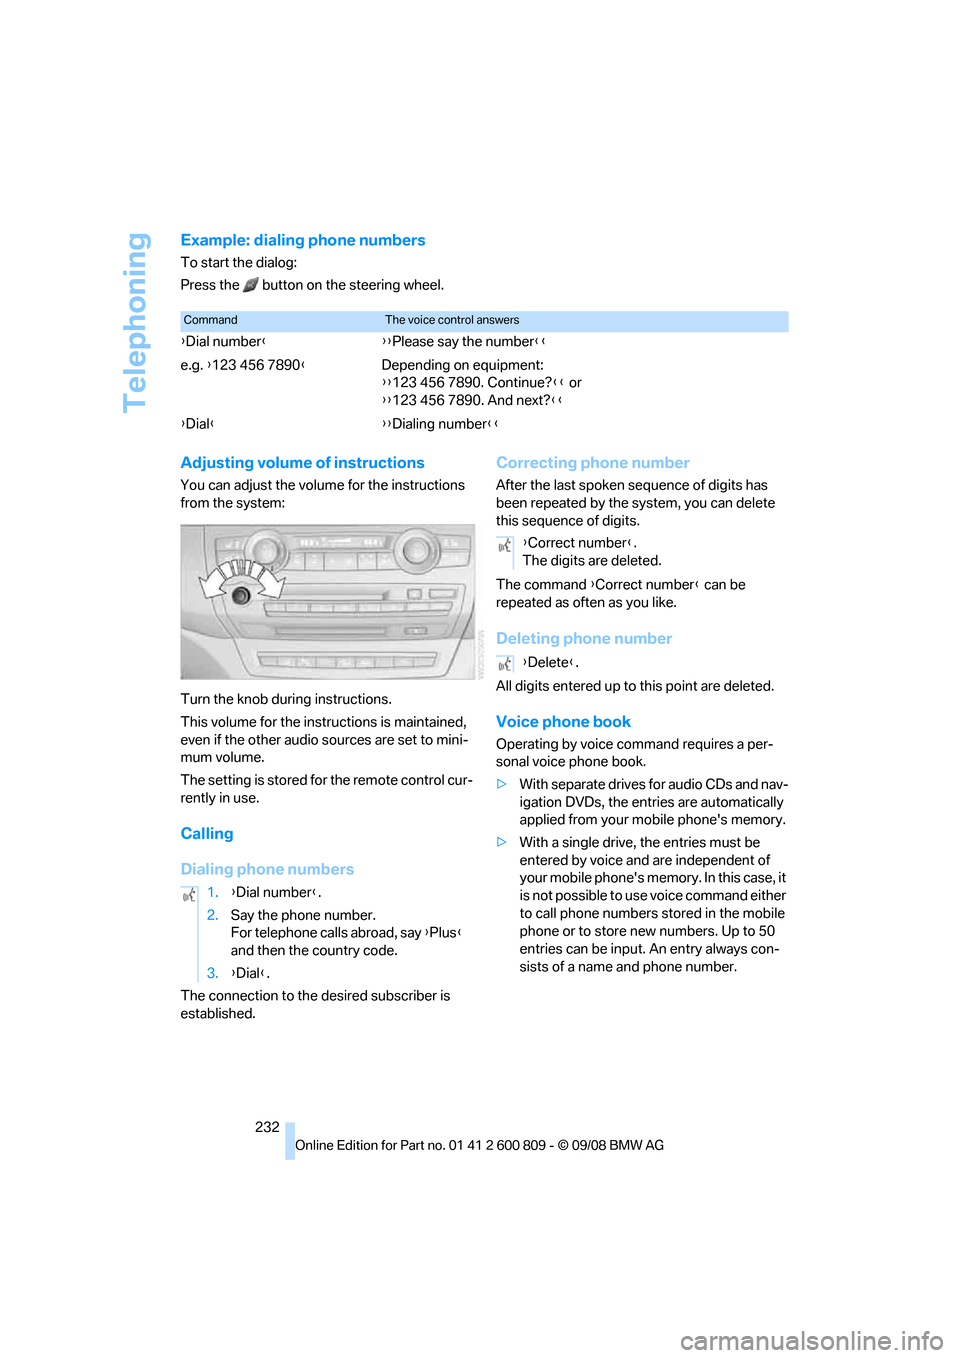
You can adjust the volume for the instructions
from the system:
Turn the knob during instructions.
This volume for the inst ructions is maintained,
even if the other audio sources are set to mini-
mum volume.
The setting is stored fo r the remote control cur-
rently in use.
Calling
Dialing phone numbers
The connection to the desired subscriber is
established.
Correcting phone number
After the last spoken sequence of digits has
been repeated by the system, you can delete
this sequence of digits.
The command {Correct number } can be
repeated as often as you like.
Deleting phone number
All digits entered up to this point are deleted.
Voice phone book
Operating by voice command requires a per-
sonal voice phone book.
>With separate drives for audio CDs and nav-
igation DVDs, the entries are automatically
applied from your mobile phone's memory.
> With a single drive, the entries must be
entered by voice and are independent of
your mobile phone's memo ry. In this case, it
is not possible to use voice command either
to call phone numbers stored in the mobile
phone or to store new numbers. Up to 50
entries can be input. An entry always con-
sists of a name and phone number.
CommandThe voice control answers
{ Dial number }{{ Please say the number }}
e.g. {123 456 7890 }Depending on equipment:
{{123 456 7890. Continue? }} or
{{ 123 456 7890. And next? }}
{ Dial }{ {Dialing number}}
1. {Dial number }.
2. Say the phone number.
For telephone calls abroad, say {Plus }
and then the country code.
3. {Dial }.
{Correct number }.
The digits are deleted.
{ Delete }.
Page 279 of 317
Mobility
277Reference
At a glance
Controls
Driving tips
Communications
Navigation
Entertainment
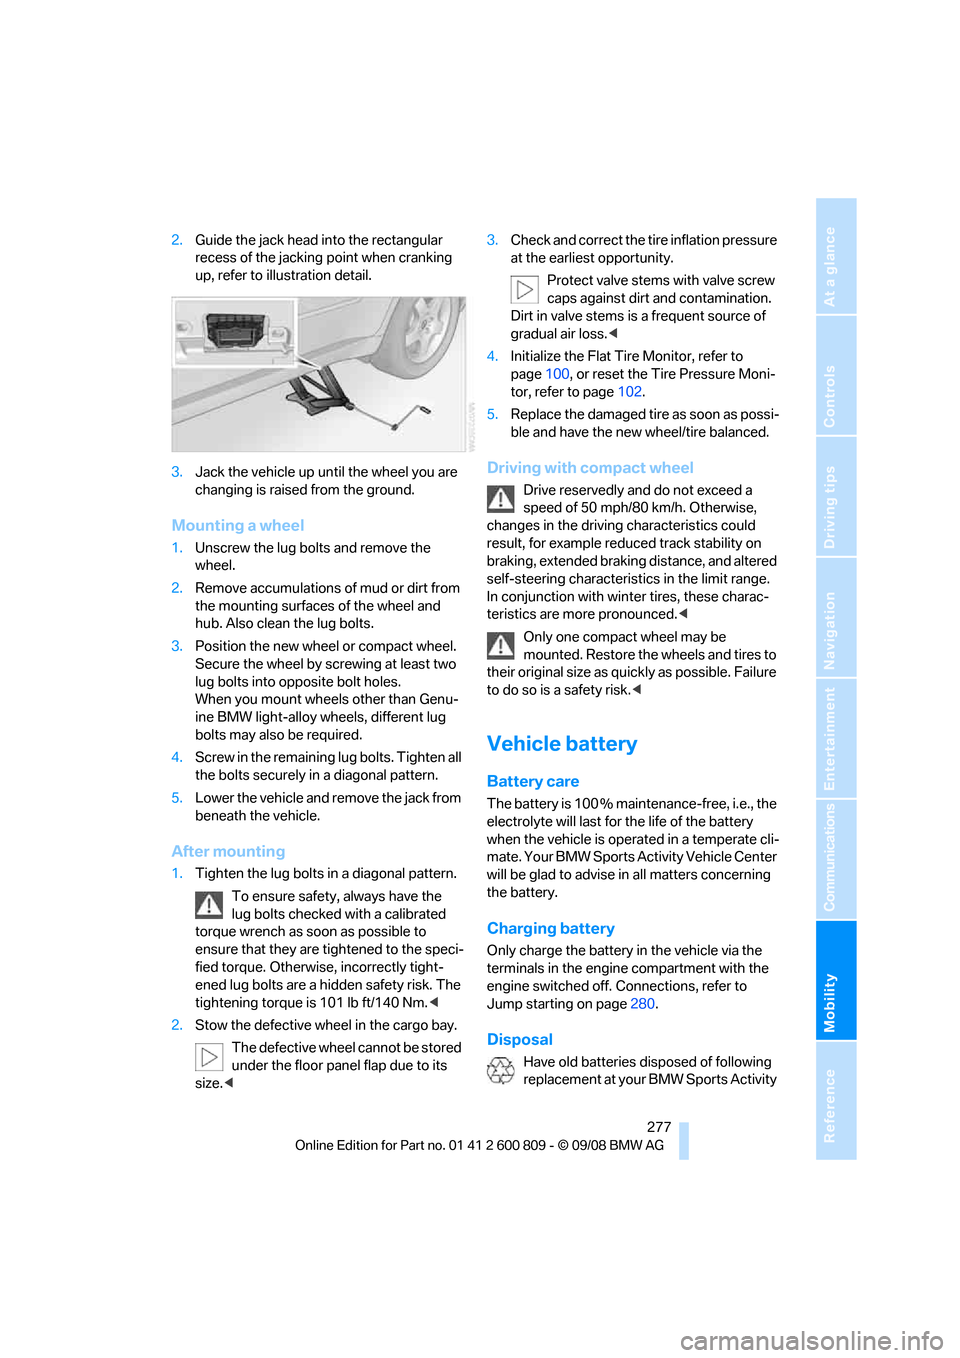
2.Guide the jack head into the rectangular
recess of the jacking point when cranking
up, refer to illustration detail.
3. Jack the vehicle up until the wheel you are
changing is raised from the ground.
Mounting a wheel
1.Unscrew the lug bolts and remove the
wheel.
2. Remove accumulations of mud or dirt from
the mounting surfaces of the wheel and
hub. Also clean the lug bolts.
3. Position the new wheel or compact wheel.
Secure the wheel by sc rewing at least two
lug bolts into opposite bolt holes.
When you mount wheels other than Genu-
ine BMW light-alloy wheels, different lug
bolts may also be required.
4. Screw in the remaining lug bolts. Tighten all
the bolts securely in a diagonal pattern.
5. Lower the vehicle and remove the jack from
beneath the vehicle.
After mounting
1.Tighten the lug bolts in a diagonal pattern.
To ensure safety, always have the
lug bolts checked with a calibrated
torque wrench as soon as possible to
ensure that they are tightened to the speci-
fied torque. Otherwis e, incorrectly tight-
ened lug bolts are a hidden safety risk. The
tightening torque is 101 lb ft/140 Nm. <
2. Stow the defective wheel in the cargo bay.
The defective wheel cannot be stored
under the floor panel flap due to its
size. < 3.
Check and correct the ti re inflation pressure
at the earliest opportunity.
Protect valve stems with valve screw
caps against dirt and contamination.
Dirt in valve stems is a frequent source of
gradual air loss. <
4. Initialize the Flat Tire Monitor, refer to
page 100, or reset the Tire Pressure Moni-
tor, refer to page 102.
5. Replace the damaged tire as soon as possi-
ble and have the new wheel/tire balanced.
Driving with compact wheel
Drive reservedly and do not exceed a
speed of 50 mph/80 km/h. Otherwise,
changes in the driving characteristics could
result, for example reduced track stability on
braking, extended brakin g distance, and altered
self-steering characterist ics in the limit range.
In conjunction with wint er tires, these charac-
teristics are more pronounced. <
Only one compact wheel may be
mounted. Restore the wheels and tires to
their original size as quickly as possible. Failure
to do so is a safety risk. <
Vehicle battery
Battery care
The battery is 100 % main tenance-free, i.e., the
electrolyte will last for the life of the battery
when the vehicle is operated in a temperate cli-
mate. Your BMW Sports Activity Vehicle Center
will be glad to advise in all matters concerning
the battery.
Charging battery
Only charge the battery in the vehicle via the
terminals in the engine compartment with the
engine switched off. Connections, refer to
Jump starting on page 280.
Disposal
Have old batteries disposed of following
replacement at your BMW Sports Activity
Page 280 of 317
Replacing components
278
Vehicle Center or bring them to a collection
point. Maintain the battery
in an upright position
for transport and storage. Always restrain the
battery to prevent it from tipping over during
transport. <
Power failure
Following a temporary power failure, e.g. due to
a discharged battery, the use of some equip-
ment will be restricted, requiring its reinitializa-
tion. In the same way, individual settings are lost
and must be updated again:
> Seat, mirror and steering wheel memory
The positions must be stored again, refer to
page 50.
> Time and Date
The values must be updated again, refer to
pages 88, 89.
> Radio
Radio stations must be stored again, refer
to page 180.
> Navigation system
You must wait until the system becomes
functional again, refer to page 170.
> Glass sunroof/panorama glass sunroof
It may only be possible to raise the glass
sunroof/panorama gl ass sunroof The sys-
tem must be initialized, refer to page 46.
> Digital compass
The system must be calibrated, refer to
page 126.
Before removing the vehicle from stor-
age, consult your BMW Sports Activity
Vehicle Center. <
Fuses
Never attempt to repair a blown fuse and
do not replace a defective fuse with a sub-
stitute of another color or amperage rating, as
this could lead to a circ uit overload, ultimately
resulting in a fire in the vehicle. <
Spare fuses, a pair of plastic tweezers and infor-
mation on the fuse assi gnment are located near
the fuses in the cargo bay.
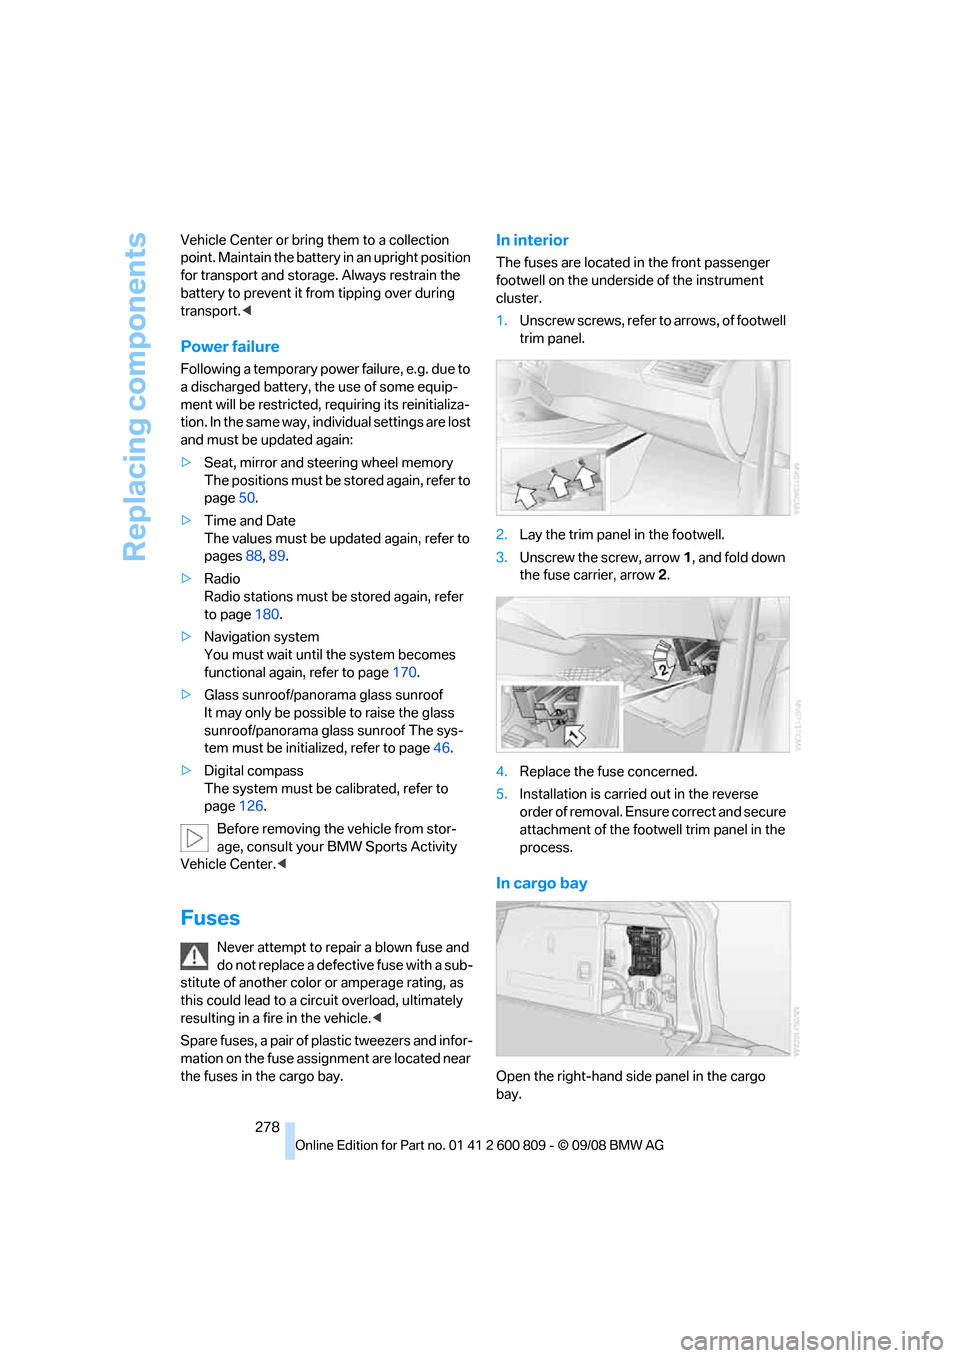
In interior
The fuses are located in the front passenger
footwell on the undersid e of the instrument
cluster.
1. Unscrew screws, refer to arrows, of footwell
trim panel.
2. Lay the trim panel in the footwell.
3. Unscrew the screw, arrow 1, and fold down
the fuse carrier, arrow 2.
4. Replace the fuse concerned.
5. Installation is carrie d out in the reverse
order of removal. Ensure correct and secure
attachment of the foot well trim panel in the
process.
In cargo bay
Open the right-hand side panel in the cargo
bay.
Page 284 of 317

Giving and receiving assistance
282
Being towed
Make sure that the ignition is switched on,
refer to page65, otherwise the low
beams, tail lamps, turn signals and windshield
wipers would not be available. When the engine
is stopped, there is no power assist. This then
requires increased effort for braking and steer-
ing. Active steering is deactivated and larger
steering wheel movements are required.<
Switch on the hazard wa rning flashers depend-
ing on the local regulations. If the electrical sys-
tem fails, mark the vehicle to be towed, e.g. with
a sign or warning triangle in the rear window.
Before towing, manua lly unlock the trans-
mission lock, refer to page 72; failure to
do so can result in damage to the transmis-
sion. <
Do not exceed a towing speed of 45 mph/
70 km/h and a towing distance of
90 miles/150 km, otherwise the automatic
transmission may be damaged. <
Towing methods
Do not lift vehicle by tow fitting or body
and chassis parts, otherwise damage may
result. <
In some countries, towi ng with tow bars or
ropes in public traffic is not permitted. Familiar-
ize yourself with the regu lations on towing in the
respective country.
With tow bar
The towing vehicle may not be lighter
than the vehicle to be towed, otherwise it
will not be possible to reliably control vehicle
response. <
The tow fittings used sh ould be on the same
side on both vehicles. Should it prove impossi-
ble to avoid mounting the tow bar at an offset
angle, observe the following:
> Clearance and maneuvering capability will
be sharply limited during cornering.
> When mounted at an angle, the tow bar will
exert lateral forces, tending to push the
vehicle sideways. Only attach the tow bar to the tow fittings,
as attachment to other vehicle parts can
lead to damage. <
With tow rope
When starting off in the towing vehicle, make
sure that the tow rope is taut.
To avoid jerking and the associated
stresses on vehicle components when
towing, always use nylon ropes or nylon straps.
Only attach tow ropes to the tow fittings, as
attachment to other vehi cle parts can lead to
damage. <
With tow truck
Do not tow your BMW with the front or
rear axle raised indi vidually; otherwise,
the wheels may lock and the transfer case may
be damaged. <
Have the BMW transported only on a flatbed
surface.
Tow-starting
The engine cannot be started by tow-starting.
Start the engine by jump starting it, refer to
page 280.
Have the cause of the st arting difficulties elimi-
nated.
Page 296 of 317
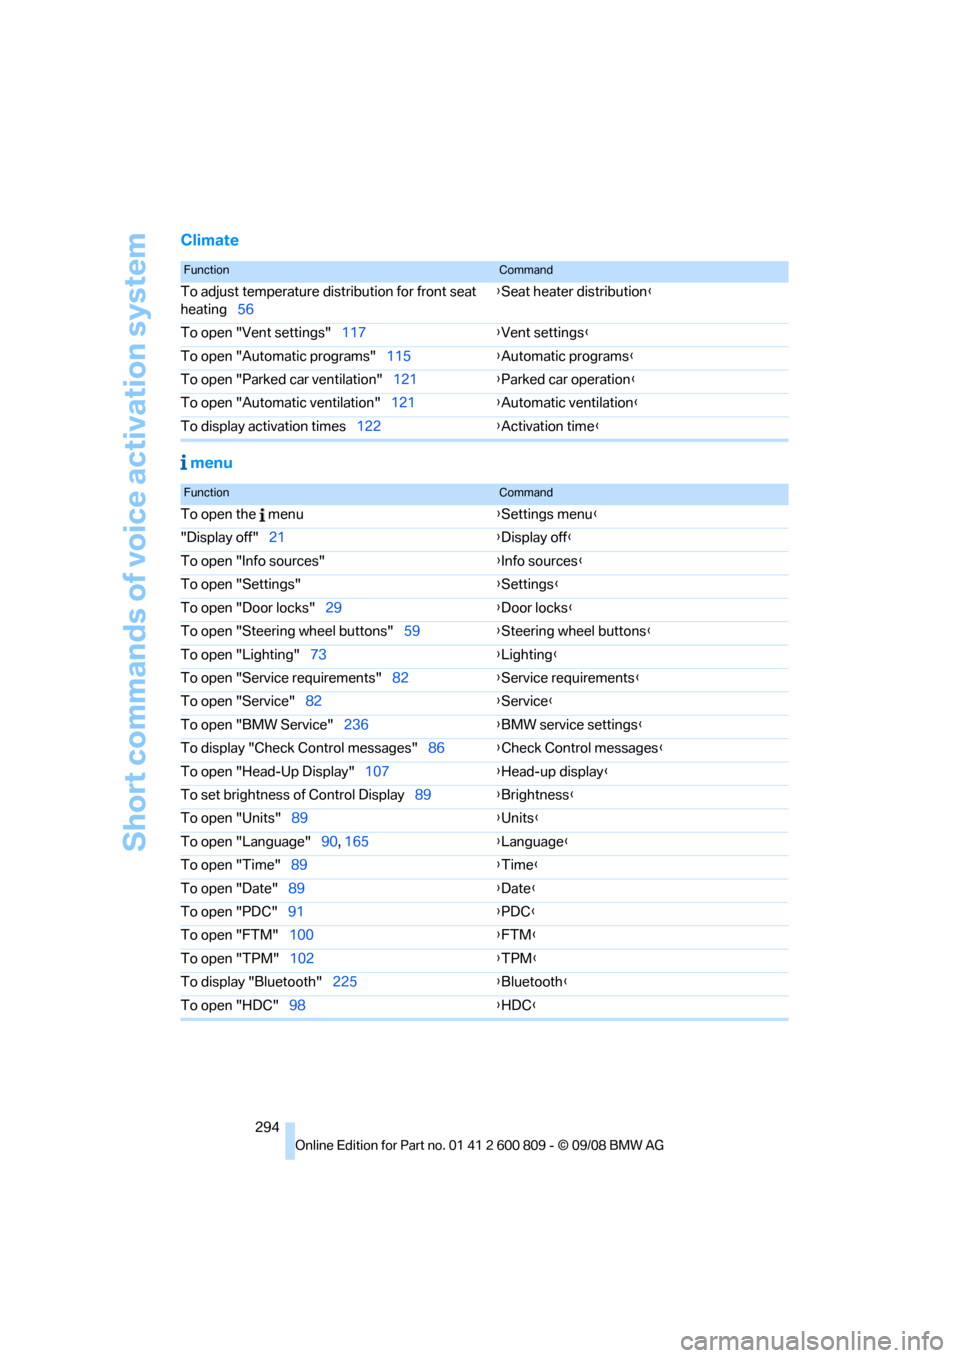
Short commands of voice activation system
294
Climate menu
FunctionCommand
To adjust temperature distribution for front seat
heating 56 {
Seat heater distribution }
To open "Vent settings" 117{Vent settings }
To open "Automatic programs" 115{Automatic programs }
To open "Parked car ventilation" 121{Parked car operation }
To open "Automatic ventilation" 121{Automatic ventilation }
To display activation times 122{Activation time }
FunctionCommand
To open the menu {Settings menu }
"Display off" 21 {Display off }
To open "Info sources" {Info sources }
To open "Settings" {Settings }
To open "Door locks" 29 {Door locks }
To open "Steering wheel buttons" 59{Steering wheel buttons }
To open "Lighting" 73 {Lighting }
To open "Service requirements" 82{Service requirements }
To open "Service" 82 {Service }
To open "BMW Service" 236{BMW service settings }
To display "Check Control messages" 86{Check Control messages }
To open "Head-Up Display" 107{Head-up display }
To set brightness of Control Display 89{Brightness }
To open "Units" 89 {Units }
To open "Language" 90, 165 {Language }
To open "Time" 89 {Time }
To open "Date" 89 {Date }
To open "PDC" 91 {PDC }
To open "FTM" 100 {FTM }
To open "TPM" 102 {TPM }
To display "Bluetooth" 225 {B
luetooth}
To open "HDC" 98 {HDC }
Page 298 of 317
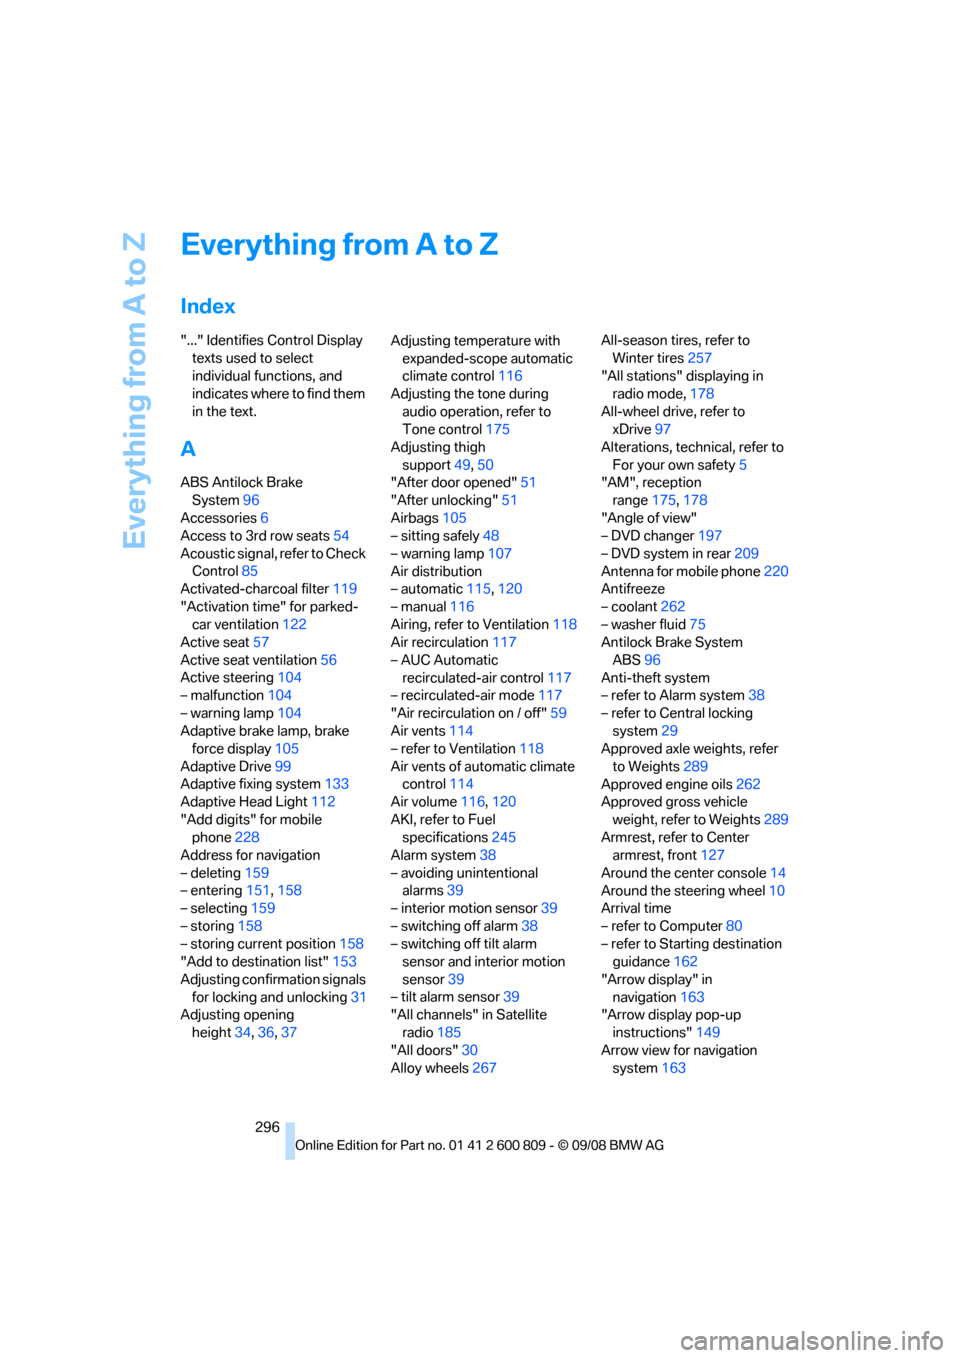
Everything from A to Z
296
Everything from A to Z
Index
"..." Identifies Control Display texts used to select
individual functions, and
indicates where to find them
in the text.
A
ABS Antilock Brake System 96
Accessories 6
Access to 3rd row seats 54
Acoustic signal, refer to Check Control 85
Activated-charcoal filter 119
"Activation time" for parked- car ventilation 122
Active seat 57
Active seat ventilation 56
Active steering 104
– malfunction 104
– warning lamp 104
Adaptive brake lamp, brake force display 105
Adaptive Drive 99
Adaptive fixing system 133
Adaptive Head Light 112
"Add digits" for mobile phone 228
Address for navigation
– deleting 159
– entering 151,158
– selecting 159
– storing 158
– storing current position 158
"Add to destination list" 153
Adjusting confirmation signals for locking and unlocking 31
Adjusting opening
height 34,36, 37 Adjusting temperature with
expanded-scope automatic
climate control 116
Adjusting the tone during audio operation, refer to
Tone control 175
Adjusting thigh support 49,50
"After door opened" 51
"After unlocking" 51
Airbags 105
– sitting safely 48
– warning lamp 107
Air distribution
– automatic 115,120
– manual 116
Airing, refer to Ventilation 118
Air recirculation 117
– AUC Automatic recirculated-air control 117
– recirculated-air mode 117
"Air recirculation on / off" 59
Air vents 11
4
– refer to Ventilation 118
Air vents of automatic climate control 114
Air volume 116,120
AKI, refer to Fuel specifications 245
Alarm system 38
– avoiding unintentional alarms 39
– interior motion sensor 39
– switching off alarm 38
– switching off tilt alarm sensor and interior motion
sensor 39
– tilt alarm sensor 39
"All channels" in Satellite
radio 185
"All doors" 30
Alloy wheels 267 All-season tires, refer to
Winter tires 257
"All stations" displaying in
radio mode, 178
All-wheel drive, refer to xDrive 97
Alterations, tech nical, refer to
For your own safety 5
"AM", reception
range 175,178
"Angle of view"
– DVD changer 197
– DVD system in rear 209
Antenna for mobile phone 220
Antifreeze
– coolant 262
– washer fluid 75
Antilock Brake System
ABS 96
Anti-theft system
– refer to Alarm system 38
– refer to Central locking system 29
Approved axle weights, refer
to Weights 289
Approved engine oils 262
Approved gross vehicle
weight, refer to Weights 289
Armrest, refer to Center armrest, front 127
Around the center console 14
Around the steering wheel 10
Arrival time
– refer to Computer 80
– refer to Starting destination guidance 162
"Arrow display" in navigation 163
"Arrow display pop-up
instructions" 149
Arrow view for navigation system 163
Page 299 of 317

Reference 297
At a glance
Controls
Driving tips
Communications
Navigation
Entertainment
Mobility
Ashtray
– front128
– rear 129
Assist 235
– refer to separate operating
instructions
Assistance systems, refer to Driving stability control
systems 96
Assistance window 20
"Assist profile" 241
"Assist. window off" 21
AUC Automatic recirculated-
air control 117
"Audio" 177,181
– for DVD system in rear 216
Audio 174
– controls 174
– switching on/off 174
– tone control 175
– volume 175
Audio CD for DVD system in
rear 210
Audio device, external 127
Automatic
– air distribution 115,120
– air volume 115,120
– BMW Teleservice call 237
– headlamp control 110
– liftgate operation 34,37
– steering wheel adjustment,
refer to Easy entry/exit 58
– storing stations 179
Automatic car washes 140
Automatic climate control
– automatic air distribution 115,120
– in rear 119
– in rear, activating on Control Display 120
– switching off 118,120
– ventilation in rear 119
– with 2-zone control 115
– with 4-zone control 119
Automatic closing of doors, refer to Automatic soft
closing 33 Automatic curb monitor
58
Automatic garage door
opener 123
Automatic Hold 67
– activating 68
– deactivating 68
– parking 68
Auto
matic lighting
– refer to Automatic headlamp control 110
– refer to Daytime driving
lamps 111
– refer to Interior lamps 113
– refer to Pathway lighting 111
"Automatic programs" 116
Automatic recirculated-air
control AUC 117
Automatic soft closing 33
Automatic station search 179
Automatic transmission with Steptronic 70
– deactivating selector lever
interlock 71
– kick-down 71
– manually releasing
transmission lock 72
– tow-starting 282
– with comfort access 40
"Automatic ventilation" 121
AUTO program for automatic climate control 115,120
"Auto Request" 237
"Autostore"
– on the radio 180
"AUX" 175,200 ,202
– AUX-In connection 200
– for DVD system in rear 215
– USB audio interface 201
"AUX / Rear" 206
AUX-In connection 127,200
Average fuel consumption 80
– setting units 89
Average speed, refer to
Computer 80
"Avoid ferries" in navigation 161
"Avoid highways" in navigation 160 Avoiding highways for
navigation 160
Avoiding unintentional alarms 39
"Avoid tollroads" in
navigation 161
Axle weights, refer to Weights 289
"A - Z" 228
B
Backrest contour, refer to
Lumbar support 50
Backrests, refer to Seats 49
Backrest width adjustment 50
Backup lamps, replacing bulbs 270,273
Balance, refer to Tone
control 176
"Balance" for DVD system in rear 209
Band-aids, refer to First-aid kit 279
Bass, refer to Tone
control 175
Battery
– charging 277
– jump starting 280
– power failure 278
– refer to Vehicle battery 277
Battery disposal
– remote control with comfort access 41
– vehicle battery 277
Battery replacement
– remote control for DVD
system in rear 206
– remote control with comfort access 41
Being towed 282
Belts, refer to Safety belts 54
Beverage holder, refer to Cup
holders 127
Blower, refer to Air volume 116,120
BMW Advanced Diesel 245