2009 BMW X6 XDRIVE 50I signal
[x] Cancel search: signalPage 172 of 317

What to do if …
170
What to do if …
What to do if …
>a navigation DVD is inserted, but an instruc-
tion to insert the DVD appears on the Con-
trol Display?
The navigation DVD ma y not be the correct
DVD for the navigation system. This infor-
mation is indicated on the DVD label.
> you request the current position of your
vehicle, but do not receive a precise dis-
play?
The system is unable to receive enough
GPS signals at your cu rrent position due to
obstructions, your position is not yet avail-
able on your navigation DVD, or the system
is in the process of calculating your posi-
tion. Reception is best when you have an
unobstructed view to the sky.
> the destination guidance does not accept a
destination?
The data of the destination is not stored on
the navigation DVD that is loaded. Select a
destination that is as close as possible to
the original.
> the destination guidance does not accept
an address without the street name?
On the navigation DVD, no downtown area
can be determined fo r the city or town
entered. Enter any street, or a destination
such as the railway st ation in the selected
town, and then start the destination guid-
ance.
> you want to enter a de stination for the des-
tination guidance, but it is not possible to
select the letters fo r your desired entry?
The data of the destination is not stored on
the navigation DVD that is loaded. In this
case, the system will not offer you any let-
ters to choose from. Select a destination
that is as close as possible to the original. >
the system stops furnishing directions on
which way to turn as you approach intersec-
tions?
You are driving in an area that has not yet
been completely reco rded on the naviga-
tion DVD. Instead of an arrow indicating a
turn, you will see an arrow which indicates
the general direction of your planned route.
Or you have left the recommended route
and the system requires a few seconds to
calculate a new recommended route.
> the navigation system does not react to
entries?
If the battery was disconnected, it takes
about 10 minutes before the system is once
again operational.
Page 180 of 317

Radio
178
Radio
Your radio provides reception of the FM and AM
wavebands.
Listening to radio
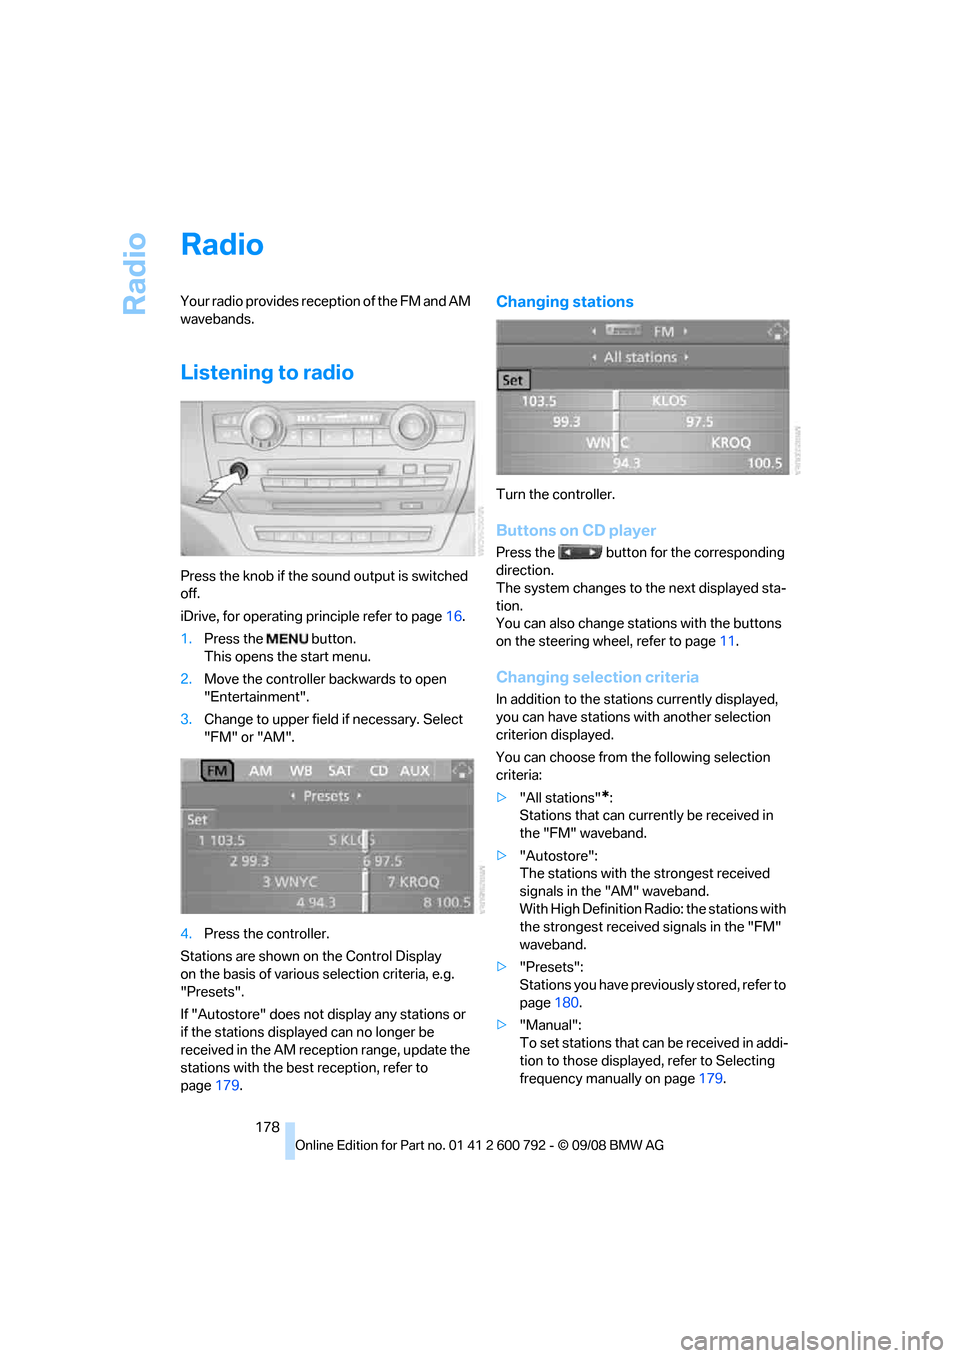
Press the knob if the sound output is switched
off.
iDrive, for operating principle refer to page16.
1. Press the button.
This opens the start menu.
2. Move the controller backwards to open
"Entertainment".
3. Change to upper field if necessary. Select
"FM" or "AM".
4. Press the controller.
Stations are shown on the Control Display
on the basis of various selection criteria, e.g.
"Presets".
If "Autostore" does not display any stations or
if the stations displayed can no longer be
received in the AM reception range, update the
stations with the best reception, refer to
page 179.
Changing stations
Turn the controller.
Buttons on CD player
Press the button for the corresponding
direction.
The system changes to the next displayed sta-
tion.
You can also change stat ions with the buttons
on the steering wheel, refer to page 11.
Changing selection criteria
In addition to the stations currently displayed,
you can have stations with another selection
criterion displayed.
You can choose from the following selection
criteria:
> "All stations"
*:
Stations that can currently be received in
the "FM" waveband.
> "Autostore":
The stations with the strongest received
signals in the "AM" waveband.
With High Definition Radio: the stations with
the strongest received signals in the "FM"
waveband.
> "Presets":
Stations you have previously stored, refer to
page 180.
> "Manual":
To set stations that ca n be received in addi-
tion to those displayed, refer to Selecting
frequency manually on page 179.
Page 183 of 317

Navigation
Entertainment
Driving tips
181Reference
At a glance
Controls
Communications
Mobility
5.Turn the controller until the desired mem-
ory position is selected.
The number of the memory position
appears beside the na me or frequency of
the station.
6. Press the controller.
The station is stored.
RDS Radio Data System
In the FM frequency range, additional informa-
tion is transmitted via RDS. If the reception con-
ditions are good, the station names are shown
on the Control Display. If the reception is weak
or disrupted, it can take some time before the
station names are displayed.
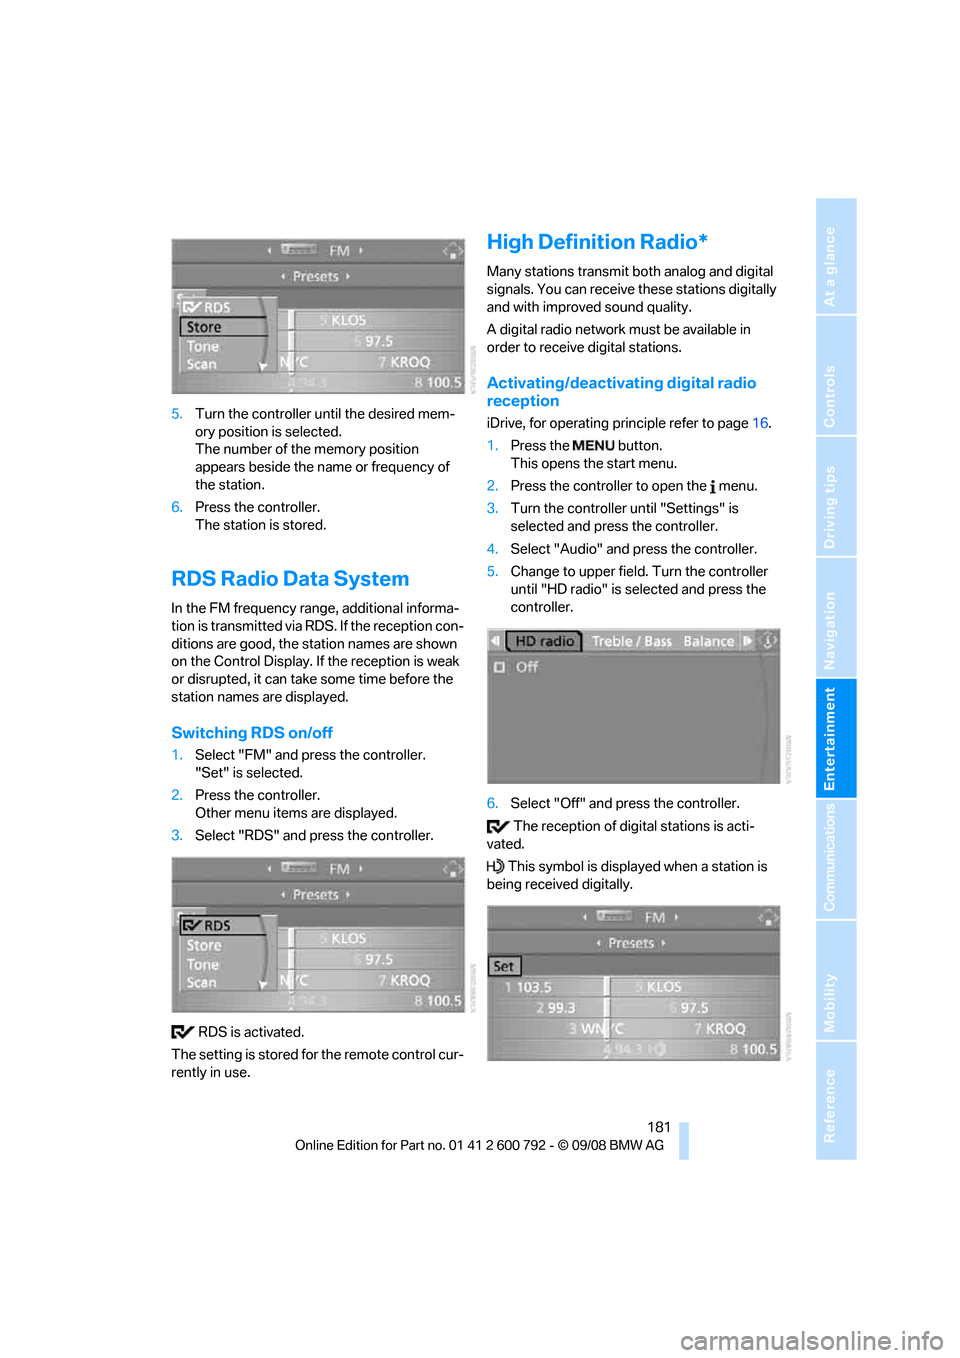
Switching RDS on/off
1. Select "FM" and press the controller.
"Set" is selected.
2. Press the controller.
Other menu items are displayed.
3. Select "RDS" and press the controller.
RDS is activated.
The setting is stored for the remote control cur-
rently in use.
High Definition Radio*
Many stations transmit both analog and digital
signals. You can receive these stations digitally
and with improved sound quality.
A digital radio network must be available in
order to receive digital stations.
Activating/deactivating digital radio
reception
iDrive, for operating pr inciple refer to page16.
1. Press the button.
This opens the start menu.
2. Press the controller to open the menu.
3. Turn the controller until "Settings" is
selected and press the controller.
4. Select "Audio" and press the controller.
5. Change to upper field. Turn the controller
until "HD radio" is se lected and press the
controller.
6. Select "Off" and press the controller.
The reception of digital stations is acti-
vated.
This symbol is displa yed when a station is
being received digitally.
Page 184 of 317

Radio
182
With some stations the
digital signals are not
transmitted simultaneously with the analog sig-
nals. If you are in an ar ea in which the selected
station is not continuous ly received digitally,
playback changes betwee n analog and digital
reception. This can result in repetitions or inter-
ruptions. In this case it may be advisable to
deactivate digital radio reception.
Selecting programs of a digital station*
Some stations transmit several programs on
one frequency. To select one of these pro-
grams:
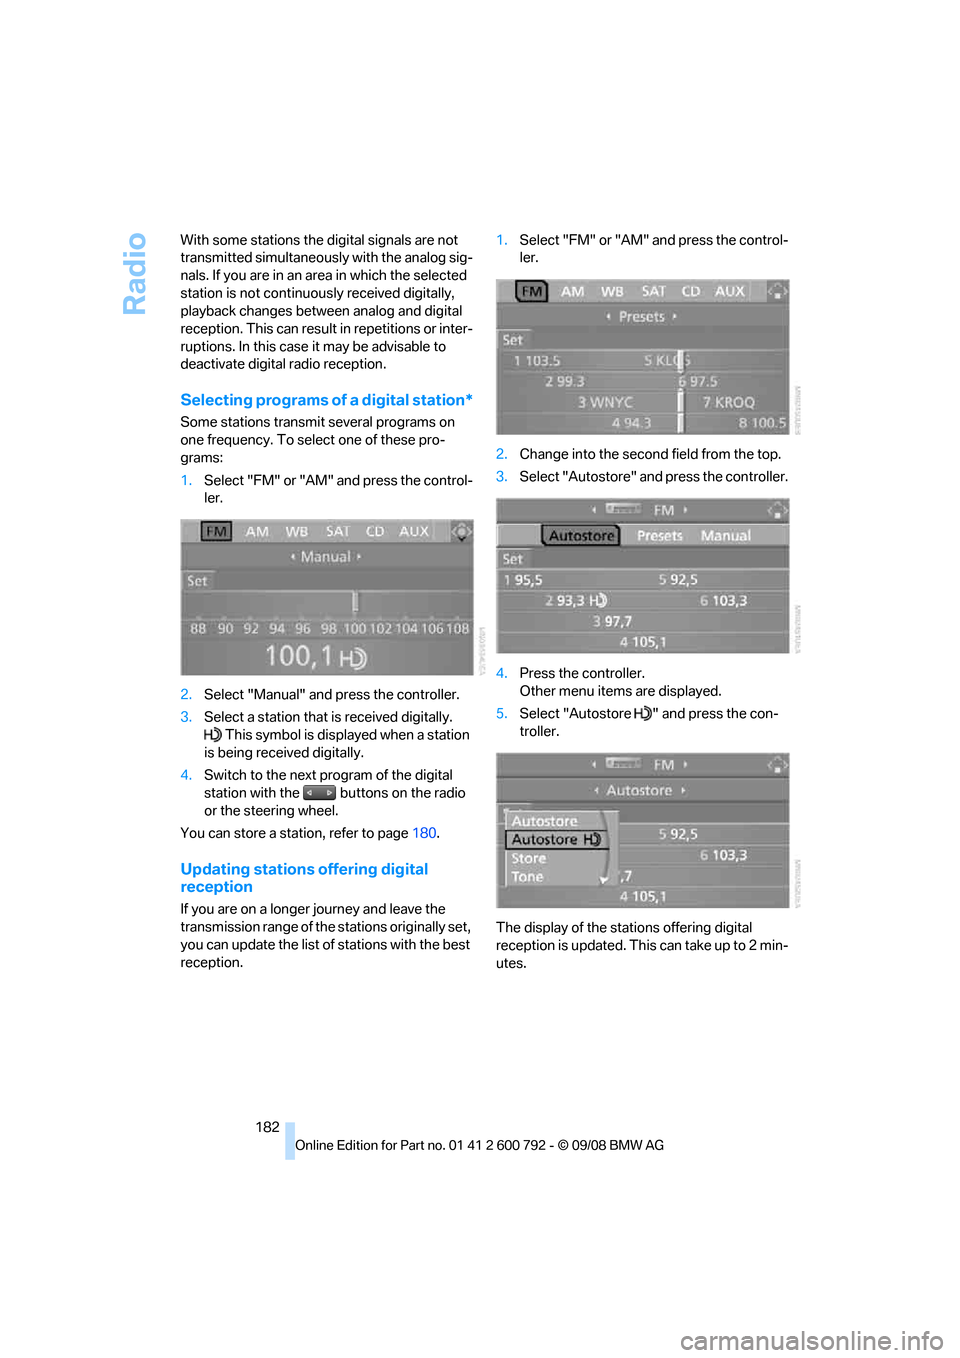
1. Select "FM" or "AM" and press the control-
ler.
2. Select "Manual" and press the controller.
3. Select a station that is received digitally.
This symbol is displayed when a station
is being received digitally.
4. Switch to the next program of the digital
station with the buttons on the radio
or the steering wheel.
You can store a station, refer to page 180.
Updating stations offering digital
reception
If you are on a longer journey and leave the
transmission range of the stations originally set,
you can update the list of stations with the best
reception. 1.
Select "FM" or "AM" and press the control-
ler.
2. Change into the second field from the top.
3. Select "Autostore" and press the controller.
4. Press the controller.
Other menu items are displayed.
5. Select "Autostore " and press the con-
troller.
The display of the stations offering digital
reception is updated. This can take up to 2 min-
utes.
Page 186 of 317

Satellite radio
184
Satellite radio
You can receive over 100 different channels
with high sound quality.
The channels are offered to you in predefined
packages. To receive the channels of your
choice, you must have this package enabled.
With this new techno logy the signal may
fail, causing interruptions in reception. <
Enabling or disabling
channels
iDrive, for operating principle refer to page16.
1. Press the button.
This opens the start menu.
2. Move the controller backwards to open
"Entertainment".
3. Select "SAT".
4. Press the controller.
The channels are displayed. These channels are enabled.
Enabling
1. Select a channel that has not yet been
enabled and press the controller.
A telephone number and the electronic
serial number, ESN, are displayed.
The electronic serial number is
required for enabling or disabling. <
2. To enable the channel:
Dial the phone number.
Disabling
1.Select an enabled channel and press the
controller.
2. Select "ESN" and press the controller.
The electronic serial number, ESN, is dis-
played.
The electronic serial number is
required for disabling. <
3. To disable the channel:
Dial the phone number.
*
Page 188 of 317

Satellite radio
186
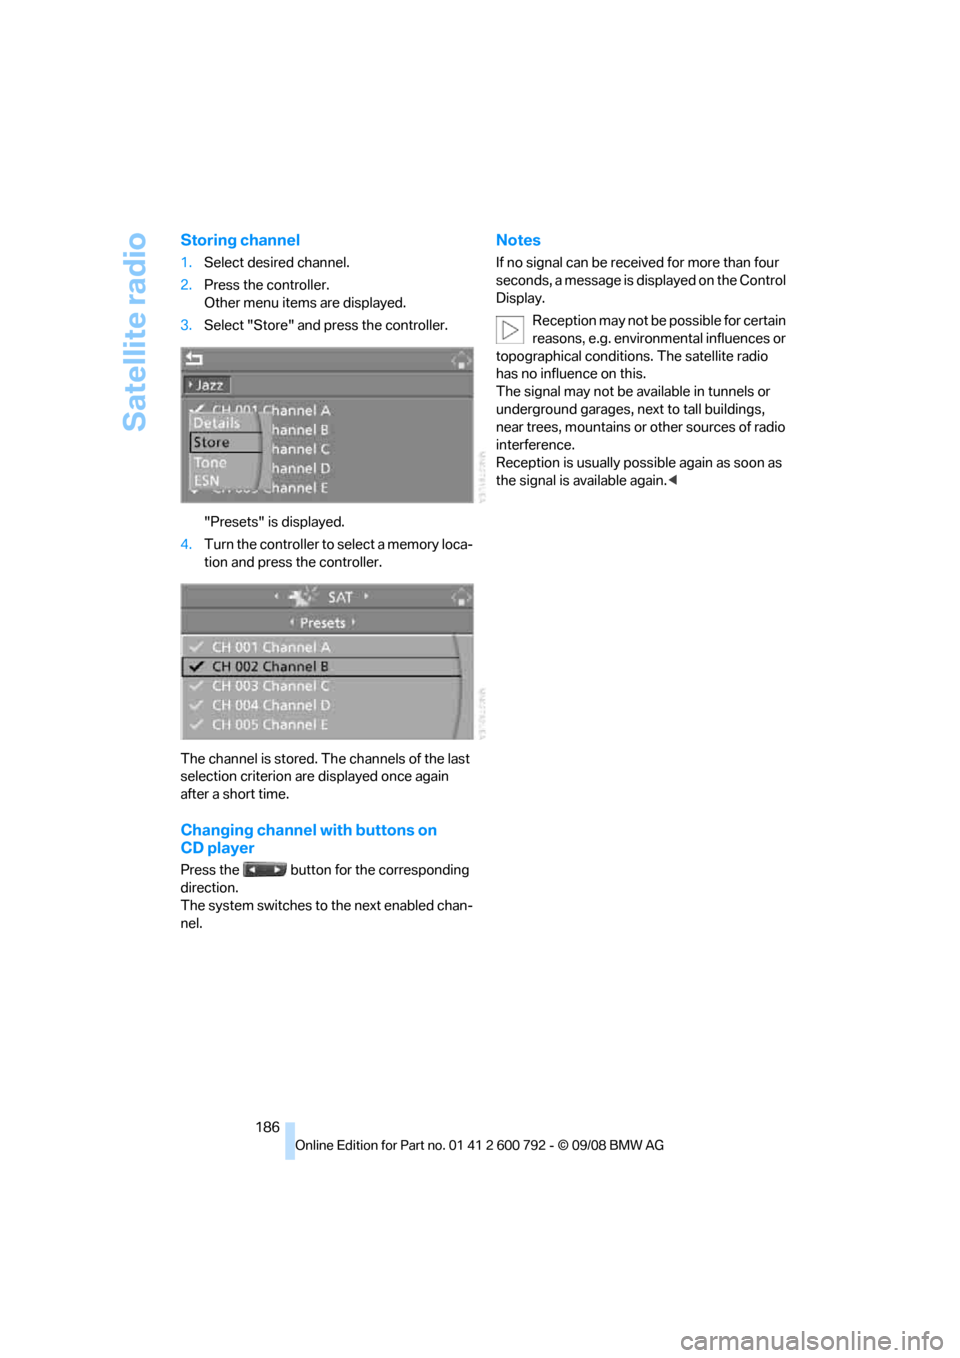
Storing channel
1.Select desired channel.
2. Press the controller.
Other menu items are displayed.
3. Select "Store" and press the controller.
"Presets" is displayed.
4. Turn the controller to select a memory loca-
tion and press the controller.
The channel is stored. Th e channels of the last
selection criterion are displayed once again
after a short time.
Changing channel with buttons on
CD player
Press the button for the corresponding
direction.
The system switches to the next enabled chan-
nel.
Notes
If no signal can be rece ived for more than four
seconds, a message is displayed on the Control
Display.
Reception may not be possible for certain
reasons, e.g. environmental influences or
topographical conditions. The satellite radio
has no influence on this.
The signal may not be av ailable in tunnels or
underground garages, ne xt to tall buildings,
near trees, mountains or other sources of radio
interference.
Reception is usually poss ible again as soon as
the signal is available again. <
Page 204 of 317

USB audio interface
202
Starting audio playback
Via iDrive
If the audio device has a device name, this will
be displayed if possible.
1. Press the button.
This opens the start menu.
2. Move the controller backwards to open
"Entertainment".
3. Change to upper field if necessary. Turn the
controller until "AUX" is selected and press
the controller.
4. Select "USB" or the name of the audio
device and press the controller.
The playback starts with the first track.
With the connection of an iPhone by means of
the snap-in adaptor and a simultaneous con-
nection of an audio device at the Aux-In con-
nection, the audio signal is played back. With external devices, the sound output
via the vehicle speakers can differ from
other audio sources. For a comparison of the
volume, adapt the sound ou tput of the external
device. <
Via programmable memory buttons
You can save the "USB" function on the pro-
grammable memory buttons. To start audio
playback, refer to page 21.
Selecting a track
You can call up the tracks via the playback lists
and information. With USB devices you can also
call up the tracks via the file directory. The titles
can be displayed if they are stored in the Latin
alphabet.
1. Make your selection, e.g. "Playlists" or
"Artists", and press the controller.
2. Select the track and press the controller.
Displaying information on track
You can display any information stored on the
current track, e.g. the name of the artist.
1.Press the controller during playback.
2. Select "Details" and press the controller.
The information for the current track are dis-
played.
Page 217 of 317

Navigation
Entertainment
Driving tips
215Reference
At a glance
Controls
Communications
Mobility
Humidity
High levels of humidity can lead to condensa-
tion on the CD/DVD or the laser's scan lens and
temporarily prevent playback.
Malfunctions with individual CDs/DVDs
If malfunctions occur only with particular CDs/
DVDs, this can be due to one of the following
causes.
Copied or self-recorded CDs/DVDs
Possible reasons for malfunctions with copied
or self-recorded CDs/DVDs are, e.g., inconsis-
tent data-creation or re cording processes, or
poor quality or high age of the CD/DVD blank.
Only label CDs/DVDs on the side with the label
using a pen intended for this purpose.
Damaged CDs/DVDs
Avoid fingerprints, dust, scratches and mois-
ture.
Store CDs/DVDs in a sleeve.
Do not subject CDs/DVDs to temperatures over
122 7/50 6, high levels of humidity, or direct
sunlight.
CDs/DVDs with copy protection
CDs/DVDs are often provided with a copy pro-
tection feature by the manufacturer. As a result,
some CDs/DVDs cannot be played, can only be
played to a limited degree, or cause the system
to switch off. In this ca se, wait a short while and
then switch the system back on again. Then
remove the CD/DVD from the drive.
CDs/DVDs with compressed audio files
If the language set for the CD/DVD player does
not match the language of the music track, the
music tracks may be displayed incorrectly.
Care instructions
Do not use cleaning CDs with a brush.
External device
Connecting
1 Connections for audio/video cables:
Watch the colors of the sockets when con-
necting.
Yellow socket: video
White socket: audio left
Red socket: audio right
2 Power supply for external device: sockets
with removable cap, also refer to page129
Playback
1.Switch on the external device and start the
playback.
2. Open the start menu with the remote con-
trol.
3. Select "AUX".
4. Press the button.
For devices without a video signal, e.g. MP3
players, "No vide o signal" is shown. The sound
is nevertheless played.