2009 BMW X5 XDRIVE 35D radio controls
[x] Cancel search: radio controlsPage 43 of 317

Controls
41Reference
At a glance
Driving tips
Communications
Navigation
Entertainment
Mobility
Before driving into a car wash
The vehicle can roll if you proceed according to
the following steps:
1.Insert remote control into ignition lock.
2. Depress brake pedal.
3. Engage transmission position N.
4. Release the parking brake.
5. Switch off the engine.
6. Leave the remote control in the ignition
lock.
Malfunction
The comfort access function may malfunction
due to local radio waves. Then open or close the
vehicle with the buttons on the remote control
or with a key. To start the engine following this,
insert the remote control in the ignition lock.
The warning lamp in the instrument
panel lights up when an attempt is
made to start the engine: starting the
engine is not possible. The remote control is
not in the vehicle or has a malfunction. Take
along the remote control into the vehicle or
have it checked. Insert another remote control
into the ignition lock if necessary.
The warning lamp in the instrument
panel lights up when the engine is
running: the remote control is no
longer in the vehicle. After switching off the
engine, the engine can only be started again
within approx. 10 seconds if no door has been
opened.
The indicator lamp in the instrument
panel lights up and a message
appears on the Control Display:
Replace the battery of the remote control.
Replacing battery
The remote control for comfort access contains
a battery which must be replaced if necessary.
1.Remove integrated key from remote con-
trol, refer to page 28.
2. Remove cover. 3.
Lay in new battery with positive side facing
upward.
4. Press cover closed.
Dispose of used batteries at a collection
point or at your BMW Sports Activity
Vehicle Center. <
Windows
To prevent injuries, exercise care when
closing the windows and keep them in
your field of vision until they are shut.
Always take along the remote control when you
leave the vehicle, otherw ise children could, for
example, operate the windows and injure them-
selves. <
Opening, closing
>Press switch to resistance point:
The window continues to open as long as
you keep the switch pressed.
> Press switch beyond resistance point:
The window opens automatically. Pressing
the switch again stops the opening move-
ment.
You can close the windows in the same manner
by pulling the switch.
Page 53 of 317

Controls
51Reference
At a glance
Driving tips
Communications
Navigation
Entertainment
Mobility
3.Press the button:
The LED in the button lights up.
4. Press the desired memory button 1 or 2:
The LED goes out.
The positions of the driver's seat, the exte-
rior rearview mirrors, and steering wheel are
stored for the remote control currently in
use.
Calling up automatically
You can choose when the stored positions of
the driver's seat, exterior rearview mirrors, and
steering wheel are activated.
> Calling up when unlocking vehicle
> Calling up when opening driver's door
When using this feat ure, always make
sure that the footwell behind the driver's
seat is empty and unobstructed. Failure to do
so could cause injury to persons or damage to
objects behind the seat as a result of a rearward
movement of the seat. <
The system cancels the adjustment procedure
when you briefly press one of the seat adjust-
ment switches or one of the memory buttons.
Selecting calling up automatically
iDrive, for operating principle refer to page 16.
1. Open the start menu.
2. Press the controller to open the menu.
3. Select "Settings" and press the controller.
4. Select "Vehicle / Tire s" and press the con-
troller.
5. Change to upper field if necessary. Turn the
controller until "Door locks" is selected and
press the controller. 6.
Select "Central locking" and press the con-
troller.
7. Select "Last seat pos." and press the con-
troller.
8. Select "After unlock ing" or "After door
opened".
9. Press the controller.
Deactivating calling up automatically
Select "Deactivated" an d press the controller.
Calling up manually
Do not call up a position from the memory
while the vehicle is moving. There is a risk
of accident from unexpected movement of the
seat or steering wheel. <
Comfort mode
1.Open the driver's door after unlocking or
switch on radio readiness.
2. Briefly press the de sired memory button 1
or 2.
The system cancels the adjustment procedure
when you briefly press one of the seat adjust-
ment switches or one of the memory buttons.
Safety feature
1. Close the driver's door and switch the igni-
tion on or off.
2. Press the desired memory button 1 or 2
and maintain pressure until the adjustment
process has been completed.
If the button was pressed inadvertently:
press the button again; the LED goes out.
Page 67 of 317

Controls
65Reference
At a glance
Driving tips
Communications
Navigation
Entertainment
Mobility
Driving
Ignition lock
Inserting remote control into ignition
lock
Insert the remote control as far as possible into
the ignition lock.
Radio readiness switches on. Some electronic
systems/consumers are ready for operation.
Comfort access*
With comfort access, only insert the remote
control into the ignition lock in exceptional
cases, refer to page 39.
Removing remote control from ignition
lock
Do not pull the remote control out of the
ignition lock using force, as otherwise
damage may result. <
Before removing the remo te control, first press
it in as far as possibl e to release the locking
device.
The ignition is switched off if it was still
switched on.
Start/Stop button
Pressing the Start/Stop button switches the
radio readiness or the ignition on and off.
Pressing the Start/Stop button with the
brake pedal depre ssed starts the
engine. <
Radio readiness
Some electronic systems/consumers are ready
for operation. The time and outside tempera-
ture are displayed in the instrument panel.
Radio readiness is auto matically switched off:
> when the remote control is removed from
the ignition lock
> with comfort access
* by touching the sen-
sitive surface above the door lock, refer to
Locking on page 40
Ignition on
All electronic systems/consumers are ready for
operation. The odometer and the trip odometer
are displayed in the instrument panel, refer to
page78.
Please switch off the ignition and the
electronic systems/consumers which are
not required when the engine is not running to
save the battery. <
Radio readiness and ignition off
All indicator lamps, warning lamps, and displays
in the instrument panel go out.
Page 109 of 317

Controls
107Reference
At a glance
Driving tips
Communications
Navigation
Entertainment
Mobility
The front and side airbags on the front pas-
senger side are activated.
> The indicator lamp does not light up when
the seat is empty.
However, the front and side airbags on the
front passenger side are not activated.
Operational readiness of airbag system
From radio readiness, refer to page 65, the
warning lamp lights up br iefly, indicating the
operational readiness of the entire airbag sys-
tem and the safety belt tensioners.
Airbag system malfunction
> Warning lamp does not light up from radio
readiness.
> Warning lamp lights up continuously.
Have the airbag system checked immedi-
ately in case of a malfunction, otherwise
there is a danger that the airbag system may not
respond in the expected manner in an accident
despite an impact of corresponding intensity. <
Head-Up Display*
The concept
With the Head-Up Display important informa-
tion is projected into the driver's field of view,
e.g. navigation instructions. This enables you to
take in this information without looking away
from the road.
Switching on/off
Press the button.
1 Navigation information or Check Control
messages
2 Cruise control
3 Speed
Selecting displays
iDrive, for operating pr inciple refer to page16.
1. Press the button.
This opens the start menu.
2. Press the controller to open the menu.
3. Select "Settings" and press the controller.
4. Select "Display settings" and press the
controller.
Page 115 of 317

Controls
113Reference
At a glance
Driving tips
Communications
Navigation
Entertainment
Mobility
Instrument lighting
You can control the lighting intensity by using
the serrated dial.
Interior lamps
The interior lamps, footwell lamps*, door entry
lighting
*, cargo bay lamps, and the courtesy
lamps
* are controlled automatically.
With the courtesy lamps, LED lights are located
in the door handles to illuminate the exterior
area before the doors.
To protect the battery, all lamps in the
vehicle are switched off approx. 15 min-
utes after radio readiness is switched off, refer
to Start/Stop button on page 65.<
Switching interior lamps on and off
manually
Press the button.
If you wish the interior lamps, footwell lamps,
door entry lighting and courtesy lamps to
remain switched off all the time, press the but-
ton for approx. 3 seconds.
Reading lamps
Reading lamps are provided in the front and
rear
* adjacent to the inte rior lamps. Press the
button to switch the lamps on and off.
Page 176 of 317

On/Off and settings
174
On/Off and settings
The following audio sources have shared con-
trols and setting options:
> Radio
> CD player
> CD changer
*
Controls
The audio sources can be controlled using:
>Buttons in the area of the CD player
> iDrive
> Buttons
on steering wheel, refer to page 11
> Programmable memory buttons, refer to
page 21
Buttons on CD player
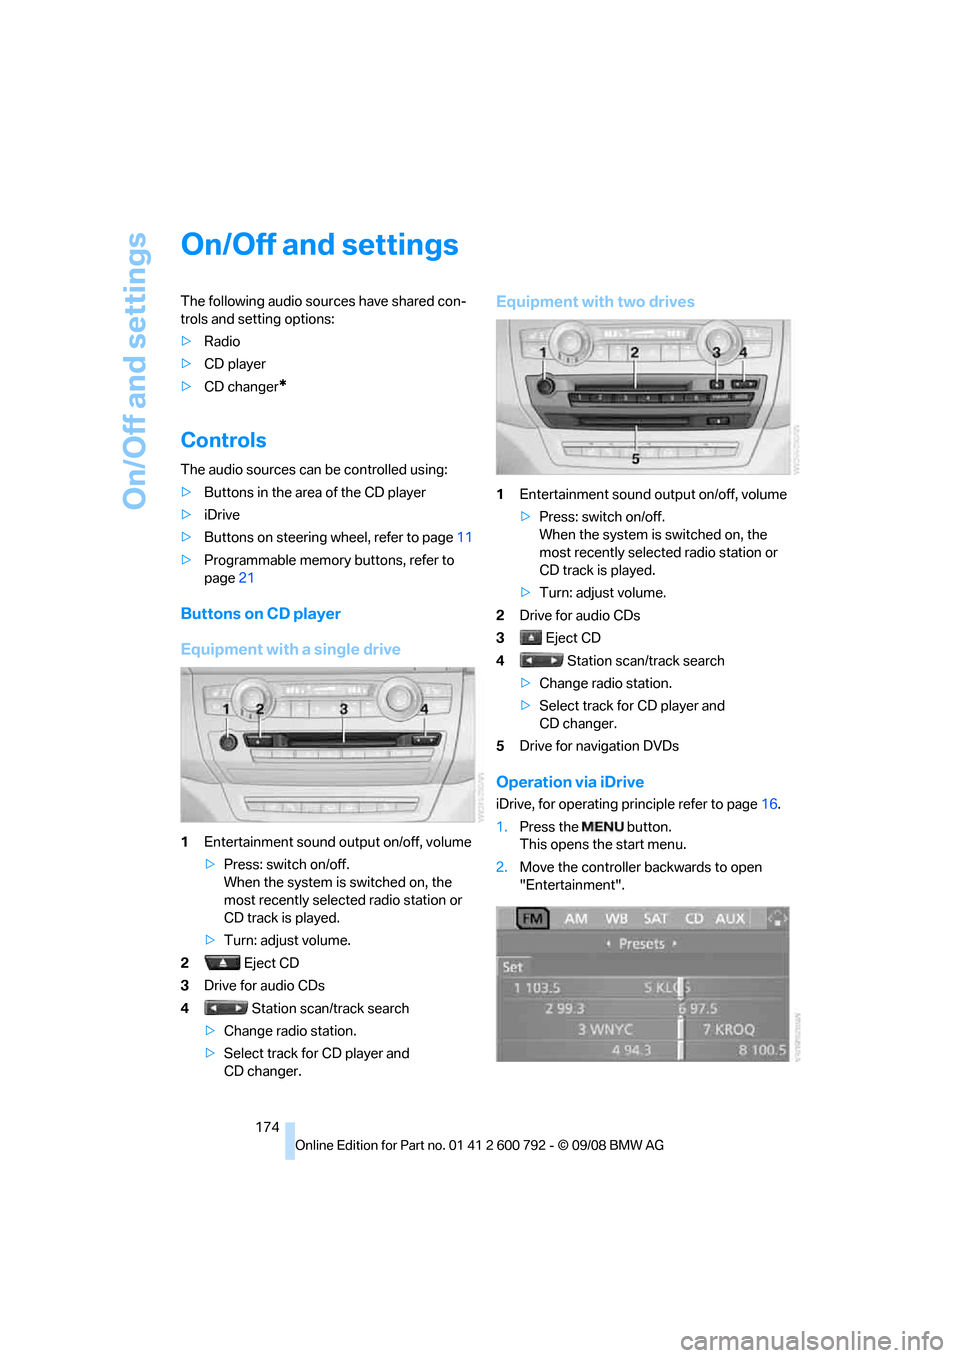
Equipment with a single drive
1Entertainment sound output on/off, volume
>Press: switch on/off.
When the system is switched on, the
most recently select ed radio station or
CD track is played.
> Turn: adjust volume.
2 Eject CD
3 Drive for audio CDs
4 Station scan/track search
> Change radio station.
> Select track for CD player and
CD changer.
Equipment with two drives
1 Entertainment sound output on/off, volume
>Press: switch on/off.
When the system is switched on, the
most recently select ed radio station or
CD track is played.
> Turn: adjust volume.
2 Drive for audio CDs
3 Eject CD
4 Station scan/track search
> Change radio station.
> Select track for CD player and
CD changer.
5 Drive for navigation DVDs
Operation via iDrive
iDrive, for operating pr inciple refer to page16.
1. Press the button.
This opens the start menu.
2. Move the controller backwards to open
"Entertainment".
Page 177 of 317

Navigation
Entertainment
Driving tips
175Reference
At a glance
Controls
Communications
Mobility
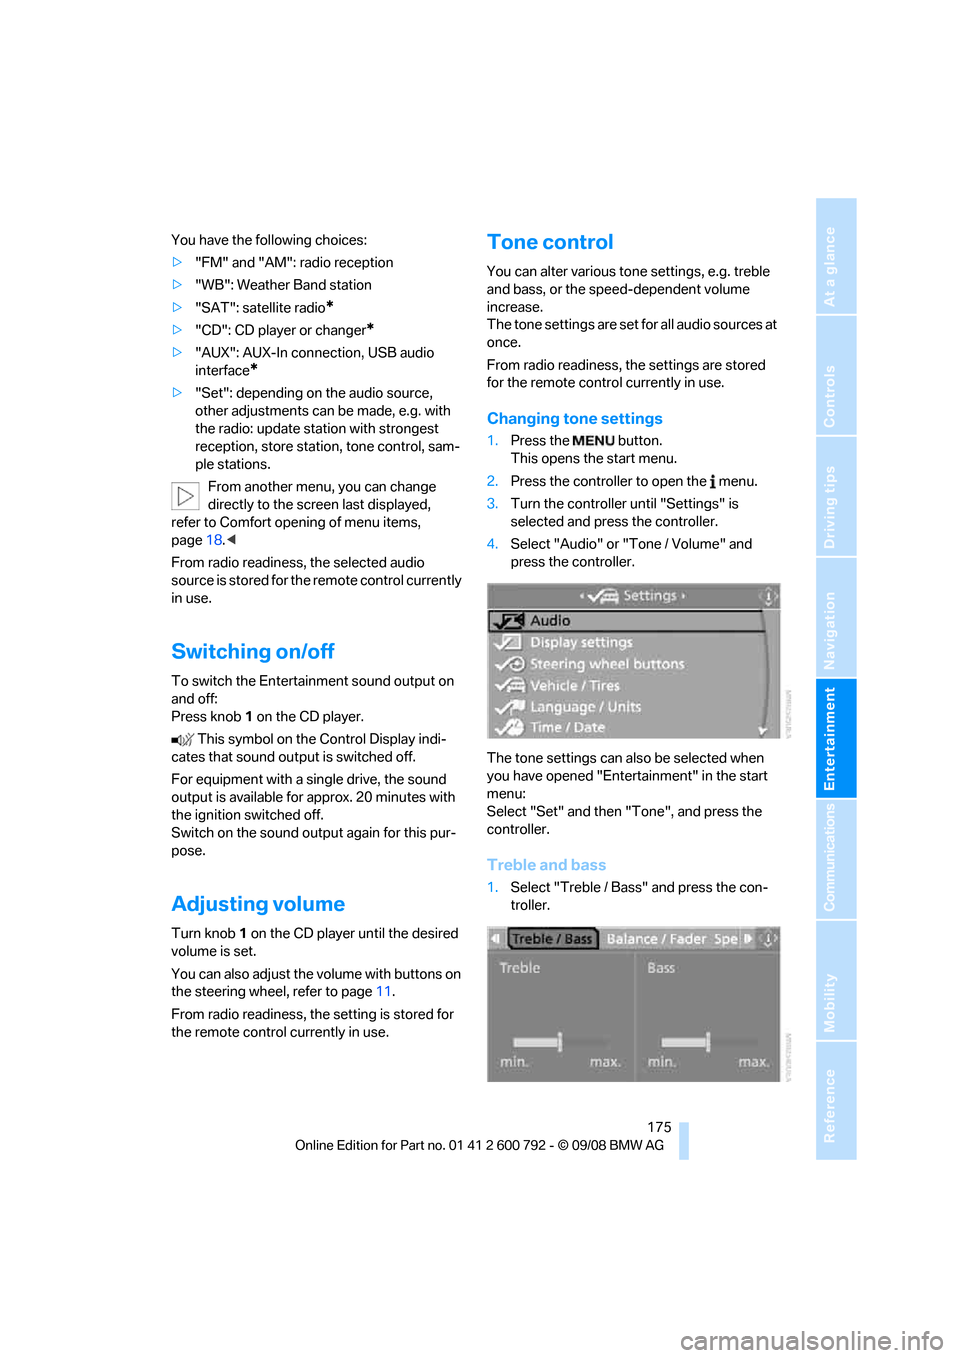
You have the following choices:
>"FM" and "AM": radio reception
> "WB": Weather Band station
> "SAT": satellite radio
*
>"CD": CD player or changer*
>"AUX": AUX-In connection, USB audio
interface
*
>"Set": depending on the audio source,
other adjustments can be made, e.g. with
the radio: update st ation with strongest
reception, store station, tone control, sam-
ple stations.
From another menu, you can change
directly to the scr een last displayed,
refer to Comfort opening of menu items,
page 18.<
From radio readiness, the selected audio
source is stored for the remote control currently
in use.
Switching on/off
To switch the Entertainment sound output on
and off:
Press knob 1 on the CD player.
This symbol on the Control Display indi-
cates that sound output is switched off.
For equipment with a single drive, the sound
output is available for approx. 20 minutes with
the ignition switched off.
Switch on the sound output again for this pur-
pose.
Adjusting volume
Turn knob 1 on the CD player until the desired
volume is set.
You can also adjust the volume with buttons on
the steering wheel, refer to page 11.
From radio readiness, the setting is stored for
the remote control currently in use.
Tone control
You can alter various tone settings, e.g. treble
and bass, or the speed-dependent volume
increase.
The tone settings are set for all audio sources at
once.
From radio readiness, the settings are stored
for the remote contro l currently in use.
Changing tone settings
1.Press the button.
This opens the start menu.
2. Press the controller to open the menu.
3. Turn the controller until "Settings" is
selected and press the controller.
4. Select "Audio" or "Tone / Volume" and
press the controller.
The tone settings can also be selected when
you have opened "Entertainment" in the start
menu:
Select "Set" and then "Tone", and press the
controller.
Treble and bass
1. Select "Treble / Bass" and press the con-
troller.
Page 181 of 317

Navigation
Entertainment
Driving tips
179Reference
At a glance
Controls
Communications
Mobility
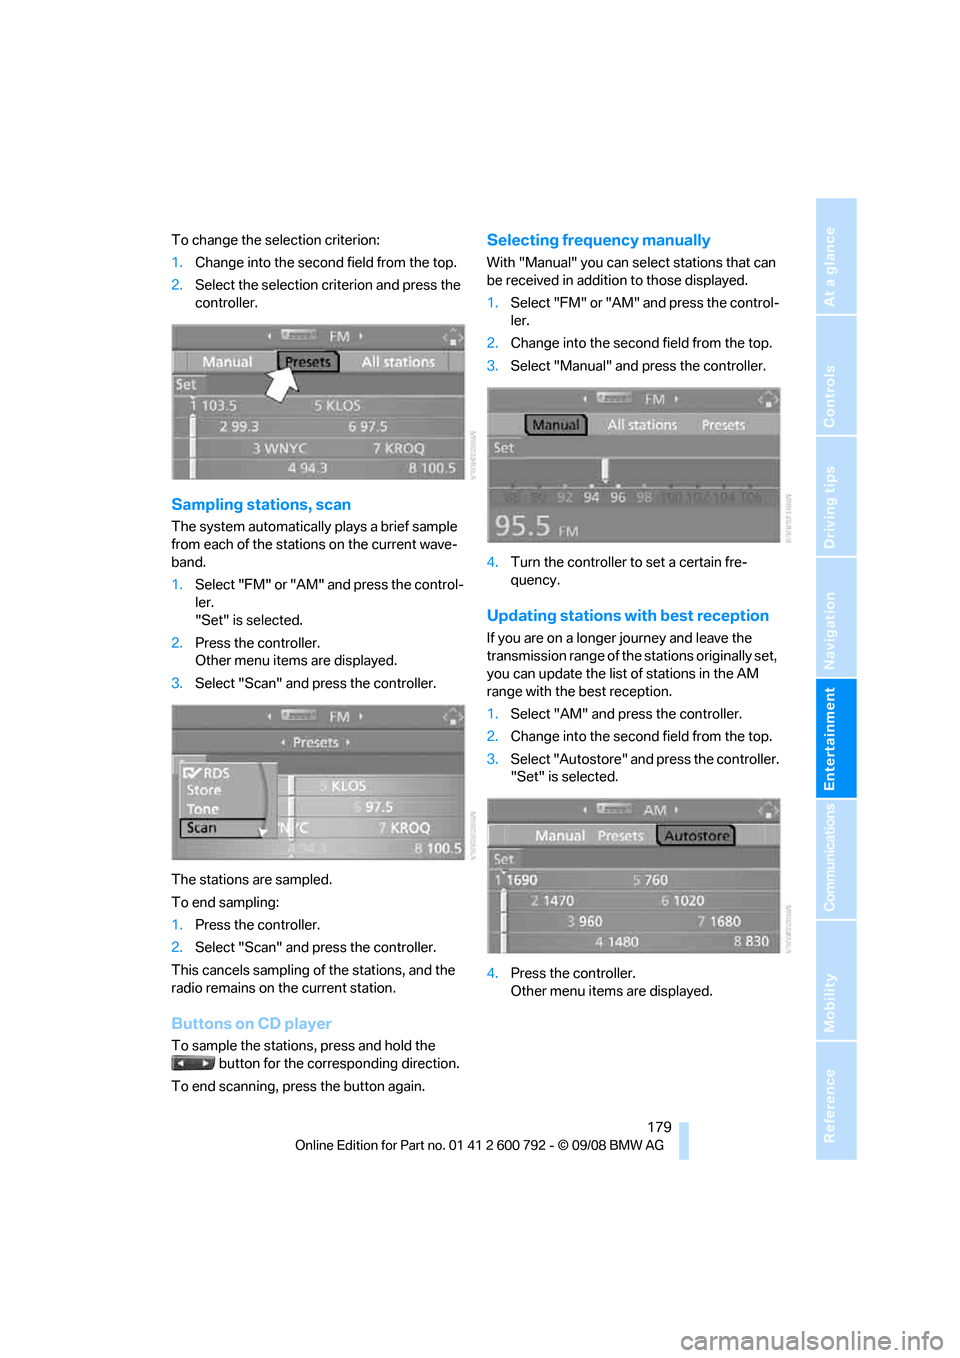
To change the selection criterion:
1.Change into the second field from the top.
2. Select the selection criterion and press the
controller.
Sampling stations, scan
The system automatically plays a brief sample
from each of the stations on the current wave-
band.
1.Select "FM" or "AM" and press the control-
ler.
"Set" is selected.
2. Press the controller.
Other menu items are displayed.
3. Select "Scan" and press the controller.
The stations are sampled.
To end sampling:
1. Press the controller.
2. Select "Scan" and press the controller.
This cancels sampling of the stations, and the
radio remains on the current station.
Buttons on CD player
To sample the stations, press and hold the button for the corresponding direction.
To end scanning, press the button again.
Selecting frequency manually
With "Manual" you can se lect stations that can
be received in additi on to those displayed.
1. Select "FM" or "AM" and press the control-
ler.
2. Change into the second field from the top.
3. Select "Manual" and press the controller.
4. Turn the controller to set a certain fre-
quency.
Updating stations with best reception
If you are on a longer journey and leave the
transmission range of the stations originally set,
you can update the list of stations in the AM
range with the best reception.
1.Select "AM" and pr ess the controller.
2. Change into the second field from the top.
3. Select "Autostore" and press the controller.
"Set" is selected.
4. Press the controller.
Other menu items are displayed.