2009 BMW X5 change wheel
[x] Cancel search: change wheelPage 176 of 317

On/Off and settings
174
On/Off and settings
The following audio sources have shared con-
trols and setting options:
> Radio
> CD player
> CD changer
*
Controls
The audio sources can be controlled using:
>Buttons in the area of the CD player
> iDrive
> Buttons
on steering wheel, refer to page 11
> Programmable memory buttons, refer to
page 21
Buttons on CD player
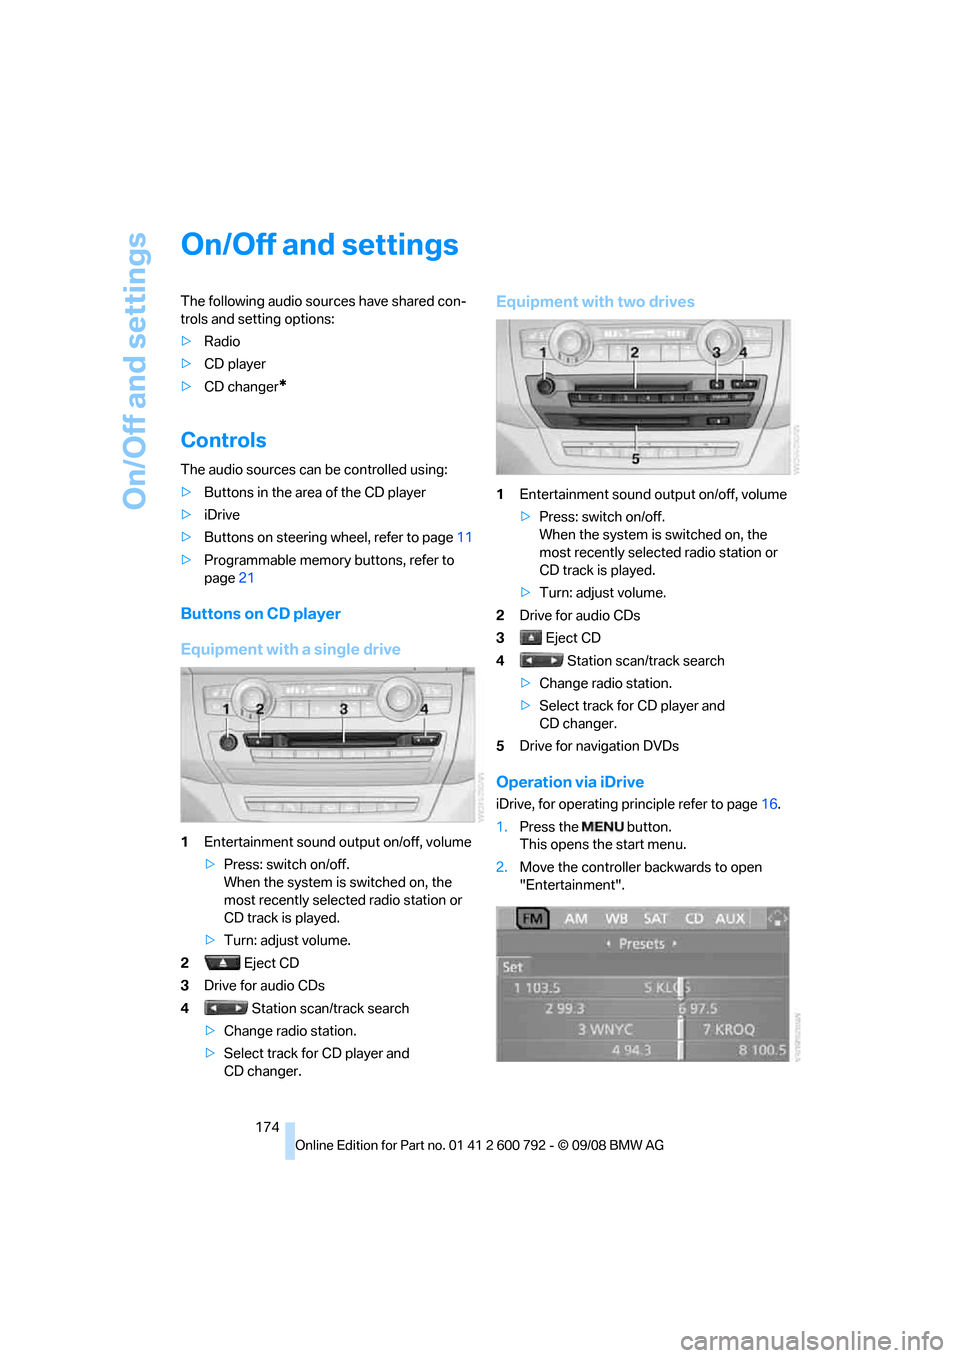
Equipment with a single drive
1Entertainment sound output on/off, volume
>Press: switch on/off.
When the system is switched on, the
most recently select ed radio station or
CD track is played.
> Turn: adjust volume.
2 Eject CD
3 Drive for audio CDs
4 Station scan/track search
> Change radio station.
> Select track for CD player and
CD changer.
Equipment with two drives
1 Entertainment sound output on/off, volume
>Press: switch on/off.
When the system is switched on, the
most recently select ed radio station or
CD track is played.
> Turn: adjust volume.
2 Drive for audio CDs
3 Eject CD
4 Station scan/track search
> Change radio station.
> Select track for CD player and
CD changer.
5 Drive for navigation DVDs
Operation via iDrive
iDrive, for operating pr inciple refer to page16.
1. Press the button.
This opens the start menu.
2. Move the controller backwards to open
"Entertainment".
Page 177 of 317

Navigation
Entertainment
Driving tips
175Reference
At a glance
Controls
Communications
Mobility
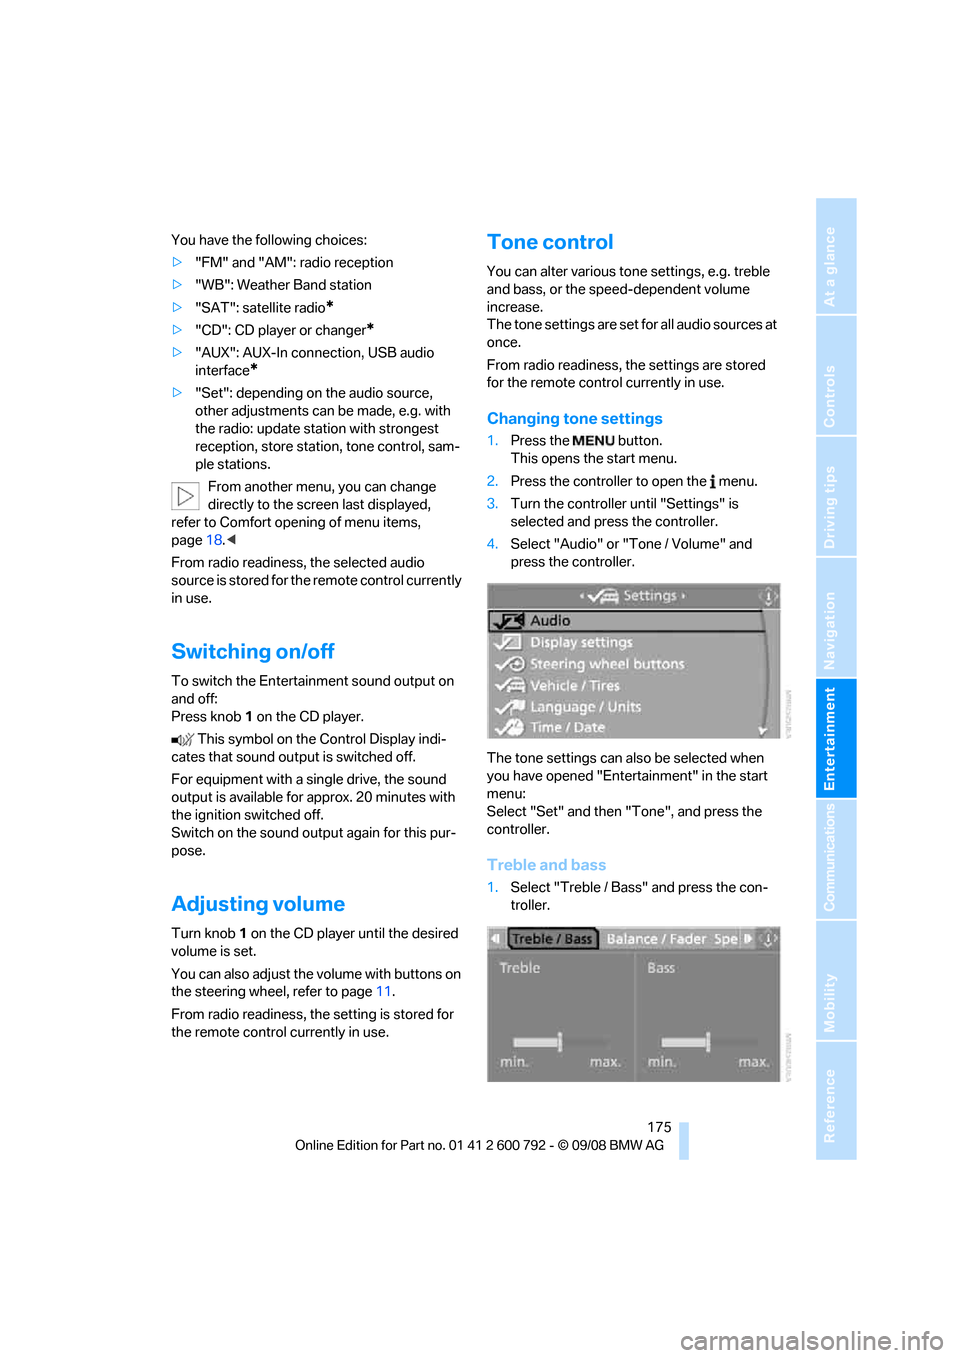
You have the following choices:
>"FM" and "AM": radio reception
> "WB": Weather Band station
> "SAT": satellite radio
*
>"CD": CD player or changer*
>"AUX": AUX-In connection, USB audio
interface
*
>"Set": depending on the audio source,
other adjustments can be made, e.g. with
the radio: update st ation with strongest
reception, store station, tone control, sam-
ple stations.
From another menu, you can change
directly to the scr een last displayed,
refer to Comfort opening of menu items,
page 18.<
From radio readiness, the selected audio
source is stored for the remote control currently
in use.
Switching on/off
To switch the Entertainment sound output on
and off:
Press knob 1 on the CD player.
This symbol on the Control Display indi-
cates that sound output is switched off.
For equipment with a single drive, the sound
output is available for approx. 20 minutes with
the ignition switched off.
Switch on the sound output again for this pur-
pose.
Adjusting volume
Turn knob 1 on the CD player until the desired
volume is set.
You can also adjust the volume with buttons on
the steering wheel, refer to page 11.
From radio readiness, the setting is stored for
the remote control currently in use.
Tone control
You can alter various tone settings, e.g. treble
and bass, or the speed-dependent volume
increase.
The tone settings are set for all audio sources at
once.
From radio readiness, the settings are stored
for the remote contro l currently in use.
Changing tone settings
1.Press the button.
This opens the start menu.
2. Press the controller to open the menu.
3. Turn the controller until "Settings" is
selected and press the controller.
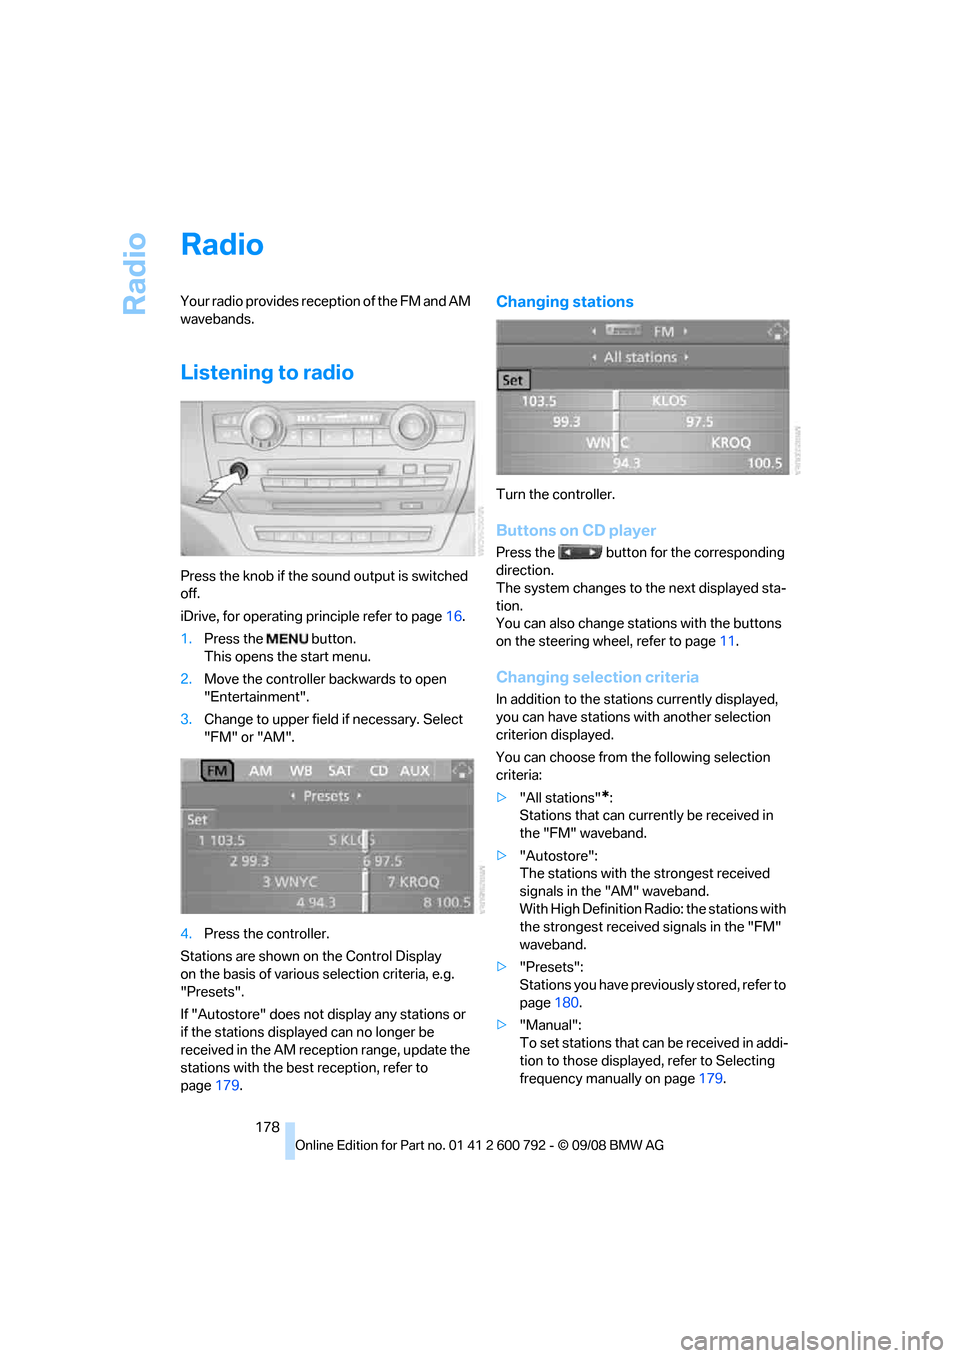
4. Select "Audio" or "Tone / Volume" and
press the controller.
The tone settings can also be selected when
you have opened "Entertainment" in the start
menu:
Select "Set" and then "Tone", and press the
controller.
Treble and bass
1. Select "Treble / Bass" and press the con-
troller.
Page 180 of 317

Radio
178
Radio
Your radio provides reception of the FM and AM
wavebands.
Listening to radio
Press the knob if the sound output is switched
off.
iDrive, for operating principle refer to page16.
1. Press the button.
This opens the start menu.
2. Move the controller backwards to open
"Entertainment".
3. Change to upper field if necessary. Select
"FM" or "AM".
4. Press the controller.
Stations are shown on the Control Display
on the basis of various selection criteria, e.g.
"Presets".
If "Autostore" does not display any stations or
if the stations displayed can no longer be
received in the AM reception range, update the
stations with the best reception, refer to
page 179.
Changing stations
Turn the controller.
Buttons on CD player
Press the button for the corresponding
direction.
The system changes to the next displayed sta-
tion.
You can also change stat ions with the buttons
on the steering wheel, refer to page 11.
Changing selection criteria
In addition to the stations currently displayed,
you can have stations with another selection
criterion displayed.
You can choose from the following selection
criteria:
> "All stations"
*:
Stations that can currently be received in
the "FM" waveband.
> "Autostore":
The stations with the strongest received
signals in the "AM" waveband.
With High Definition Radio: the stations with
the strongest received signals in the "FM"
waveband.
> "Presets":
Stations you have previously stored, refer to
page 180.
> "Manual":
To set stations that ca n be received in addi-
tion to those displayed, refer to Selecting
frequency manually on page 179.
Page 184 of 317

Radio
182
With some stations the
digital signals are not
transmitted simultaneously with the analog sig-
nals. If you are in an ar ea in which the selected
station is not continuous ly received digitally,
playback changes betwee n analog and digital
reception. This can result in repetitions or inter-
ruptions. In this case it may be advisable to
deactivate digital radio reception.
Selecting programs of a digital station*
Some stations transmit several programs on
one frequency. To select one of these pro-
grams:
1. Select "FM" or "AM" and press the control-
ler.
2. Select "Manual" and press the controller.
3. Select a station that is received digitally.
This symbol is displayed when a station
is being received digitally.
4. Switch to the next program of the digital
station with the buttons on the radio
or the steering wheel.
You can store a station, refer to page 180.
Updating stations offering digital
reception
If you are on a longer journey and leave the
transmission range of the stations originally set,
you can update the list of stations with the best
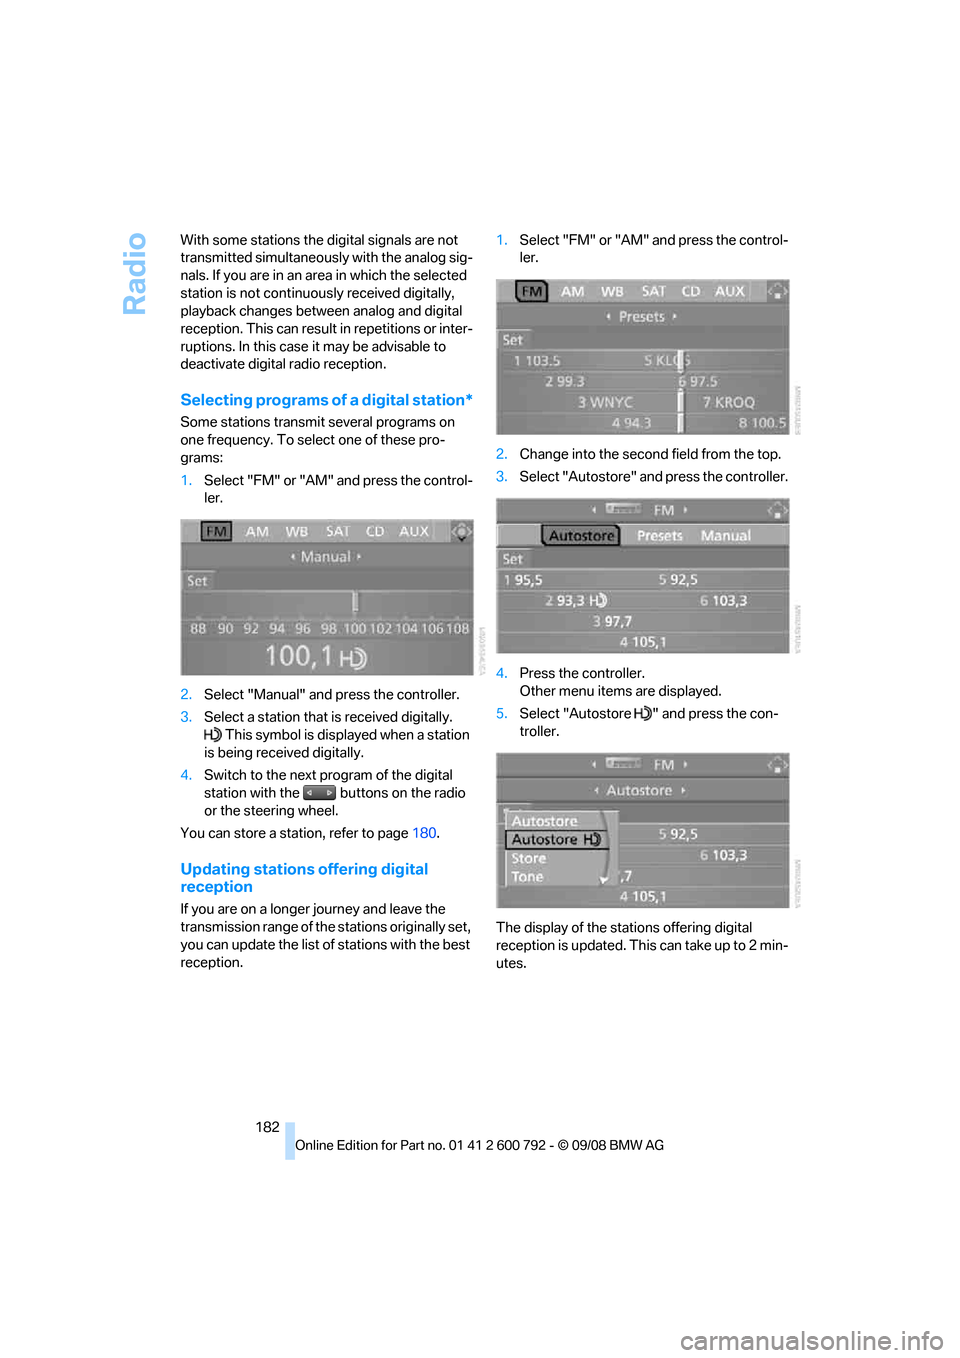
reception. 1.
Select "FM" or "AM" and press the control-
ler.
2. Change into the second field from the top.
3. Select "Autostore" and press the controller.
4. Press the controller.
Other menu items are displayed.
5. Select "Autostore " and press the con-
troller.
The display of the stations offering digital
reception is updated. This can take up to 2 min-
utes.
Page 190 of 317

CD player and CD changer
188
4.
Change to the second field from the top if
necessary. Select the desired CD and press
the controller.
At the end of the last tr ack, the next CD will be
selected.
Via programmable memory buttons
You can store a CD compartment of the CD
changer on the programmable memory but-
tons. To start the CD changer, refer to page 21.
Selecting a track
Buttons on CD player
Press the button for the corresponding
direction repeatedly until you reach the desired
track.
The track is displayed on the Control Display.
You can also change tracks using the buttons
on the steering wheel, refer to page 11.
Via iDrive
Select a track by turning the controller.
Compressed audio files
1.Select the directory if necessary and press
the controller.
2. Select the track and press the controller.
To change the directory:
Select the directory and press the controller.
To exit from the menu: Select the arrow and press the controller.
For equipment with two drives, you can save a
certain track on the programmable memory
buttons, refer to page 21.
Displaying information on track
With compressed audio files, you can display
any information stored on the current track, e.g.
the name of the artist.
Page 257 of 317

Mobility
255Reference
At a glance
Controls
Driving tips
Communications
Navigation
Entertainment
Temperature
The temperature grades are A, the highest, B,
and C, representing the tire's resistance to the
generation of heat and its ability to dissipate
heat when tested under controlled conditions
on a specified indoor laboratory test wheel.
Sustained high temperature can cause the
material of the tire to degenerate and reduce
tire life, and excessive temperature can lead to
sudden tire failure. The grade C corresponds to
a level of performance which all passenger car
tires must meet under the Federal Motor Vehi-
cle Safety Standard No. 109. Grades B and A
represent higher levels of performance on the
laboratory test wheel than the minimum
required by law.
The temperature grade for this tire is
established for a tire that is properly
inflated and not overloaded. Excessive speed,
underinflation, or excessive loading, either sep-
arately or in combination, can cause heat
buildup and possible tire failure. <
RSC – run-flat tires
You will recognize run-flat tires by a circular
symbol containing the letters RSC on the side
of the tire, refer to page256.
M+S
Winter and all-season tires.
These have better winter properties than sum-
mer tires.
XL
Indicates specially reinforced tires.
Tire condition
Inspect your tires freq uently for tread wear,
signs of damage and for foreign objects lodged
in the tread. Check the tread depth.
Minimum tread depth
The tread depth should not drop below 0.12 in/
3 mm, although, for example, European legisla-
tion only specifies a minimum tread depth of 0.063 in/1.6 mm. At tread depths below 0.12 in/
3 mm there is an increased risk of high-speed
hydroplaning, even when only small amounts of
water are present on the road surface.
When winter tires wear down past a tread depth
of 0.16 in/4 mm, they become perceptibly less
suitable for winter conditions. For the sake of
safety, new tires should be installed.
Wear indicators at the tread-groove base are
distributed over the ti
re's circumference and
are marked on the side of the tire with TWI –
Tread Wear Indicator. If the tire tread has been
driven down to the we ar indicators, a tread
depth of 0.063 in/1.6 mm has been reached.
Wheel/tire damage
Please note that low-pr ofile tires cause wheels,
tires and suspension parts to be more suscep-
tible to road hazards and consequential dam-
ages.
Unusual vibrations encountered during normal
vehicle operation can indi cate tire failure or
some other vehicle defect. This can, for exam-
ple, be caused by driving over curbs. These
kinds of problems may also be signaled by other
changes in vehicle response, such as a strong
tendency to pull to the left or right.
In these cases, reduce speed immedi-
ately and have wheels and tires thor-
oughly checked. To do so , drive carefully to the
nearest BMW Sports Activity Vehicle Center or
tire shop that works ac cording to BMW repair
procedures with corres pondingly trained per-
sonnel. If necessary, have the vehicle towed
there. Otherwise, tire damage can be extremely
dangerous to vehicle occupants and other road
users. <
Page 258 of 317

Wheels and tires
256
Run-flat tires
You will recognize run-flat tires by the circular
symbol containing the letters RSC on the side
of the tire.
Run-flat tires consist of partially self-contained
tires and special rims. The sidewall reinforce-
ment ensures that the tire retains some residual
safety in the event of pr essure drop and driving
remains possible to a restricted degree.
To continue driving with a damaged tire:
> With Flat Tire Monitor, refer to Indication of
a flat tire page 101
> With Tire Pressure Monitor, refer to Mes-
sage with low tire inflation pressure
page 103
New wheels and tires
Have new wheels and tires installed only
by your BMW Sports Activity Vehicle
Center or a tire shop that works according to
BMW repair procedures with correspondingly
trained personnel. If this work is not carried out
properly, there is a danger of subsequent dam-
age and related safety ha zards. Make sure that
the new wheels are balanced. <
Retreaded tires
BMW does not recommend that you use
retreaded tires, as driving safety may be
impaired. The causes for this include the possi-
bly different tire casing structures and the often
wide variations in their age, which can result in a
limited service life. <
The right wheels and tires
When mounting new tires or changing over
from summer to winter tires and vice versa,
mount Run-Flat Tires for your own safety. Your
BMW Sports Activity Vehicle Center will be
happy to advise you.
BMW recommends that you use only
wheel and tire combinations that BMW
has tested and approved for your particular
vehicle. Variations in factors such as manufac-
turing tolerances mean that even wheels and
tires with identical offi cial size ratings could
actually have different dimensions than the
approved units – these differences could lead to
body contact, and with it the risk of severe acci-
dents. If non-approved wheels and tires are
used, BMW cannot evaluate their suitability,
and therefore cannot be held liable for driving
safety. <
When changing to larger wheels and tires,
it may be necessary to make changes to
the wheel-well trim piec e, as otherwise road
users could be endangered or the vehicle could
be damaged. Only have th is work carried out by
a BMW Sports Activity Vehicle Center or a
workshop that works in accordance with BMW
guidelines and uses appropriately trained per-
sonnel. <
You can ask your BMW Sp orts Activity Vehicle
Center for the correct wheel/tire combination.
The correct wheel/tire combination also affects
various systems whose function would other-
wise be impaired, e.g. ABS, DSC, xDrive,
Dynamic Performance Control in the BMW X6,
or Flat Tire Monitor.
To maintain good handling and vehicle
response, use only tires of a single tread config-
uration from a single manufacturer. Following
tire damage, have the or iginal wheel and tire
combination remounted on the vehicle as soon
as possible.
Wheels with electronics for
TPM Tire Pressure Monitor
When mounting new tires or changing from
summer to winter tires or vice versa, only use
wheels with TPM electronics, otherwise the
Page 277 of 317

Mobility
275Reference
At a glance
Controls
Driving tips
Communications
Navigation
Entertainment
3.Apply gentle pressure to the bulb while
turning it to the left for removal and replace-
ment.
4. Insert the bulb socket in the liftgate and
engage it.
5. Replace the cover.
License plate lamp
5-Watt bulb, C5W
1.Slide the lamp to the right with a screw-
driver, refer to arrow 1.
2. Remove the lamp, arrow 2.
3. Replace the bulb.
4. Reinstall the lamp.
Center brake lamp
This lamp uses LED technology for operation.
In case of a defect, please go to a BMW Sports
Activity Vehicle Center or a workshop that
works according to BMW repair procedures
with correspondingly trained personnel.
Changing wheels
Your BMW is equipped with run-flat tires as
standard. As a result, it is not necessary to
change the wheel immediately in the case of air
loss in the event of a breakdown.
To continue driving with a damaged tire:
> With Flat Tire Monitor, refer to Indication of
a flat tire page 101
> With Tire Pressure Monitor, refer to Mes-
sage with low tire inflation pressure
page 103
You will recognize run-flat tires by a circular
symbol containing the letters RSC on the side
of the tire, refer to Run-flat tires, page 256.
When mounting new tires, or changing from
summer to winter tires or vice versa, use run-flat
tires for your own safety. No spare tire is avail-
able in case of a flat tire. Your BMW Sports
Activity Vehicle Center will be happy to advise
you. Also refer to New wheels and tires,
page 256.
BMW X6: do not rotate the front wheels to
the rear or vice versa, as otherwise the
handling characteristic s will be negatively
affected. <
Suitable tools for changing tires are avail-
able as accessories at your BMW Sports
Activity Vehicle Center. <
Jacking points for vehicle jack
The jacking points for the vehicle jack are
located in the positions shown.
Compact wheel*
Safety precautions in the event of a flat
tire or wheel change: park the vehicle as