2009 BMW M5 SEDAN park
[x] Cancel search: parkPage 221 of 266
Mobility
219Reference
At a glance
Controls
Driving tips
Communications
Navigation
Entertainment
12 in/30 cm from sensors, e.g. Park Distance
Control sensors or radar sensors.<
Hand washing
When washing the vehicle by hand, use plenty
of water and car washing shampoo. Clean the
vehicle with gentle pressure using a sponge or a
washing brush.
Before cleaning the windshield, deacti-
vate the rain sensor or switch off the igni-
tion to prevent unwanted wiper operation.<
Follow local guidelines for washing vehi-
cles by hand.<
Headlamps
Do not rub dry and never use abrasives or
strong solvents to clean the covers.
Loosen dirt, e.g. insects, with shampoo or
insect remover and wash away with plenty of
water.
Use a window de-icer to remove accumulated
ice and snow, not a scraper.
Windows
Use a glass cleaner to clean the inside and out-
side surfaces of the windows and the glass sur-
faces of the mirrors.
Do not use quartz-containing cleansers
to clean glass surfaces of the mirrors.<
Wiper blades
Clean with soapy water and replace regularly to
prevent streaking.
The presence of wax and sealant residues
and dirt on the windows leads to streaking
during wiper operation and results in premature
wear on wiper blades as well as interference
with the rain sensor.<
Caring for the vehicle finish
Regular care helps your vehicle retain its value
and protects the paint from the long-term
effects of aggressive substances.
Regionally occurring environmental factors can
affect and damage vehicle finish. It is therefore important to tailor the frequency and extent of
your car care accordingly.
Immediately remove particularly aggressive
substances such as spilled fuel, oil, grease,
brake fluid, tree resin, or bird droppings; other-
wise, they may damage your paint.
Repairing paint damage
Repair stone damage or scratches imme-
diately, depending on the severity of the
damage, to prevent the formation of rust.<
BMW recommends having paint damage pro-
fessionally repaired using Genuine BMW finish
materials in accordance with factory guidelines.
Waxing
Sealant is required when water no longer beads
on the clean surface of the paint. Use only prod-
ucts that contain carnauba wax or synthetic wax
to seal your finish.
Rubber gaskets
Treat only with water or a rubber care product.
To avoid noise or damage, do not use
products that contain silicone to care for
rubber gaskets.<
Chrome components
Particularly after exposure to road salt, thor-
oughly cleanse parts like the radiator grille, door
handles, or window frames with plenty of water
with shampoo added to it. For additional treat-
ment, use chrome polish.
Alloy wheels
Depending on your system, braking can gener-
ate dust, which settles on the light-alloy wheels.
Remove this dust regularly with acid-free wheel
cleaner.
Do not use aggressive, acid-containing,
strongly alkaline, or coarse cleansers and
do not use steam cleaners at temperatures
greater than 1407/606; otherwise you may
damage your vehicle.<
Page 222 of 266
Care
220
Outside sensors
Sensors on the outside of the vehicle, such as
Park Distance Control sensors or radar sensors,
should be kept clean and free of ice to retain
their full function.
Interior care
Upholstery materials/cloth-covered
paneling
Clean regularly with a vacuum cleaner in order
to remove surface dirt.
In the event of more serious soiling such as bev-
erage stains, use a soft sponge or a lint-free
microfiber cloth in combination with suitable
interior cleaners. Follow the instructions on the
packaging.
Clean upholstery material over a large
area extending out to the seams. Avoid
intense friction.<
Open Velcro fasteners on pants or other
items of clothing can cause damage to
the seat covering. Make sure that the Velcro
fasteners are closed.<
Leather/leather-covered paneling
The leather used by BMW is a high quality
natural product. Slight patterns in the
grain are part of the typical properties of a natu-
ral leather.
Dust and dirt from the road chafe in pores and
folds and result in considerable wear and cause
the leather surface to become prematurely brit-
tle. We therefore suggest that you clean the
leather with a dust cloth or vacuum cleaner at
regular intervals.<
Particularly with light-colored leather, make
sure to clean it regularly since it has a greater
tendency to become soiled.
Treat the leather twice a year with a leather
lotion since dirt and grease harm the protective
layer of the leather.
Carpets/luggage compartment
Carpeting, floor mats, and luggage compart-
ment rugs and paneling can be cleaned with a
vacuum or in the event of more serious soiling,
cleansed with an interior cleaner.
Floor mats and luggage compartment rugs can
be removed for cleaning. When inserting into
place, make sure that the seat rails do not pro-
trude over the floor mats; otherwise floor mats
can be damaged.
Fluff on new floor mats is a result of the produc-
tion process and can be removed by repeated
vacuuming.
Plastic components inside
Clean the glass cover of the instrument panel,
imitation leather surfaces, lamp lenses, and
matte components with water and, if necessary,
a solvent-free plastic cleaner.
Fine wooden components
Use a damp cloth to clean fine wooden trim
panels and components. Follow up by drying
with a soft cloth.
Safety belts
Do not use cleansers to clean the safety
belts since this can destroy the web-
bing.<
Inside sensors
Clean inside sensors such as those of the high-
beam assistant using a lint-free cloth moist-
ened with glass cleaner.
Displays
Clean displays like the radio or the Control Dis-
play using a display-cleaning cloth or a soft,
nonabrasive lint-free cloth.
Avoid using excessive pressure when
cleaning displays; otherwise, you could
damage them.<
Never use chemical-based cleansers or
household scouring products. Keep all
liquids away from the equipment. Otherwise
Page 225 of 266
Mobility
223Reference
At a glance
Controls
Driving tips
Communications
Navigation
Entertainment
Have work on the xenon lighting system
performed only by your BMW center or a
workshop that works according to BMW repair
procedures with correspondingly trained per-
sonnel. Due to the high voltage present in the
system, there is a danger of fatal injuries when
work is carried out improperly.<
Access to lamps
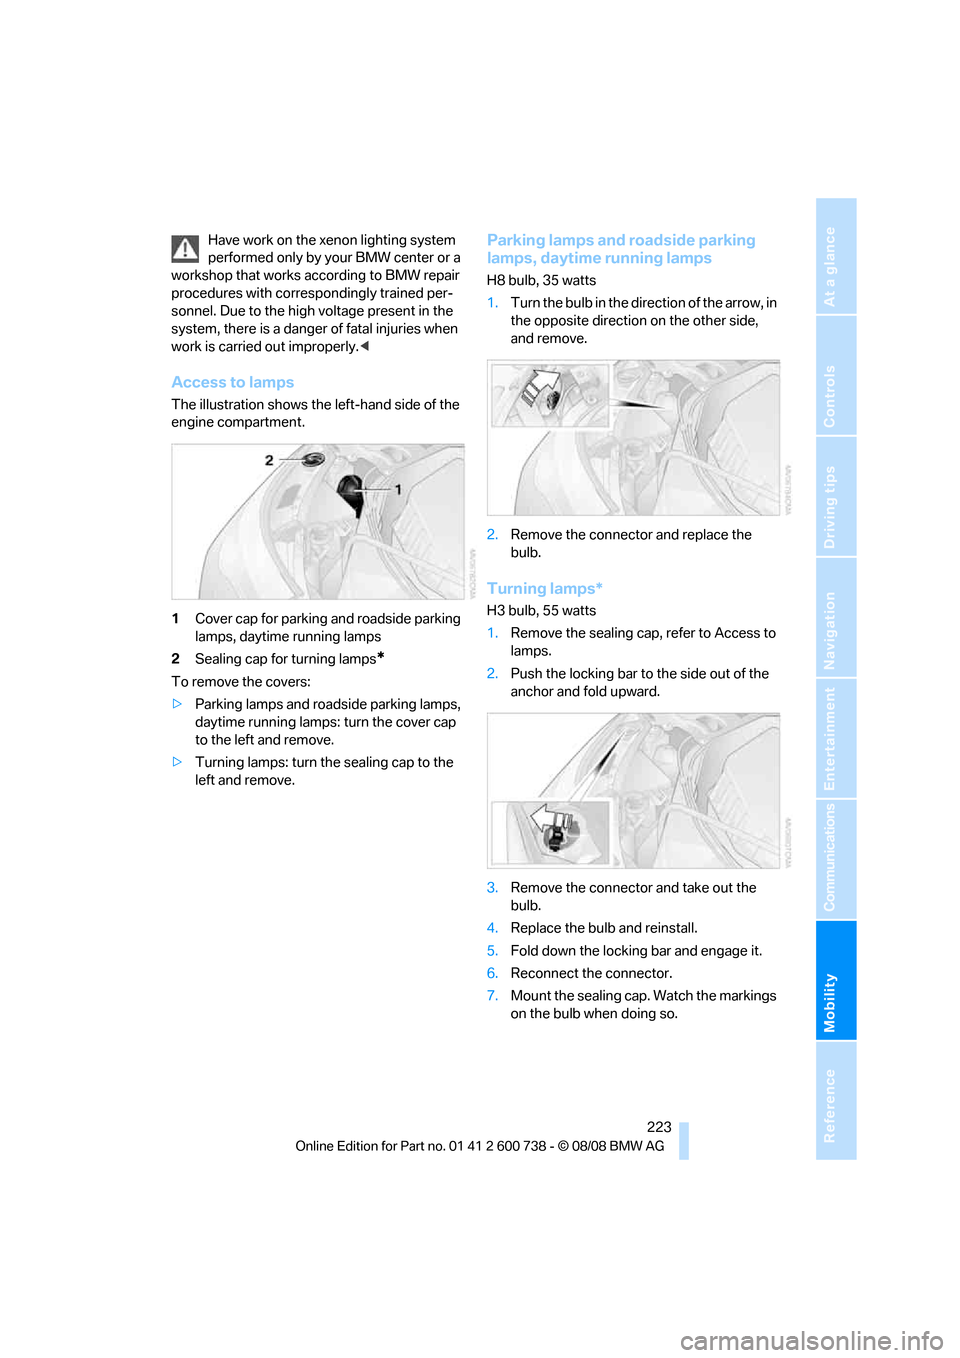
The illustration shows the left-hand side of the
engine compartment.
1Cover cap for parking and roadside parking
lamps, daytime running lamps
2Sealing cap for turning lamps
*
To remove the covers:
>Parking lamps and roadside parking lamps,
daytime running lamps: turn the cover cap
to the left and remove.
>Turning lamps: turn the sealing cap to the
left and remove.
Parking lamps and roadside parking
lamps, daytime running lamps
H8 bulb, 35 watts
1.Turn the bulb in the direction of the arrow, in
the opposite direction on the other side,
and remove.
2.Remove the connector and replace the
bulb.
Turning lamps*
H3 bulb, 55 watts
1.Remove the sealing cap, refer to Access to
lamps.
2.Push the locking bar to the side out of the
anchor and fold upward.
3.Remove the connector and take out the
bulb.
4.Replace the bulb and reinstall.
5.Fold down the locking bar and engage it.
6.Reconnect the connector.
7.Mount the sealing cap. Watch the markings
on the bulb when doing so.
Page 227 of 266
Mobility
225Reference
At a glance
Controls
Driving tips
Communications
Navigation
Entertainment
3.Turn the lock to the left and remove the bulb
holder.
4.Backup lamps:
Remove and replace the bulb.
Other lamps:
Apply gentle pressure to the bulb while
turning it to the left for removal and replace-
ment.
Lamps in luggage compartment lid
License plate lamp
5-watt bulb, C5W
1.Insert screwdriver into the slot and press to
the right, refer to arrows. This releases the
lamp.
2.Remove the lamp and replace the bulb.
Repairing flat tire with
M Mobility System
To repair a flat tire, an M Mobility System is pro-
vided in the BMW M5. Using this system you
can apply a sealant in the inside of the tire, seal
off the damaged area, restore the tire inflation
pressure and then continue driving.Safety measures in case of a breakdown:
Park the vehicle as far as possible from
passing traffic and on solid ground. Switch on
the hazard warning flashers.
Apply the handbrake and engage the first or
reverse gear. Have all vehicle occupants get out
of the vehicle and ensure that they remain out-
side the immediate area in a safe place, such as
behind a guardrail.
If a warning triangle
* or portable hazard warning
lamp
* is required, set it up on the roadside at an
appropriate distance from the rear of the vehi-
cle. Comply with all safety guidelines and regu-
lations.<
Preparation
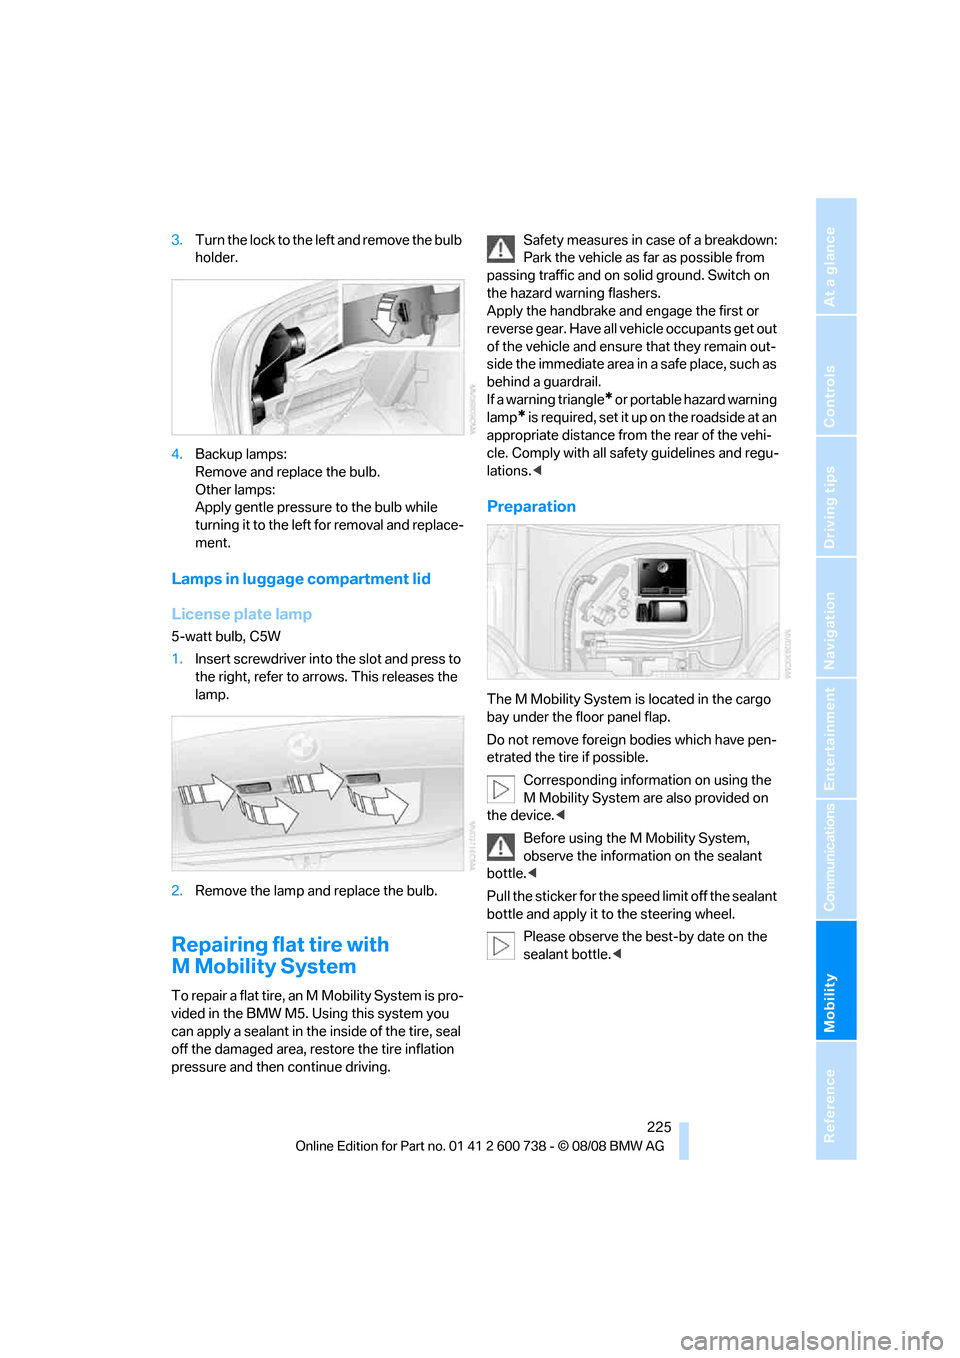
The M Mobility System is located in the cargo
bay under the floor panel flap.
Do not remove foreign bodies which have pen-
etrated the tire if possible.
Corresponding information on using the
M Mobility System are also provided on
the device.<
Before using the M Mobility System,
observe the information on the sealant
bottle.<
Pull the sticker for the speed limit off the sealant
bottle and apply it to the steering wheel.
Please observe the best-by date on the
sealant bottle.<
Page 229 of 266

Mobility
227Reference
At a glance
Controls
Driving tips
Communications
Navigation
Entertainment
4.Screw dust cap off valve of defective wheel
and screw filling hose2 of sealant bottle
onto valve.
5.Insert sealant bottle on compressor hous-
ing so that it is positioned upright.
6.Make sure that the device is switched off,
position 0.
7.Insert connector3 into lighter socket in
vehicle interior, refer to page109.
8.With the ignition switched on:
Switch on the device and allow to run for
approx. 3 minutes to fill wheel with sealant.
It is not important what inflation pressure
the tire has after filling.
9.Switch off device.
10.Remove connecting hose from connection
of sealant bottle and tire valve.
Stow the M Mobility System in the vehicle
again.
Distributing sealant
Immediately drive approx. 2 miles/3 km so that
sealant is evenly distributed in tire.
Do not exceed a maximum speed of
35 mph/60 km/h. Do not drop below
12 mph/20 km/h if possible.<
Producing tire inflation pressure
1.After approx. 2 miles/3 km, stop at suitable
location.
2.Screw compressor hose9 directly onto tire
valve.
3.Insert connector 3 in lighter socket in vehi-
cle interior.4.Correct tire inflation pressure to 29 psi/
200 kPa. With the ignition switched on:
>Increase inflation pressure: switch on
compressor, position I. To check cur-
rently set inflation pressure, briefly
switch off device.
Do not allow compressor to run
longer than 10 minutes, otherwise
the device will overheat and may be dam-
aged.<
>Reduce inflation pressure: press
button8 or turn screw8 on pressure
gauge.
If the inflation pressure is not held, drive
the vehicle again, refer to Distributing
sealant. Then repeat steps 1 to 4 once.
Using the M Mobility System can be ineffective
in the event of tire damage greater than
approx. 0.16 in/4 mm in size. Please contact the
nearest BMW center, refer to page232, or a
workshop that works according to BMW repair
procedures with correspondingly trained per-
sonnel if the tire cannot be made ready for driv-
ing with the M Mobility System.<
The tire inflation pressure must be at least
29 psi/200 kPa. Otherwise do not con-
tinue driving.<
Continue driving
Do not exceed the permissible maximum
speed of 50 mph/80 km/h, otherwise
accidents can occur.<
Reinitialize the Flat Tire Monitor.
For details, refer to page84.
Have the defective tire and the sealant bottle of
the M Mobility System replaced as soon as
possible.<
Changing wheels*
Safety precautions in the event of a flat
tire or wheel change: Park the vehicle as
far as possible from passing traffic and on solid
ground. Switch on the hazard warning flashers.
Apply the handbrake and shift into first gear or
reverse with the manual transmission, or move
Page 234 of 266

Giving and receiving assistance
232
First-aid kit*
Some of the articles contained in the first-aid kit
have a limited service life. Therefore, check the
expiration dates of the contents regularly and
replace the contents concerned in good time if
necessary.
The first-aid kit is located in the luggage com-
partment lid.
Loosen the wing nut to open.
Roadside Assistance*
The Roadside Assistance of the BMW Group
offers you assistance in the event of a break-
down around the clock, including on weekends
and public holidays.
The phone numbers of the Roadside Assis-
tance in your home country can be found in the
Contact brochure.
With BMW Assist you can contact the Roadside
Assistance of the BMW Group for assistance in
the event of a breakdown directly via iDrive,
refer to page192.
Jump starting
When your battery is discharged, you can use
two jumper cables to start your BMW with
power from the battery in a second vehicle. You
can also use the same method to help start
another vehicle. Use only jumper cables with
fully-insulated clamp handles.
To avoid the risk of potentially fatal injury,
always avoid all contact with electrical
components while the engine is running. Care-fully adhere to the following sequence, both to
prevent damage to one or both vehicles, and to
guard against possible personal injuries.<
Preparation
1.Check whether the battery of the other
vehicle has a voltage of 12 Volts and
approximately the same capacitance in Ah.
This information can be found on the bat-
tery.
2.Switch off the engine of the assisting vehi-
cle.
3.Switch off any electrical systems and com-
ponents in both vehicles.
There must not be any contact between
the bodies of the two vehicles, otherwise
there is a danger of shorting.<
Connecting jumper cables
To avoid personal injury from sparks, fol-
low this sequence when connecting
jumper cables.<
In your BMW M5, the so-called jump-starting
terminal in the engine compartment serves as a
positive terminal for the battery, also refer to
engine compartment overview on page211.
The cover cap is marked with a +.
1.Fold open the cover of the BMW jump-
starting terminal. To do so, pull the tab.
2.Attach one end of the jumper cable plus/+
to the positive terminal of the battery or a
jump-starting terminal of the vehicle provid-
ing assistance.
3.Attach the second end of the cable to the
positive terminal of the battery or to a start-
ing-aid terminal of the vehicle to be started.
Page 245 of 266
Reference 243
At a glance
Controls
Driving tips
Communications
Navigation
Entertainment
Mobility
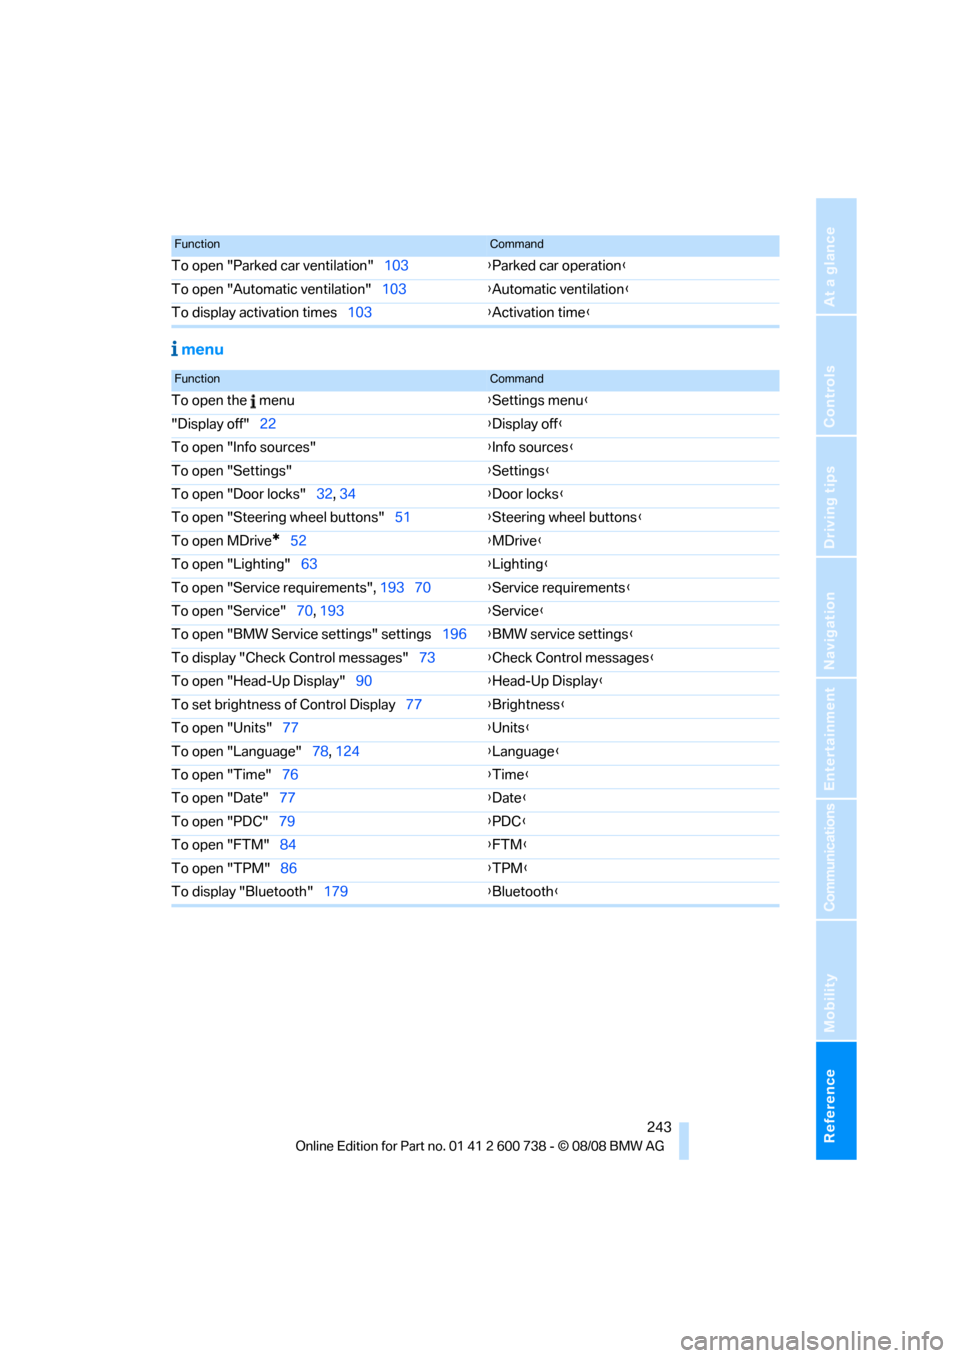
menu
To open "Parked car ventilation"103{Parked car operation}
To open "Automatic ventilation"103{Automatic ventilation}
To display activation times103{Activation time}
FunctionCommand
FunctionCommand
To open the menu{Settings menu}
"Display off"22{Display off}
To open "Info sources"{Info sources}
To open "Settings"{Settings}
To open "Door locks"32, 34{Door locks}
To open "Steering wheel buttons"51{Steering wheel buttons}
To open MDrive
*52{MDrive}
To open "Lighting"63{Lighting}
To open "Service requirements", 193 70{Service requirements}
To open "Service"70, 193{Service}
To open "BMW Service settings" settings196{BMW service settings}
To display "Check Control messages"73{Check Control messages}
To open "Head-Up Display"90{Head-Up Display}
To set brightness of Control Display77{Brightness}
To open "Units"77{Units}
To open "Language"78, 124{Language}
To open "Time"76{Time}
To open "Date"77{Date}
To open "PDC"79{PDC}
To open "FTM"84{FTM}
To open "TPM"86{TPM}
To display "Bluetooth"179{Bluetooth}
Page 246 of 266

Everything from A to Z
244
Everything from A to Z
Index
"..." Identifies Control Display
texts used to select
individual functions and
refers you to the page where
these texts can be found.
A
ABS Antilock Brake
System80
– indicator lamp82
Accepted calls184
Accessories6
Accident, refer to Emergency
request231
Acoustic signal, refer to Check
Control72
Activated-charcoal filter for
automatic climate
control102
"Activation time" for parked
car ventilation103
Active front head restraints46
Active seat ventilation49
Adapter for spare key30
Adaptive brake lamps, refer to
Brake force display88
Adaptive Head Light95
"Add digits" in mobile phone
mode184
Additives
– coolant215
– engine oil, refer to Approved
engine oils214
"Address book" in
navigation134
Address for navigation
– deleting135
– entering126,129
– selecting135
– storing134
– storing current position134
"Add to address book"134"Add to destination
list"129,131
Adjusting active backrest
width44
Adjusting interior
temperature99
Adjusting the tone during
audio operation, refer to
Tone control151
Adjusting thigh support44
"After door opened"46
"After unlocking"46
Airbags88
– indicator/warning lamp90
– indicator lamp for front
passenger airbags89
– sitting safely43
Air distribution
– automatic99
– manual100
Airing, refer to Ventilation102
Air recirculation
– AUC Automatic
recirculated-air control101
– recirculated-air mode
101
Air recirculation, refer to
Recirculated-air mode101
"Air recirculation on / off"52
Air supply, automatic climate
control98
Air volume100
AKI, refer to Fuel quality203
Alarm system37
– avoiding unintentional
alarms37
– interior motion sensor37
– switching off alarm37
– switching off tilt alarm
sensor and interior motion
sensor38
– tilt alarm sensor37
"All channels"162
"All doors"32Alloy wheels219
All-season tires, refer to
Winter tires208
"All stations", requesting in
radio mode154
Alterations, technical, refer to
For your own safety5
Altering stretch of road142
"AM", reception
range150,154
Antenna for mobile phone176
Antifreeze
– coolant215
– washer fluid65
Anti-theft alarm system, refer
to Alarm system37
Anti-theft system, refer to
Central lokking system32
Approved axle loads, refer to
Weights239
Approved engine oils214
Approved gross vehicle
weight, refer to Weights239
Armrest, refer to Center
armrest, rear111
Around the center console14
Around the steering wheel10
Arrival time
– refer to Computer69
– refer to Starting destination
guidance138
"Arrow display" in
navigation139
"Arrow display pop-up
instructions"125
Ashtray
– front109
– rear110
Assist, refer to
BMW Assist191
Assistance systems, refer to
Driving stability control
systems80