2009 BMW M3 SEDAN navigation
[x] Cancel search: navigationPage 201 of 246

Mobility
199Reference
At a glance
Controls
Driving tips
Communications
Navigation
Entertainment
Care
Care products
Regular cleaning and care contributes signifi-
cantly to the value retention of your BMW.
BMW recommends cleaning and caring for your
vehicle with products that are approved by
BMW for this purpose.
Your BMW center will be happy to advise you on
the products and services available for cleaning
and caring for your BMW.
Original BMW CareProducts have been
material tested, laboratory checked and
proven in the field, and offer optimal care and
protection for your vehicle.<
Do not use cleaners that contain alcohol
or solvents as these may result in dam-
age.<
Cleaning agents can contain substances
that are dangerous or hazardous to your
health. Therefore, follow the warning and safety
instructions on the packaging. When cleaning
inside the vehicle, always open the doors or
windows of the vehicle. In enclosed areas, pro-
vide for sufficient ventilation. Only use products
designed for cleaning vehicles.<
Exterior care
Washing the vehicle
Especially during the winter months,
ensure that the vehicle is washed more
frequently. Heavy soiling and road salt can lead
to vehicle damage.<
After washing the vehicle, apply the
brakes briefly to dry them, otherwise
water can reduce braking efficiency over the
short term and the brake discs can corrode.<
Automatic car washes
Preference should be given to cloth car washes.
Before driving into a car wash, ensure that it is
suitable for your BMW. Check the following:>Dimensions of your vehicle, refer to
page219
>If necessary: fold in the exterior mirrors,
refer to page42
>Maximum permissible tire width
Preparations before driving into an automatic
car wash:
>Deactivate the rain sensor
* to prevent unin-
tentional wiping.
>Remove additional attachments, e.g.
spoiler or telephone antennas, if there is a
possibility that they could be damaged.
M dual clutch transmission
Before driving into an automatic car wash, per-
form the following steps to ensure that the vehi-
cle can roll:
1.Insert the remote control, even with conve-
nient access, into the ignition lock.
2.Engage transmission position N.
3.Release the parking brake.
4.Switch off the engine.
5.Leave the remote control in the ignition lock
so that the vehicle can roll.
Steam jets / high-pressure washers
When using steam jets or high-pressure
washers, ensure that you maintain suffi-
cient clearance to the vehicle and do not exceed
a temperature of 1407/606.
Insufficient clearance or excessive pressure or
temperature can lead to component damage or
water penetration. Follow the operating instruc-
tions of the high-pressure washer.<
When using high-pressure washers, do
not spray against the sensors and cam-
eras, e.g. Park Distance Control, for an
extended period and maintain a distance of at
least 12 in/30 cm.<
ba8_E90M3_cic.book Seite 199 Dienstag, 19. August 2008 11:51 11
Page 203 of 246

Mobility
201Reference
At a glance
Controls
Driving tips
Communications
Navigation
Entertainment
Outside sensors / cameras
Keep the sensors and cameras on the
outside of the vehicle, e.g. Park Distance
Control, clean and free of ice to ensure that they
remain fully functional.<
Interior care
Upholstery / cloth trim
Vacuum regularly with a vacuum cleaner to
remove superficial dirt.
To treat severe stains, e.g. from beverages, use
a soft sponge or lint-free microfiber cloth in
combination with suitable interior cleaners. Fol-
low the instructions on the packaging.
Clean the upholstery down to the seams
using a sweeping motion. Avoid strong
rubbing.<
Opened Velcro fasteners on pants or
other articles of clothing can damage the
seat covers. Ensure that Velcro fasteners are
closed.<
Leather / leather trim
The leather used by BMW is a high quality
natural product. Slight irregularities in the
leather are a typical characteristic of natural
leather.<
Dust and road grit in the pores and folds of the
leather have an abrasive effect, leading to
increased wear and causing the leather surface
to become brittle prematurely. Therefore, fre-
quently clean the leather of dust using a cloth or
vacuum cleaner.
In particular, ensure that light-colored leather is
cleaned regularly as it has a tendency to soil
more easily.
Treat the leather twice a year using a leather
lotion as dirt and grease will gradually attack the
leather's protective layer.
Carpets / cargo bay
You can vacuum the carpets and floor mats or
clean them with interior cleaner if heavily soiled.The floor mats can be removed for cleaning.
When replacing the mats, ensure that the seat
rails do not extend over the floor mats, as this
may damage the mats.
Lint on the floor mats occurs for technical rea-
sons and can be removed by vacuuming
repeatedly.
Interior plastic parts
>Imitation leather surfaces
>Lamp glasses
>Display pane of instrument cluster
>Matt parts
Clean with water and, if necessary, with sol-
vent-free plastic cleaner.
Fine wood parts
Clean fine wood trim and fine wood parts with a
damp cloth. Wipe dry with a soft cloth.
Safety belts
Do not clean with cleaning agents as
these may destroy the fabric.<
Interior sensors / cameras
To clean interior sensors and cameras, use a
lint-free cloth moistened with glass cleaner.
Displays
To clean the displays, e.g. of the radio or instru-
ment cluster, use a display cleaning cloth or a
soft, non-abrasive, lint-free cloth.
Avoid applying excessive pressure when
cleaning the displays, otherwise damage
may occur.<
Do not use chemical or abrasive house-
hold cleaning agents. Keep all types of
fluid away from the device. Otherwise, surfaces
or electrical components may be corroded or
damaged.<
CD/DVD drives
Do not use a cleaning CD, as it may dam-
age parts of the drive.<
ba8_E90M3_cic.book Seite 201 Dienstag, 19. August 2008 11:51 11
Page 205 of 246

Mobility
203Reference
At a glance
Controls
Driving tips
Communications
Navigation
Entertainment
Replacing components
Onboard tool kit
The onboard tool kit is stored in a compartment
on the right-hand side of the cargo bay.
Remove the cover.
Wiper blades
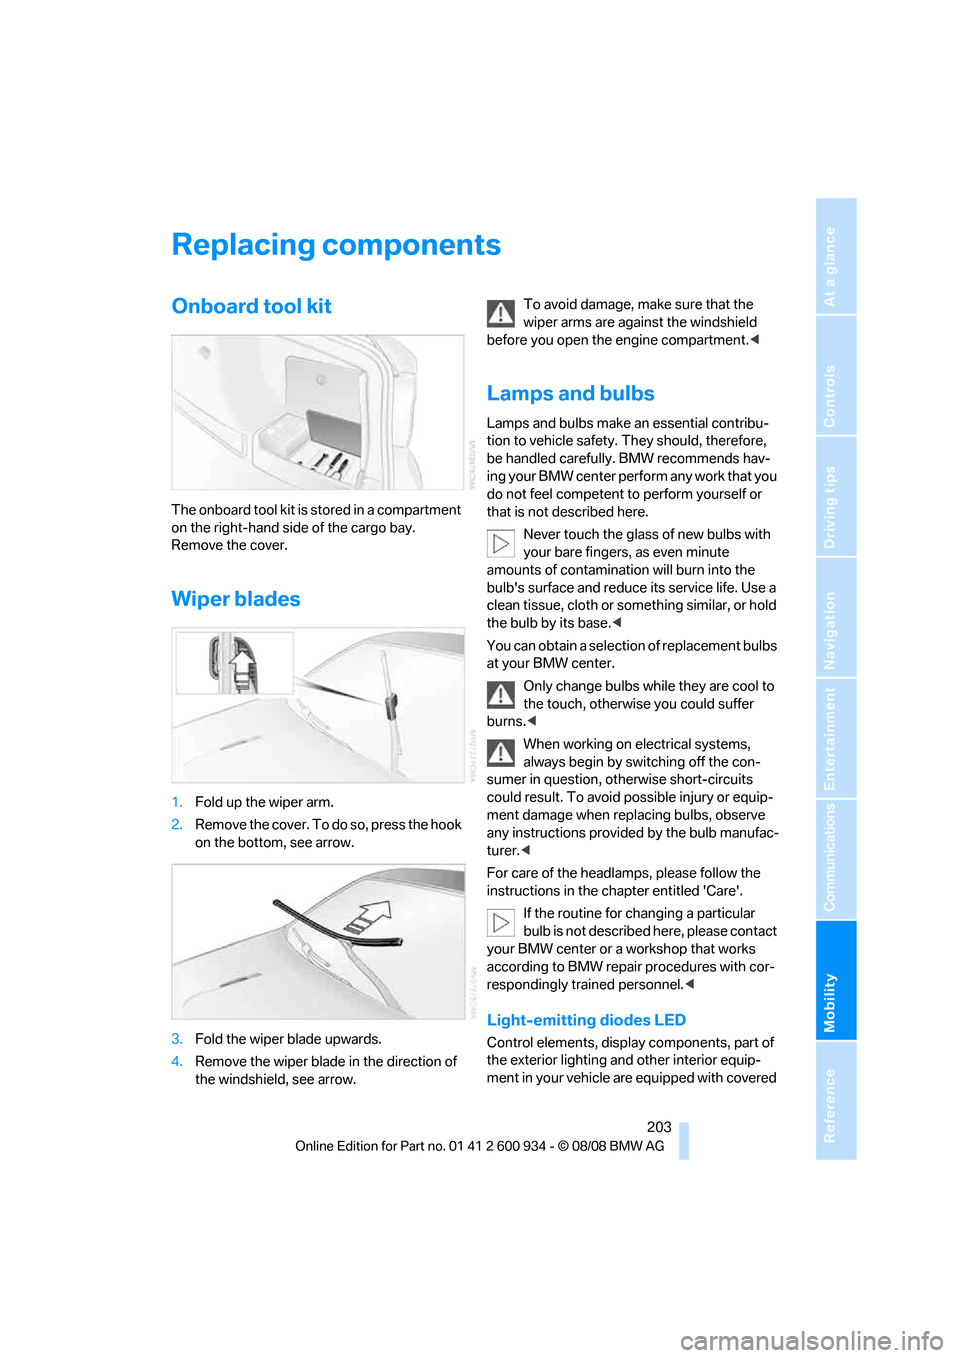
1.Fold up the wiper arm.
2.Remove the cover. To do so, press the hook
on the bottom, see arrow.
3.Fold the wiper blade upwards.
4.Remove the wiper blade in the direction of
the windshield, see arrow.To avoid damage, make sure that the
wiper arms are against the windshield
before you open the engine compartment.<
Lamps and bulbs
Lamps and bulbs make an essential contribu-
tion to vehicle safety. They should, therefore,
be handled carefully. BMW recommends hav-
ing your BMW center perform any work that you
do not feel competent to perform yourself or
that is not described here.
Never touch the glass of new bulbs with
your bare fingers, as even minute
amounts of contamination will burn into the
bulb's surface and reduce its service life. Use a
clean tissue, cloth or something similar, or hold
the bulb by its base.<
You can obtain a selection of replacement bulbs
at your BMW center.
Only change bulbs while they are cool to
the touch, otherwise you could suffer
burns.<
When working on electrical systems,
always begin by switching off the con-
sumer in question, otherwise short-circuits
could result. To avoid possible injury or equip-
ment damage when replacing bulbs, observe
any instructions provided by the bulb manufac-
turer.<
For care of the headlamps, please follow the
instructions in the chapter entitled 'Care'.
If the routine for changing a particular
bulb is not described here, please contact
your BMW center or a workshop that works
according to BMW repair procedures with cor-
respondingly trained personnel.<
Light-emitting diodes LED
Control elements, display components, part of
the exterior lighting and other interior equip-
ment in your vehicle are equipped with covered
ba8_E90M3_cic.book Seite 203 Dienstag, 19. August 2008 11:51 11
Page 207 of 246

Mobility
205Reference
At a glance
Controls
Driving tips
Communications
Navigation
Entertainment
Turn signals, front
PY24W Silver Vision bulb, 24 watts
The turn signal bulb can be changed via a cover
in the wheel arch.
1.Turn the respective wheel inwards.
2.Using a coin, turn both locks of the cover all
the way to the left, arrows 1, and remove the
cover.
3.Turn the bulb holder to the left, arrow2, and
take it out.
4.Turn the bulb socket in the bulb holder to
the right for removal and replacement.
5.Insert the bulb holder and lock it by turning
it to the right.
6.Attach the cover by positioning the bottom
edge first and then turning both locks all the
way to the right using a coin.
Tail lamps
>Brake lamp in the luggage compartment lid:
H21W bulb, 21 watts
>Backup lamp:
W16W bulb, 16 watts
>Other bulbs:
P21W bulb, 21 watts
The tail lamps are divided in two parts. One part
is in the luggage compartment lid, the other is in
the fender.1Brake lamp
2Roadside parking lamp/tail lamp, LED
3Turn signal, LED
4Backup lamp
5Tail lamp, LED
6Brake lamp
If one of the bulbs 2, 3 or 5 malfunctions, please
contact your BMW center or a workshop that
works according to BMW repair procedures
with correspondingly trained personnel.
Fender-mounted lamps
1.Using a screwdriver, pry off the cover in the
cargo bay or release the turn-lock fastener
by turning it counterclockwise and remove
the cover.
2.Loosen the bulb holder at the clip, see
arrow, and pull out.
3.Apply gentle pressure to the bulb while
turning it to the left for removal and replace-
ment.
4.Re-engage the bulb holder so that it audibly
clicks into place.
5.Reattach the cover in the cargo bay.
ba8_E90M3_cic.book Seite 205 Dienstag, 19. August 2008 11:51 11
Page 209 of 246

Mobility
207Reference
At a glance
Controls
Driving tips
Communications
Navigation
Entertainment
Components of the M Mobility System
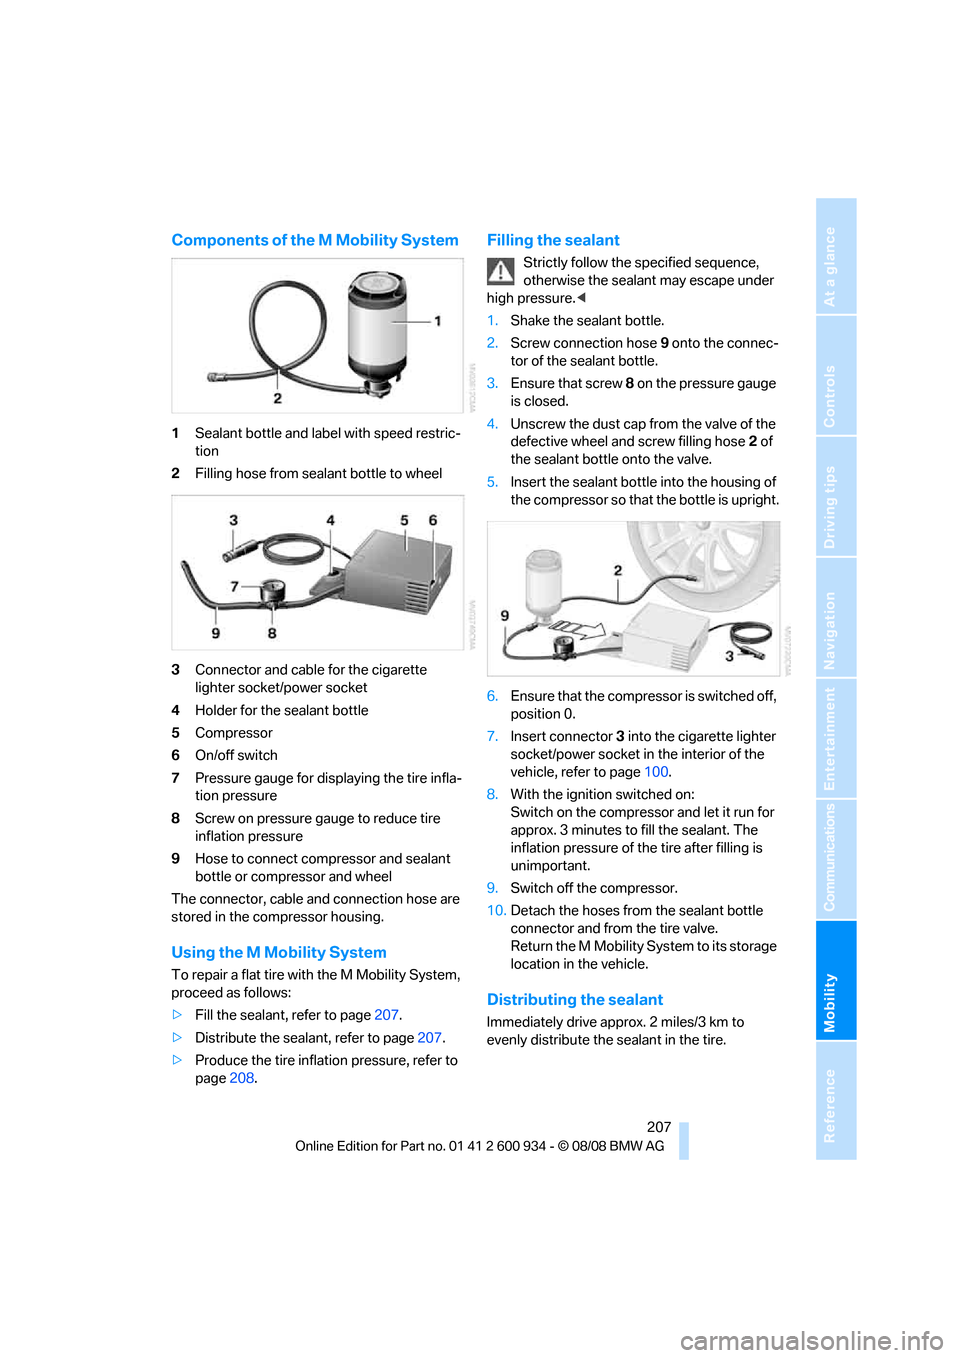
1Sealant bottle and label with speed restric-
tion
2Filling hose from sealant bottle to wheel
3Connector and cable for the cigarette
lighter socket/power socket
4Holder for the sealant bottle
5Compressor
6On/off switch
7Pressure gauge for displaying the tire infla-
tion pressure
8Screw on pressure gauge to reduce tire
inflation pressure
9Hose to connect compressor and sealant
bottle or compressor and wheel
The connector, cable and connection hose are
stored in the compressor housing.
Using the M Mobility System
To repair a flat tire with the M Mobility System,
proceed as follows:
>Fill the sealant, refer to page207.
>Distribute the sealant, refer to page207.
>Produce the tire inflation pressure, refer to
page208.
Filling the sealant
Strictly follow the specified sequence,
otherwise the sealant may escape under
high pressure.<
1.Shake the sealant bottle.
2.Screw connection hose 9 onto the connec-
tor of the sealant bottle.
3.Ensure that screw 8 on the pressure gauge
is closed.
4.Unscrew the dust cap from the valve of the
defective wheel and screw filling hose 2 of
the sealant bottle onto the valve.
5.Insert the sealant bottle into the housing of
the compressor so that the bottle is upright.
6.Ensure that the compressor is switched off,
position 0.
7.Insert connector 3 into the cigarette lighter
socket/power socket in the interior of the
vehicle, refer to page100.
8.With the ignition switched on:
Switch on the compressor and let it run for
approx. 3 minutes to fill the sealant. The
inflation pressure of the tire after filling is
unimportant.
9.Switch off the compressor.
10.Detach the hoses from the sealant bottle
connector and from the tire valve.
Return the M Mobility System to its storage
location in the vehicle.
Distributing the sealant
Immediately drive approx. 2 miles/3 km to
evenly distribute the sealant in the tire.
ba8_E90M3_cic.book Seite 207 Dienstag, 19. August 2008 11:51 11
Page 211 of 246

Mobility
209Reference
At a glance
Controls
Driving tips
Communications
Navigation
Entertainment
secure the battery against tipping over during
transport.<
Power failure
After a temporary power loss, the functioning of
some equipment may be limited and require
reinitialization. Individual settings may likewise
have been lost and will have to be programmed:
>Time and date
These values must be updated, refer to
page68.
>Radio
In some cases, stations may have to be
stored again, refer to page139.
>Navigation system
Operability must be waited for, refer to
page116.
>Glass roof
It may happen that the roof can only be
raised. The system must be initialized.
Please contact your BMW center.
>Seat and mirror memory
The positions must be stored again, refer to
page40.
>Inside rearview mirror with digital compass
The system must be calibrated, refer to
page96.
Fuses
Never attempt to repair a blown fuse and
do not replace a defective fuse with a sub-
stitute of another color or amperage rating, oth-
erwise this could lead to a circuit overload, ulti-
mately resulting in a fire in the vehicle.
Spare fuses and a pair of plastic forceps are set
in holders on the distributor box.
See the rear of the cover for information on fuse
assignment.
ba8_E90M3_cic.book Seite 209 Dienstag, 19. August 2008 11:51 11
Page 213 of 246

Mobility
211Reference
At a glance
Controls
Driving tips
Communications
Navigation
Entertainment
First aid pouch*
Some of the articles contained in the first aid
pouch have a limited service life. Therefore,
check the expiration dates of the contents reg-
ularly and replace any items in good time, if nec-
essary.
The first aid pouch is located on the right-hand
side of the cargo bay in a storage area.
Warning triangle*
The warning triangle is located in a holder in the
luggage compartment lid. Press the tabs to take
it out.
Jump starting
If the car's own battery is flat, your BMW's
engine can be started by connecting two
jumper cables to another vehicle's battery. You
can also use the same method to help start
another vehicle. Only use jumper cables with
fully-insulated clamp handles.
Do not touch any electrically live parts
when the engine is running, or a fatal acci-
dent may occur. Carefully adhere to the follow-ing sequence, both to prevent damage to one or
both vehicles, and to guard against possible
personal injuries.<
Preparation
1.Check whether the battery of the other
vehicle has a voltage of 12 volts and
approximately the same capacitance in Ah.
This information can be found on the bat-
tery.
2.Switch off the engine of the assisting vehi-
cle.
3.Switch off any consumers in both vehicles.
There must not be any contact between
the bodies of the two vehicles, otherwise
there is a danger of shorting.<
Connecting jumper cables
Connect the jumper cables in the correct
order, so that no sparks which could
cause injury occur.<
Your BMW has a jump-starting connection in
the engine compartment which acts as the bat-
tery's positive terminal, refer also to the Engine
compartment overview on page193. The cap is
marked with +.
1.Pull the cap of the BMW jump-starting con-
nection up to remove.
2.Attach one terminal clamp of the plus/+
jumper cable to the positive terminal of the
battery or a starting-aid terminal of the vehi-
cle providing assistance.
3.Attach the second terminal clamp of the
plus/+ jumper cable to the positive terminal
of the battery or a starting-aid terminal of
the vehicle to be started.
ba8_E90M3_cic.book Seite 211 Dienstag, 19. August 2008 11:51 11
Page 215 of 246

Mobility
213Reference
At a glance
Controls
Driving tips
Communications
Navigation
Entertainment
headlamps, tail lamps, turn signal indicators and
windshield wipers may be unavailable.
Power steering assistance is not available when
the engine is not running. Thus, braking and
steering will require increased effort.<
Manual transmission
Gearshift lever in neutral position.
M dual clutch transmission with
Drivelogic
Ensure that the parking lock P is not
engaged as the rear wheels will otherwise
be blocked.
When using the car wash function, refer to
page51, note that the parking lock P is
engaged automatically after approx. 30 min-
utes, blocking the rear wheels.
If an electrical malfunction occurs or if towing
takes longer than approx. 20 minutes, manually
release the parking lock, refer to page54.<
When towing, do not exceed a maximum
speed of 30 mph/50 km/h and a maxi-
mum distance of 30 miles/50 km, otherwise the
transmission can be damaged.<
BMW recommends transporting the vehicle on
a tow truck with a flat bed.
Towing methods
Do not lift the vehicle by a tow fitting or
body and chassis parts, otherwise dam-
age may result.<
With a tow bar
The towing vehicle must not be lighter
than the towed vehicle, otherwise it may
be impossible to maintain control.<
The tow fittings used should be on the same
side on both vehicles. Should it prove impossi-
ble to avoid mounting the tow bar at an angle,
please observe the following:
>Clearance and maneuvering capability will
be sharply limited during cornering.
>The tow bar will generate lateral forces if it is
attached offset.Attach the tow bar to the tow fittings only,
as attaching it to other parts of the vehicle
could result in damage.<
With a tow rope
When starting off in the towing vehicle, make
sure that the tow rope is taut.
To avoid jerking and the associated
stresses on vehicle components when
towing, always use nylon ropes or nylon straps.
Attach the tow rope to the tow fittings only, as
attaching it to other parts of the vehicle could
result in damage.<
With a tow truck
Manual transmission:
Have the BMW transported with a tow truck
with a so-called lift bar or on a flat bed.
Do not tow the vehicle with just the rear axle
raised as this may cause the steering to turn.
M dual clutch transmission:
Have the BMW transported with a tow truck
with a so-called lift bar or on a flat bed.
Tow-starting
If possible, do not tow-start the vehicle but
jump-start the engine, refer to page211. Vehi-
ba8_E90M3_cic.book Seite 213 Dienstag, 19. August 2008 11:51 11