2009 BMW 650I COUPE door lock
[x] Cancel search: door lockPage 60 of 272

Transporting children safely
58
Transporting children safely
The right place for children
Do not leave children unattended in the
vehicle, otherwise they could endanger
themselves and other persons, e.g. by opening
the doors.<
Children always in the rear
Accident research shows that the safest place
for children is on the rear seat.
Children younger than 13 years of age or
with a height under 5 ft/150 cm may only
be transported in the rear in child restraint sys-
tems which correspond to the age, weight and
height of the child. Otherwise there is an
increased danger of injury in an accident.<
Children 13 years of age or older must wear a
safety belt as soon as a suitable child restraint
system can no longer be used due to their age,
size and weight.
Exception for front passenger seat
Should it be necessary to use a child
restraint system on the front passenger
seat, the front, knee and side airbags on the
passenger side must be deactivated before
doing so. Otherwise, there is an increased risk
of injury to the child if the airbags are triggered,
even with a child restraint system.<
For more information on automatic deactivation
of the front passenger airbags, refer to page96.
Installing child restraint
systems
Follow child restraint system manufac-
turer's instructions for the selection,
installation and use of child restraint systems.
Otherwise, the degree of protection they offer
may be reduced.<
On front passenger seat
After mounting a child restraint system on
the front passenger seat, make sure that
the front and side airbags on the front passen-
ger side are deactivated, as otherwise there is
an increased risk of injury if the airbags are trig-
gered.<
Child seat security
All rear safety belts and the safety belt for the
front passenger can be locked against pulling
out to secure child restraint systems.
Locking safety belt
1.Secure the child restraint system with the
belt.
2.Pull out the belt webbing completely.
3.Allow the belt webbing to retract and pull
taut against the child restraint system. The
safety belt is locked.
Unlocking safety belt
1.Open the belt buckle.
2.Remove the child restraint system.
3.Allow the belt webbing to retract com-
pletely.
LATCH child restraint fixing
system
LATCH: Lower Anchor and Tethers for Chil-
dren.
Page 62 of 272

Driving
60
Driving
Ignition lock
Inserting remote control into ignition
lock
Insert the remote control as far as possible into
the ignition lock.
Radio readiness switches on.
Some electronic systems/consumers are ready
for operation.
Comfort access*
With comfort access, only insert the remote
control into the ignition lock in exceptional
cases, refer to page38.
Removing remote control from ignition
lock
Do not pull the remote control out of the
ignition lock using force, as otherwise
damage may result.<
Before removing the remote control, first press
it in as far as possible to release the locking
device.
The ignition is switched off if it was still
switched on.
Sport automatic transmission
The remote control can only be removed when
transmission position P is selected: interlock.
Start/Stop button
Pressing the Start/Stop button switches the
radio readiness or the ignition on and off.
The engine is started when you press the
Start/Stop button and depress the clutch
if your vehicle is equipped with the manual
transmission or the brake if your vehicle is
equipped with the sport automatic transmis-
sion.<
Radio readiness
Some electronic systems/consumers are ready
for operation. The time and outside tempera-
ture are displayed in the instrument cluster.
Radio readiness is switched off:
>when the remote control is removed from
the ignition lock
>with comfort access
* by touching the sur-
face on the door handle, refer to Locking on
page39
Ignition on
All electronic systems/consumers are ready for
operation. The odometer and the trip odometer
are displayed in the instrument cluster, refer to
page76.
Please switch off the ignition and the
electronic systems/consumers which are
not required when the engine is not running to
save the battery.<
Page 106 of 272

Lamps
104
Lamps
Parking lamps/low beams
0Lights off and daytime running lamps*
1Parking lamps and daytime running lamps*
2Low beams and welcome lamps
3Automatic headlamp control, daytime run-
ning lamps
*, welcome lamps, Adaptive
Head Light
* and high-beam assistant*
If you open the driver's door with the ignition
switched off, the exterior lighting is switched off
when the light switch is in position2 or 3. The
daytime running lamps have already been
switched off at the same time as the ignition.
For this reason, switch on the side marker
lamps as needed, switch position1; otherwise,
the vehicle is not lit.
Parking lamps
In switch position1, the front, rear and side
vehicle lighting is switched on. You can use the
parking lamps for parking.
The parking lamps drain the battery. Do
not leave them switched on for long peri-
ods of time, otherwise it may no longer be pos-
sible to start the engine. It is preferable to
switch on the roadside parking lamps on one
side, refer to page106.<
Low beams
The low beams light up when the light switch is
in position 2 and the ignition is on.
Automatic headlamp control
In switch position3, the system activates the
low beams and switches them on or off in
response to changes in ambient light condi-
tions, for instance, in a tunnel, at dawn and dusk
and in case of precipitation. Adaptive Head
Light
* is active. The LED next to the symbol
lights up when the low beams are on.
You can also activate the daytime running
lamps, refer to page105. In the situations
described above, the lamps then switch to low
beams.
A blue sky with the sun low on the horizon can
cause the lights to be switched on.
The low beams remain on independent of
the ambient lighting conditions when you
switch on the fog lamps.<
The automatic headlamp control cannot
serve as a substitute for your personal
judgment in determining when the lamps
should be switched on in response to ambient
lighting conditions. For example, the sensors
cannot detect fog of hazy weather. To avoid
safety risks, you should always switch on the
low beams manually under these conditions.<
Welcome lamps
If you leave the light switch in position2 or 3
when parking the vehicle, then when you unlock
the vehicle, the parking lamps and interior light-
ing remain illuminated for a brief time.
Activating/deactivating welcome
lamps
iDrive, for operating principle refer to page16.
1.Press the button.
This opens the start menu.
2.Press the controller to open the menu.
3.Select "Settings" and press the controller.
4.Select "Vehicle / Tires" and press the con-
troller.
Page 122 of 272

Practical interior accessories
120
Storage compartments
Storage compartments in the
passenger compartment
Storage compartment behind center
armrest
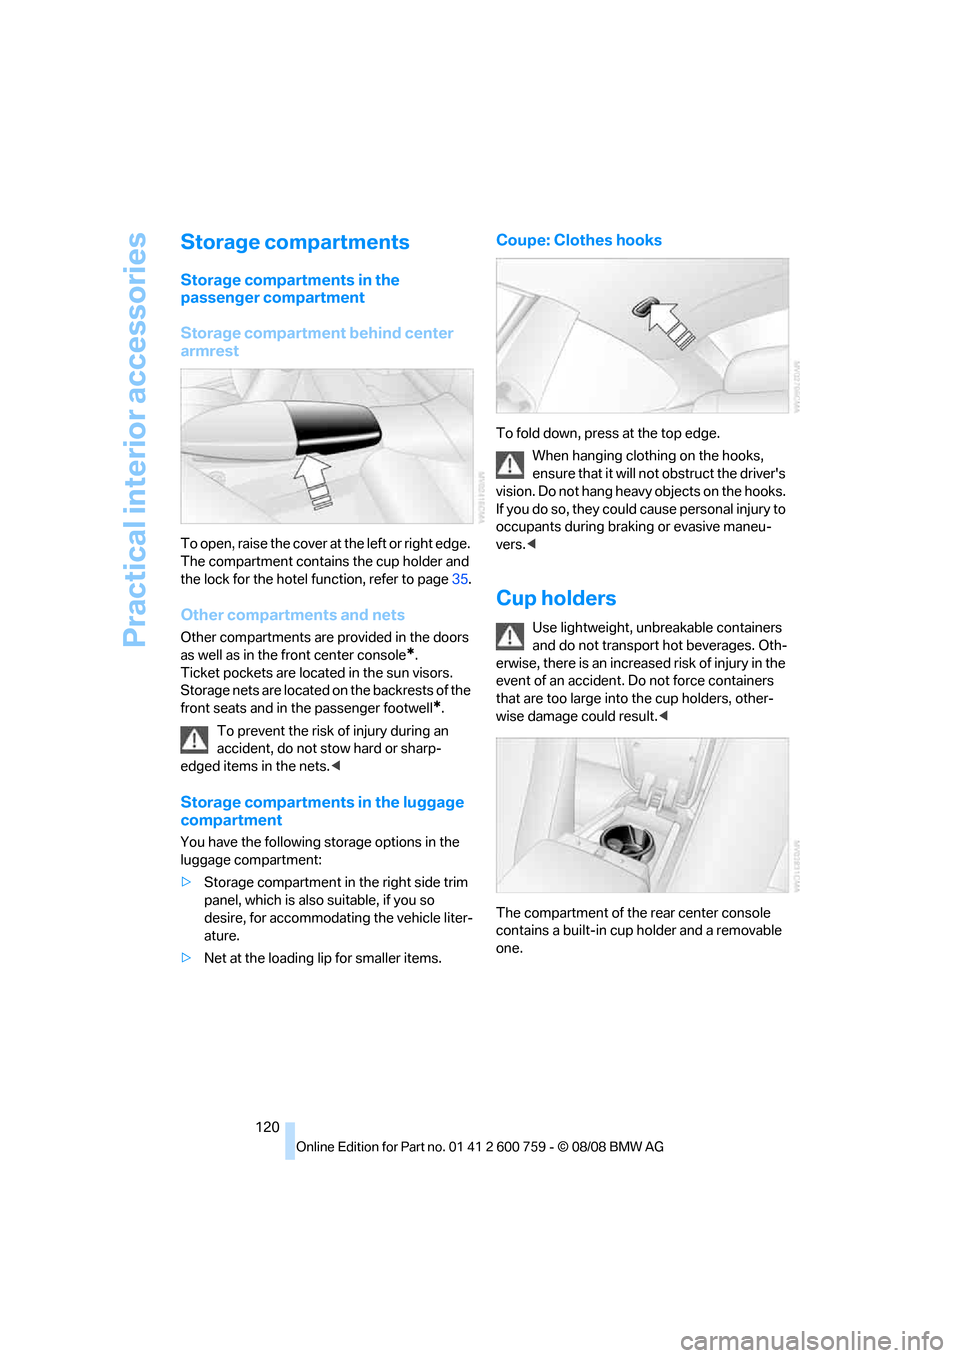
To open, raise the cover at the left or right edge.
The compartment contains the cup holder
and
the lock for the hotel function, refer to page35.
Other compartments and nets
Other compartments are provided in the doors
as well as in the front center console
*.
Ticket pockets are located in the sun visors.
Storage nets are located on the backrests of the
front seats and in the passenger footwell
*.
To prevent the risk of injury during an
accident, do not stow hard or sharp-
edged items in the nets.<
Storage compartments in the luggage
compartment
You have the following storage options in the
luggage compartment:
>Storage compartment in the right side trim
panel, which is also suitable, if you so
desire, for accommodating the vehicle liter-
ature.
>Net at the loading lip for smaller items.
Coupe: Clothes hooks
To fold down, press at the top edge.
When hanging clothing on the hooks,
ensure that it will not obstruct the driver's
vision. Do not hang heavy objects on the hooks.
If you do so, they could cause personal injury to
occupants during braking or evasive maneu-
vers.<
Cup holders
Use lightweight, unbreakable containers
and do not transport hot beverages. Oth-
erwise, there is an increased risk of injury in the
event of an accident. Do not force containers
that are too large into the cup holders, other-
wise damage could result.<
The compartment of the rear center console
contains a built-in cup holder and a removable
one.
Page 203 of 272

201
Entertainment
Reference
At a glance
Controls
Driving tips Communications
Navigation
Mobility
BMW Assist
BMW Assist provides you with various services.
For example, the position data of your vehicle
can be transmitted to the BMW Assist
Response Center if an emergency request
* has
been initiated.
Many BMW Assist services depend on the indi-
vidually agreed contract.
After your contract has expired, the BMW
Assist system will be deactivated by the BMW
Assist Response Center without you having to
visit a BMW center. After the BMW Assist sys-
tem has been deactivated, no BMW Assist ser-
vice will be available. The BMW Assist system
can be reactivated by a BMW center after sign-
ing a new contract.
Requirements
You can use BMW Assist when the following
requirements are met:
>The installed BMW Assist system is logged
on to a mobile phone network. This network
must be capable of transmitting the ser-
vices.
>To transmit position data, the vehicle must
be able to determine the current position.
>In order to activate and update BMW Assist,
a GPS signal must be available.
>You have subscribed to BMW Assist with
your BMW center or with the BMW Assist
Response Center. Activation must be com-
pleted.
>BMW Assist is activated, refer to page206.
Offered services
The following services are available via
BMW Assist:
>Emergency request, refer to page235:
When you press the SOS button, a connec-
tion is established to the BMW Assist
Response Center. The BMW Assist Response Center contacts you and takes
further steps to help you.
>Automatic collision notification:
Under certain conditions, a connection is
established to the BMW Assist Response
Center immediately after a serious acci-
dent. If possible, the BMW Assist Response
Center contacts you and takes further steps
to help you.
>Enhanced roadside assistance:
You can call Roadside Assistance
* of the
BMW Group should you require help in the
event of a breakdown. If possible, the vehi-
cle data and position data are transmitted
during this time.
>BMW Customer Relations:
For information related to your vehicle, call
BMW Customer Relations.
>BMW TeleServices
*:
The data on the service status of your vehi-
cle or on required inspections are transmit-
ted to your BMW center either automati-
cally prior to the due date or when you
request a BMW service appointment.
>Remote door unlock:
Inform the BMW Assist Response Center,
e.g. if your remote control is not available
and you want to have the vehicle unlocked.
>Stolen vehicle recovery:
After your vehicle has been reported to the
police as stolen, the BMW Assist Response
Center can locate its position.
In addition, you can be provided with other ser-
vices, e.g. the concierge service or information
on route planning, traffic conditions, and the
weather. With Critical Calling, you can make a
limited number of calls via the BMW Assist
Response Center, e.g. if you do not have your
mobile phone with you.
Press the SOS button to contact the BMW
Assist Response Center, see below.
You also have access to the BMW Assist con-
cierge service via the Internet.
*
Page 214 of 272

Refueling
212
Refueling
Switch off the engine before refueling,
otherwise no fuel can be filled into the
tank and a message is displayed.<
When handling fuel, always observe all
applicable precautionary measures and
regulations. Never transport reserve fuel con-
tainers in the vehicle. They can leak and cause
an explosion or a fire in an accident.<
Fuel filler door
To open and close: briefly press the rear edge of
the fuel filler door.
Unlocking manually
In the event of an electrical malfunction, you can
release the fuel filler door manually:
In the luggage compartment, pull the knob with
the gas pump symbol on the right side panel.
Observe the following when refueling
When handling fuels, follow the safety
precautions posted at the filling station. Otherwise, there is a danger of personal injury
and property damage.<
Place the fuel filler cap in the bracket attached
to the fuel filler door.
When refueling, insert the filler nozzle com-
pletely into the filler pipe. Avoid raising the filler
nozzle during refueling, otherwise this
>results in premature pump shutoff
>can lead to reduced efficiency in the fuel-
vapor recovery system
The fuel tank is full when the filler nozzle clicks
off the first time.
Fuel tank capacity
Approx. 18.5 US gal/70 liters, including the
reserve capacity of approx. 2.6 US gal/10 liters.
Refuel as soon as possible once your
cruising range falls below 30 miles/
50 km, otherwise engine functions are not
ensured and damage can occur.<
Fuel filler cap
Closing
Insert the cap and turn it clockwise until there is
a clearly audible click.
Do not crush the band attached to the
cap; otherwise, the cap may not properly
seal and fuel vapors can escape.<
A message
* is displayed if the cap is loose or
missing.
Page 229 of 272

Mobility
227Reference
At a glance
Controls
Driving tips
Communications
Navigation
Entertainment
Care
Car-care products
Regular cleaning and care make a significant
contribution to retaining your BMW's value.
For the cleaning and care of your vehicle, BMW
recommends using only products that BMW
has approved for this purpose.
Your BMW center will be glad to advise you
about products and services for the cleaning
and care of your BMW.
Genuine BMW Care Products are materi-
als tested, laboratory tested, and tested in
actual use. They offer optimum care and pro-
tection for your vehicle.<
Do not use cleaners that contain alcohol
or solvents; they can damage your vehi-
cle.<
Cleaning agents can contain substances
that are dangerous or pose health risks.
You should therefore heed the warnings and
hazard indications on the packaging. Open the
doors or windows on your vehicle whenever
cleaning the interior. Make sure there is suffi-
cient ventilation in enclosed spaces. Use only
products that are formulated for vehicle clean-
ing.<
Exterior care
Washing your vehicle
In the winter months, it is especially
important to ensure that the vehicle is
washed on a regular basis. Otherwise, signifi-
cant soiling and road salt can cause damage to
the vehicle.<
After washing the vehicle, apply the
brakes briefly to dry them. Failure to do so
may lead to a reduction in braking efficiency and
also to corrosion of the brake rotors.<
Car washes
Give preference to cloth car washes.Do not use high-pressure car washes
because they can cause drops of water to
penetrate in the vicinity of the windshield.<
Before driving into the car wash, make sure that
it is suitable for your BMW. Pay attention to the
following points:
>Dimensions of your vehicle, refer to
page243.
>If necessary, fold in the outside rearview
mirrors, refer to page55.
>Maximum permissible tire width.
>The convertible top must not be treated
with wax. Make sure that a program without
wax or a special convertible program is
available.
Preparations for driving into the car wash:
>Deactivate rain sensor to prevent unwanted
wiper activation.
>Remove additional add-on parts, e.g. spoil-
ers or phone antennas, if they could be
damaged.
Automatic transmission
Before driving into the car wash, make sure the
vehicle is able to roll by making sure to:
1.Insert the remote control into the ignition
lock, even with comfort access.
2.Shift into transmission position N.
3.Release the parking brake.
4.Switch off the engine.
5.Leave the remote control in the ignition lock
so that the vehicle can roll.
Steam cleaners/high-pressure
cleaning jets
When using steam jets or high-pressure
washers, ensure that you maintain suffi-
cient clearance to the vehicle and do not exceed
a temperature of 606.
Insufficient distance or excessive pressure or
temperature can damage parts of the vehicle or
Page 251 of 272

Reference 249
At a glance
Controls
Driving tips
Communications
Navigation
Entertainment
Mobility
menu
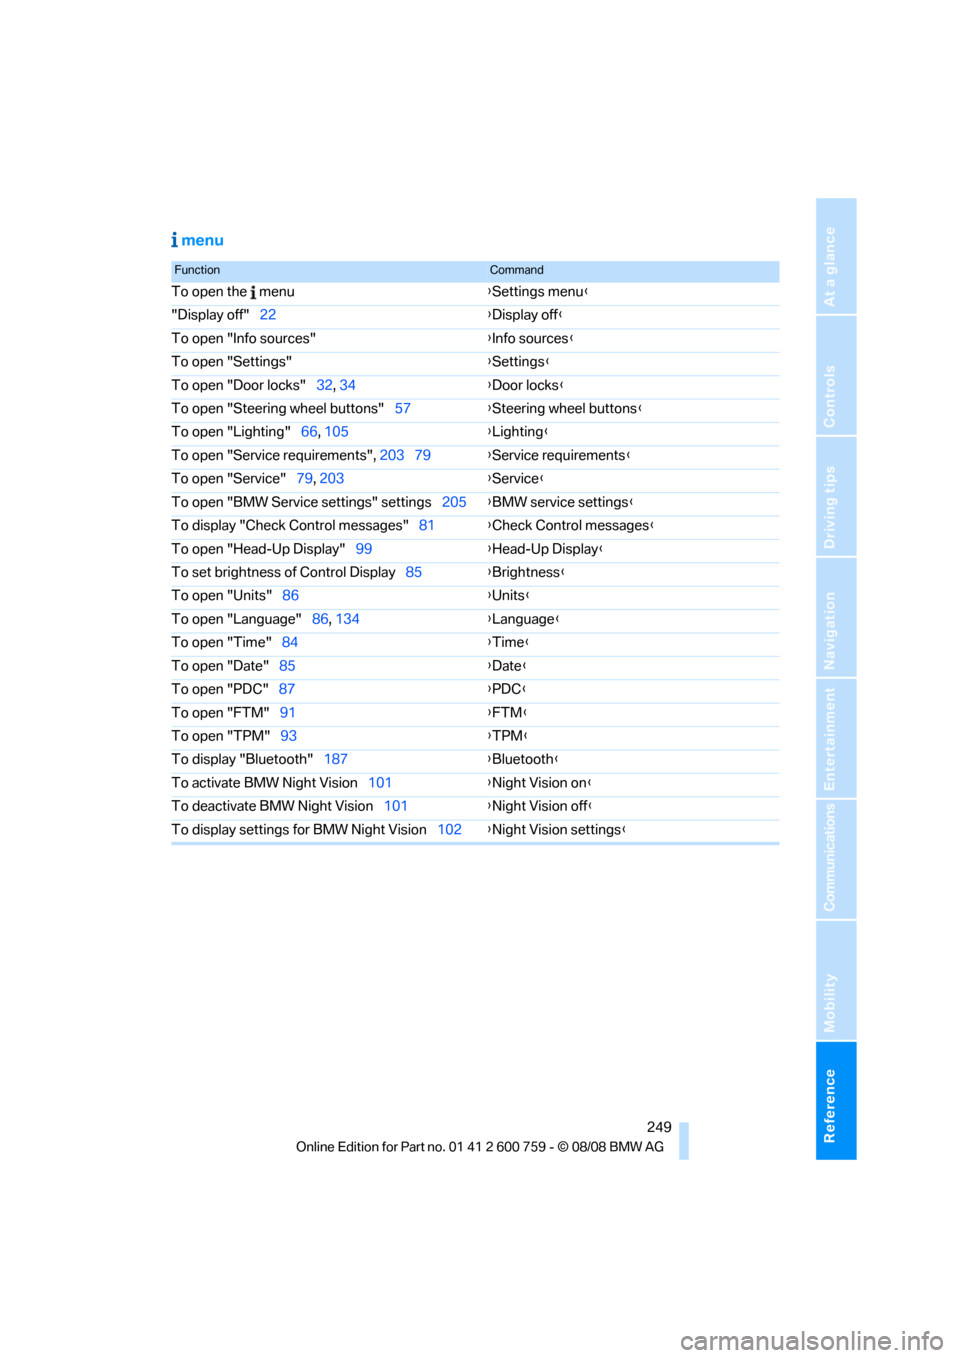
FunctionCommand
To open the menu{Settings menu}
"Display off"22{Display off}
To open "Info sources"{Info sources}
To open "Settings"{Settings}
To open "Door locks"32, 34{Door locks}
To open "Steering wheel buttons"57{Steering wheel buttons}
To open "Lighting"66, 105{Lighting}
To open "Service requirements", 203 79{Service requirements}
To open "Service"79, 203{Service}
To open "BMW Service settings" settings205{BMW service settings}
To display "Check Control messages"81{Check Control messages}
To open "Head-Up Display"99{Head-Up Display}
To set brightness of Control Display85{Brightness}
To open "Units"86{Units}
To open "Language"86, 134{Language}
To open "Time"84{Time}
To open "Date"85{Date}
To open "PDC"87{PDC}
To open "FTM"91{FTM}
To open "TPM"
93{TPM}
To display "Bluetooth"187{Bluetooth}
To activate BMW Night Vision101{Night Vision on}
To deactivate BMW Night Vision101{Night Vision off}
To display settings for BMW Night Vision102{Night Vision settings}