2009 BMW 550I SEDAN bulb
[x] Cancel search: bulbPage 70 of 294

Driving
68
Activating system
Press the SPORT button.
The LED in the button lights up and SPORT is
displayed in the instrument cluster.
Deactivating system
>Press the SPORT button again
>Engage reverse gear
>Switch off engine
The LED in the button and SPORT in the instru-
ment cluster go out.
Turn signals/
headlamp flasher
1High beams
2Headlamp flasher
3Turn signals
Using turn signals
Press the lever beyond the resistance point.
To turn off manually, press the lever to the
resistance point.
Atypically rapid flashing of the indicator
lamp indicates that a turn signal bulb
needs to be replaced.<
Signaling briefly
Press lever to resistance point and hold for as
long as you wish to signal.
Triple turn signal activation
Press the lever to the resistance point; the turn
signal flashes three times.
You can activate or deactivate this function.
iDrive, for operating principle refer to page16.
1.Press the button.
This opens the start menu.
2.Press the controller to open the menu.
3.Select "Settings" and press the controller.
4.Select "Vehicle / Tires" and press the con-
troller.
5.Change to upper field if necessary. Turn the
controller until "Lighting" is selected and
press the controller.
6.Select "Triple turn signal" and press the
controller.
Triple turn signaling is activated.
The setting is stored for the remote control cur-
rently in use.
Page 245 of 294
Mobility
243Reference
At a glance
Controls
Driving tips
Communications
Navigation
Entertainment
Replacing components
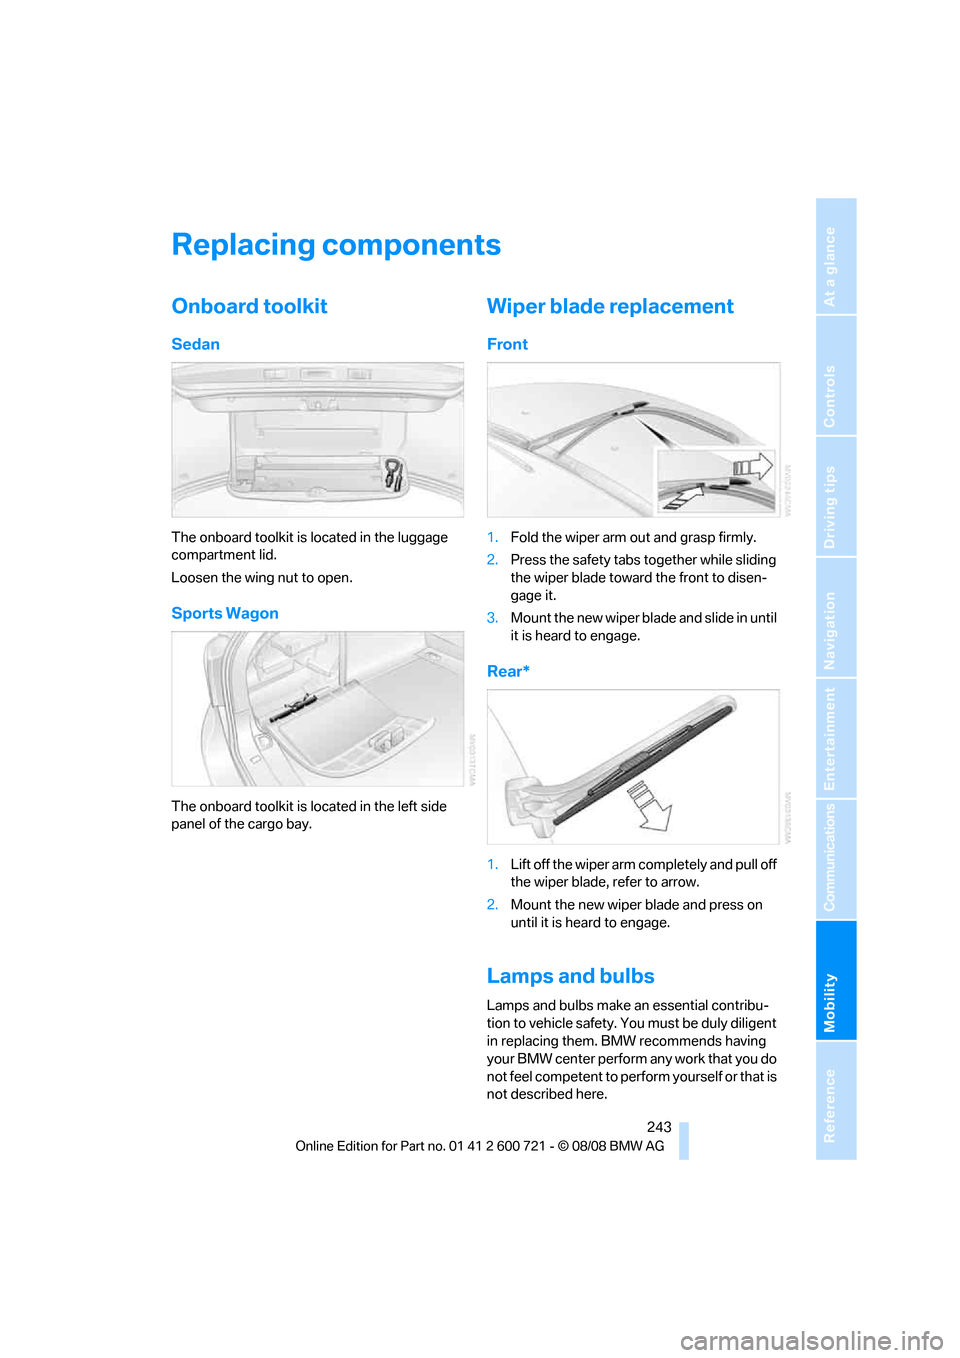
Onboard toolkit
Sedan
The onboard toolkit is located in the luggage
compartment lid.
Loosen the wing nut to open.
Sports Wagon
The onboard toolkit is located in the left side
panel of the cargo bay.
Wiper blade replacement
Front
1.Fold the wiper arm out and grasp firmly.
2.Press the safety tabs together while sliding
the wiper blade toward the front to disen-
gage it.
3.Mount the new wiper blade and slide in until
it is heard to engage.
Rear*
1.Lift off the wiper arm completely and pull off
the wiper blade, refer to arrow.
2.Mount the new wiper blade and press on
until it is heard to engage.
Lamps and bulbs
Lamps and bulbs make an essential contribu-
tion to vehicle safety. You must be duly diligent
in replacing them. BMW recommends having
your BMW center perform any work that you do
not feel competent to perform yourself or that is
not described here.
Page 246 of 294
Replacing components
244 Never touch the glass of new bulbs with
your bare fingers, as even minute
amounts of contamination will burn into the
bulb's surface and reduce its service life. Use a
clean cloth, napkin, etc., or hold the bulb by its
metal socket.<
A selection of replacement bulbs is available at
your BMW center.
Only replace bulbs when cool, as other-
wise you may be burned.<
Whenever you perform any work on the
electrical system, turn off the systems/
consumers involved to prevent short circuits
from occurring. To avoid possible injury or
equipment damage when replacing bulbs,
observe any instructions provided by the bulb
manufacturer.<
For information on how to care for the head-
lamps, please follow the instructions on
page239.
For bulbs for which changing is not
described, and for checking and adjusting
headlamp aim, please contact your BMW cen-
ter.<
Light-emitting diodes LEDs
Light-emitting diodes installed behind translu-
cent lenses serve as the light source for many of
the controls and displays in your vehicle. These
light-emitting diodes, which operate using a
concept similar to that applied in conventional
lasers, are officially designated as Class 1 light-
emitting diodes.
Do not remove the covers, and never
stare into the unfiltered light for several
hours, as irritation of the retina could result.<
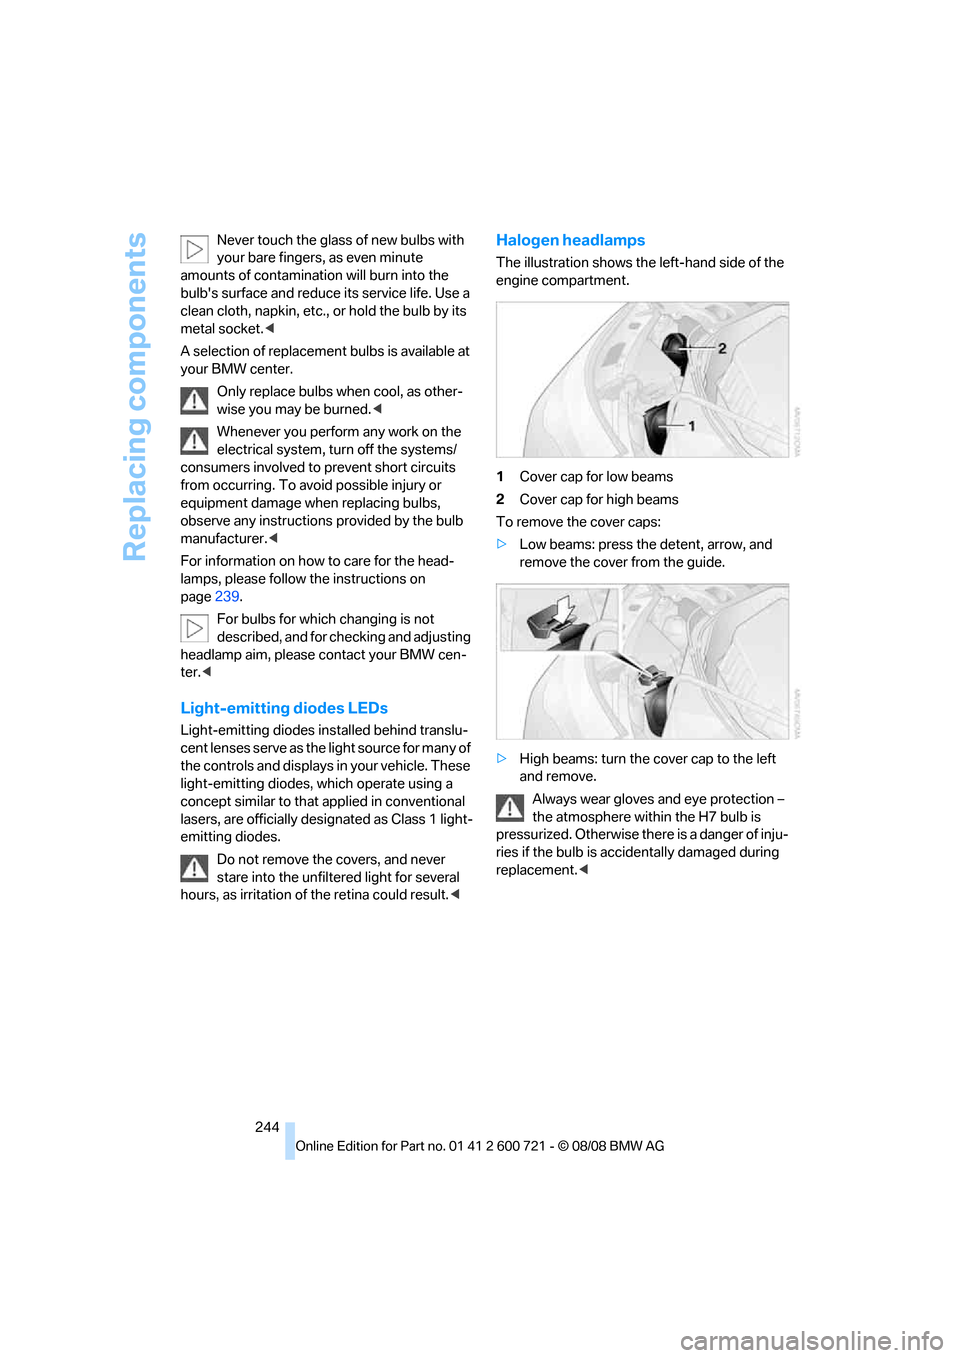
Halogen headlamps
The illustration shows the left-hand side of the
engine compartment.
1Cover cap for low beams
2Cover cap for high beams
To remove the cover caps:
>Low beams: press the detent, arrow, and
remove the cover from the guide.
>High beams: turn the cover cap to the left
and remove.
Always wear gloves and eye protection –
the atmosphere within the H7 bulb is
pressurized. Otherwise there is a danger of inju-
ries if the bulb is accidentally damaged during
replacement.<
Page 247 of 294
Mobility
245Reference
At a glance
Controls
Driving tips
Communications
Navigation
Entertainment
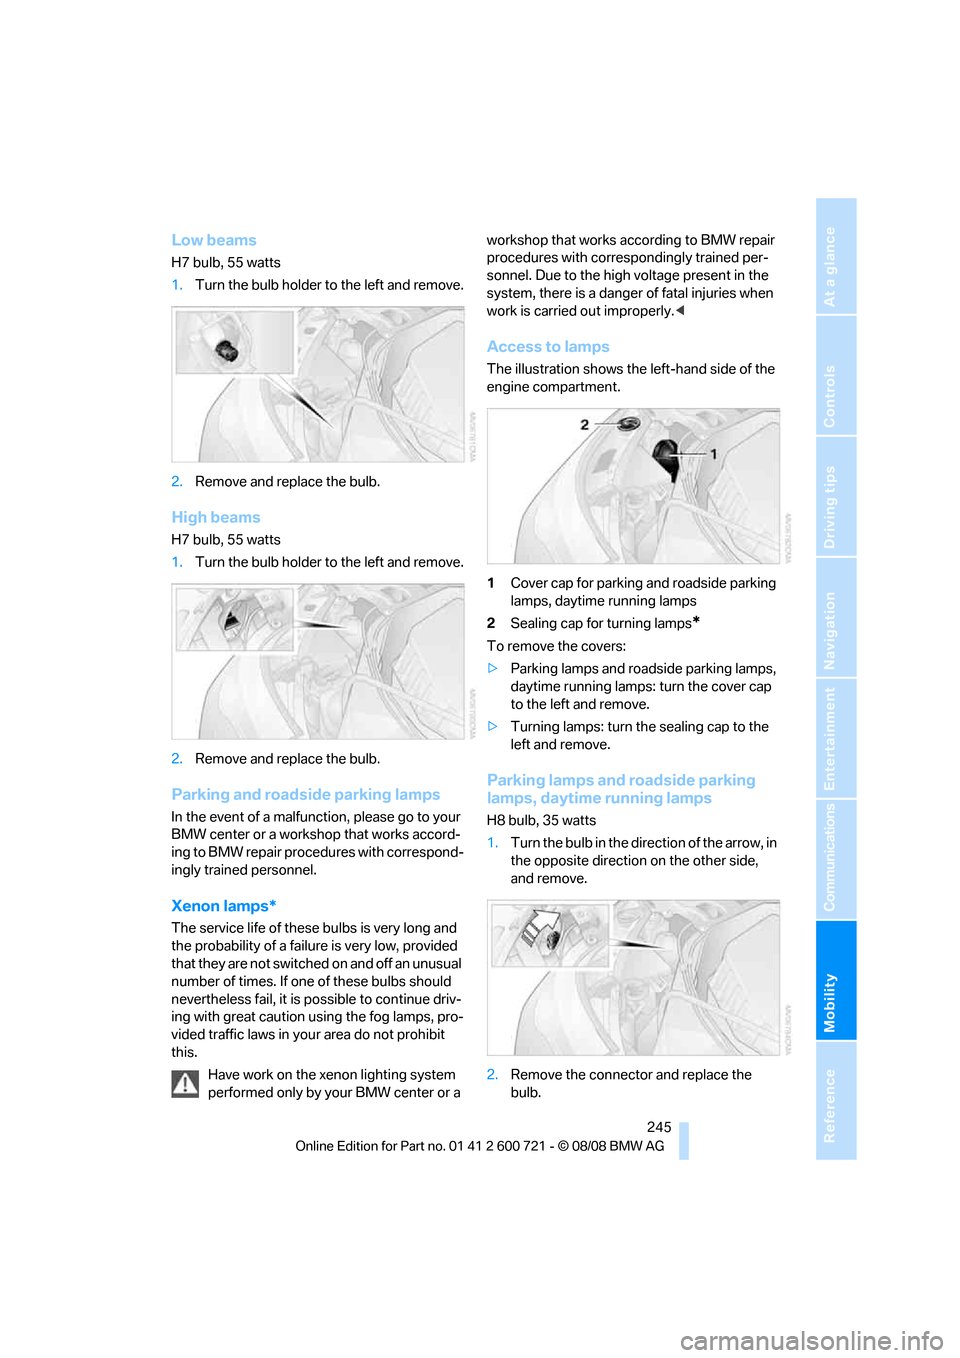
Low beams
H7 bulb, 55 watts
1.Turn the bulb holder to the left and remove.
2.Remove and replace the bulb.
High beams
H7 bulb, 55 watts
1.Turn the bulb holder to the left and remove.
2.Remove and replace the bulb.
Parking and roadside parking lamps
In the event of a malfunction, please go to your
BMW center or a workshop that works accord-
ing to BMW repair procedures with correspond-
ingly trained personnel.
Xenon lamps*
The service life of these bulbs is very long and
the probability of a failure is very low, provided
that they are not switched on and off an unusual
number of times. If one of these bulbs should
nevertheless fail, it is possible to continue driv-
ing with great caution using the fog lamps, pro-
vided traffic laws in your area do not prohibit
this.
Have work on the xenon lighting system
performed only by your BMW center or a workshop that works according to BMW repair
procedures with correspondingly trained per-
sonnel. Due to the high voltage present in the
system, there is a danger of fatal injuries when
work is carried out improperly.<
Access to lamps
The illustration shows the left-hand side of the
engine compartment.
1Cover cap for parking and roadside parking
lamps, daytime running lamps
2Sealing cap for turning lamps
*
To remove the covers:
>Parking lamps and roadside parking lamps,
daytime running lamps: turn the cover cap
to the left and remove.
>Turning lamps: turn the sealing cap to the
left and remove.
Parking lamps and roadside parking
lamps, daytime running lamps
H8 bulb, 35 watts
1.Turn the bulb in the direction of the arrow, in
the opposite direction on the other side,
and remove.
2.Remove the connector and replace the
bulb.
Page 248 of 294
Replacing components
246
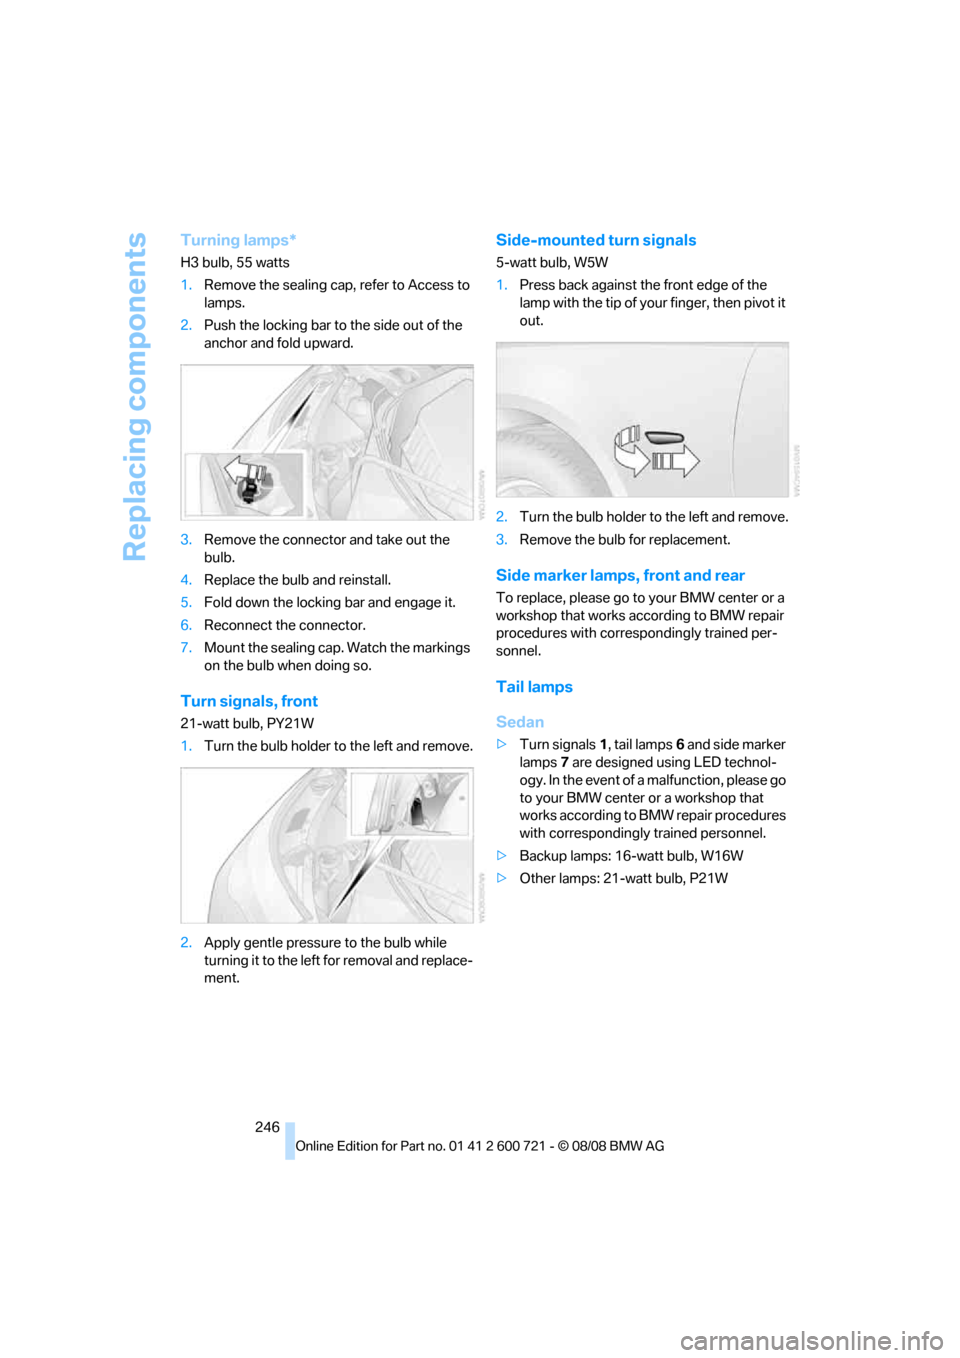
Turning lamps*
H3 bulb, 55 watts
1.Remove the sealing cap, refer to Access to
lamps.
2.Push the locking bar to the side out of the
anchor and fold upward.
3.Remove the connector and take out the
bulb.
4.Replace the bulb and reinstall.
5.Fold down the locking bar and engage it.
6.Reconnect the connector.
7.Mount the sealing cap. Watch the markings
on the bulb when doing so.
Turn signals, front
21-watt bulb, PY21W
1.Turn the bulb holder to the left and remove.
2.Apply gentle pressure to the bulb while
turning it to the left for removal and replace-
ment.
Side-mounted turn signals
5-watt bulb, W5W
1.Press back against the front edge of the
lamp with the tip of your finger, then pivot it
out.
2.Turn the bulb holder to the left and remove.
3.Remove the bulb for replacement.
Side marker lamps, front and rear
To replace, please go to your BMW center or a
workshop that works according to BMW repair
procedures with correspondingly trained per-
sonnel.
Tail lamps
Sedan
>Turn signals1, tail lamps6 and side marker
lamps7 are designed using LED technol-
ogy. In the event of a malfunction, please go
to your BMW center or a workshop that
works according to BMW repair procedures
with correspondingly trained personnel.
>Backup lamps: 16-watt bulb, W16W
>Other lamps: 21-watt bulb, P21W
Page 249 of 294
Mobility
247Reference
At a glance
Controls
Driving tips
Communications
Navigation
Entertainment
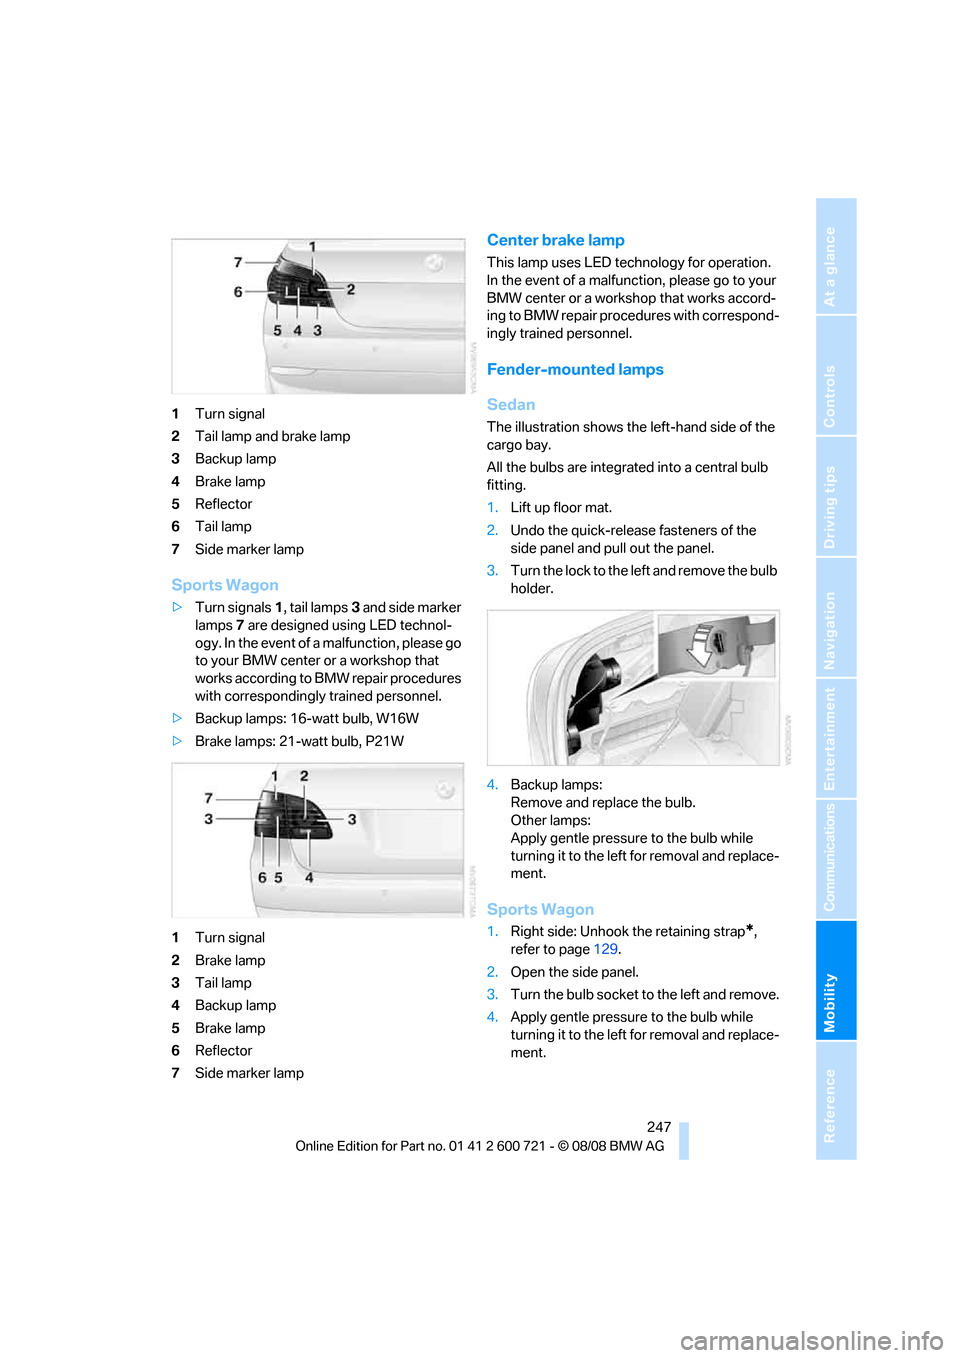
1Turn signal
2Tail lamp and brake lamp
3Backup lamp
4Brake lamp
5Reflector
6Tail lamp
7Side marker lamp
Sports Wagon
>Turn signals1, tail lamps3 and side marker
lamps7 are designed using LED technol-
ogy. In the event of a malfunction, please go
to your BMW center or a workshop that
works according to BMW repair procedures
with correspondingly trained personnel.
>Backup lamps: 16-watt bulb, W16W
>Brake lamps: 21-watt bulb, P21W
1Turn signal
2Brake lamp
3Tail lamp
4Backup lamp
5Brake lamp
6Reflector
7Side marker lamp
Center brake lamp
This lamp uses LED technology for operation.
In the event of a malfunction, please go to your
BMW center or a workshop that works accord-
ing to BMW repair procedures with correspond-
ingly trained personnel.
Fender-mounted lamps
Sedan
The illustration shows the left-hand side of the
cargo bay.
All the bulbs are integrated into a central bulb
fitting.
1.Lift up floor mat.
2.Undo the quick-release fasteners of the
side panel and pull out the panel.
3.Turn the lock to the left and remove the bulb
holder.
4.Backup lamps:
Remove and replace the bulb.
Other lamps:
Apply gentle pressure to the bulb while
turning it to the left for removal and replace-
ment.
Sports Wagon
1.Right side: Unhook the retaining strap*,
refer to page129.
2.Open the side panel.
3.Turn the bulb socket to the left and remove.
4.Apply gentle pressure to the bulb while
turning it to the left for removal and replace-
ment.
Page 250 of 294
Replacing components
248
Lamps in luggage compartment lid
License plate lamp
5-watt bulb, C5W
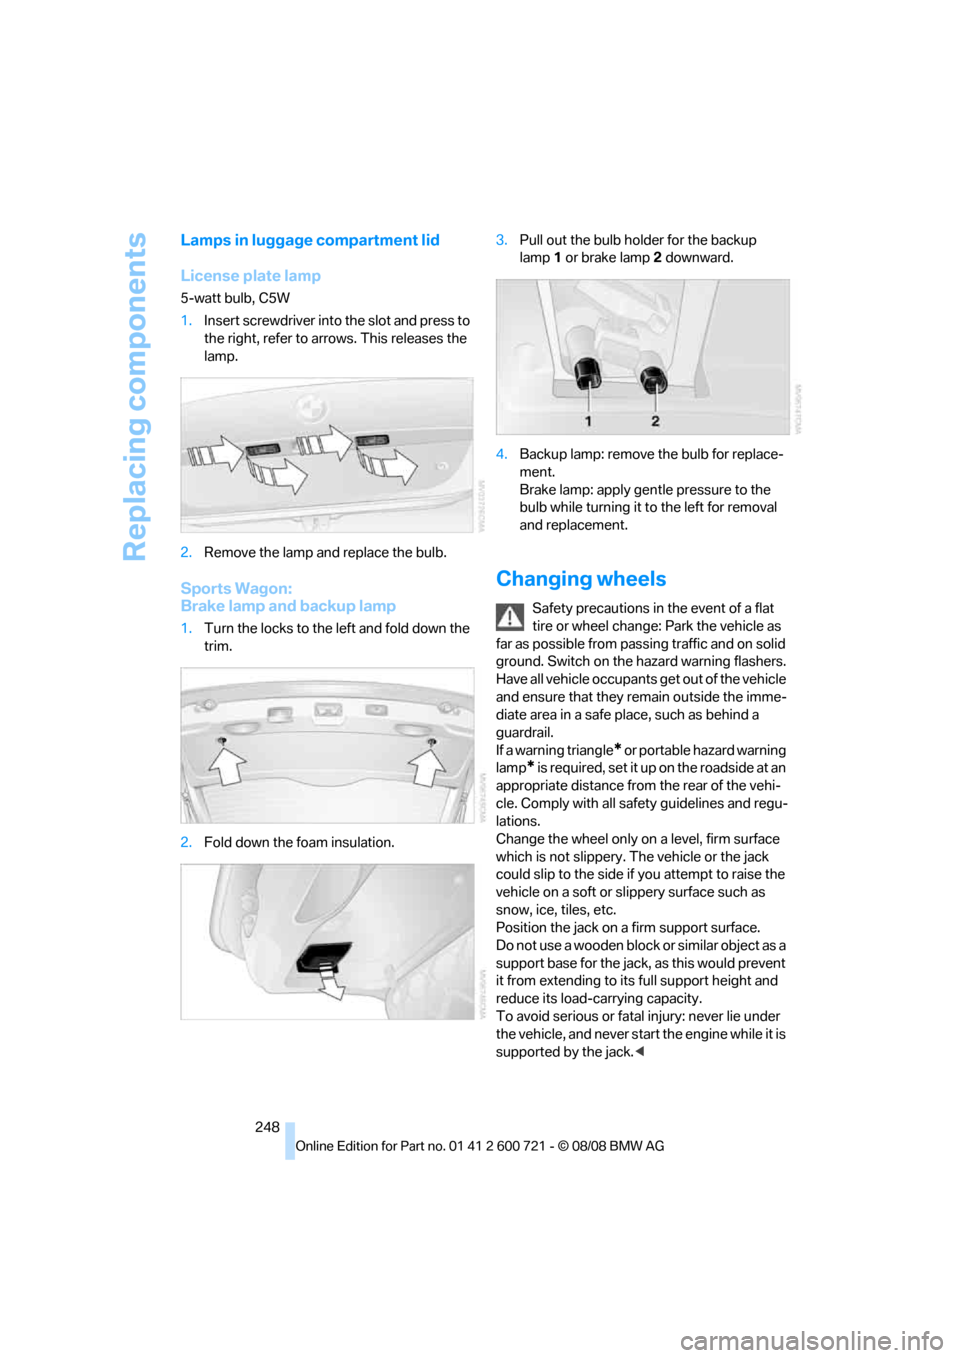
1.Insert screwdriver into the slot and press to
the right, refer to arrows. This releases the
lamp.
2.Remove the lamp and replace the bulb.
Sports Wagon:
Brake lamp and backup lamp
1.Turn the locks to the left and fold down the
trim.
2.Fold down the foam insulation.3.Pull out the bulb holder for the backup
lamp1 or brake lamp2 downward.
4.Backup lamp: remove the bulb for replace-
ment.
Brake lamp: apply gentle pressure to the
bulb while turning it to the left for removal
and replacement.
Changing wheels
Safety precautions in the event of a flat
tire or wheel change: Park the vehicle as
far as possible from passing traffic and on solid
ground. Switch on the hazard warning flashers.
Have all vehicle occupants get out of the vehicle
and ensure that they remain outside the imme-
diate area in a safe place, such as behind a
guardrail.
If a warning triangle
* or portable hazard warning
lamp
* is required, set it up on the roadside at an
appropriate distance from the rear of the vehi-
cle. Comply with all safety guidelines and regu-
lations.
Change the wheel only on a level, firm surface
which is not slippery. The vehicle or the jack
could slip to the side if you attempt to raise the
vehicle on a soft or slippery surface such as
snow, ice, tiles, etc.
Position the jack on a firm support surface.
Do not use a wooden block or similar object as a
support base for the jack, as this would prevent
it from extending to its full support height and
reduce its load-carrying capacity.
To avoid serious or fatal injury: never lie under
the vehicle, and never start the engine while it is
supported by the jack.<
Page 273 of 294
Reference 271
At a glance
Controls
Driving tips
Communications
Navigation
Entertainment
Mobility
Around the center console14
Around the steering wheel10
Arrival time
– refer to Computer81
– refer to Starting destination
guidance156
"Arrow display" in
navigation157
"Arrow display pop-up
instructions"143
Ashtray
– front125
– rear126
Assist, refer to
BMW Assist209
Assistance systems, refer to
Driving stability control
systems91
Assistance window21
"Assist. window off"22
AUC Automatic recirculated-
air control117
Audio168,171,176
– controls168
– switching on/off168
– tone control169
– volume169
Audio device, external124
Automatic
– air distribution115
– air volume115
– cruise control71
– garage door opener121
– headlamp control108
– service notification211
– steering wheel
adjustment49
– storing stations174
– tailgate operation38
Automatic car washes136
Automatic climate control114
– automatic air
distribution115
– parked car ventilation118
– switching on and off118
– ventilation in rear118Automatic closing of doors,
refer to Automatic soft
closing35
Automatic curb monitor55
Automatic lighting
– refer to Automatic headlamp
control108
– refer to Daytime running
lamps109
– refer to Interior lamps112
– refer to Pathway lighting109
– refer to Welcome lamps108
Automatic lights
– refer to High-beam
assistant110
Automatic low beams, refer to
High-beam assistant110
"Automatic programs"115
Automatic roll-up cover,
Sports Wagon128
Automatic soft closing35
Automatic speed reduction for
descents, refer to HDC Hill
Descent Control93
Automatic station search173
Automatic transmission with
Steptronic64
– interlock65
– kick-down65
– manually unlocking and
locking transmission lock66
– shiftlock65
– towing256
– tow-starting257
– with comfort access42
"Automatic ventilation"119
AUTO program for automatic
climate control115
"Auto Request"211
"Autostore" on the
radio172,174
"AUX"168,188,190
AUX-IN connection188
"AUX IN" in audio mode188
Average fuel consumption80
– setting units89
Average speed, refer to
Computer80"Avoid ferries" in
navigation155
"Avoid highways" in
navigation155
Avoiding freeways for
navigation154
Avoiding unintentional
alarms40
"Avoid tollroads" in
navigation155
Axle loads, refer to
Weights263
"A - Z"202
B
Backrest contour, refer to
Lumbar support49
Backrests, refer to Seats48
Backrest width adjustment48
Back seats, refer to Rear seats
Backup lamps, replacing
bulbs246
"Balance", tone control170
Band-aids, refer to First-aid
kit254
Bass, refer to Tone
control169
"Bass", tone control169
Battery, refer to Vehicle
battery251
– jump starting254
Battery replacement
– remote control for comfort
access42
BC button, refer to
Computer80
Being towed256
Belts, refer to Safety belts52
Beverage holder, refer to Cup
holders125
Blower, refer to Air
volume116
"Bluetooth"195
BMW
– Car Shampoo241
"BMW Assist"210,211