2009 BMW 535I XDRIVE ESP
[x] Cancel search: ESPPage 247 of 294
Mobility
245Reference
At a glance
Controls
Driving tips
Communications
Navigation
Entertainment
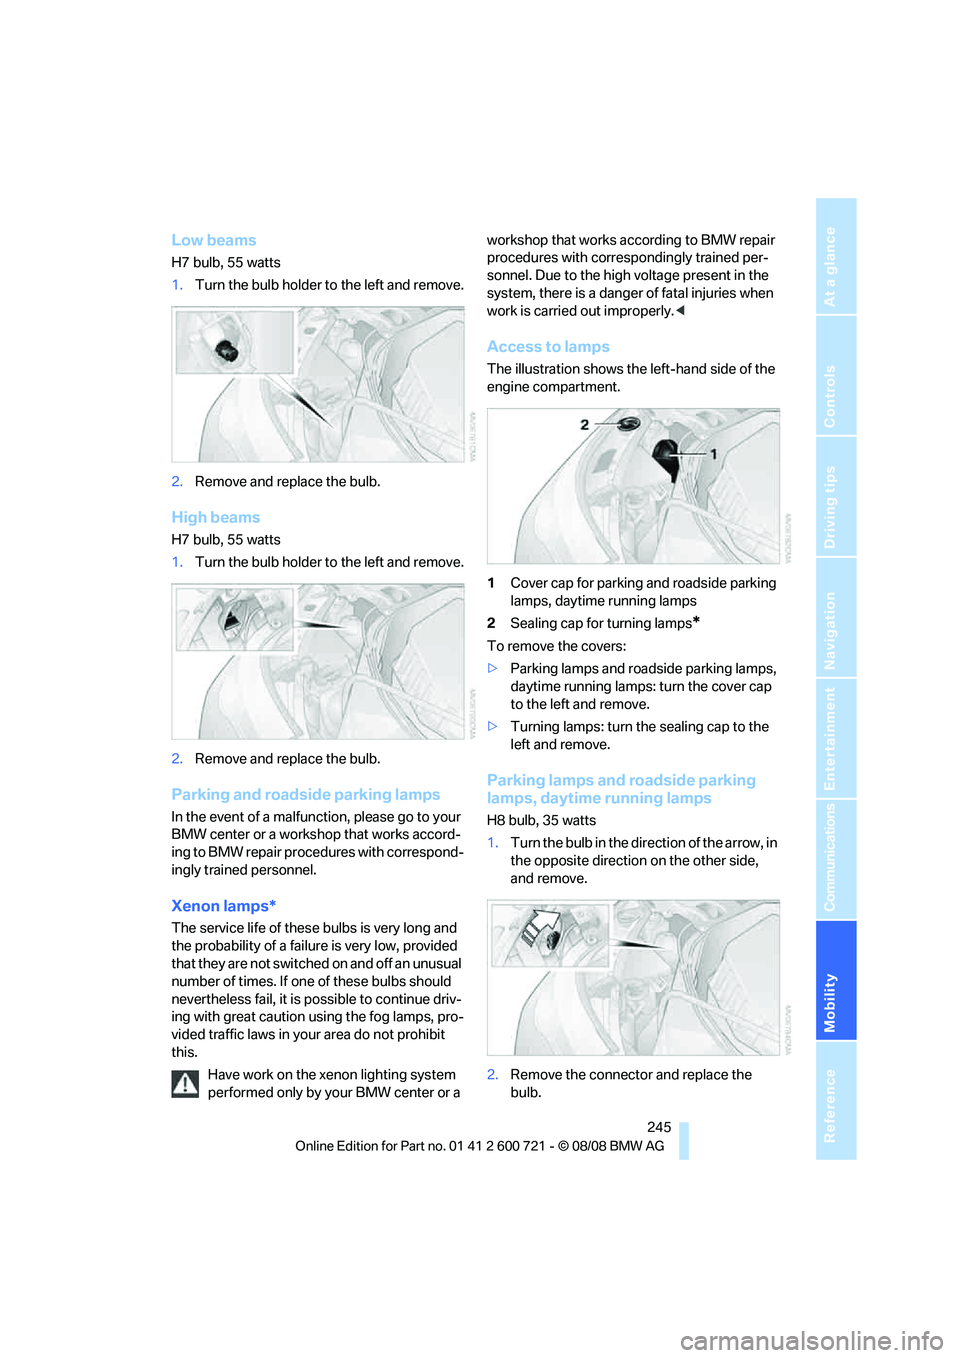
Low beams
H7 bulb, 55 watts
1.Turn the bulb holder to the left and remove.
2.Remove and replace the bulb.
High beams
H7 bulb, 55 watts
1.Turn the bulb holder to the left and remove.
2.Remove and replace the bulb.
Parking and roadside parking lamps
In the event of a malfunction, please go to your
BMW center or a workshop that works accord-
ing to BMW repair procedures with correspond-
ingly trained personnel.
Xenon lamps*
The service life of these bulbs is very long and
the probability of a failure is very low, provided
that they are not switched on and off an unusual
number of times. If one of these bulbs should
nevertheless fail, it is possible to continue driv-
ing with great caution using the fog lamps, pro-
vided traffic laws in your area do not prohibit
this.
Have work on the xenon lighting system
performed only by your BMW center or a workshop that works according to BMW repair
procedures with correspondingly trained per-
sonnel. Due to the high voltage present in the
system, there is a danger of fatal injuries when
work is carried out improperly.<
Access to lamps
The illustration shows the left-hand side of the
engine compartment.
1Cover cap for parking and roadside parking
lamps, daytime running lamps
2Sealing cap for turning lamps
*
To remove the covers:
>Parking lamps and roadside parking lamps,
daytime running lamps: turn the cover cap
to the left and remove.
>Turning lamps: turn the sealing cap to the
left and remove.
Parking lamps and roadside parking
lamps, daytime running lamps
H8 bulb, 35 watts
1.Turn the bulb in the direction of the arrow, in
the opposite direction on the other side,
and remove.
2.Remove the connector and replace the
bulb.
Page 248 of 294
Replacing components
246
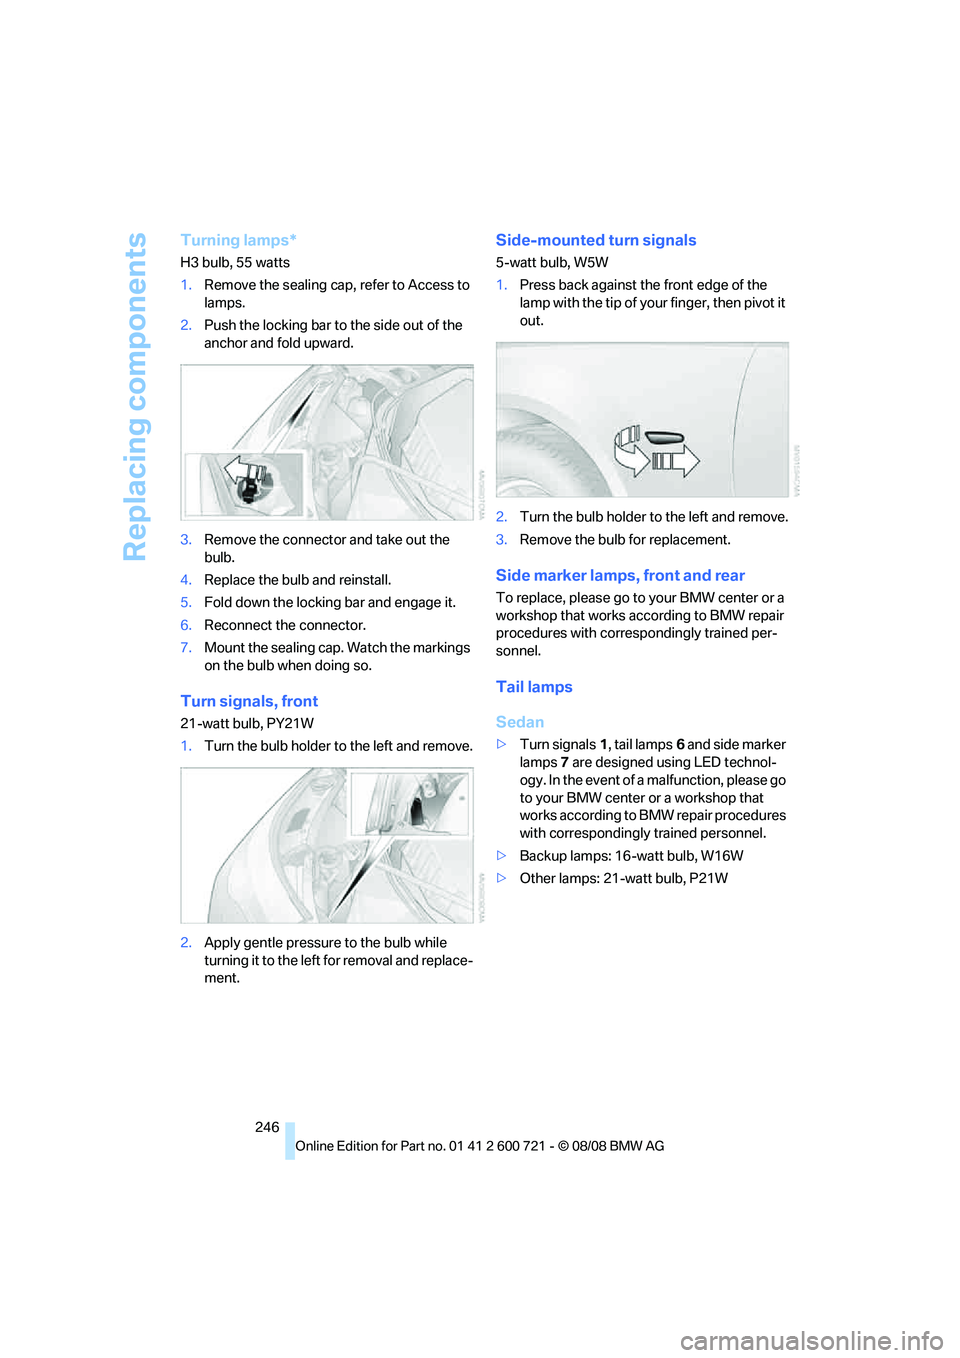
Turning lamps*
H3 bulb, 55 watts
1.Remove the sealing cap, refer to Access to
lamps.
2.Push the locking bar to the side out of the
anchor and fold upward.
3.Remove the connector and take out the
bulb.
4.Replace the bulb and reinstall.
5.Fold down the locking bar and engage it.
6.Reconnect the connector.
7.Mount the sealing cap. Watch the markings
on the bulb when doing so.
Turn signals, front
21-watt bulb, PY21W
1.Turn the bulb holder to the left and remove.
2.Apply gentle pressure to the bulb while
turning it to the left for removal and replace-
ment.
Side-mounted turn signals
5-watt bulb, W5W
1.Press back against the front edge of the
lamp with the tip of your finger, then pivot it
out.
2.Turn the bulb holder to the left and remove.
3.Remove the bulb for replacement.
Side marker lamps, front and rear
To replace, please go to your BMW center or a
workshop that works according to BMW repair
procedures with correspondingly trained per-
sonnel.
Tail lamps
Sedan
>Turn signals1, tail lamps6 and side marker
lamps7 are designed using LED technol-
ogy. In the event of a malfunction, please go
to your BMW center or a workshop that
works according to BMW repair procedures
with correspondingly trained personnel.
>Backup lamps: 16-watt bulb, W16W
>Other lamps: 21-watt bulb, P21W
Page 249 of 294
Mobility
247Reference
At a glance
Controls
Driving tips
Communications
Navigation
Entertainment
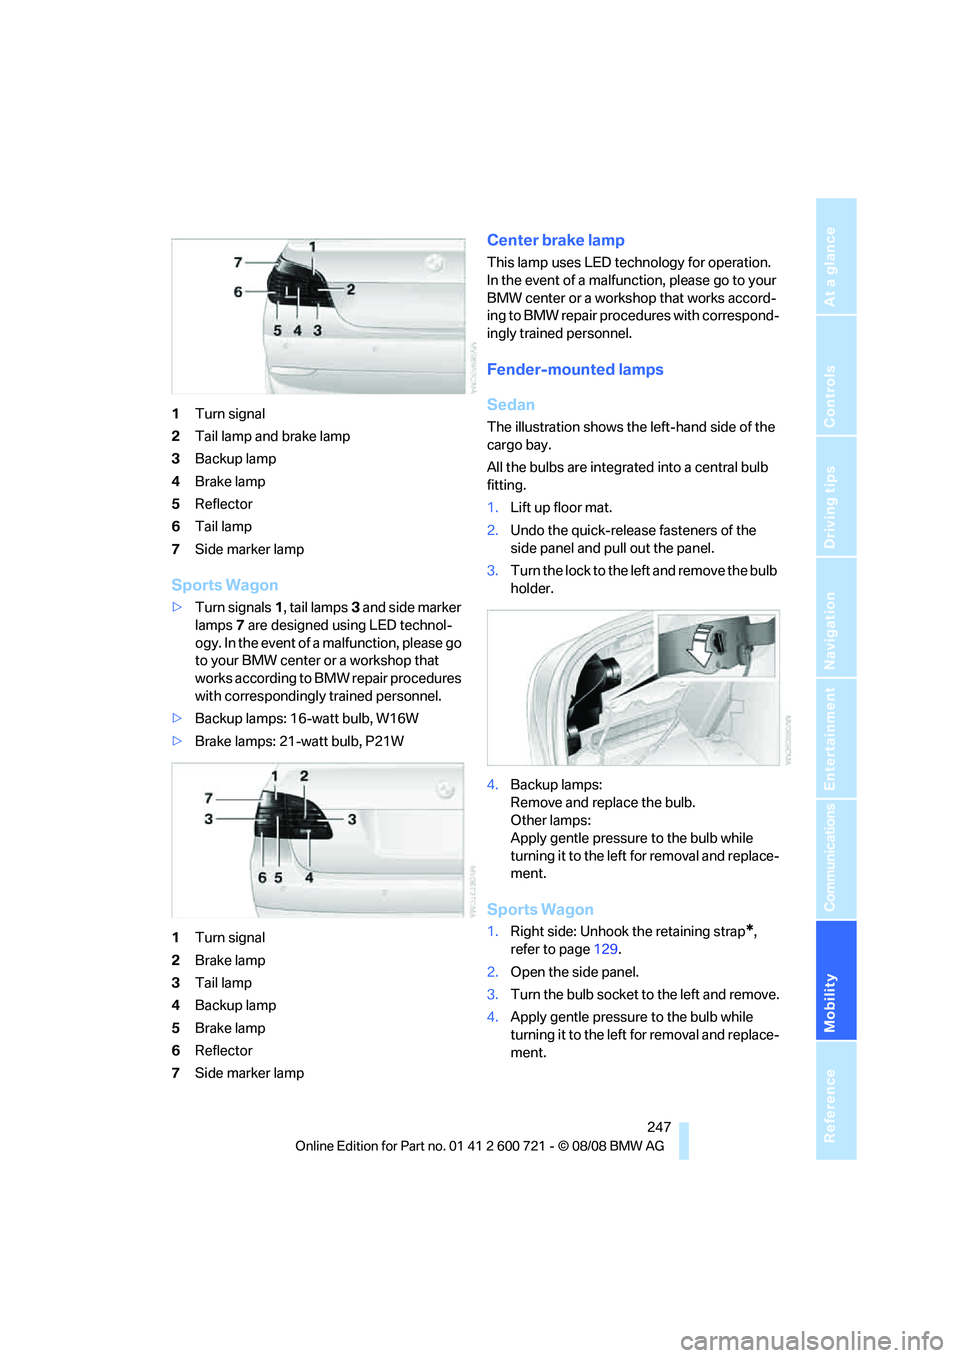
1Turn signal
2Tail lamp and brake lamp
3Backup lamp
4Brake lamp
5Reflector
6Tail lamp
7Side marker lamp
Sports Wagon
>Turn signals1, tail lamps3 and side marker
lamps7 are designed using LED technol-
ogy. In the event of a malfunction, please go
to your BMW center or a workshop that
works according to BMW repair procedures
with correspondingly trained personnel.
>Backup lamps: 16-watt bulb, W16W
>Brake lamps: 21-watt bulb, P21W
1Turn signal
2Brake lamp
3Tail lamp
4Backup lamp
5Brake lamp
6Reflector
7Side marker lamp
Center brake lamp
This lamp uses LED technology for operation.
In the event of a malfunction, please go to your
BMW center or a workshop that works accord-
ing to BMW repair procedures with correspond-
ingly trained personnel.
Fender-mounted lamps
Sedan
The illustration shows the left-hand side of the
cargo bay.
All the bulbs are integrated into a central bulb
fitting.
1.Lift up floor mat.
2.Undo the quick-release fasteners of the
side panel and pull out the panel.
3.Turn the lock to the left and remove the bulb
holder.
4.Backup lamps:
Remove and replace the bulb.
Other lamps:
Apply gentle pressure to the bulb while
turning it to the left for removal and replace-
ment.
Sports Wagon
1.Right side: Unhook the retaining strap*,
refer to page129.
2.Open the side panel.
3.Turn the bulb socket to the left and remove.
4.Apply gentle pressure to the bulb while
turning it to the left for removal and replace-
ment.
Page 255 of 294
Mobility
253Reference
At a glance
Controls
Driving tips
Communications
Navigation
Entertainment
Giving and receiving assistance
Emergency request
Conditions for an emergency request:
>Full preparation package mobile phone.
With this equipment, an emergency request
is still possible when no mobile phone is
paired with the vehicle.
>BMW Assist is activated.
Activating BMW Assist, refer to page215.
>Radio readiness is activated.
>The BMW Assist system is logged on to a
mobile phone network.
>The emergency request system is opera-
ble.
Once your BMW Assist subscription expires,
the BMW Assist system can be deactivated by
a BMW center without you having to visit a
workshop. Once the BMW Assist system has
been deactivated, emergency requests are not
possible. The BMW Assist system can be reac-
tivated by a BMW center after signing a new
contract.
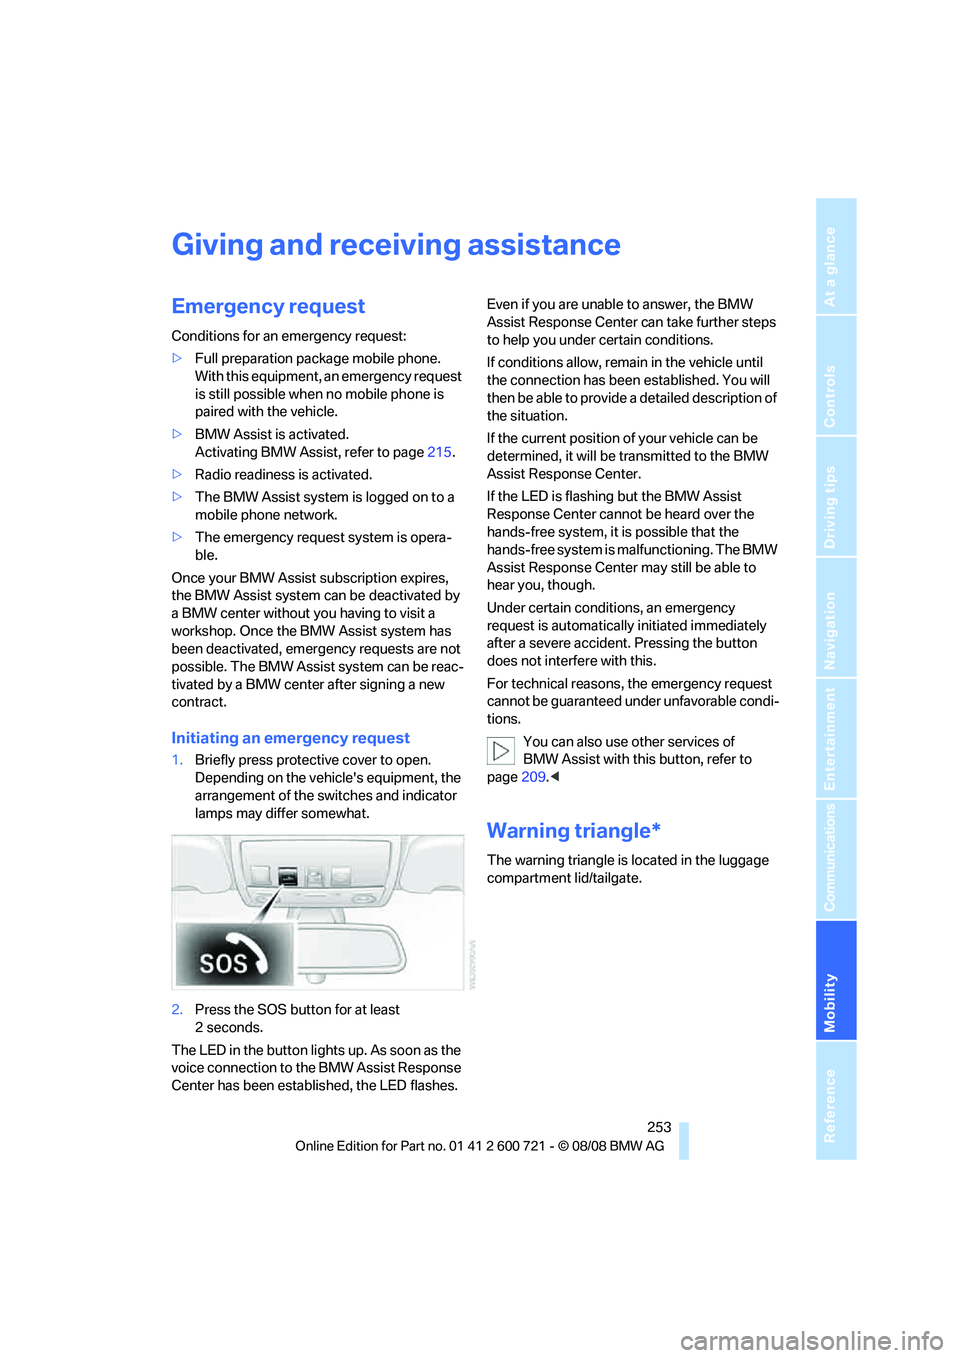
Initiating an emergency request
1.Briefly press protective cover to open.
Depending on the vehicle's equipment, the
arrangement of the switches and indicator
lamps may differ somewhat.
2.Press the SOS button for at least
2seconds.
The LED in the button lights up. As soon as the
voice connection to the BMW Assist Response
Center has been established, the LED flashes.Even if you are unable to answer, the BMW
Assist Response Center can take further steps
to help you under certain conditions.
If conditions allow, remain in the vehicle until
the connection has been established. You will
then be able to provide a detailed description of
the situation.
If the current position of your vehicle can be
determined, it will be transmitted to the BMW
Assist Response Center.
If the LED is flashing but the BMW Assist
Response Center cannot be heard over the
hands-free system, it is possible that the
hands-free system is malfunctioning. The BMW
Assist Response Center may still be able to
hear you, though.
Under certain conditions, an emergency
request is automatically initiated immediately
after a severe accident. Pressing the button
does not interfere with this.
For technical reasons, the emergency request
cannot be guaranteed under unfavorable condi-
tions.
You can also use other services of
BMW Assist with this button, refer to
page209.<
Warning triangle*
The warning triangle is located in the luggage
compartment lid/tailgate.
Page 258 of 294
Giving and receiving assistance
256 Sedan:
It is located in the toolkit in the luggage com-
partment lid, refer to page243.
Sports Wagon:
It is located in the toolkit behind the left side
panel in the cargo bay, refer to page243.
Use only the tow fitting provided with the
vehicle and screw it all the way in. Use the
tow fitting for towing only on roads. Avoid lateral
loading of the tow fitting, e.g. do not lift the vehi-
cle by the tow fitting. Otherwise damage to the
tow fitting and the vehicle can occur.<
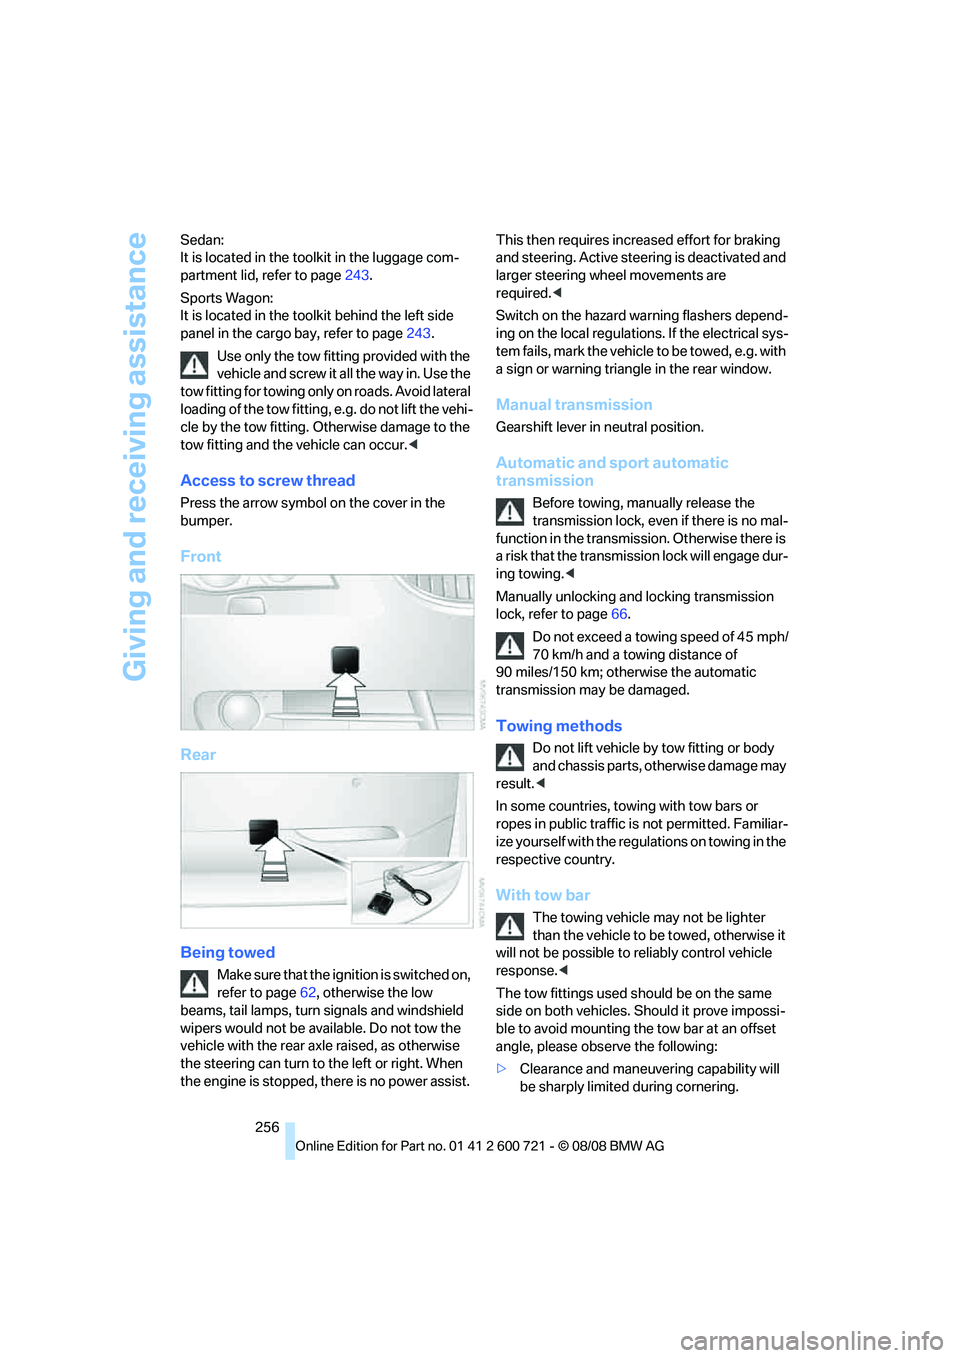
Access to screw thread
Press the arrow symbol on the cover in the
bumper.
Front
Rear
Being towed
Make sure that the ignition is switched on,
refer to page62, otherwise the low
beams, tail lamps, turn signals and windshield
wipers would not be available. Do not tow the
vehicle with the rear axle raised, as otherwise
the steering can turn to the left or right. When
the engine is stopped, there is no power assist. This then requires increased effort for braking
and steering. Active steering is deactivated and
larger steering wheel movements are
required.<
Switch on the hazard warning flashers depend-
ing on the local regulations. If the electrical sys-
tem fails, mark the vehicle to be towed, e.g. with
a sign or warning triangle in the rear window.
Manual transmission
Gearshift lever in neutral position.
Automatic and sport automatic
transmission
Before towing, manually release the
transmission lock, even if there is no mal-
function in the transmission. Otherwise there is
a risk that the transmission lock will engage dur-
ing towing.<
Manually unlocking and locking transmission
lock, refer to page66.
Do not exceed a towing speed of 45 mph/
70 km/h and a towing distance of
90 miles/150 km; otherwise the automatic
transmission may be damaged.
Towing methods
Do not lift vehicle by tow fitting or body
and chassis parts, otherwise damage may
result.<
In some countries, towing with tow bars or
ropes in public traffic is not permitted. Familiar-
ize yourself with the regulations on towing in the
respective country.
With tow bar
The towing vehicle may not be lighter
than the vehicle to be towed, otherwise it
will not be possible to reliably control vehicle
response.<
The tow fittings used should be on the same
side on both vehicles. Should it prove impossi-
ble to avoid mounting the tow bar at an offset
angle, please observe the following:
>Clearance and maneuvering capability will
be sharply limited during cornering.
Page 278 of 294
Everything from A to Z
276 Electronic brake-force
distribution91
Electronic oil level check234
Emergency operation, refer to
Manual operation
– door lock34
– driver's door34
– fuel filler door220
– luggage compartment lid36
– tailgate38
– transmission lock, automatic
transmission66
Emergency operation, refer to
Moving manually
– glass sunroof44
– panorama glass sunroof46
Emergency release for
luggage compartment lid in
cargo bay37
Emergency request253
Emergency services, refer to
Roadside Assistance254
"Enabled services"215
"Enabled TeleServices"212
"Enable services"215
"End call"202
Energy-conscious driving,
refer to Energy Control80
Energy Control80
Engine
– breaking-in134
– data260
– overheated, refer to Coolant
temperature79
– speed260
– starting63
– starting, with comfort
access40
– switching off63
Engine compartment233
Engine coolant235Engine oil
– adding235
– additives, refer to Approved
engine oils235
– approved engine oil235
– checking oil level234
– electronic oil level check234
– interval between changes,
refer to Service
requirements82
– oil change235
– oil grades, refer to Approved
engine oils235
"Engine oil level"234
Engine output, refer to Engine
data260
Engine overheating, refer to
Coolant temperature79
Engine speed, refer to Engine
data260
Engine starting, refer to
Starting engine63
"Enter address"144,152
Entering destination via town/
city name145
Entering intersection,
navigation146
Entering the
address144,147
Entering town/city for
navigation145
Entering zip code for
navigation146
"Entertainment"168
Entertainment sound output
on/off169
Entry map for destination149
Environmentally friendly
driving
– refer to Energy control80
Equalizer, refer to Tone
control171
"Equalizer", tone control171
"ESN"179
ESP Electronic Stability
Program, refer to DSC
Dynamic Stability
Control92
Event Data Recorders238Exhaust system, refer to Hot
exhaust system135
Exterior mirrors54
– adjusting54
– automatic dimming
feature56
– automatic heating55
– folding in and out55
– tilting down passenger-side
exterior mirror55
External audio device124
Eye for tow-starting and
towing, refer to Tow
fitting255
F
Fader, refer to Tone
control170
"Fader", tone control170
Failure messages, refer to
Check Control84
False alarm
– refer to Avoiding
unintentional alarms40
– refer to Switching off
alarm40
Fastening safety belts, refer to
Safety belts52
– warning lamp52
Fastest route for
navigation154
"Fast route" in navigation155
Filler neck for washer fluid70
Filter, refer to Microfilter/
activated-charcoal filter118
First aid, refer to First-aid
kit254
First-aid kit254
Flashing
– during locking/unlocking,
refer to Setting confirmation
signals33
– triple turn signal
activation68