2009 BMW 530XI TOURING window
[x] Cancel search: windowPage 144 of 294

Starting navigation system
142
Starting navigation system
Your navigation system can use satellites to
ascertain the precise position of your vehicle
and guide you reliably to any destination you
enter.
Navigation DVD
The navigation system requires a special navi-
gation DVD. The latest version is available at
your BMW center.
Inserting navigation DVD
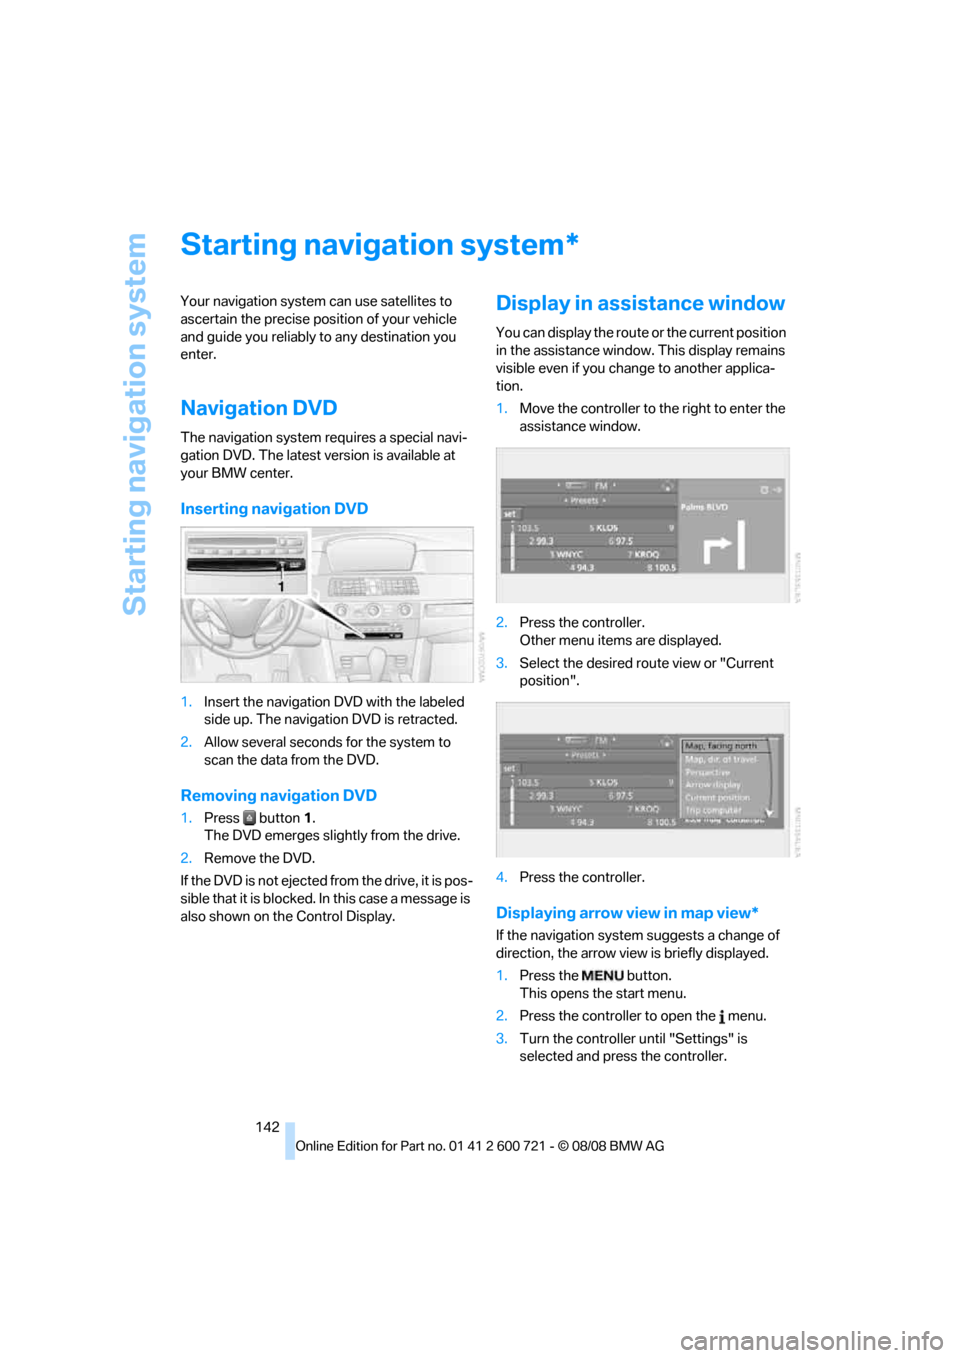
1.Insert the navigation DVD with the labeled
side up. The navigation DVD is retracted.
2.Allow several seconds for the system to
scan the data from the DVD.
Removing navigation DVD
1.Press button 1.
The DVD emerges slightly from the drive.
2.Remove the DVD.
If the DVD is not ejected from the drive, it is pos-
sible that it is blocked. In this case a message is
also shown on the Control Display.
Display in assistance window
You can display the route or the current position
in the assistance window. This display remains
visible even if you change to another applica-
tion.
1.Move the controller to the right to enter the
assistance window.
2.Press the controller.
Other menu items are displayed.
3.Select the desired route view or "Current
position".
4.Press the controller.
Displaying arrow view in map view*
If the navigation system suggests a change of
direction, the arrow view is briefly displayed.
1.Press the button.
This opens the start menu.
2.Press the controller to open the menu.
3.Turn the controller until "Settings" is
selected and press the controller.
*
Page 145 of 294

Navigation
Driving tips
143Reference
At a glance
Controls
Communications
Entertainment
Mobility
4.Turn the controller until "Language / Units"
is selected and press the controller.
5.Change to upper field if necessary. Turn the
controller until "Languages" is selected and
press the controller.
6.Select "Arrow display pop-up instructions"
and press the controller.
The arrow view appears in the assistance
window.
Page 202 of 294

Telephoning
200
Adjusting volume
Turn the knob during a call to select the desired
volume.
This volume for the hands-free system is main-
tained, even if the other audio sources are set to
minimum volume.
You can also adjust the volume with the buttons
on the steering wheel, refer to page11.
The setting is stored for the remote control cur-
rently in use.
Operation via iDrive
You can operate the following functions via
iDrive:
>Accepting/refusing a call
>Dialing phone numbers
>Dialing phone numbers from the phone
book
>Dialing stored phone numbers, e.g. from the
list of accepted calls.
>Ending a call
When the ignition is switched off or in radio
readiness, e.g. after taking the remote control
out of the ignition lock, you can continue an
ongoing call via the hands-free system for sev-
eral minutes.
Speech quality
If the person you are talking to cannot under-
stand you well, this may be due to excessively
loud background noises. The full mobile phone
preparation package can compensate for these
noises to a certain degree. To optimize the speech quality during a call, we recommend
that you:
>Reduce background noises, e.g. by closing
the windows, reducing the air volume of the
automatic climate control or pointing the
opened front vent outlets downward
>Reduce volume of hands-free system
Requirements
>The logon data of the mobile phone are
stored in the vehicle and the mobile phone
is ready to operate.
>The engine is running or the ignition is
switched on.
>The mobile phone is detected by the vehi-
cle.
Opening Communication
Many of the functions described below are con-
trolled using the "Communication" menu.
iDrive, for operating principle refer to page16.
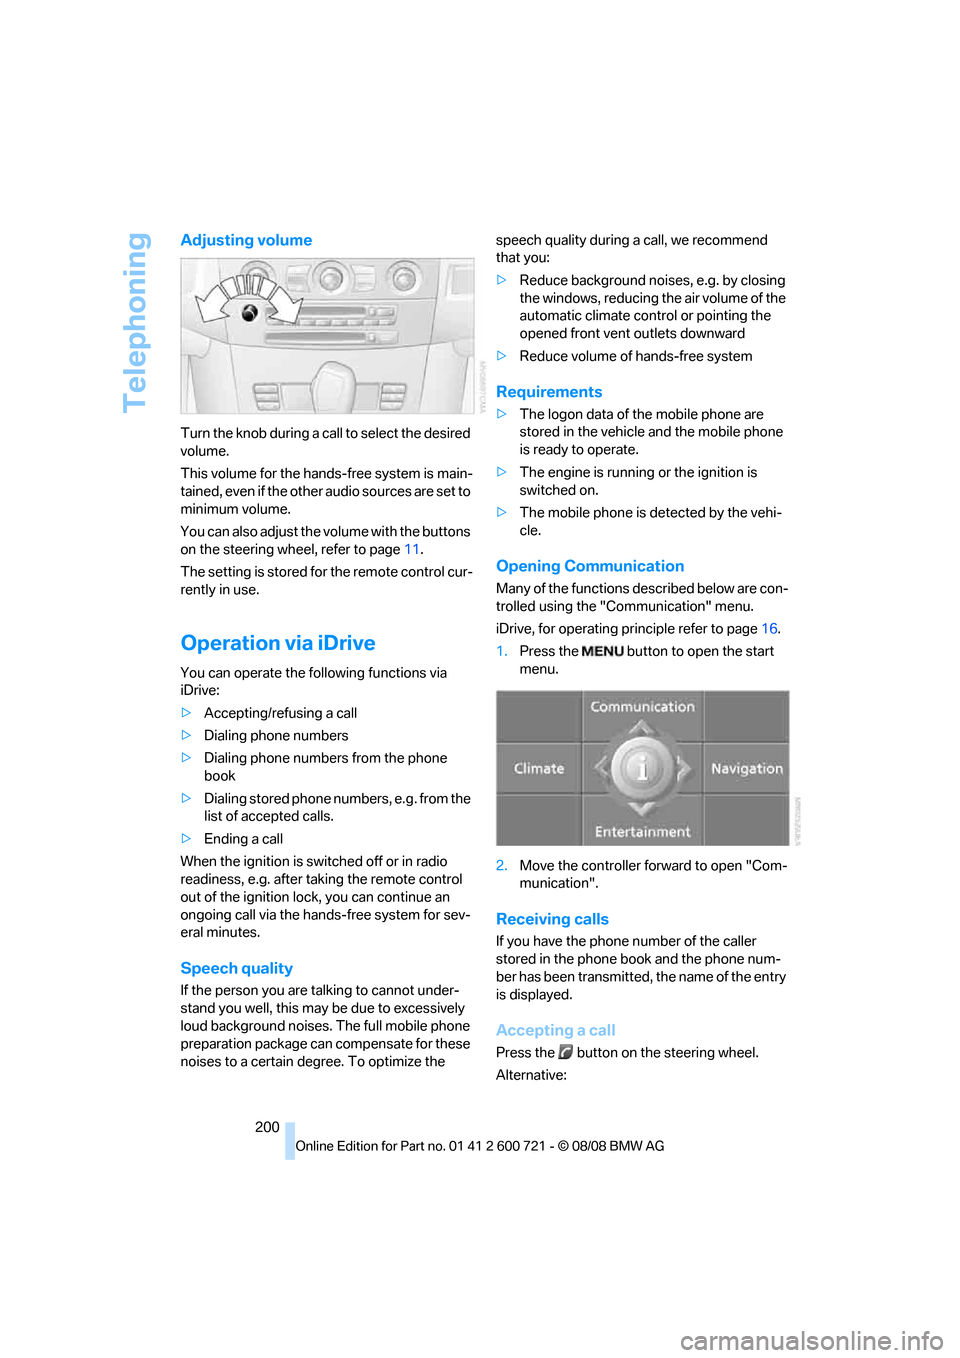
1.Press the button to open the start
menu.
2.Move the controller forward to open "Com-
munication".
Receiving calls
If you have the phone number of the caller
stored in the phone book and the phone num-
ber has been transmitted, the name of the entry
is displayed.
Accepting a call
Press the button on the steering wheel.
Alternative:
Page 209 of 294

207
Entertainment
Reference
At a glance
Controls
Driving tips Communications
Navigation
Mobility
{Delete phone book} deletes all entries in the
phone book.
Have entries read aloud and select:
You can have all the entries of your voice phone
book read aloud in the order of input and select
a certain entry to establish a connection:
Selecting an entry
The connection to the phone number of the
selected entry is established.
Redialing
The {Redial} command opens "Redial".
Notes
Important for voice commands
For voice commands, keep the following in
mind:
>Issue the commands smoothly and at nor-
mal volume, avoiding excessive emphasis
and pauses.
>Keep the doors, windows and glass sunroof
closed to prevent interference from ambi-
ent noise.
>Avoid making other noise in the vehicle
while speaking.
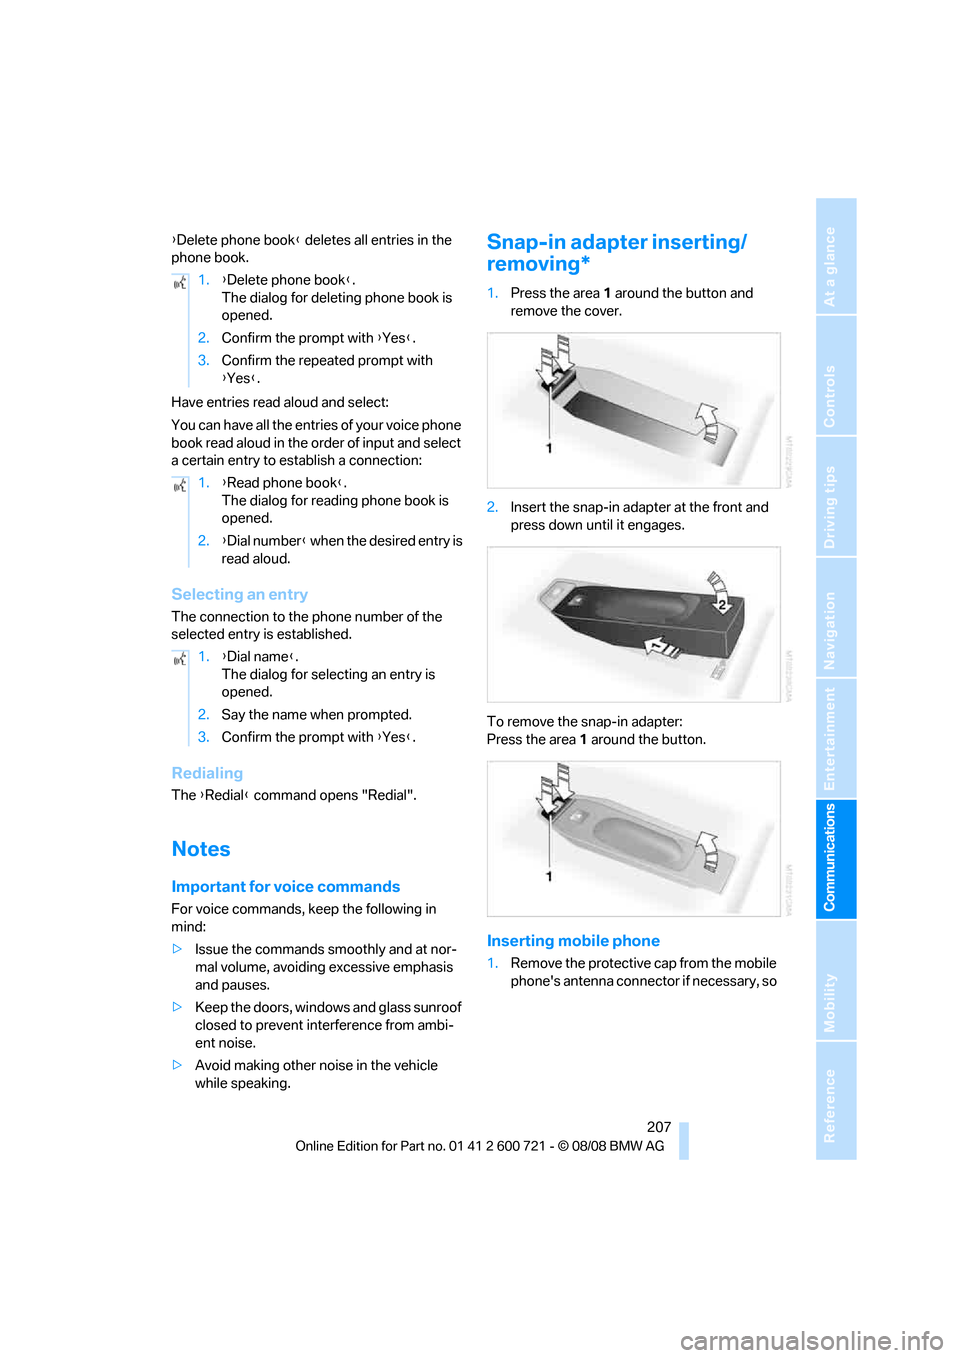
Snap-in adapter inserting/
removing*
1.Press the area 1 around the button and
remove the cover.
2.Insert the snap-in adapter at the front and
press down until it engages.
To remove the snap-in adapter:
Press the area 1 around the button.
Inserting mobile phone
1.Remove the protective cap from the mobile
phone's antenna connector if necessary, so 1.{Delete phone book}.
The dialog for deleting phone book is
opened.
2.Confirm the prompt with {Yes}.
3.Confirm the repeated prompt with
{Yes}.
1.{Read phone book}.
The dialog for reading phone book is
opened.
2.{Dial number} when the desired entry is
read aloud.
1.{Dial name}.
The dialog for selecting an entry is
opened.
2.Say the name when prompted.
3.Confirm the prompt with {Yes}.
Page 241 of 294

Mobility
239Reference
At a glance
Controls
Driving tips
Communications
Navigation
Entertainment
Care
Car-care products
Regular cleaning and care make a significant
contribution to retaining your BMW's value.
For the cleaning and care of your vehicle, BMW
recommends using only products that BMW
has approved for this purpose.
Your BMW center will be glad to advise you
about products and services for the cleaning
and care of your BMW.
Genuine BMW Care Products are materi-
als tested, laboratory tested, and tested in
actual use. They offer optimum care and pro-
tection for your vehicle.<
Do not use cleaners that contain alcohol
or solvents; they can damage your vehi-
cle.<
Cleaning agents can contain substances
that are dangerous or pose health risks.
You should therefore heed the warnings and
hazard indications on the packaging. Open the
doors or windows on your vehicle whenever
cleaning the interior. Make sure there is suffi-
cient ventilation in enclosed spaces. Use only
products that are formulated for vehicle clean-
ing.<
Exterior care
Washing your vehicle
In the winter months, it is especially
important to ensure that the vehicle is
washed on a regular basis. Otherwise, signifi-
cant soiling and road salt can cause damage to
the vehicle.<
After washing the vehicle, apply the
brakes briefly to dry them. Failure to do so
may lead to a reduction in braking efficiency and
also to corrosion of the brake rotors.<
Car washes
Give preference to cloth car washes.Before driving into the car wash, make sure that
it is suitable for your BMW. Pay attention to the
following points:
>Dimensions of your vehicle, refer to
page261.
>If necessary, fold in the outside rearview
mirrors, refer to page55.
>Maximum permissible tire width.
Preparations for driving into the car wash:
>Deactivate rain sensor to prevent unwanted
wiper activation.
>Deactivate rear window wiper
* and protect
it from damage. Take appropriate protec-
tive measures; inquiring with the car wash
operator as needed.
>Remove additional add-on parts, e.g. spoil-
ers or phone antennas, if they could be
damaged.
Automatic transmission
Before driving into the car wash, make sure the
vehicle is able to roll by making sure to:
1.Insert the remote control into the ignition
lock, even with comfort access.
2.Shift into transmission position N.
3.Release the parking brake.
4.Switch off the engine.
5.Leave the remote control in the ignition lock
so that the vehicle can roll.
Steam cleaners/high-pressure
cleaning jets
When using steam jets or high-pressure
washers, ensure that you maintain suffi-
cient clearance to the vehicle and do not exceed
a temperature of 1407/606.
Insufficient distance or excessive pressure or
temperature can damage parts of the vehicle or
can result in water penetration. Follow the oper-
ating instructions for the high-pressure clean-
ing jets.<
Page 242 of 294

Care
240 When using high-pressure cleaning jets,
do not remain in one place for a long time
and be sure to maintain a distance of at least
12 in/30 cm from sensors, e.g. Park Distance
Control sensors or radar sensors.<
Hand washing
When washing the vehicle by hand, use plenty
of water and car washing shampoo. Clean the
vehicle with gentle pressure using a sponge or a
washing brush.
Before cleaning the windshield, deacti-
vate the rain sensor or switch off the igni-
tion to prevent unwanted wiper operation.<
Follow local guidelines for washing vehi-
cles by hand.<
Headlamps
Do not rub dry and never use abrasives or
strong solvents to clean the covers.
Loosen dirt, e.g. insects, with shampoo or
insect remover and wash away with plenty of
water.
Use a window de-icer to remove accumulated
ice and snow, not a scraper.
Windows
Use a glass cleaner to clean the inside and out-
side surfaces of the windows and the glass sur-
faces of the mirrors.
Do not use quartz-containing cleansers
to clean glass surfaces of the mirrors.<
Wiper blades
Clean with soapy water and replace regularly to
prevent streaking.
The presence of wax and sealant residues
and dirt on the windows leads to streaking
during wiper operation and results in premature
wear on wiper blades as well as interference
with the rain sensor.<
Caring for the vehicle finish
Regular care helps your vehicle retain its value
and protects the paint from the long-term
effects of aggressive substances.Regionally occurring environmental factors can
affect and damage vehicle finish. It is therefore
important to tailor the frequency and extent of
your car care accordingly.
Immediately remove particularly aggressive
substances such as spilled fuel, oil, grease,
brake fluid, tree resin, or bird droppings; other-
wise, they may damage your paint.
Repairing paint damage
Repair stone damage or scratches imme-
diately, depending on the severity of the
damage, to prevent the formation of rust.<
BMW recommends having paint damage pro-
fessionally repaired using Genuine BMW finish
materials in accordance with factory guidelines.
Waxing
Sealant is required when w a t e r n o l o ng e r b e a ds
on the clean surface of the paint. Use only prod-
ucts that contain carnauba wax or synthetic wax
to seal your finish.
Rubber gaskets
Treat only with water or a rubber care product.
To avoid noise or damage, do not use
products that contain silicone to care for
rubber gaskets.<
Chrome components
Particularly after exposure to road salt, thor-
oughly cleanse parts like the radiator grille, door
handles, or window frames with plenty of water
with shampoo added to it. For additional treat-
ment, use chrome polish.
Alloy wheels
Depending on your system, braking can gener-
ate dust, which settles on the light-alloy wheels.
Remove this dust regularly with acid-free wheel
cleaner.
Do not use aggressive, acid-containing,
strongly alkaline, or coarse cleansers and
do not use steam cleaners at temperatures
greater than 1407/606; otherwise you may
damage your vehicle.<
Page 253 of 294

Mobility
251Reference
At a glance
Controls
Driving tips
Communications
Navigation
Entertainment
3.Check and correct the tire inflation pressure
at the earliest opportunity.
Protect valve stems with valve stem
seal caps against dirt and contamina-
tion. Dirt in valve stems is a frequent source
of gradual air loss.<
4.Initialize the Flat Tire Monitor, refer to
page95, or reset the Tire Pressure Monitor,
refer to page97.
5.Replace the damaged tire as soon as possi-
ble and have the new wheel/tire balanced.
Driving with compact wheel
Drive reservedly and do not exceed a speed of
50 mph/80 km/h.
The driving characteristics change, for example
reduced track stability on braking, extended
braking distance, and altered self-steering
characteristics in the limit range. In conjunction
with winter tires, these characteristics are more
pronounced.
Only one compact wheel may be
mounted. Restore the wheels and tires to
their original size as quickly as possible. Failure
to do so is a safety risk.<
Vehicle battery
Battery care
The battery is 100 % maintenance-free, i.e., the
electrolyte will last for the life of the battery
when the vehicle is operated in a temperate cli-
mate. Your BMW center will be glad to advise in
all matters concerning the battery.
Charging battery
Only charge the battery in the vehicle via the
terminals in the engine compartment with the
engine switched off. Connections, refer to
Jump starting on page254.
Disposal
Have old batteries disposed of by your
BMW center or hand them in to a recy-
cling center. Maintain the battery in an upright position for transport and storage. Always
restrain the battery to prevent it from tipping
over during transport.<
Power failure
Following a temporary power failure, e.g. due to
a discharged battery, the use of some equip-
ment will be restricted, requiring its reinitializa-
tion. In the same way, individual settings are lost
and must be updated again:
>Seat, mirror and steering wheel memory
The positions must be stored again, refer to
page50.
>Time and date
Must be updated again, refer to page87.
>Radio
Radio stations must be stored again, refer
to page174.
>Navigation system
You must wait until the system becomes
functional again, refer to page142.
>Glass roof, electric
It may only be possible to raise the glass
roof. The system must be initialized, refer to
page44.
>Panorama glass roof
It may only be possible to raise the glass
roof. The system must be reinitialized, refer
to page46.
>Active steering
The system is deactivated and must be
reinitialized, refer to page99. Until then,
larger steering wheel movements are
required.
>Power windows
The pinch prevention system for the power
windows must be reinitialized, refer to
page42.
Talk to your BMW center before placing
the stored vehicle back in service.<
Fuses
Never attempt to repair a blown fuse and
do not replace a defective fuse with a sub-
Page 258 of 294

Giving and receiving assistance
256 Sedan:
It is located in the toolkit in the luggage com-
partment lid, refer to page243.
Sports Wagon:
It is located in the toolkit behind the left side
panel in the cargo bay, refer to page243.
Use only the tow fitting provided with the
vehicle and screw it all the way in. Use the
tow fitting for towing only on roads. Avoid lateral
loading of the tow fitting, e.g. do not lift the vehi-
cle by the tow fitting. Otherwise damage to the
tow fitting and the vehicle can occur.<
Access to screw thread
Press the arrow symbol on the cover in the
bumper.
Front
Rear
Being towed
Make sure that the ignition is switched on,
refer to page62, otherwise the low
beams, tail lamps, turn signals and windshield
wipers would not be available. Do not tow the
vehicle with the rear axle raised, as otherwise
the steering can turn to the left or right. When
the engine is stopped, there is no power assist. This then requires increased effort for braking
and steering. Active steering is deactivated and
larger steering wheel movements are
required.<
Switch on the hazard warning flashers depend-
ing on the local regulations. If the electrical sys-
tem fails, mark the vehicle to be towed, e.g. with
a sign or warning triangle in the rear window.
Manual transmission
Gearshift lever in neutral position.
Automatic and sport automatic
transmission
Before towing, manually release the
transmission lock, even if there is no mal-
function in the transmission. Otherwise there is
a risk that the transmission lock will engage dur-
ing towing.<
Manually unlocking and locking transmission
lock, refer to page66.
Do not exceed a towing speed of 45 mph/
70 km/h and a towing distance of
90 miles/150 km; otherwise the automatic
transmission may be damaged.
Towing methods
Do not lift vehicle by tow fitting or body
and chassis parts, otherwise damage may
result.<
In some countries, towing with tow bars or
ropes in public traffic is not permitted. Familiar-
ize yourself with the regulations on towing in the
respective country.
With tow bar
The towing vehicle may not be lighter
than the vehicle to be towed, otherwise it
will not be possible to reliably control vehicle
response.<
The tow fittings used should be on the same
side on both vehicles. Should it prove impossi-
ble to avoid mounting the tow bar at an offset
angle, please observe the following:
>Clearance and maneuvering capability will
be sharply limited during cornering.