2009 BMW 530XI TOURING turn signal
[x] Cancel search: turn signalPage 83 of 294

Controls
81Reference
At a glance
Driving tips
Communications
Navigation
Entertainment
Mobility
To reset average fuel consumption: press BC
button on turn signal lever for approx. 2 sec-
onds.
For different routes
You can display the average speed and average
consumption for two different routes on the
Control Display, refer to the following and to
Trip computer
*.
Displays on Control Display
You can also call up the computer via iDrive.
For operating principle refer to page16.
1.Press the button.
This opens the start menu.
2.Move the controller to the right to open
"Navigation".
Without navigation system
*:
Open "Car Data".
3.Select "Car Data" and press the controller.
4.Select "Onboard info" and press the con-
troller.>Estimated time of arrival at destination and
remaining distance:
>Entering a distance manually in the com-
puter, see below.
>Entering a destination in the navigation
system
*, refer to page144.
>Cruising range
>Average speed
>Average fuel consumption
Resetting values
You can reset the values for the average speed
and average fuel consumption:
1.Select the respective menu item and press
the controller.
2.To confirm your selection, press the con-
troller again.
Entering a distance manually
1.Select "Distance to dest." and press the
controller.
2.Turn the controller to select the distance to
your destination.
3.Press the controller to apply the setting.
The distance is automatically preset during the
destination guidance of the navigation sys-
tem
*.
Trip computer*
The trip computer is suitable, for example, for a
vacation trip.
1.Open the start menu.
2.Open "Navigation".
Without navigation system
*:
Open "Car Data".
Page 86 of 294

Everything under control
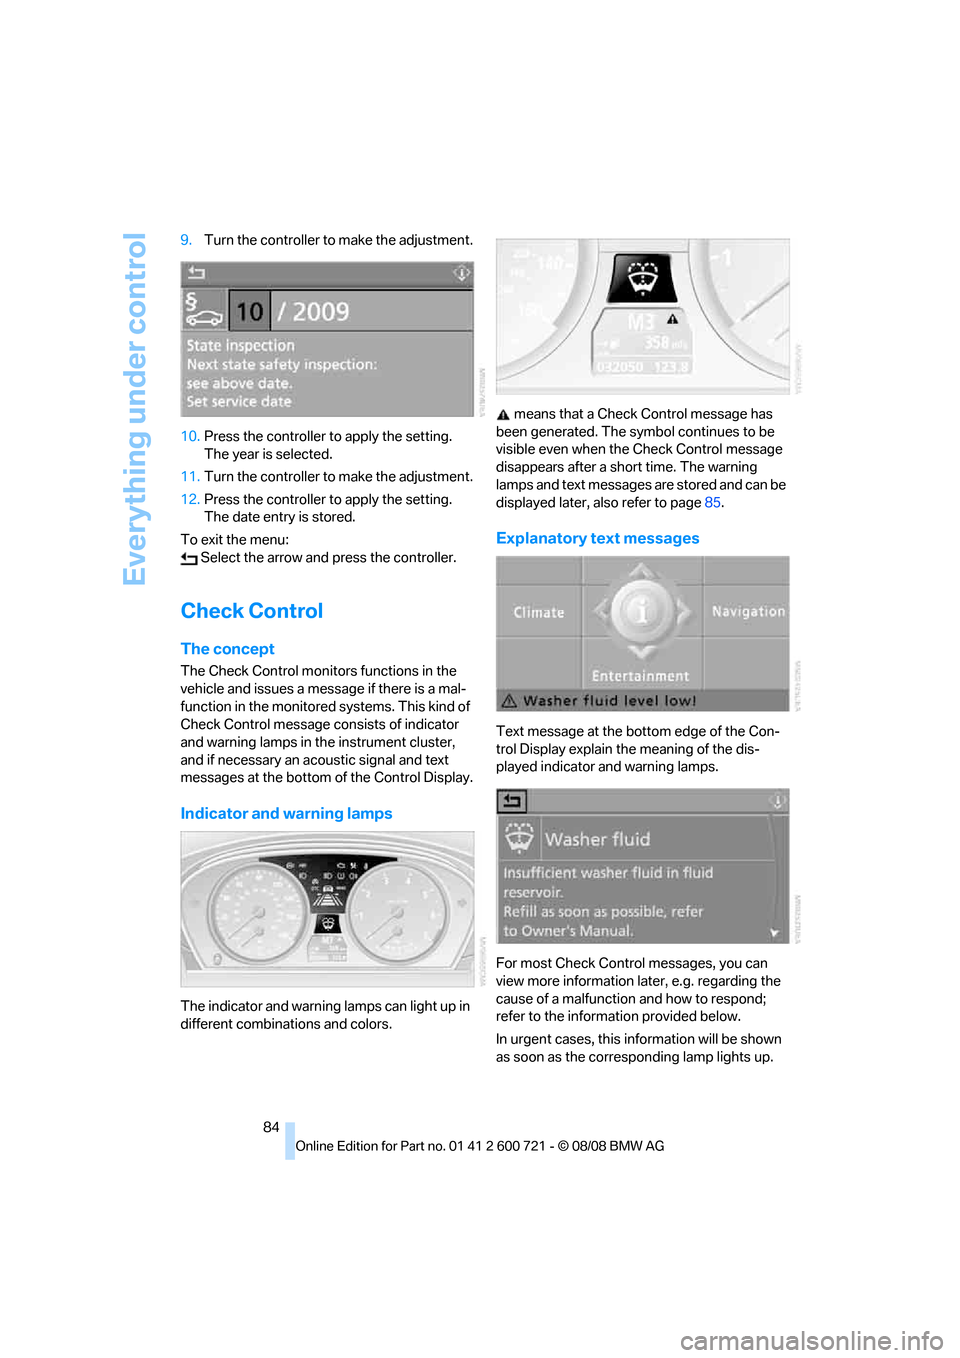
84 9.Turn the controller to make the adjustment.
10.Press the controller to apply the setting.
The year is selected.
11.Turn the controller to make the adjustment.
12.Press the controller to apply the setting.
The date entry is stored.
To exit the menu:
Select the arrow and press the controller.
Check Control
The concept
The Check Control monitors functions in the
vehicle and issues a message if there is a mal-
function in the monitored systems. This kind of
Check Control message consists of indicator
and warning lamps in the instrument cluster,
and if necessary an acoustic signal and text
messages at the bottom of the Control Display.
Indicator and warning lamps
The indicator and warning lamps can light up in
different combinations and colors. means that a Check Control message has
been generated. The symbol continues to be
visible even when the Check Control message
disappears after a short time. The warning
lamps and text messages are stored and can be
displayed later, also refer to page85.
Explanatory text messages
Text message at the bottom edge of the Con-
trol Display explain the meaning of the dis-
played indicator and warning lamps.
For most Check Control messages, you can
view more information later, e.g. regarding the
cause of a malfunction and how to respond;
refer to the information provided below.
In urgent cases, this information will be shown
as soon as the corresponding lamp lights up.
Page 87 of 294

Controls
85Reference
At a glance
Driving tips
Communications
Navigation
Entertainment
Mobility
Exit the displayed information:
Select the arrow and press the controller.
Hiding Check Control messages
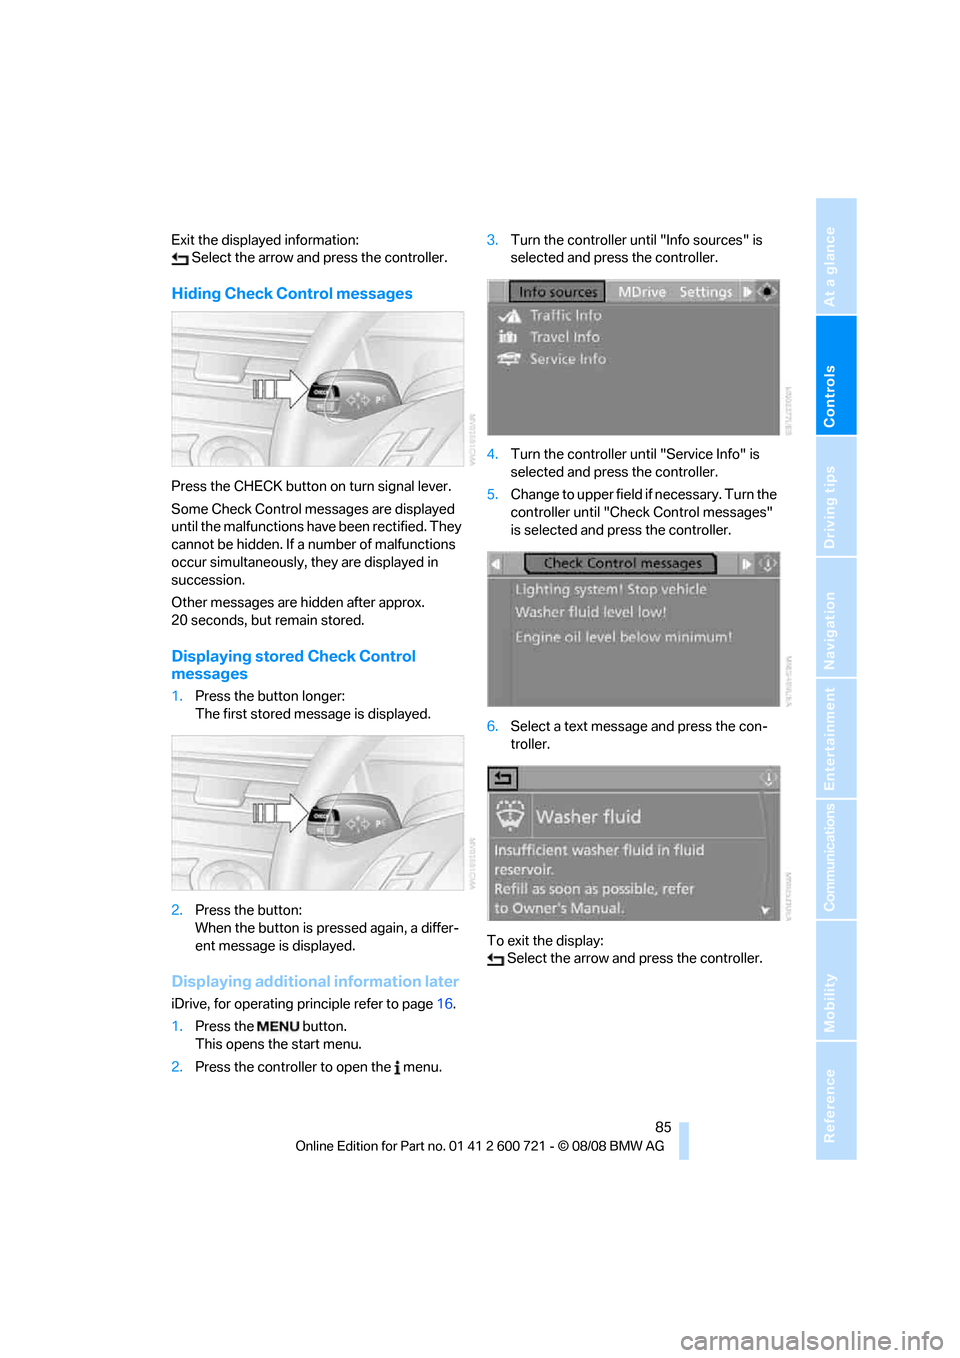
Press the CHECK button on turn signal lever.
Some Check Control messages are displayed
until the malfunctions have been rectified. They
cannot be hidden. If a number of malfunctions
occur simultaneously, they are displayed in
succession.
Other messages are hidden after approx.
20 seconds, but remain stored.
Displaying stored Check Control
messages
1.Press the button longer:
The first stored message is displayed.
2.Press the button:
When the button is pressed again, a differ-
ent message is displayed.
Displaying additional information later
iDrive, for operating principle refer to page16.
1.Press the button.
This opens the start menu.
2.Press the controller to open the menu.3.Turn the controller until "Info sources" is
selected and press the controller.
4.Turn the controller until "Service Info" is
selected and press the controller.
5.Change to upper field if necessary. Turn the
controller until "Check Control messages"
is selected and press the controller.
6.Select a text message and press the con-
troller.
To exit the display:
Select the arrow and press the controller.
Page 90 of 294

Everything under control
88 3.Turn the controller until "Time" is selected
and press the controller.
4.Turn the controller until "Set time" is
selected and press the controller.
Creating settings
1.Turn the controller to set the hours and
press the controller.
2.Turn the controller to set the minutes and
press the controller.
The changed time is stored.
Switching on hour signal*
You will hear three tones just before the top of
each hour.
Select "Hour memo" and press the controller.
The hour signal is activated.
The setting is stored for the remote control cur-
rently in use.
Setting 12h/24h format
1.Select "Time format" and press the control-
ler.
2.Select the desired format and press the
controller.
The setting is stored for the remote control cur-
rently in use.
Setting date
1.Select "Date" and press the controller.
2.Select "Set date" and press the controller.
The first setting of the date display is
selected.
3.Turn the controller to make the adjustment.
4.Press the controller to apply the setting.
The next setting is selected.
5.Make the remaining adjustments. After the
last adjustment, the date is stored.
Setting date format
1.Select "Date format" and press the control-
ler.
2.Select the desired format and press the
controller.
The setting is stored for the remote control cur-
rently in use.
Brightness of Control Display
The brightness is automatically adapted to the
ambient lighting conditions. However, you can
change the basic setting.
iDrive, for operating principle refer to page16.
1.Press the button.
This opens the start menu.
2.Press the controller to open the menu.
3.Select "Settings" and press the controller.
4.Select "Display settings" and press the
controller.
Page 93 of 294

Controls
91Reference
At a glance
Driving tips
Communications
Navigation
Entertainment
Mobility
1.Press the button.
This opens the start menu.
2.Press the controller to open the menu.
3.Turn the controller until "Settings" is
selected and press the controller.
4.Turn the controller until "Vehicle / Tires" is
selected and press the controller.
5.Change to upper field if necessary. Turn the
controller until "PDC" is selected and press
the controller.
6.Select "PDC display on" and press the con-
troller.
The PDC screen is activated.
The display appears on the Control Display as
soon as PDC is activated.
System limits
Even with PDC, final responsibility for
estimating the distance between the
vehicle and any obstructions always remains
with the driver. Even when sensors are pro-
vided, there is a blind spot in which objects can
no longer be detected. The system is also sub-
ject to the physical limits that apply to all forms
of ultrasonic measurement, such as those
encountered with tow bars and trailer cou-
plings, or thin and wedge-shaped objects etc. Low objects already displayed, e. g. curbs, can
also disappear from the detection area of the
sensors again before or after a continuous tone
already sounds. Higher, protruding objects, e.g.
ledges, cannot be detected. For this reason,
drive with care; otherwise, there is a danger of
personal injury or property damage.
Loud sources of sound, inside and outside the
vehicle, could drown out the PDC signal tone.<
Driving stability control
systems
Your BMW is equipped with an extended array
of systems designed to enhance and maintain
vehicle stability under extreme conditions.
ABS Antilock Brake System
ABS prevents locking of the wheels during
braking. Safe steering response is maintained
even during full braking. Active safety is thus
increased.
The ABS is operational every time you start the
engine. Braking safely refer to page136.
CBC Cornering Brake Control
When braking during curves or when braking
during a lane change, driving stability and steer-
ing response are improved further.
Electronic brake-force distribution
The system controls the brake pressure in the
rear wheels to ensure stable braking behavior.
Brake assistant
When you apply the brakes rapidly, this system
produces maximum braking force boosting and
thus helps to achieve the shortest possible
braking distance during full braking maneuvers.
This system exploits all of the benefits provided
by ABS.
Do not reduce the pressure on the brake pedal
for the duration of the full braking.
Page 98 of 294

Technology for comfort, convenience and safety
96 5.Change to upper field if necessary. Turn the
controller until "FTM" is selected and press
the controller.
6.Start the engine, but do not start driving.
7.Select "Reset" and press the controller.
8.Select "Yes" and press the controller.
9.Start to drive.
"resetting FTM …" is displayed.
The initialization finishes during driving.
Indication of a flat tire
The warning lamp lights up red. A mes-
sage appears on the Control Display.
In addition, an acoustic signal sounds.
There is a flat tire or extensive inflation pressure
loss.
1.Reduce speed and stop the vehicle care-
fully. Avoid sudden braking and steering
maneuvers.
2.Identify damaged tire.
If identification is not possible, con-
tact a BMW center.<
3.Replace the damaged wheel, refer to
Changing wheels on page248.
Run-flat tires*
1.Cautiously reduce speed to below 50 mph/
80 km/h. Avoid severe braking and steering
maneuvers and do not exceed a speed of
50 mph/80 km/h.
If the vehicle is not equipped with run-
flat tires, refer to page229, do not
continue driving. Continuing to drive with a
flat tire could cause severe accidents.<
2.At the next opportunity, check the air pres-
sure in all four tires.
If the tire inflation pressure in all four
tires is correct, the Flat Tire Monitor
may not have been initialized. The system
must then be initialized.<
3.In the event of complete tire pressure loss,
0 psi/0 kPa, you can estimate the possible
distance for continued driving on the basis
of the following guide values:
>With a light load:
1 to 2 persons without luggage:
approx. 155 miles/250 km
>With a medium load:
2 persons, cargo bay full, or
4 persons without luggage:
approx. 94 miles/150 km
>With a full load:
4 or more persons, cargo bay full:
approx. 30 miles/50 km
Drive cautiously and do not exceed
50 mph/80 km/h or else you run the risk of
causing an accident. In the event of pressure
loss, vehicle handling changes. This includes
reduced tracking stability in braking, extended
braking distance and altered natural steering
characteristics.
If unusual vibrations or loud noises occur while
the vehicle is being driven, this can indicate final
failure of the damaged tire. Reduce speed and
stop at a suitable location as soon as possible,
otherwise pieces of the tire could become
detached and cause an accident. Do not con-
tinue driving, but instead contact your BMW
center.<
Page 100 of 294

Technology for comfort, convenience and safety
98 5.Change to upper field if necessary. Turn the
controller until "TPM" is selected and press
the controller.
6.Start the engine, but do not start driving.
7.Select "Reset" and press the controller.
8.Select "Yes" and press the controller.
9.Start to drive.
The tires are shown in gray and "Resetting
TPM..." is displayed.
After a few minutes of driving, the set tire infla-
tion pressures in the tires are applied as the set
values to be monitored. Resetting finishes dur-
ing driving. The tires are shown in green on the
Control Display.
If a flat tire is detected during resetting
and applying the tire inflation pressures,
all tires are shown in yellow on the Control Dis-
play. The message "Tire low!" is displayed.<
Message with low tire inflation
pressure
The warning lamp lights up yellow. A
message appears on the Control Dis-
play. In addition, an acoustic signal
sounds. There is a flat tire or extensive inflation
pressure loss.1.Reduce speed and stop the vehicle care-
fully. Avoid sudden braking and steering
maneuvers.
2.Check whether your vehicle is equipped
with standard tires or run-flat tires.
You will recognize run-flat tires by a
circular symbol containing the letters
RSC on the side of the tire, refer to
page229.<
Standard tires
1.If all four wheels are shown in yellow, iden-
tify the damaged tire on the vehicle.
2.Replace the damaged wheel or wheels,
refer to Changing wheels on page248.
In contrast to a compact wheel, a spare wheel is
equipped with the necessary TPM electronics
and also monitored after mounting and after
resetting the system.
Have the tire replaced by a BMW center or a
workshop informed on handling TPM which
works according to BMW repair procedures
with correspondingly trained personnel.
Run-flat tires*
1.Cautiously reduce speed to below 50 mph/
80 km/h. Avoid severe braking and steering
maneuvers and do not exceed a speed of
50 mph/80 km/h.
If the vehicle is not equipped with run-
flat tires, refer to page229, do not
continue driving. Continuing to drive with a
flat tire could cause severe accidents.<
2.In the event of complete tire pressure loss,
0 psi/0 kPa, you can estimate the possible
distance for continued driving on the basis
of the following guide values:
>With a light load:
1 to 2 persons without luggage:
approx. 155 miles/250 km
>With a medium load:
2 persons, cargo bay full, or
Page 109 of 294

Controls
107Reference
At a glance
Driving tips
Communications
Navigation
Entertainment
Mobility
stating that the system is not active until this
speed is reached.
A warning will be canceled:
>after approx. 3 seconds
>if you return to your lane
>if you brake heavily
>if you signal
System limits
The leaving lane warning cannot serve as
a substitute for your personal judgment in
determining the course of the road.
If the system issues a warning, do not move the
steering wheel with unnecessary severity, as
otherwise you could loose control of the vehi-
cle.<
The function of the system may be limited in the
following example situations:
>in heavy fog, rain or snowfall
>with worn-away, poorly visible limit lines, or
lines that run together or apart or are
unclear, e.g. in road construction areas
>when limit lines are covered by snow, ice,
dirt or a great deal of water
>in tight curves or on narrow roads
>when limit lines are not white
>when limit lines are covered by objects
>when driving up close behind a vehicle driv-
ing ahead
>with bright counter light
>when the windshield is fogged up, dirty or
covered with stickers, vignettes etc. in the
area of the inside rearview mirror