Page 257 of 294

Mobility
255Reference
At a glance
Controls
Driving tips
Communications
Navigation
Entertainment
Preparation
1.Check whether the battery of the other
vehicle has a voltage of 12 Volts and
approximately the same capacitance in Ah.
This information can be found on the bat-
tery.
2.Switch off the engine of the assisting vehi-
cle.
3.Switch off any electrical systems and com-
ponents in both vehicles.
There must not be any contact between
the bodies of the two vehicles, otherwise
there is a danger of shorting.<
Connecting jumper cables
To avoid personal injury from sparks, fol-
low this sequence when connecting
jumper cables.<
In your BMW, the so-called jump-starting termi-
nal in the engine compartment serves as a pos-
itive terminal for the battery, also refer to engine
compartment overview on page233. The cover
cap is marked with a +.
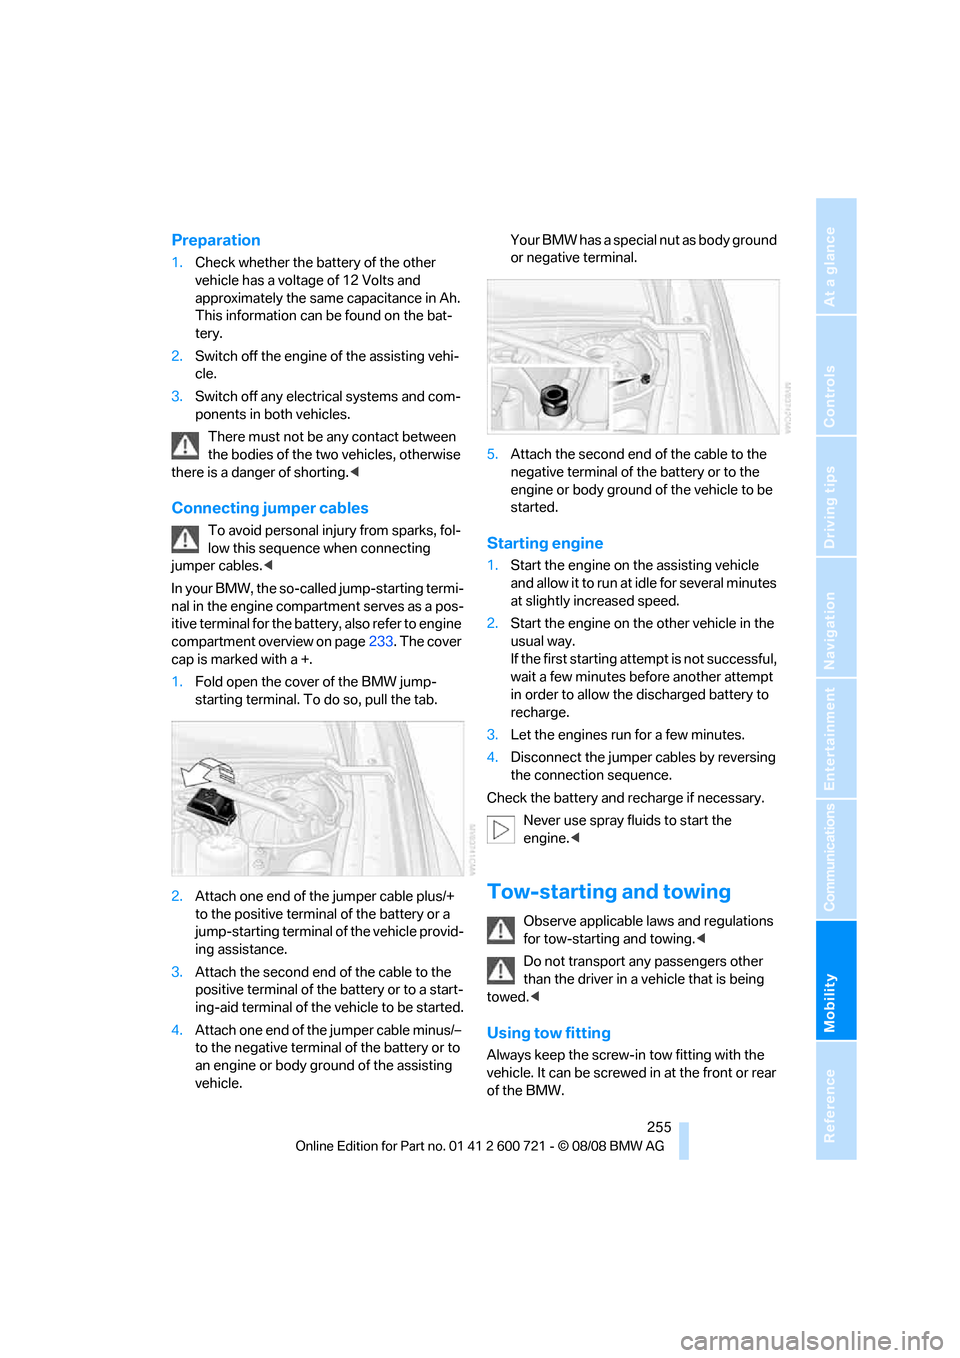
1.Fold open the cover of the BMW jump-
starting terminal. To do so, pull the tab.
2.Attach one end of the jumper cable plus/+
to the positive terminal of the battery or a
jump-starting terminal of the vehicle provid-
ing assistance.
3.Attach the second end of the cable to the
positive terminal of the battery or to a start-
ing-aid terminal of the vehicle to be started.
4.Attach one end of the jumper cable minus/–
to the negative terminal of the battery or to
an engine or body ground of the assisting
vehicle.Your BMW has a special nut as body ground
or negative terminal.
5.Attach the second end of the cable to the
negative terminal of the battery or to the
engine or body ground of the vehicle to be
started.Starting engine
1.Start the engine on the assisting vehicle
and allow it to run at idle for several minutes
at slightly increased speed.
2.Start the engine on the other vehicle in the
usual way.
If the first starting attempt is not successful,
wait a few minutes before another attempt
in order to allow the discharged battery to
recharge.
3.Let the engines run for a few minutes.
4.Disconnect the jumper cables by reversing
the connection sequence.
Check the battery and recharge if necessary.
Never use spray fluids to start the
engine.<
Tow-starting and towing
Observe applicable laws and regulations
for tow-starting and towing.<
Do not transport any passengers other
than the driver in a vehicle that is being
towed.<
Using tow fitting
Always keep the screw-in tow fitting with the
vehicle. It can be screwed in at the front or rear
of the BMW.
Page 259 of 294

Mobility
257Reference
At a glance
Controls
Driving tips
Communications
Navigation
Entertainment
>When mounted at an angle, the tow bar will
exert lateral forces, tending to push the
vehicle sideways.
Only attach the tow bar to the tow fittings,
as attachment to other vehicle parts can
lead to damage.<
With tow rope
When starting off in the towing vehicle, make
sure that the tow rope is taut.
To avoid jerking and the associated
stresses on vehicle components when
towing, always use nylon ropes or nylon straps.
Only attach tow ropes to the tow fittings, as
attachment to other vehicle parts can lead to
damage.<
With tow truck
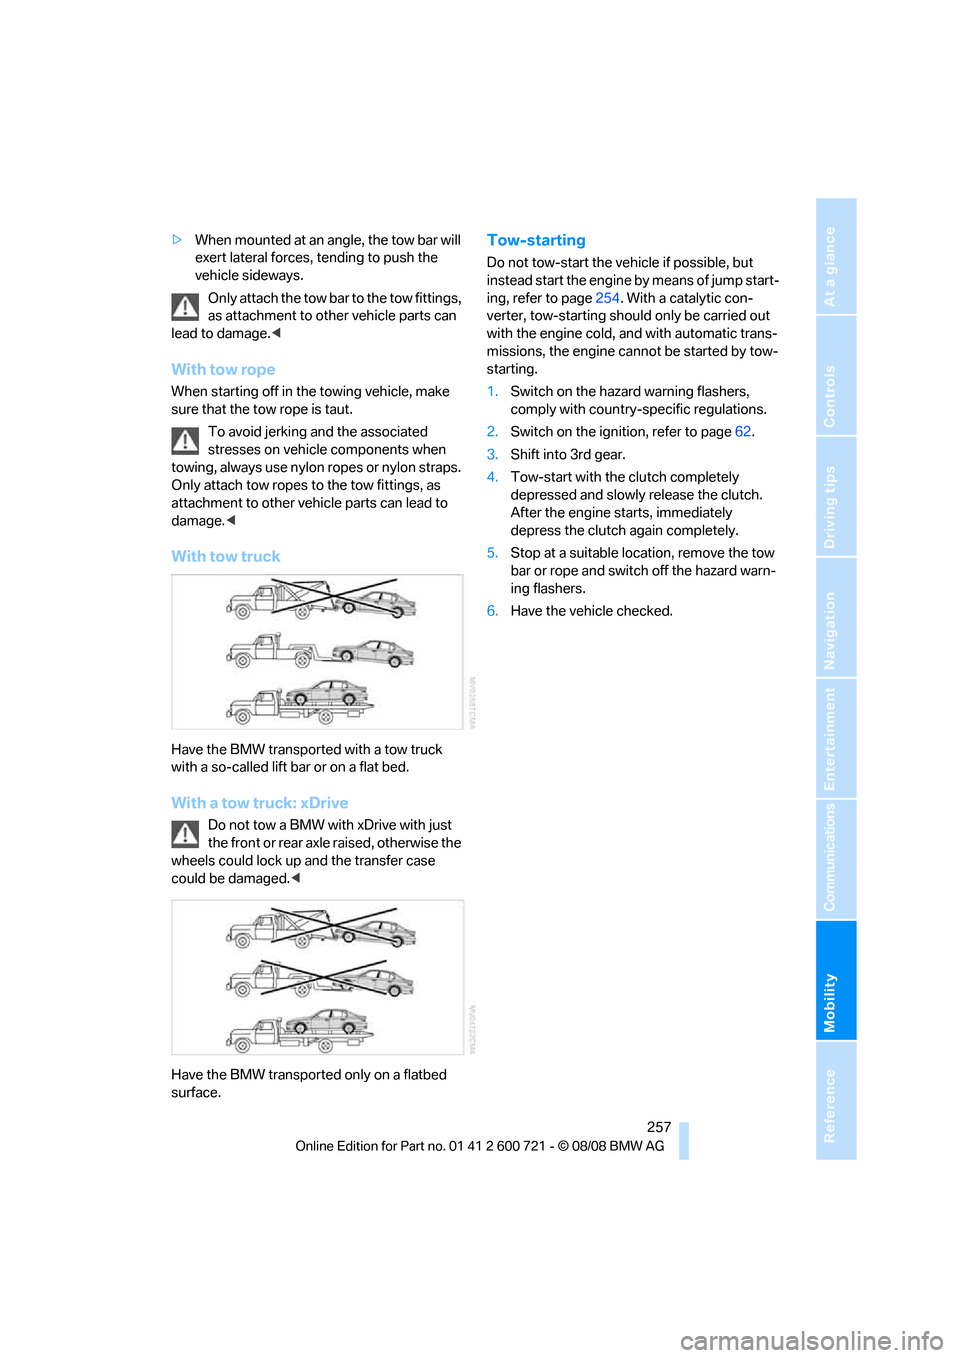
Have the BMW transported with a tow truck
with a so-called lift bar or on a flat bed.
With a tow truck: xDrive
Do not tow a BMW with xDrive with just
the front or rear axle raised, otherwise the
wheels could lock up and the transfer case
could be damaged.<
Have the BMW transported only on a flatbed
surface.
Tow-starting
Do not tow-start the vehicle if possible, but
instead start the engine by means of jump start-
ing, refer to page254. With a catalytic con-
verter, tow-starting should only be carried out
with the engine cold, and with automatic trans-
missions, the engine cannot be started by tow-
starting.
1.Switch on the hazard warning flashers,
comply with country-specific regulations.
2.Switch on the ignition, refer to page62.
3.Shift into 3rd gear.
4.Tow-start with the clutch completely
depressed and slowly release the clutch.
After the engine starts, immediately
depress the clutch again completely.
5.Stop at a suitable location, remove the tow
bar or rope and switch off the hazard warn-
ing flashers.
6.Have the vehicle checked.
Page 263 of 294
Reference 261
At a glance
Controls
Driving tips
Communications
Navigation
Entertainment
Mobility
Dimensions
Sedan
All dimensions are given in inches/mm.
Vehicle height with xDrive: 58.3 in/1,482 mm
Smallest turning circle diam.: 37.5 ft/11.4 m, with xDrive 39 ft/11.9 m
Page 265 of 294

Reference 263
At a glance
Controls
Driving tips
Communications
Navigation
Entertainment
Mobility
Weights
Never exceed either the approved axle loads or
the gross vehicle weight.
Never exceed either the approved axle loads or
the gross vehicle weight.
Sedan528i535i550i
Curb weight
>Manual transmission lbs./kg 3,505/1,590 3,660/1,660 3,946/1,790
>Automatic transmission lbs./kg 3,571/1,620 3,703/1,680 3,968/1,800
Approved gross vehicle weight
>Manual transmission lbs./kg 4,607/2,090 4,872/2,210 5,048/2,290
>Automatic transmission lbs./kg 4,673/2,120 4,872/2,210 5,070/2,300
Load lbs./kg 1,102/500 1,102/500 1,102/500
Approved front axle load lbs./kg 2,227/1,010 2,359/1,070 2,469/1,120
Approved rear axle load lbs./kg 2,601/1,180 2,711/1,230 2,733/1,240
Approved roof load capacity lbs./kg 220/100 220/100 220/100
Cargo bay capacity cu ft/l 18.4/520 18.4/520 18.4/520
Sedan528i xDrive535i xDrive
Curb weight
>Manual transmission lbs./kg 3,670/1,710 3,902/1,770
>Automatic transmission lbs./kg 3,704/1,730 3,946/1,790
Approved gross vehicle weight
>Manual transmission lbs./kg 4,839/2,195 5,004/2,270
>Automatic transmission lbs./kg 4,883/2,215 5,048/2,290
Load lbs./kg 1,102/500 1,102/500
Approved front axle load lbs./kg 2,315/1,050 2,315/1,050
Approved rear axle load lbs./kg 2,689/1,220 2,689/1,220
Approved roof load capacity lbs./kg 220/100 220/100
Cargo bay capacity cu ft/l 18.4/520 18.4/520
Page 267 of 294

Reference 265
At a glance
Controls
Driving tips
Communications
Navigation
Entertainment
Mobility
Short commands of voice command
system
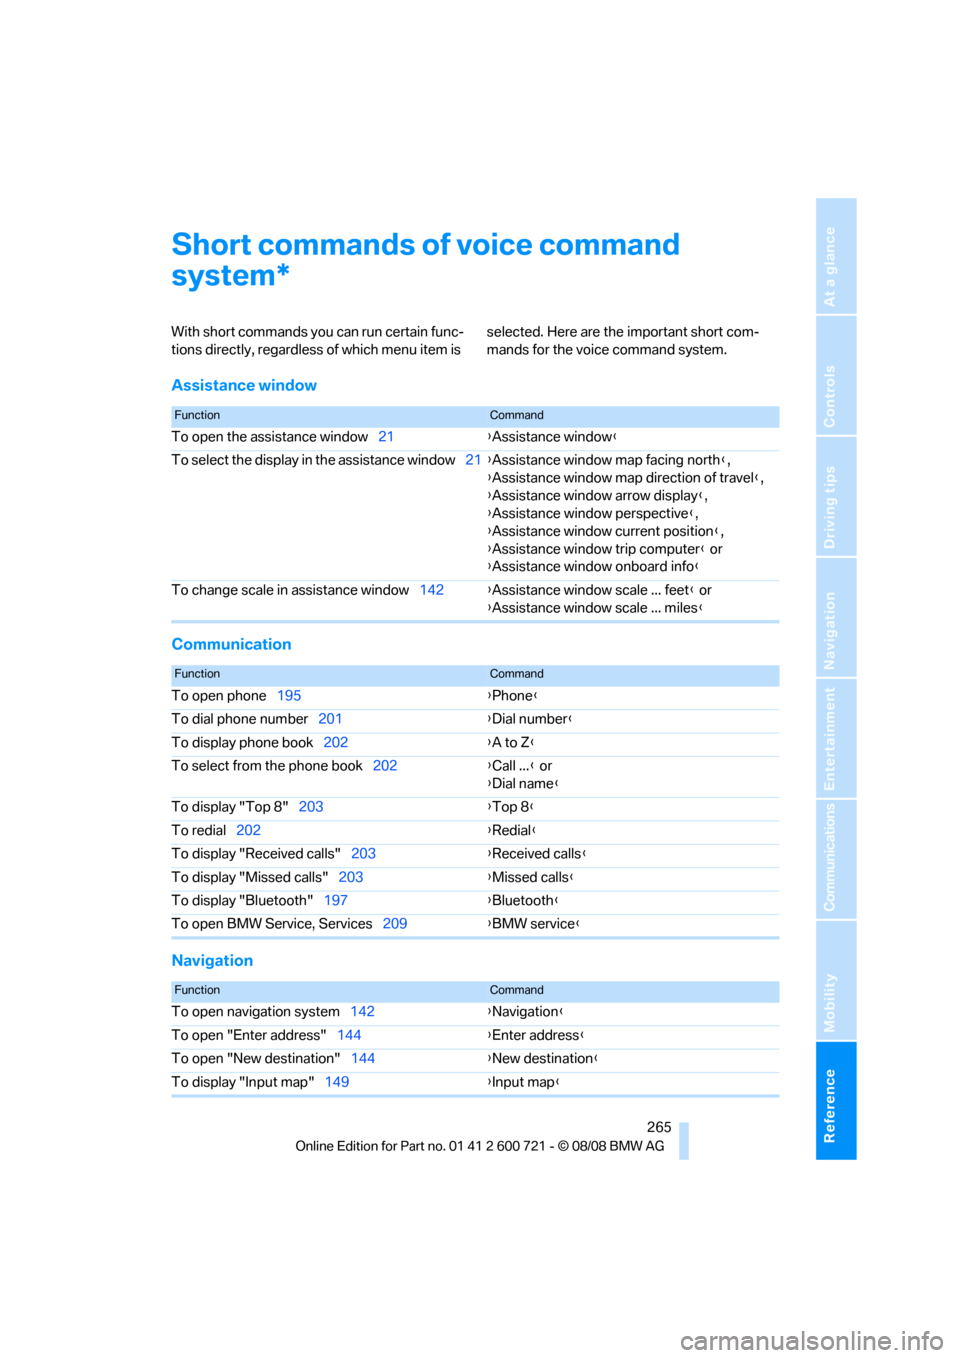
With short commands you can run certain func-
tions directly, regardless of which menu item is selected. Here are the important short com-
mands for the voice command system.
Assistance window
Communication
Navigation
*
FunctionCommand
To open the assistance window21{Assistance window}
To select the display in the assistance window21{Assistance window map facing north},
{Assistance window map direction of travel},
{Assistance window arrow display},
{Assistance window perspective},
{Assistance window current position},
{Assistance window trip computer} or
{Assistance window onboard info}
To change scale in assistance window142{Assistance window scale ... feet} or
{Assistance window scale ... miles}
FunctionCommand
To open phone195{Phone}
To dial phone number201{Dial number}
To display phone book202{A to Z}
To select from the phone book202{Call ...} or
{Dial name}
To display "Top 8"203{Top 8}
To redial202{Redial}
To display "Received calls"203{Received calls}
To display "Missed calls"203{Missed calls}
To display "Bluetooth"197{Bluetooth}
To open BMW Service, Services209{BMW service}
FunctionCommand
To open navigation system142{Navigation}
To open "Enter address"144{Enter address}
To open "New destination"144{New destination}
To display "Input map"149{Input map}
Page 268 of 294

Short commands of voice command system
266
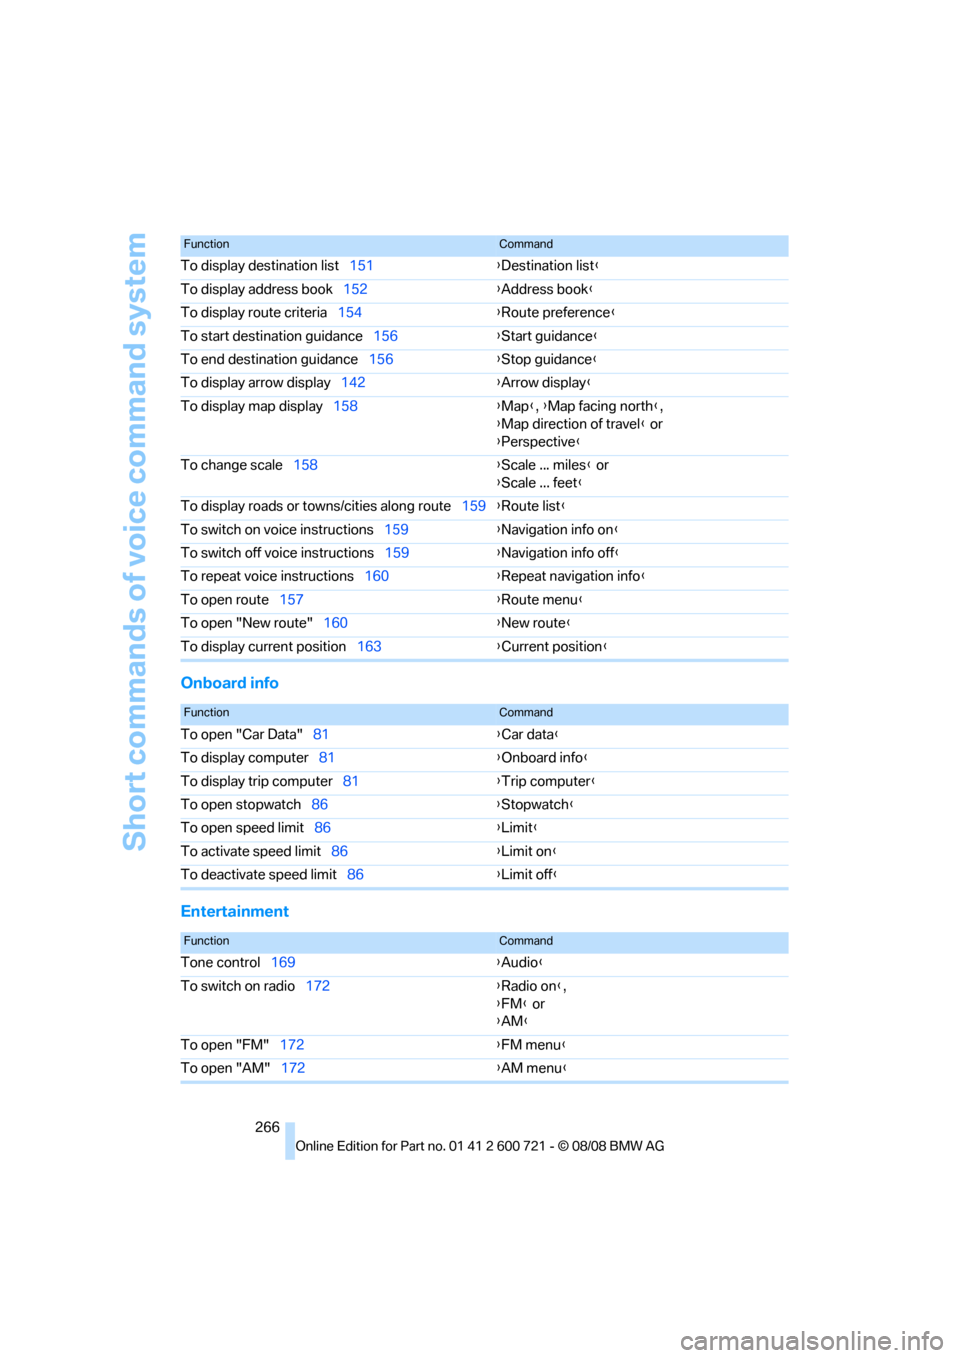
Onboard info
Entertainment
To display destination list151{Destination list}
To display address book152{Address book}
To display route criteria154{Route preference}
To start destination guidance156{Start guidance}
To end destination guidance156{Stop guidance}
To display arrow display142{Arrow display}
To display map display158{Map}, {Map facing north},
{Map direction of travel} or
{Perspective}
To change scale158{Scale ... miles} or
{Scale ... feet}
To display roads or towns/cities along route159{Route list}
To switch on voice instructions159{Navigation info on}
To switch off voice instructions159{Navigation info off}
To repeat voice instructions160{Repeat navigation info}
To open route157{Route menu}
To open "New route"160{New route}
To display current position163{Current position}
FunctionCommand
FunctionCommand
To open "Car Data"81{Car data}
To display computer81{Onboard info}
To display trip computer81{Trip computer}
To open stopwatch86{Stopwatch}
To open speed limit86{Limit}
To activate speed limit86{Limit on}
To deactivate speed limit86{Limit off}
FunctionCommand
Tone control169{Audio}
To switch on radio172{Radio on},
{FM} or
{AM}
To open "FM"172{FM menu}
To open "AM"172{AM menu}
Page 269 of 294

Reference 267
At a glance
Controls
Driving tips
Communications
Navigation
Entertainment
Mobility
Climate
To open "All stations"172{FM all stations}
To select radio station172{Station ...}, e.g. {Station WNYC}, or
{Choose station}
To open "Presets"172{FM presets} or
{AM presets}
To select preset radio station172{Preset ...}, e.g. {Preset 1}
To open "Manual"173{FM manual},
{AM manual} or
{Choose frequency},
{Frequency ... Megahertz}
To open strongest radio stations174{AM Autostore}
To open "WB"176{Weatherband menu}
To switch on weatherband 176{Weatherband on}
To select a weatherband station176{Choose weatherband station}
To open "SAT"180{SAT radio menu}
To switch on satellite radio179{SAT radio}
To open "Presets" of the satellite radio180{SAT radio presets}
To open "All channels" of the satellite radio180{SAT radio all channels}
To open "Categories" of the satellite radio180{SAT radio categories}
To open CD player
182{CD menu}
To switch on CD player182{CD}
To open CD changer182{CD changer menu}
To switch on CD changer182{CD changer}
To select a CD in the CD changer182{CD 1...6}
To select music track183{CD track ...}
To select a CD and music track in the CD
changer183{CD 1...6 track ...}
To switch on audio playback with external audio
device188{Audio Aux}
FunctionCommand
FunctionCommand
To adjust temperature distribution for front seat
heating53{Seat heater distribution}
To open "Vent settings"116{Vent settings}
To open "Automatic programs"115{Automatic programs}
Page 271 of 294
Reference 269
At a glance
Controls
Driving tips
Communications
Navigation
Entertainment
Mobility