2009 BMW 530I TOURING symbols
[x] Cancel search: symbolsPage 6 of 294

Notes
4
Notes
Using this Owner's Manual
We have made every effort to ensure that you
are able to find what you need in this Owner's
Manual as quickly as possible. The fastest way
to find specific topics is to refer to the detailed
index at the back of the manual. If you wish to
gain an initial overview of your vehicle, you will
find this in the first chapter.
Should you sell your BMW some day, please
remember to hand over the Owner's Manual
as well; it is an important component of your
vehicle.
Additional sources of information
Should you have any other questions, your
BMW center will be happy to advise you.
You can find information on BMW, e.g. on tech-
nology, on the Internet at www.bmwusa.com.
Symbols used
Indicates precautions that must be fol-
lowed precisely in order to avoid the pos-
sibility of personal injury and serious damage to
the vehicle.<
Indicates information that will assist you
in gaining the optimum benefit from your
vehicle and enable you to care more effectively
for your vehicle.<
Refers to measures that can be taken to
help protect the environment.<
*Indicates special equipment, country-spe-
cific equipment and optional accessories, as
well as equipment and functions not yet avail-
able at the time of printing.
"..." Identifies Control Display texts used to
select individual functions.
These sections contain information on using
the voice activation system.
{...} Verbal instructions to use with the voice
activation system.
{{...}} Identifies the answers generated by the
voice activation system.
Symbols on vehicle components
Indicates that you should consult the rel-
evant section of this Owner's Manual for
information on a particular part or assembly.
Page 26 of 294

Voice command system
24
Voice command system
The concept
The voice command system allows you to con-
trol operation of various vehicle systems with-
out taking your hands off the steering wheel.
Individual menu items on the Control Display
can be spoken as commands. This frees you of
having to use the controller.
The voice command system transforms your
oral commands into control signals for the
selected systems and provides support in the
form of instructions or questions.
The voice command system uses a special
microphone located in the area of the interior
rearview mirror, refer to page14.
Precondition
Via iDrive, set the language that applies for the
voice command system in order to enable iden-
tification of the spoken commands. To set the
language of iDrive, refer to page89.
Symbols in Owner's Manual
Voice commands
Activating voice command system
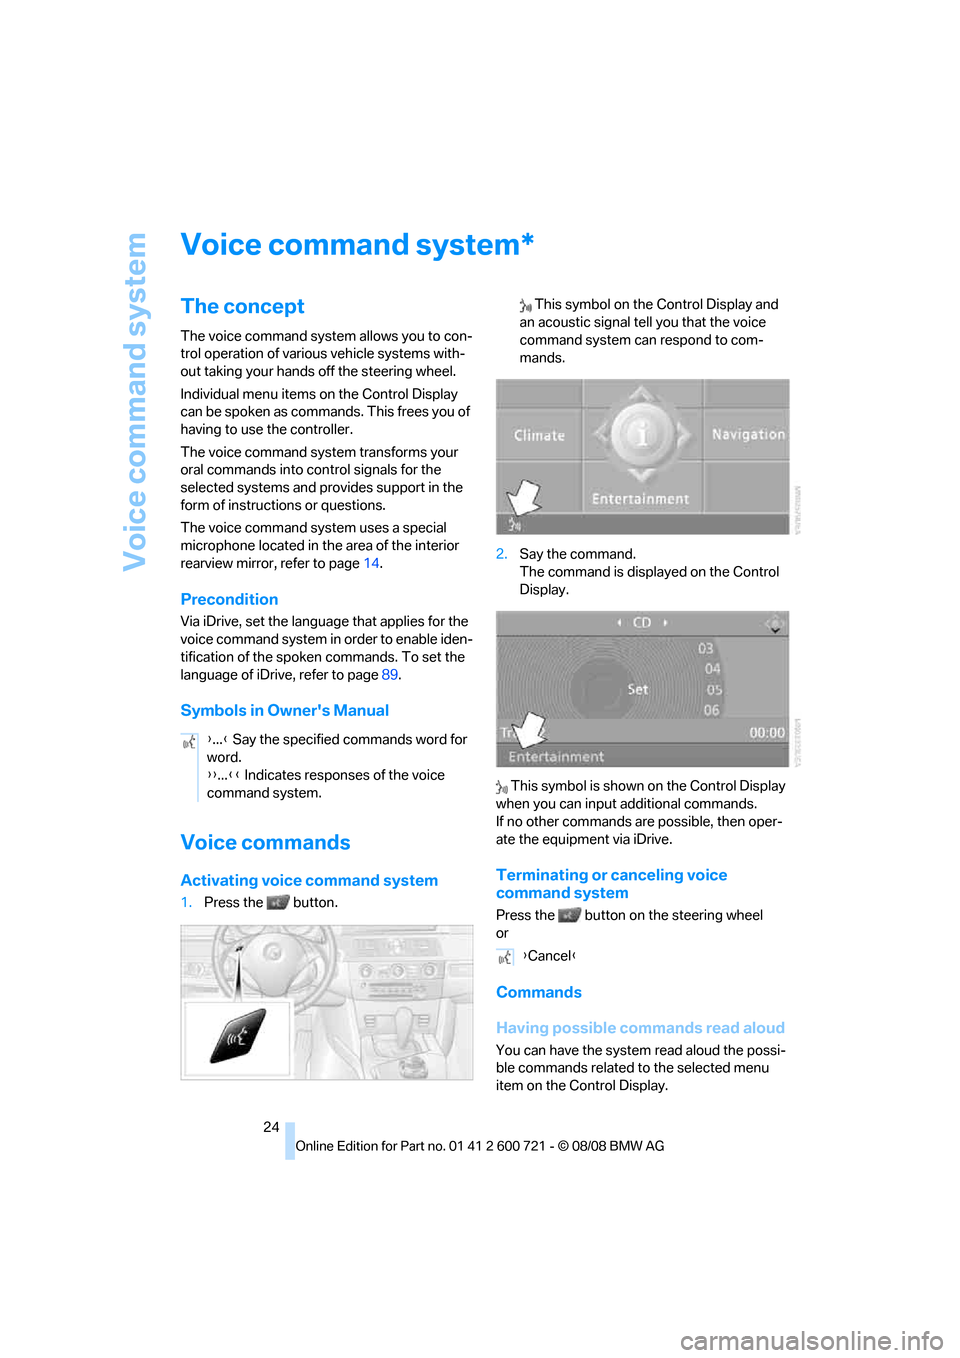
1.Press the button. This symbol on the Control Display and
an acoustic signal tell you that the voice
command system can respond to com-
mands.
2.Say the command.
The command is displayed on the Control
Display.
This symbol is shown on the Control Display
when you can input additional commands.
If no other commands are possible, then oper-
ate the equipment via iDrive.
Terminating or canceling voice
command system
Press the button on the steering wheel
or
Commands
Having possible commands read aloud
You can have the system read aloud the possi-
ble commands related to the selected menu
item on the Control Display.
*
{...} Say the specified commands word for
word.
{{...}} Indicates responses of the voice
command system.
{Cancel}
Page 85 of 294

Controls
83Reference
At a glance
Driving tips
Communications
Navigation
Entertainment
Mobility
5.Change to upper field if necessary. Turn the
controller until "Service requirements" is
selected and press the controller.
6.Select "Status" and press the controller.
The display shows a list of selected service and
maintenance procedures, as well as legally
mandated inspections.
You can request more detailed information on
every entry:
Select the entry and press the controller.
To exit the menu:
Select the arrow and press the controller.
Symbols
No service is currently required. The deadline for service or a legally man-
dated inspection is approaching. Please
arrange a service appointment.
The service deadline has already passed.
Entering deadlines for legally required
inspections*
Make sure the date on the Control Display is set
correctly, refer to page87, otherwise the effec-
tiveness of CBS Condition Based Service is not
ensured.
1.Open the start menu.
2.Press the controller to open the menu.
3.Select "Info sources" and press the control-
ler.
4.Select "Service Info" and press the control-
ler.
5.Change to upper field if necessary. Turn the
controller until "Service requirements" is
selected and press the controller.
6.Select "Status" and press the controller.
7.Select "State inspection" and press the
controller.
8.Select "Set service date" and press the
controller. The month is selected.
Page 88 of 294

Everything under control
86
Indication of malfunction urgency
Depending on your vehicle's equipment, the
stored Check Control messages are also dis-
played with the following symbols:
No malfunctions are present in the moni-
tored systems.
Malfunctions are present in the moni-
tored systems. Depending on the mal-
function, supplementary information is
shown on the Control Display.
The symbols also indicate the status of the ser-
vice requirements display, refer to page82.
Displays after completion of trip
Malfunction reports generated during the trip
are shown consecutively when you switch off
the ignition.
Before the display disappears, you can display
the messages once again. Press the CHECK
button for approx. 2 seconds. If several mes-
sages are present, you can continue to press
the CHECK button to view them in succession.
The display goes out
>after a short time
>when you press the CHECK button again
for approx. 2 seconds
Speed limit
You can enter a speed and a Check Control
message indicates when you have reached this
speed. This enables you, for example, to
receive warnings if you exceed a speed limit in
an urban area.
You are only warned of reaching this speed a second time if your vehicle speed falls below it
again by at least 3 mph/5 km/h.
Displaying, setting or changing limit
iDrive, for operating principle refer to page16.
1.Open the start menu.
2.Open "Navigation".
Without navigation system
*:
Open "Car Data".
3.Select "Car Data" and press the controller.
4.Select "Limit" and press the controller.
5.Select the speed value and press the con-
troller.
6.Turn the controller to set the limit.
7.Press the controller to apply the setting.
The limit is activated.
Applying your current speed as limit
Select "Select current speed" and press the
controller. The system adopts your current
speed as the limit.
Activating/deactivating the limit
Select "On" and press the controller.
The limit is activated.
Stopwatch
iDrive, for operating principle refer to page16.
1.Open the start menu.
2.Open "Navigation".
Without navigation system
*:
Open "Car Data".
3.Select "Car Data" and press the controller.
Page 152 of 294

Destination entry
150 6.Select the desired menu item:
>"Start route guidance" starts destination
guidance.
>"Show current position" places your
current position at the center of the map.
>"Show destination position" places the
current destination at the center of the
map.
>"Return to map" changes back to the
"Input map".
> Exit the menu.
7.Press the controller.
The map for the destination entry can also be
displayed in the map display:
Select the symbol and press the controller.
Selecting destination using
information
You can obtain a display of selected destina-
tions, e.g. hotels, sights or hospitals, and adopt
them into the destination guidance.
1.Select "Navigation" and press the control-
ler.
2.Select "Information" and press the control-
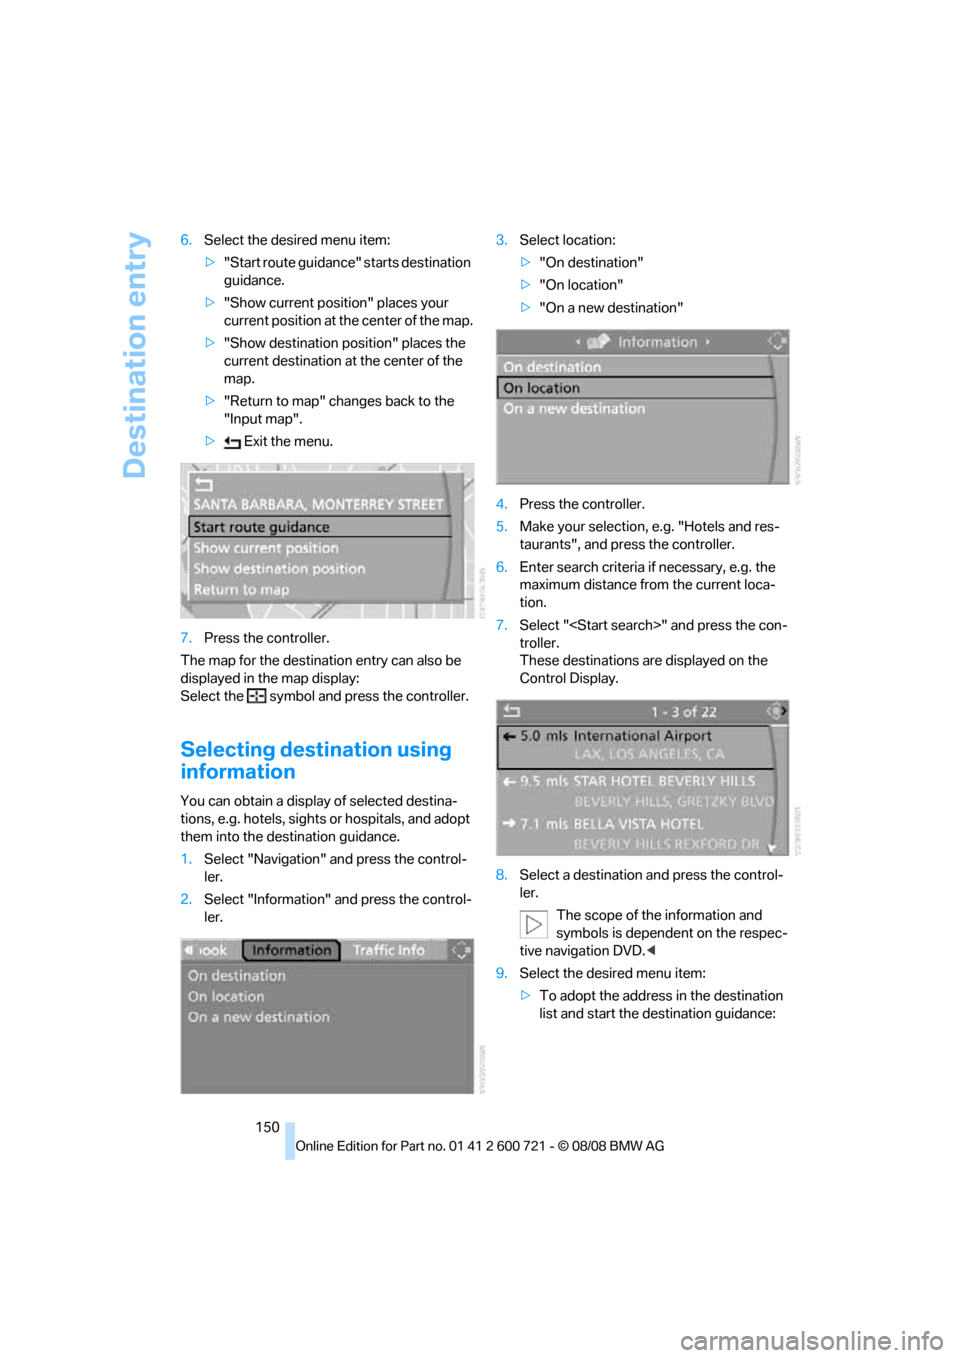
ler.3.Select location:
>"On destination"
>"On location"
>"On a new destination"
4.Press the controller.
5.Make your selection, e.g. "Hotels and res-
taurants", and press the controller.
6.Enter search criteria if necessary, e.g. the
maximum distance from the current loca-
tion.
7.Select "
troller.
These destinations are displayed on the
Control Display.
8.Select a destination and press the control-
ler.
The scope of the information and
symbols is dependent on the respec-
tive navigation DVD.<
9.Select the desired menu item:
>To adopt the address in the destination
list and start the destination guidance:
Page 153 of 294

Navigation
Driving tips
151Reference
At a glance
Controls
Communications
Entertainment
Mobility
Select the symbol and press the
controller.
>To establish a telephone connection:
Select the symbol and press the con-
troller.
>To display additional destinations:
Select the symbol and press the
controller.
>To start a new search:
Select the symbol and press the con-
troller.
To exit the menu:
Select the arrow and press the controller.
Symbols in map view
If, for example, you have selected the category
Hotels, the hotels are shown on the map as
symbols.
To hide the symbols in the map view:
1.Select the symbol and press the controller.
2.Select "Hide map icons" and press the con-
troller.
The symbols are hidden.
To display the symbols:
Select "Show map icons" and press the con-
troller.
To exit the menu:
Select the arrow and press the controller.
Destination list
The last 20 entered destinations are shown in
the destination list. You can display these desti-
nations and adopt them in the destination guid-
ance system.For example, to plan a longer route, you can
store all destinations you want to drive to in
advance in the destination list, refer to Entering
a destination manually on page144.
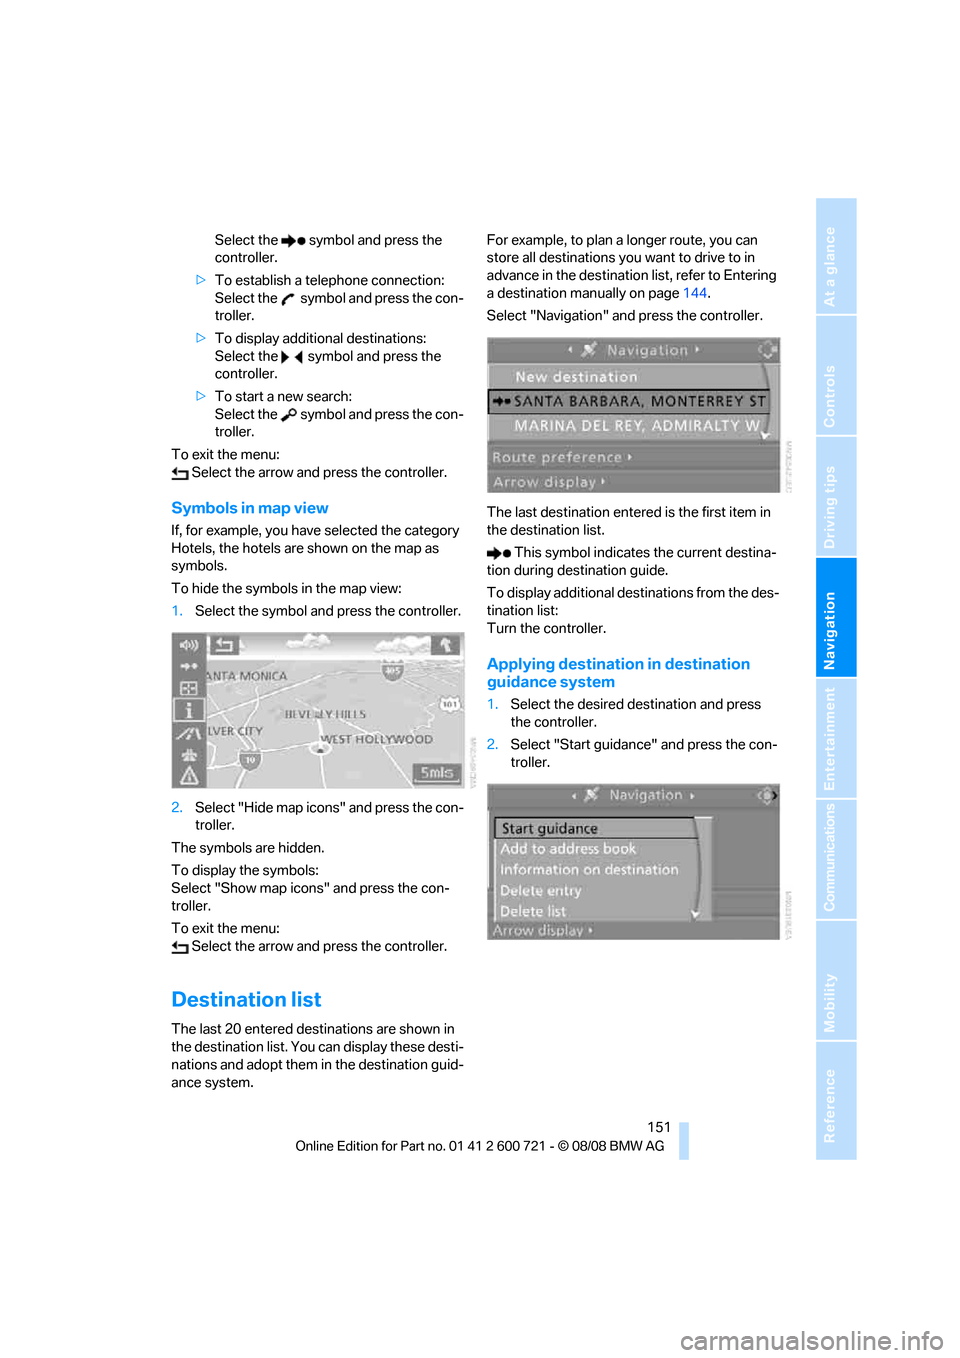
Select "Navigation" and press the controller.
The last destination entered is the first item in
the destination list.
This symbol indicates the current destina-
tion during destination guide.
To display additional destinations from the des-
tination list:
Turn the controller.
Applying destination in destination
guidance system
1.Select the desired destination and press
the controller.
2.Select "Start guidance" and press the con-
troller.
Page 164 of 294

Destination guidance
162 3.Select "Traffic Info" and press the control-
ler.
First the traffic information along the planned
route is shown sorted according to the distance
to the current vehicle position.
Depiction of traffic information in map
view
The traffic information symbols are shown in
the map view up to a scale of 100 miles/200 km.
The section of the route affected by a traffic
report as well as the number for the type of inci-
dent are displayed and hidden. This occurs as a
function of the scale selected.
Displaying detailed traffic information
Select a traffic information item from the list and
press the controller.
To exit from the menu:
Select the arrow and press the controller.
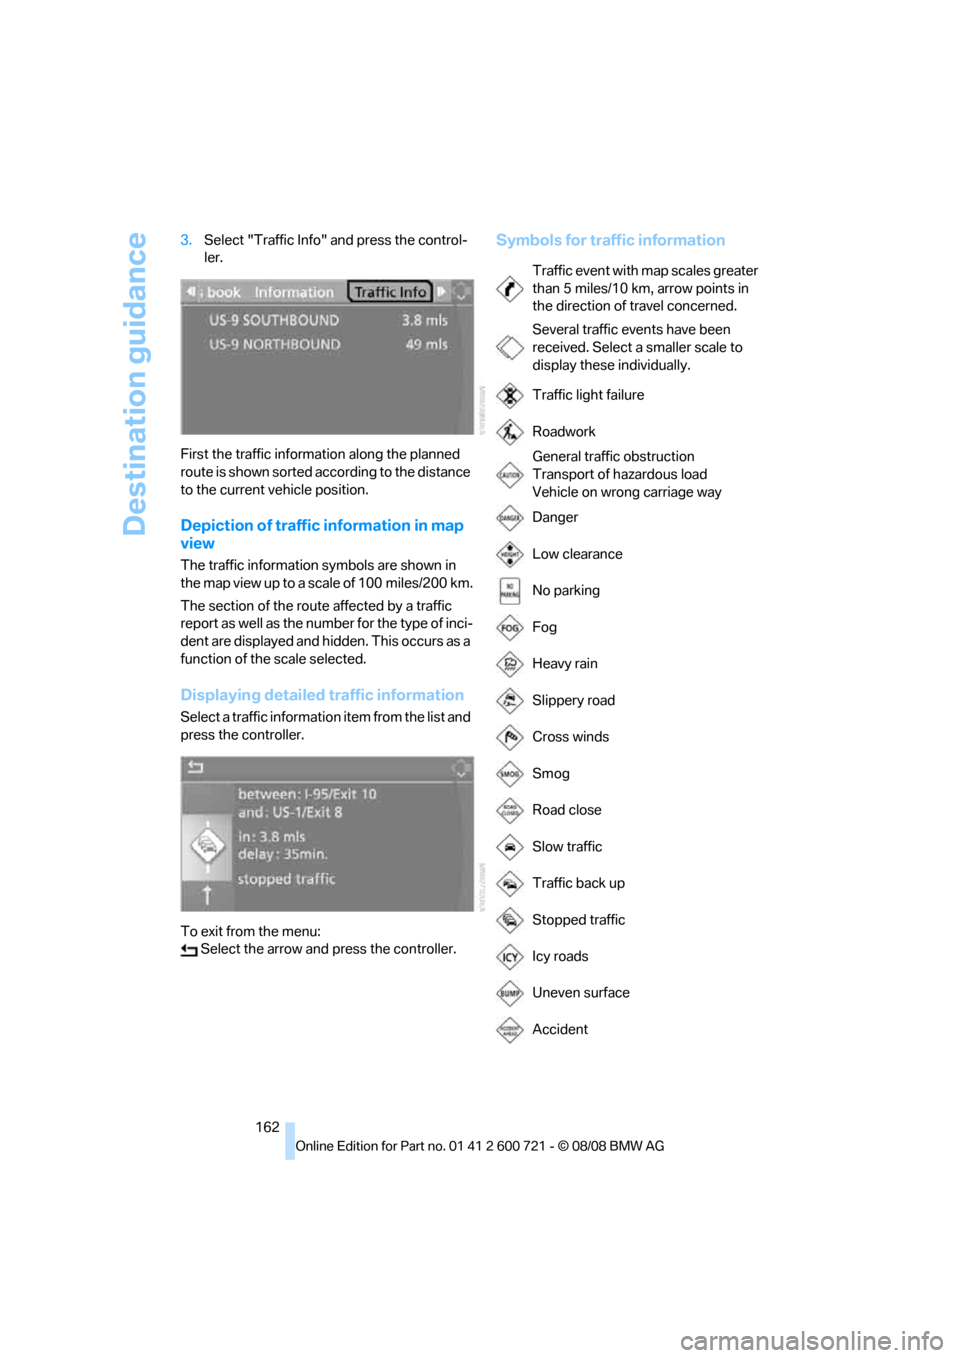
Symbols for traffic information
Traffic event with map scales greater
than 5 miles/10 km, arrow points in
the direction of travel concerned.
Several traffic events have been
received. Select a smaller scale to
display these individually.
Traffic light failure
Roadwork
General traffic obstruction
Transport of hazardous load
Vehicle on wrong carriage way
Danger
Low clearance
No parking
Fog
Heavy rain
Slippery road
Cross winds
Smog
Road close
Slow traffic
Traffic back up
Stopped traffic
Icy roads
Uneven surface
Accident
Page 280 of 294

Everything from A to Z
278 Head restraints51
– active front head
restraints51
– removing52
– sitting safely47
Head-Up Display102,103
Heated
– mirrors55
– rear window116
– seats53
– steering wheel56
Heating114
– exterior mirrors55
– interior114
– rear window116
– residual heat117
– seats53
– steering wheel56
Heating with engine switched
off, refer to Residual
heat117
Heavy cargo, refer to Securing
cargo138
Height, refer to
Dimensions261
Height adjustment
– seats48
– steering wheel56
High-beam
assistant110,112
High beams110
– headlamp flasher110
– indicator lamp13
– replacing bulbs245
High Definition Radio176
High-pressure cleaning
jets239,240
High water, refer to Driving
through water136
Hill Descent Control HDC93
Hills136
Holder for cups125
"Home address" in
navigation154
Homepage of BMW4
Hood232
Hooks for shopping bags,
Sports Wagon130Horn10
Hotel function, refer to
Locking separately36
Hot exhaust system135
"Hour memo"88
"House number" in
destination entry
147
Hydraulic brake assistant,
refer to Brake assistant91
Hydroplaning135
I
IBOC, refer to High Definition
Radio176
Ice, refer to Outside
temperature warning79
ID3 tag, refer to Information on
track184
Identification mark
– recommended tire
brands230
– run-flat tires229
– tire coding227
iDrive16
– assistance window21
– automatic climate control
with expanded scope115
– changing date and time87
– changing language89
– changing menu page20
– changing settings87
– changing units of measure
and display type89
– confirming selection or
entry20
– controller16
– controls16
– displays, menus18
– operating principle18
– selecting menu item20
– setting brightness88
– start menu18
– status information21
– symbols19
Ignition62
– switched off63
– switched on62Ignition key, refer to Keys/
remote control30
Ignition key position 1, refer to
Radio readiness62
Ignition key position 2, refer to
Ignition on62
Ignition lock62
– starting engine with comfort
access42
i menu18
Imprint2
Indicator/warning lamps
– ABS Antilock Brake
System94
– active steering100
– airbags102
– brake system94
– DSC13,92
– DTC13,92
– Flat Tire Monitor96
– fog lamps
13
– safety belt warning52
– TPM Tire Pressure
Monitor98
Indicator and warning
lamps13
Inflation pressure, refer to Tire
inflation pressure222
Inflation pressure monitoring,
refer to Flat Tire Monitor95
Inflation pressure monitoring,
refer to TPM Tire Pressure
Monitor97
Info menu18
Information
– on another location150
– on current position150
– on destination location150
"Information" in
navigation150
Information menu, refer to
imenu18
"Information on
destination"152
"Info sources"82