2009 BMW 525XI TOURING navigation system
[x] Cancel search: navigation systemPage 113 of 294

Controls
111Reference
At a glance
Driving tips
Communications
Navigation
Entertainment
Mobility
and low beams, reacting to oncoming traffic,
vehicles ahead of you, and sufficiently lit areas,
e.g. in built-up zones.
Manually switching between high
beams and low beams
If you wish or the situation requires, you can
intervene at any time.
>If the high-beam assistant has switched on
the high beams, but you wish to use the low
beams, just switch on the low beams with
the turn signal lever. This deactivates the
high-beam assistant.
In order to reactivate the system, briefly
press the turn signal lever in the high-beam
direction.
>If the high-beam assistant has switched on
the low beams, but you wish to use the high
beams, simply switch on the high beams as
usual. This deactivates the system and it is
up to you to switch back to low beams.
In order to reactivate the system, briefly
press the turn signal lever in the high-beam
direction.
>When the low beams are on, use the head-
lamp flasher as usual.
System limits
The high-beam assistant is designed to
maximize the amount of time that high
beams can be safely used and to quickly switch
back to low beams when traffic approaches.
The system cannot completely replace driver
intervention when unusual conditions are
encountered. For this reason, switch to low
beams when circumstances so dictate. Failure
to do so can pose a safety risk.<
Below are a few examples of situations in which
the system may not react or may only function
to a limited degree, requiring personal interven-
tion:
>in extremely unfavorable weather condi-
tions such as fog or heavy precipitation
>in sensing road users with poor inherent
illumination such as pedestrians, cyclists,
equestrians, horse-drawn vehicles, railroad or shipping traffic close to the road, and at
deer crossings
>in tight curves, on steep crests or dips, with
cross-traffic, or with partially hidden
oncoming traffic on divided highways
>in poorly illuminated areas and in the pres-
ence of highly reflective signs
>in the low speed range
>when the windshield is fogged up, dirty or
covered with stickers, decals etc. in the area
of the inside rearview mirror
>when the sensor is dirty. Clean the sensor
on the front side of the inside rearview mir-
ror with a cloth slightly moistened with glass
cleaner
Moreover, no system can operate without limi-
tations. High-beam assistant operation is sub-
ject to conditions that may reduce the system's
ability to recognize the difference between
actual vehicle head lamps or tail lamps and, for
example, highly reflective signs, markers, and
streetlights. To be on the safe side, the system
may periodically interpret these situations as
conditions that require low beams. Below are
some of the situations in which premature
switching to low beams can occur:
>approaching large and/or highly reflective
signs
>approaching certain lights, such as drive-
way lighting and porch lights
>approaching certain traffic signals
>approaching large reflective markers
In these situations, the system may interpret
the above conditions as a vehicle ahead requir-
ing a switch to low beams. When the conditions
return to normal, the system will reactivate the
high beams.
The high-beam assistant cannot replace the
driver's responsibility for complying with state
laws on high-beam switching or for adapting to
visibility and traffic conditions.
Switching off via iDrive
iDrive, for operating principle refer to page16.
Page 119 of 294

Controls
117Reference
At a glance
Driving tips
Communications
Navigation
Entertainment
Mobility
6.Turn the controller to adjust the air distribu-
tion.
Driver's side:
1Air directed toward the windshield and side
windows
2Air for the upper body
3Air to footwell
Front passenger side:
4Air for the upper body
5Air to footwell
Pressing the AUTO button cancels the
manual air distribution settings.<
The automatic mode for the air volume remains
effective with manual air distribution.
Switching cooling function on and off
The cooling function cools and
dehumidifies the incoming air
before also reheating it as
required, according to the temperature setting.
This function is only available when the engine
is running.
The cooling function helps to avoid condensa-
tion on the window surfaces or to quickly
remove them.
Depending on the weather, the windshield may
fog over briefly when the engine is started.
The cooling function is also switched on with
the AUTO program.
Maximum cooling
Maximally cooled air is obtained as
quickly as possible at an outside
temperature above approx. 327/
06 and with the engine running.At the lowest temperature, the automatic cli-
mate control switches into recirculating air
mode. The maximum air volume flows out of the
vents for the upper body. Therefore, open these
vents for maximum cooling.
AUC Automatic recirculated-air
control/recirculated-air mode
You can respond to pollutants or
unpleasant odors in the immediate
environment by suspending the
supply of outside air. The system then recircu-
lates the air currently within the vehicle. During
AUC operation, a sensor detects pollutants in
the outside air and controls the shut-off auto-
matically.
By pressing the button repeatedly, you can
request three operating modes:
>LED off: outside air flows in continuously.
>Right LED on, AUC mode: the system
detects pollutants in the outside air and
shuts off the supply as needed.
>Left LED on, recirculated-air mode: the
supply of outside air is permanently shut off.
Should the windows fog up in the recircu-
lated-air mode, press the AUTO button or
switch off the recirculated-air mode and
increase the air volume if necessary.
The recirculated-air mode should not be used
over an extended period of time, as the air qual-
ity inside the vehicle deteriorates continu-
ously.<
Residual heat
The heat stored in the engine is
used to heat the passenger com-
partment, e.g. while stopped at a
school to pick up a child.
1.Switch off the engine.
2.Turn to the right, refer to arrow.
The function can be switched on when the fol-
lowing conditions are met:
>up to 15 minutes after switching off the
engine
>with engine at operating temperature
Page 121 of 294

Controls
119Reference
At a glance
Driving tips
Communications
Navigation
Entertainment
Mobility
The air emerges through the upper body region
vent outlets in the instrument panel. These vent
outlets must be open for the system to operate.
The parked car ventilation is operated via iDrive.
Switching on and off directly
iDrive, for operating principle refer to page16.
1.Open the start menu.
2.Move the controller to the left to open "Cli-
mate".
3.Select "Parked car operation" and press the
controller.
4.Select "Automatic ventilation" and press
the controller.
5.Select "Parked car ventilation" and press
the controller.
The parked-car ventilation is switched on.
The symbol on the display of the automatic
climate control flashes.
Preselecting activation times
1.Open the start menu.
2.Move the controller to the left to open "Cli-
mate".
3.Select "Parked car operation" and press the
controller.
4.Select "Activation time" and press the con-
troller.5.Move the controller to the left or right to
select "Timer 1" or "Timer 2".
6.Select the time and press the controller.
The first setting of the time display is
selected.
7.Turn the controller to make the adjustment.
8.Press the controller to apply the setting.
The next setting is selected.
9.Make the remaining adjustments. After the
last adjustment, the time is stored.
Activating activation time
Move the controller to the left or right to select
"Timer 1" or "Timer 2" and press the controller.
The activation time is activated.
The symbol on the display of the automatic
climate control lights up.
Page 123 of 294
Controls
121Reference
At a glance
Driving tips
Communications
Navigation
Entertainment
Mobility
Practical interior accessories
Integrated universal remote
control*
The concept
The integrated universal remote control can
replace as many as three hand-held transmit-
ters for various remote-controlled accessories,
such as garage and gate or lighting systems.
The integrated universal remote control regis-
ters and stores signals from the original hand-
held transmitters.
The signal of an original hand-held transmitter
can be programmed on one of the three mem-
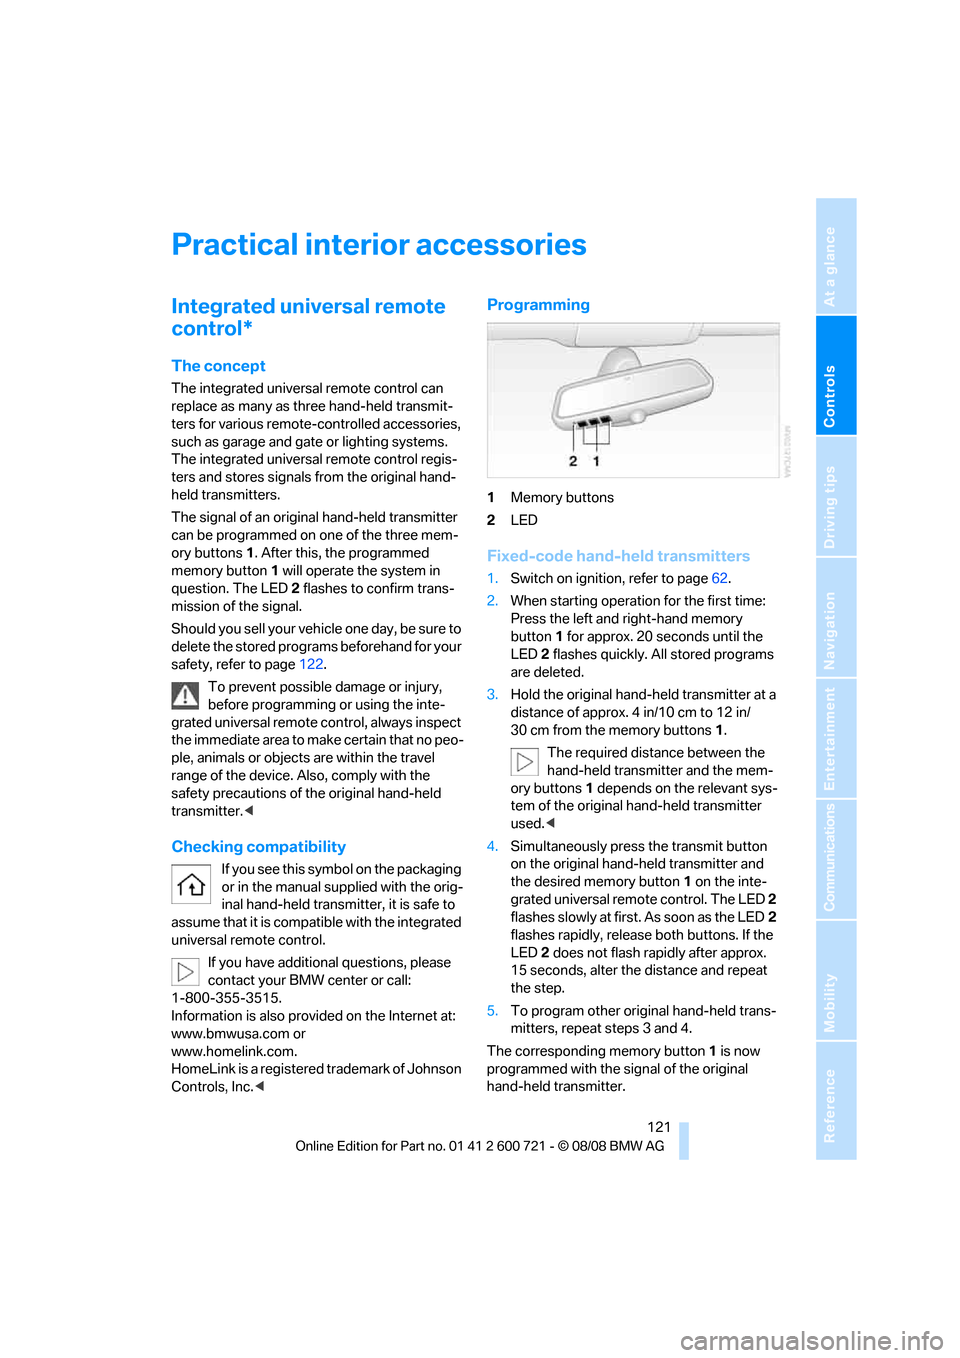
ory buttons1. After this, the programmed
memory button1 will operate the system in
question. The LED2 flashes to confirm trans-
mission of the signal.
Should you sell your vehicle one day, be sure to
delete the stored programs beforehand for your
safety, refer to page122.
To prevent possible damage or injury,
before programming or using the inte-
grated universal remote control, always inspect
the immediate area to make certain that no peo-
ple, animals or objects are within the travel
range of the device. Also, comply with the
safety precautions of the original hand-held
transmitter.<
Checking compatibility
If you see this symbol on the packaging
or in the manual supplied with the orig-
inal hand-held transmitter, it is safe to
assume that it is compatible with the integrated
universal remote control.
If you have additional questions, please
contact your BMW center or call:
1-800-355-3515.
Information is also provided on the Internet at:
www.bmwusa.com or
www.homelink.com.
HomeLink is a registered trademark of Johnson
Controls, Inc.<
Programming
1Memory buttons
2LED
Fixed-code hand-held transmitters
1.Switch on ignition, refer to page62.
2.When starting operation for the first time:
Press the left and right-hand memory
button1 for approx. 20 seconds until the
LED2 flashes quickly. All stored programs
are deleted.
3.Hold the original hand-held transmitter at a
distance of approx. 4 in/10 cm to 12 in/
30 cm from the memory buttons1.
The required distance between the
hand-held transmitter and the mem-
ory buttons1 depends on the relevant sys-
tem of the original hand-held transmitter
used.<
4.Simultaneously press the transmit button
on the original hand-held transmitter and
the desired memory button 1 on the inte-
grated universal remote control. The LED 2
flashes slowly at first. As soon as the LED2
flashes rapidly, release both buttons. If the
LED2 does not flash rapidly after approx.
15 seconds, alter the distance and repeat
the step.
5.To program other original hand-held trans-
mitters, repeat steps 3 and 4.
The corresponding memory button 1 is now
programmed with the signal of the original
hand-held transmitter.
Page 129 of 294
Controls
127Reference
At a glance
Driving tips
Communications
Navigation
Entertainment
Mobility
In rear center console
Depending on the equipment, the sockets in
the rear are covered with caps or equipped with
a lighter. Refer to Cigarette lighter, front,
page125.
Access to socket:
Remove respective cap or lighter.
Center armrest, rear
Storage tray:
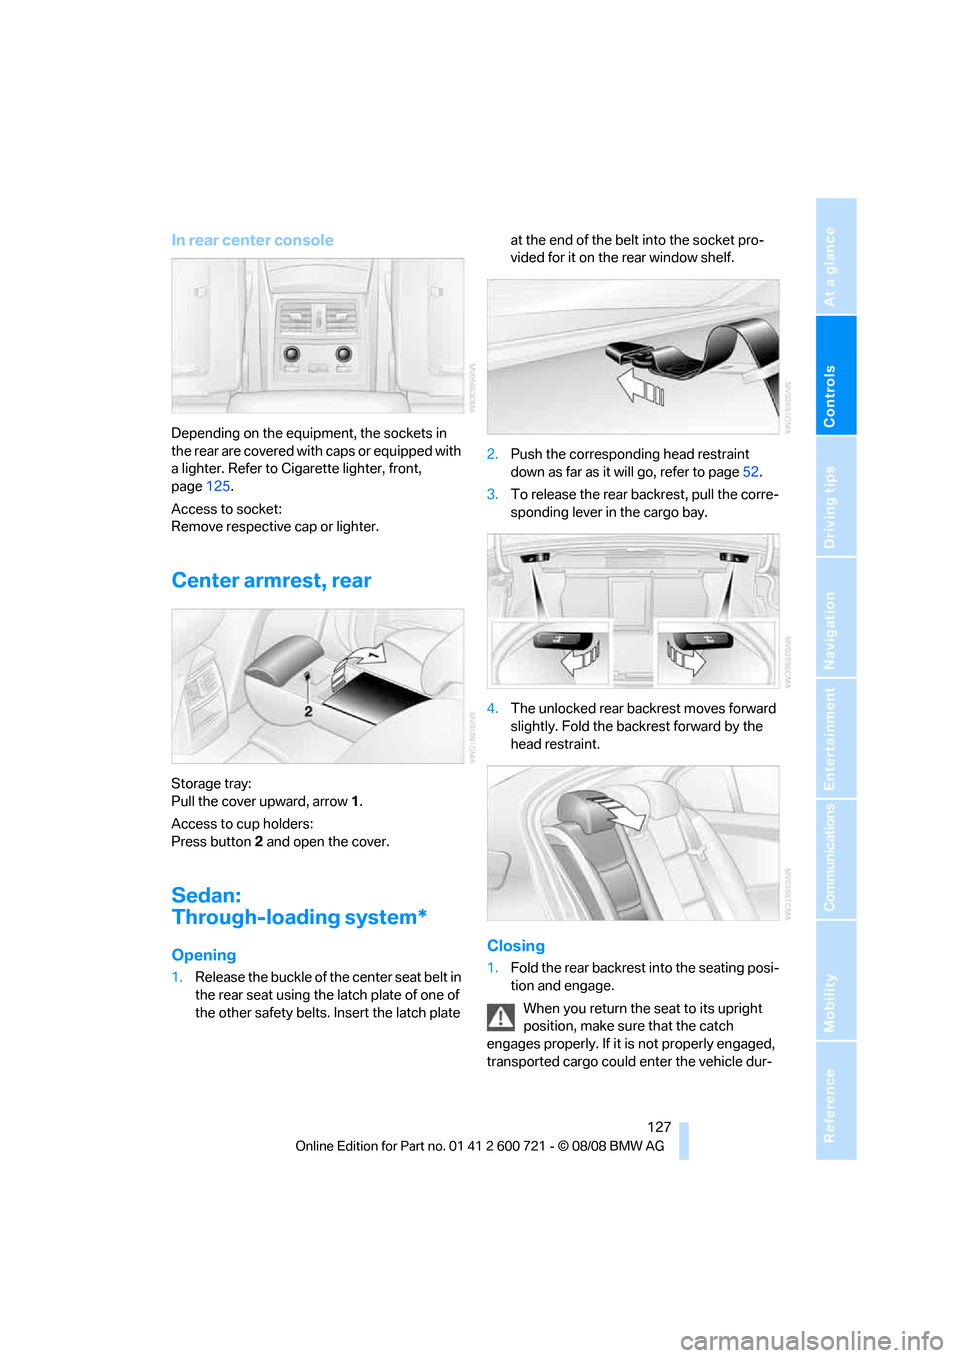
Pull the cover upward, arrow1.
Access to cup holders:
Press button2 and open the cover.
Sedan:
Through-loading system*
Opening
1.Release the buckle of the center seat belt in
the rear seat using the latch plate of one of
the other safety belts. Insert the latch plate at the end of the belt into the socket pro-
vided for it on the rear window shelf.
2.Push the corresponding head restraint
down as far as it will go, refer to page52.
3.To release the rear backrest, pull the corre-
sponding lever in the cargo bay.
4.The unlocked rear backrest moves forward
slightly. Fold the backrest forward by the
head restraint.
Closing
1.Fold the rear backrest into the seating posi-
tion and engage.
When you return the seat to its upright
position, make sure that the catch
engages properly. If it is not properly engaged,
transported cargo could enter the vehicle dur-
Page 137 of 294
Driving tips
135Reference
At a glance
Controls
Communications
Navigation
Entertainment
Mobility
Thinking ahead when driving
Avoid unnecessary acceleration and braking.
To do so, maintain the appropriate distance
from the vehicle in front of you. An anticipatory
and smooth driving style reduces fuel con-
sumption.
Avoiding high engine speeds
Use 1st gear only for starting off. Accelerate
rapidly in 2nd gear and above. Avoid high
engine speeds in doing so and shift into the
next gear early.
When you have reached the desired speed,
shift into the highest possible gear and drive
with the lowest possible engine speed while
maintaining a constant a vehicle speed.
In general: driving at a low engine speed
reduces fuel consumption and minimizes wear.
Taking advantage of coasting
When approaching a red light, let off the gas
and allow the vehicle to coast to a stop in the
highest possible gear.
On steep roadways, let off the gas and allow the
vehicle to roll in the appropriate gear.
The flow of fuel is interrupted when coasting.
Switching off the engine during longer
stops
Switch off the engine at longer stops such as
traffic signals, railroad crossings, or in traffic
jams. Even having the engine switched off for
approx. 4 seconds results in fuel savings.
Switching off functions currently not
required
Functions such as the cooling function of the
automatic climate control, seat heating or rear
window defroster draw large amounts of power
and consume additional fuel. Their influence is
particularly pronounced in city traffic and stop &
go operation. For this reason, it is a good idea to
switch these functions off when they are not
really needed.
Having maintenance carried out
Have the vehicle serviced regularly in order to
achieve the optimum economy and service life
of your vehicle. BMW recommends having the
maintenance performed by a BMW center. Also
please pay attention to the BMW maintenance
system, refer to page237.
General driving notes
Closing luggage compartment lid/
tailgate
Operate the vehicle only when the lug-
gage compartment lid/tailgate is com-
pletely closed. Otherwise, exhaust fumes could
enter the interior of the vehicle.<
If it is absolutely necessary to drive with the lug-
gage compartment lid open:
1.Close all windows and the glass sunroof or
panorama glass sunroof.
2.Increase the air volume of the automatic cli-
mate control to a high level, refer to
page116.
Hot exhaust system
As in all vehicles, extremely high temper-
atures are generated on the exhaust sys-
tem. Do not remove the heat shields installed
adjacent to it, and never apply undercoating to
them. When driving, standing at idle and while
parking take care to avoid possible contact
between the hot exhaust system and any highly
flammable materials such as hay, leaves, grass,
etc. Such contact could lead to a fire, and with it
the risk of serious property damage as well as
personal injury. Do not touch hot exhaust tail
pipes. Otherwise there is a risk of burns.<
Hydroplaning
When driving on wet or slushy roads,
reduce road speed. If you do not, a wedge
of water can form between tires and road sur-
face. This phenomenon is referred to as hydro-
planing, and is characterized by a partial or
complete loss of contact between the tires and
Page 141 of 294
Driving tips
139Reference
At a glance
Controls
Communications
Navigation
Entertainment
Mobility
Roof-mounted luggage rack*
A special rack system is available as an option
for your BMW. Please comply with the precau-
tions included with the installation instructions.
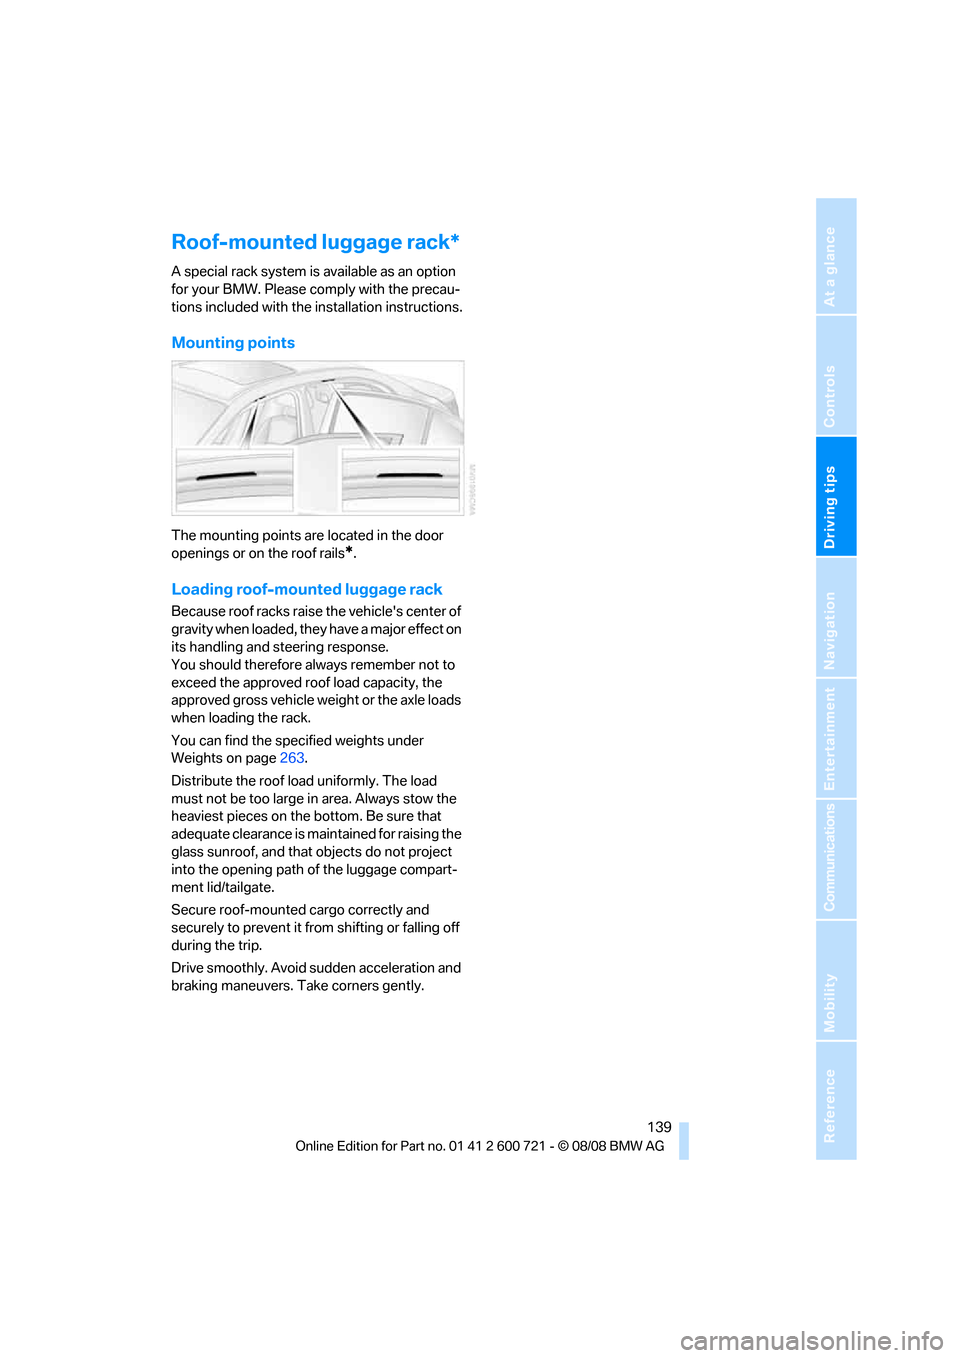
Mounting points
The mounting points are located in the door
openings or on the roof rails
*.
Loading roof-mounted luggage rack
Because roof racks raise the vehicle's center of
gravity when loaded, they have a major effect on
its handling and steering response.
You should therefore always remember not to
exceed the approved roof load capacity, the
approved gross vehicle weight or the axle loads
when loading the rack.
You can find the specified weights under
Weights on page263.
Distribute the roof load uniformly. The load
must not be too large in area. Always stow the
heaviest pieces on the bottom. Be sure that
adequate clearance is maintained for raising the
glass sunroof, and that objects do not project
into the opening path of the luggage compart-
ment lid/tailgate.
Secure roof-mounted cargo correctly and
securely to prevent it from shifting or falling off
during the trip.
Drive smoothly. Avoid sudden acceleration and
braking maneuvers. Take corners gently.
Page 143 of 294
Navigation
This chapter describes how to enter
destinations and specify your route so that the
navigation system can guide you reliably to your
destination.
Navigation