2009 BMW 525XI TOURING ESP
[x] Cancel search: ESPPage 62 of 294

Transporting children safely
60
Sedan
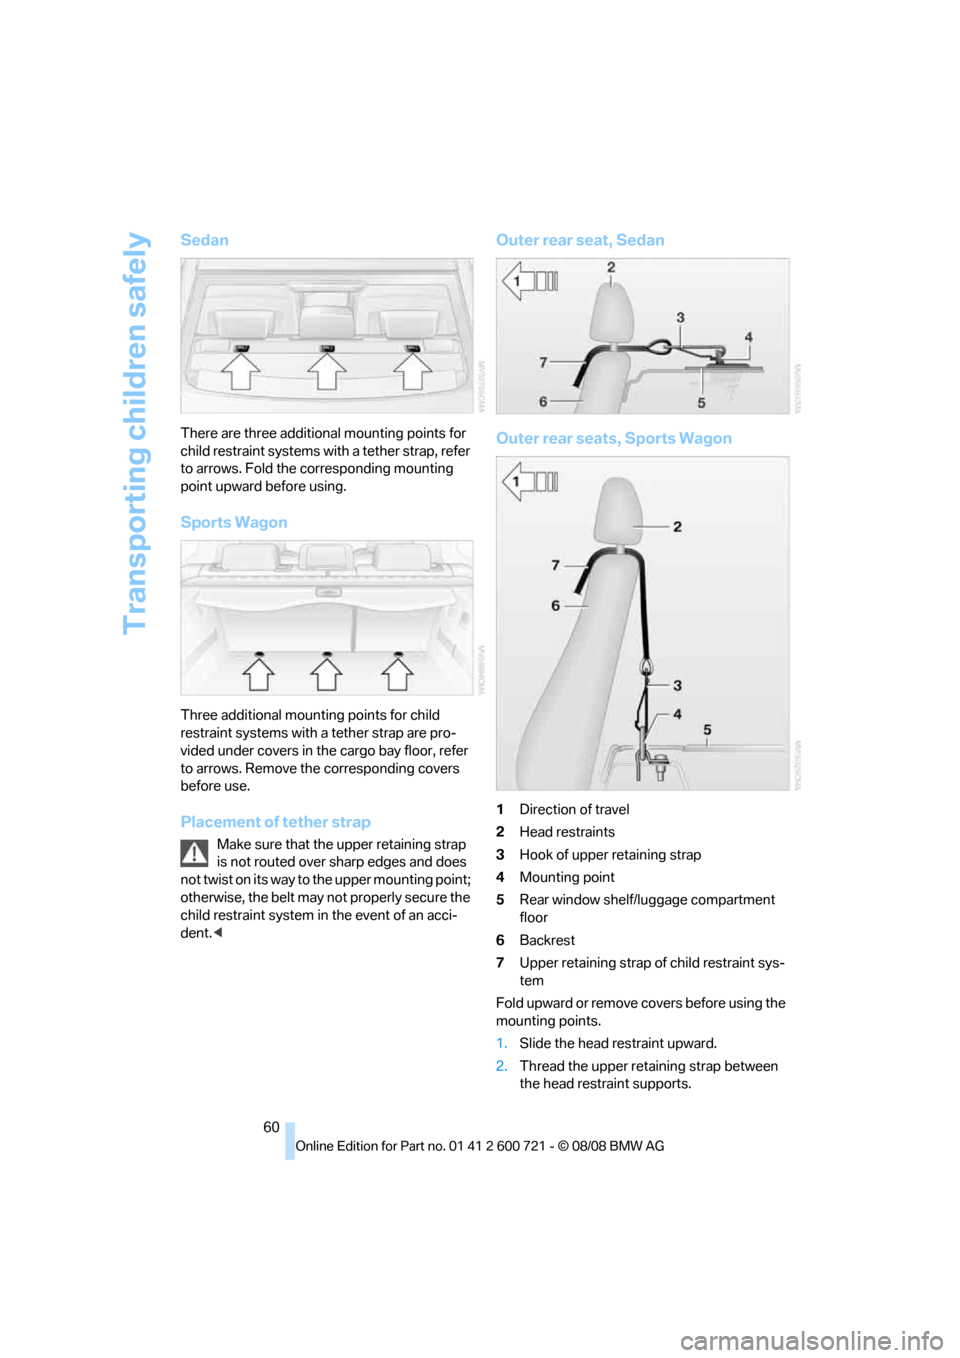
There are three additional mounting points for
child restraint systems with a tether strap, refer
to arrows. Fold the corresponding mounting
point upward before using.
Sports Wagon
Three additional mounting points for child
restraint systems with a tether strap are pro-
vided under covers in the cargo bay floor, refer
to arrows. Remove the corresponding covers
before use.
Placement of tether strap
Make sure that the upper retaining strap
is not routed over sharp edges and does
not twist on its way to the upper mounting point;
otherwise, the belt may not properly secure the
child restraint system in the event of an acci-
dent.<
Outer rear seat, Sedan
Outer rear seats, Sports Wagon
1Direction of travel
2Head restraints
3Hook of upper retaining strap
4Mounting point
5Rear window shelf/luggage compartment
floor
6Backrest
7Upper retaining strap of child restraint sys-
tem
Fold upward or remove covers before using the
mounting points.
1.Slide the head restraint upward.
2.Thread the upper retaining strap between
the head restraint supports.
Page 69 of 294

Controls
67Reference
At a glance
Driving tips
Communications
Navigation
Entertainment
Mobility
5.Insert a screwdriver from the onboard tool
kit, refer to page243, into the opening,
arrow1.
6.Pull the screwdriver toward the rear until it is
heard to engage, arrow2, and leave it
inserted in the opening. The transmission
lock is released.
Locking
1.Pull out the screwdriver upward.
The transmission lock is locked again.
2.Reinstall the cover and the trim piece.
Information on jump starting and towing from
page254.
Sport automatic
transmission*
You can also shift manually with two shift pad-
dles on the steering wheel.
You can also choose between two driving pro-
grams: Normal or Sport, refer to Dynamic Driv-
ing Control.
Shift paddles on steering wheel
The shift paddles allow you to shift gears
quickly, as both hands can remain on the steer-
ing wheel.
>When you use the shift paddles on the
steering wheel to shift gears in automatic
mode, the gearshift system switches into
the manual mode.
>If you do not shift with the shift paddles and
do not accelerate for a certain time, the sys-
tem switches into the automatic mode
again when the selector lever is in D.
>To shift up: pull one of the shift paddles.
>To shift down: press one of the shift pad-
dles.
Dynamic Driving Control
The Dynamic Driving Control makes it possible
for your BMW to react in an even more perfor-
mance-oriented manner at the push of a button:
>The speed range of the engine is optimally
utilized.
>Gearshifts are faster.
>The engine responds more spontaneously
to accelerator pedal movements.
>The steering will operate in an even sportier
mode.
>In the automatic mode, the 6th gear is not
engaged.
Page 74 of 294

Driving
72 Active cruise control represents a technological
advance over the familiar cruise control and is a
welcome relief from the constant adjustment of
speed that can accompany driving in traffic on
freeways or other high-speed thoroughfares.
Especially on longer trips and in traffic conges-
tion, the system can reduce fatigue and tension,
while increasing your enjoyment of driving.
Please use it safely and responsibly.
In addition to holding a steady cruising speed, if
you encounter slower vehicles ahead, active
cruise control will, within limits, adjust your
vehicle's speed automatically so that you can
flow with the traffic without having to make con-
stant adjustments. If, for example, while cruis-
ing at the selected speed, you begin to
approach a slower vehicle ahead of you in the
same lane, the system will reduce your vehicle's
speed to the same as that of the vehicle ahead
to maintain your selected distance setting. You
can vary the following distance, which will vary
with speed. Based on your selected distance
setting, the system automatically decreases the
throttle setting and lightly applies the brakes if
necessary. In addition, if the vehicle ahead of
you slows to a complete stop, the system can
follow this action within the given scope and
can also accelerate from a complete stop if the
vehicle ahead of you drives off again shortly
thereafter. During braking, your vehicle brake
lamps will automatically illuminate to alert a fol-
lowing driver to take action. In addition, it may
be necessary for your vehicle to downshift the
automatic transmission to maintain the dis-
tance setting selected. As soon as the road in
front of you has no moving vehicles, the system
will accelerate to your desired speed. This set
speed is also maintained on downhill grades,
however the vehicle speed can drop below the
set speed when driving uphill if the engine out-
put is not sufficient.
Active cruise control cannot detect stop
signs, red lights, or any object that is
stopped or is blocking the road.
Active cruise control is not and must not be
used as a collision avoidance/warning system.
Since this active cruise control system is a new
technology and operates differently from con-ventional cruise control systems which you may
be accustomed to, it is necessary that you read
all of the pages relating to this system before
use. Carefully read and observe the information
on the system limitations beginning on page76
to obtain a good command of the system and its
range of applications.<
Brake pedal feel
When the system brakes and you also depress
the brake pedal, a somewhat different braking
feel results.
Professional* navigation system
If a navigation DVD is in the drive, refer to
page142, within limits the system adjusts the
accelerating and braking behavior of the vehicle
to the road you are driving on.
To ensure that the system is informed of
the current course of the road, always use
the latest navigation DVD if possible.<
When the vehicle position is unknown, e. g.
when you leave the map area, this influence of
the navigation system is not available.
Applications
Please try the system first during sparse traffic
and clear road conditions so that you can get
used to the system. After you have experience
and understand the system, only then use it
during normal traffic.
As with conventional cruise control systems,
active cruise control in no way reduces or sub-
stitutes for the driver's own personal experi-
ence, responsibility, alertness and awareness in
adjusting speed, braking or otherwise control-
ling the vehicle. The driver should decide when
to use the system on the basis of road, traffic,
visibility, and weather conditions. Active cruise
control is intended for use on highway-type
roadways where traffic is moving relatively
smoothly as well as in slow-moving traffic. Do
not use the system in city driving; in complex
driving situations; heavy traffic such as during
rush hour; on curvy, winding roads, slippery
roads or roads with sharp curves such as high-
way off-ramps; during inclement weather such
Page 75 of 294

Controls
73Reference
At a glance
Driving tips
Communications
Navigation
Entertainment
Mobility
as snow, strong rain or fog; or when entering
interchanges, service/parking areas or toll
booths. It is also important to regulate your
vehicle's speed and distance setting within
applicable legal limits. Always be ready to take
action or apply the brakes if necessary, espe-
cially when the system is actively following a
vehicle in front of you. Otherwise, driving condi-
tions can result which lead to a violation of the
law or elevated risk of an accident.
The minimum initial activation speed is 20 mph/
30 km/h, and the maximum speed is 110 mph/
180 km/h. However, you can also activate the
system while stopped, refer to While stopped,
page74.
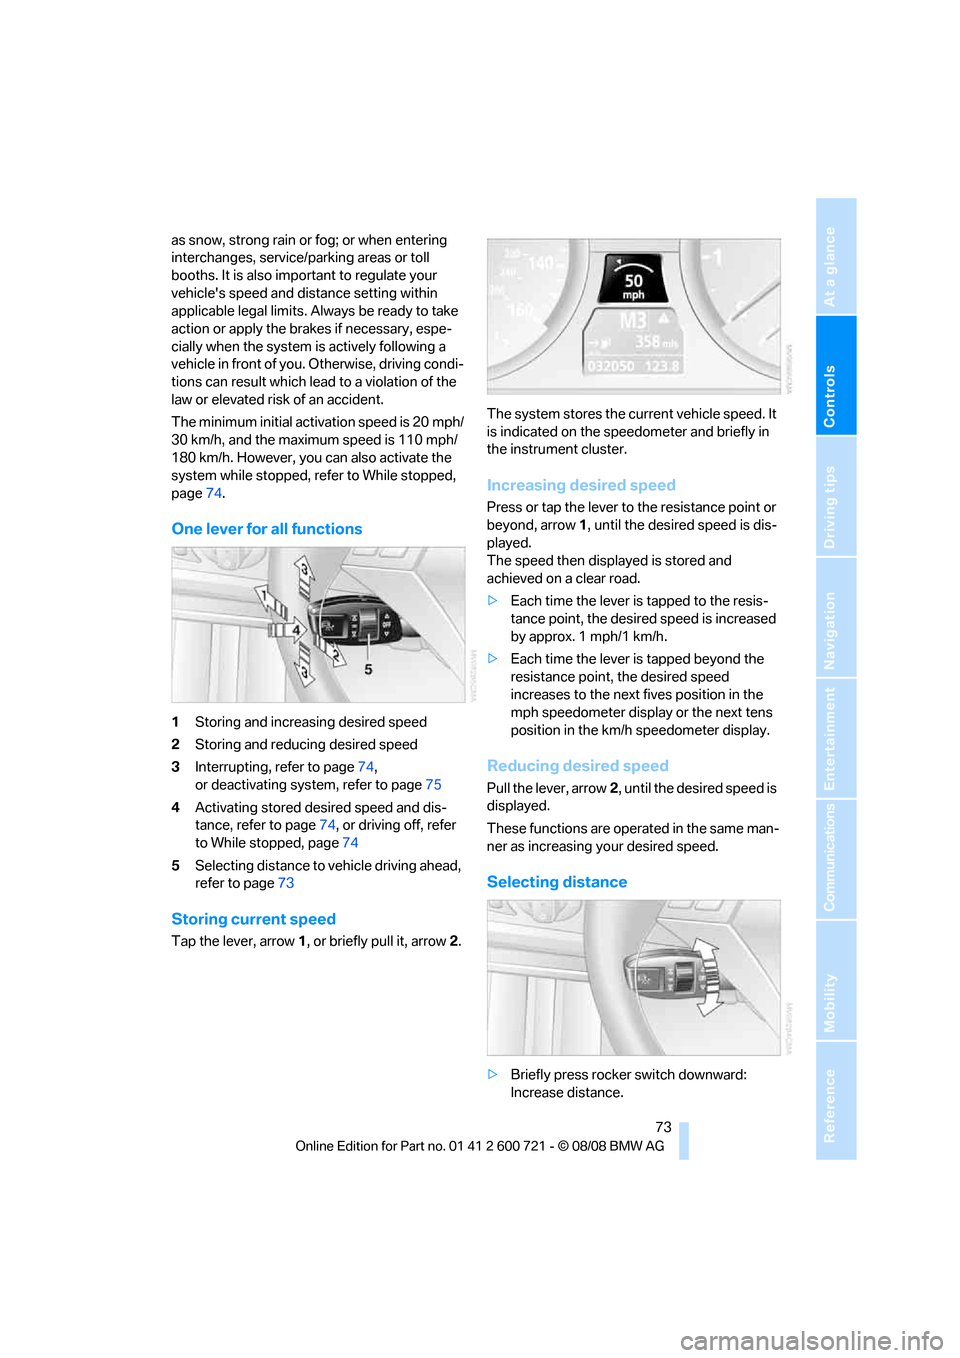
One lever for all functions
1Storing and increasing desired speed
2Storing and reducing desired speed
3Interrupting, refer to page74,
or deactivating system, refer to page75
4Activating stored desired speed and dis-
tance, refer to page74, or driving off, refer
to While stopped, page74
5Selecting distance to vehicle driving ahead,
refer to page73
Storing current speed
Tap the lever, arrow1, or briefly pull it, arrow2.The system stores the current vehicle speed. It
is indicated on the speedometer and briefly in
the instrument cluster.
Increasing desired speed
Press or tap the lever to the resistance point or
beyond, arrow1, until the desired speed is dis-
played.
The speed then displayed is stored and
achieved on a clear road.
>Each time the lever is tapped to the resis-
tance point, the desired speed is increased
by approx. 1 mph/1 km/h.
>Each time the lever is tapped beyond the
resistance point, the desired speed
increases to the next fives position in the
mph speedometer display or the next tens
position in the km/h speedometer display.
Reducing desired speed
Pull the lever, arrow2, until the desired speed is
displayed.
These functions are operated in the same man-
ner as increasing your desired speed.
Selecting distance
>Briefly press rocker switch downward:
Increase distance.
Page 77 of 294

Controls
75Reference
At a glance
Driving tips
Communications
Navigation
Entertainment
Mobility
If you are stopped behind a vehicle with the
brake pedal depressed and the system is inter-
rupted or deactivated:
1.Press button4 to activate a stored desired
speed or select a desired speed with the
lever, arrow1 or arrow2.
2.Release the brake pedal.
3.If the vehicle in front of you drives off, briefly
depress the accelerator pedal or press
button4.
Deactivating system
>Press the lever upward or downward twice
while driving.
>When stopped, do the same with the brake
pedal depressed.
>Switch off the ignition.
The displays turn off, and the stored desired
speed and distance are deleted.
Displays in instrument cluster
1Stored desired speed
>Green: the system is active.
>Orange: the system is interrupted.
2Lights up yellow: vehicle detected ahead
Display also used for warnings, please read
all information on warnings
3Selected distance to vehicle ahead
The indicator lights up as soon as the sys-
tem is activated
The bars roll: the vehicle in front of you has
driven off
4Brief display of stored desired speedIf the display --- mph/--- km/h appears
briefly, the conditions necessary for oper-
ation may currently not be met.<
Warning lamps
The indicator2 continuously
flashes yellow.
The prerequisites for operating the
system are no longer met, e.g. as a
result of ABS or DSC interven-
tions. The system brakes until you actively take
over.
The indicator2 flashes red; a sig-
nal sounds.
The system indicates that you
must brake and/or maneuver the
vehicle yourself. The system can-
not automatically restore the distance to the
vehicle driving ahead.
However, this display cannot relieve the driver
of the responsibility for adjusting the desired
speed and driving style to the traffic conditions.
Radar sensors
1Long-range sensor
2Location of the short-range sensors behind
the bumper
3Location of the short-range sensors behind
the bumper with the M sports package
*
Heavy rain and also dirt, snow or ice can limit
the detection of vehicles ahead. If needed,
clean the radar sensor under the front bumper
as well as the bumper area covering the short
range sensors. When doing so, be particularly
careful in removing layers of snow and ice.
Page 78 of 294

Driving
76 Do not apply adhesive labels etc. in the area of
the short-range sensors.If the sensor is not aligned properly, e. g. due to
damage, the active cruise control cannot be
activated.
System limitations
As with conventional cruise control sys-
tems, active cruise control in no way
diminishes or substitutes for the driver's own
personal responsibility, alertness and aware-
ness in adjusting speed, braking or otherwise
controlling the vehicle. The driver should
decide when to use the system on the basis of
road, traffic, visibility, and weather conditions.
Active cruise control is intended for use on
highway-type roadways where traffic is moving
relatively smoothly. Do not use this system in
city driving; in complex driving situations; on
curvy, winding roads, slippery roads or roads
with sharp curves such as highway off-ramps;
during inclement weather such as snow, strong
rain or fog; or when entering interchanges, ser-
vice/parking areas or toll booths. It is also
important to regulate your vehicle's speed and
distance setting within applicable legal limits.
Always be ready to take action or apply the
brakes if necessary, especially when the sys-
tem is actively following a vehicle in front of
you.<
Always remember that the range and abil-
ity of the system do have physical limita-
tions. For example, the system may not detect
vehicles driving ahead if they suddenly brake
heavily in stop-and-go traffic during accelera-
tion. The system will not apply the brakes or
slow your vehicle when a very slow-moving
vehicle, stopped vehicle or stationary object is
in the lane ahead of you, for example when
approaching a traffic light or parked vehicle or
when a vehicle is stalled in your lane. Also, the system does not react to oncoming traffic,
pedestrians or other types of potential traffic
s u c h a s a r i d e r o n a h o r s e b a c k . I t i s a l s o p o s s i b l e
that the system may not detect smaller moving
objects such as motorcycles or bicycles. Be
especially alert when encountering any of these
situations as the system will neither automati-
cally brake, nor provide a warning to you. Also,
be aware that every decrease in the distance
setting allows your vehicle to come closer to a
vehicle in front of you and requires a heightened
amount of alertness.<
The system cannot allow the vehicle to drive off
automatically in situations that make driving off
considerably more difficult, e.g. on steep uphill
grades, with a heavy trailer or before raised
areas in the road.
Near radio astronomy stations, the system
radar is deactivated at speeds under 20 mph/
30 km/h due to legal regulations.
Be certain to interrupt the system when
you pull into an exit lane for a highway
offramp.<
Also, vehicles traveling in a staggered manner
on a highway may cause a delay in the system's
reaction to a vehicle in front of you or may cause
the system to react to a vehicle that is actually in
the lane next to yours. Always be ready to take
action or apply the brakes if necessary.
In addition, the system is interrupted
whenever the driver applies the vehicle
brakes, shifts the transmission from drive/D to
Page 80 of 294

Driving
78 case, you can choose to overcome the deceler-
ation by briefly pressing the accelerator pedal.
Driver interventions and your
responsibility
Anytime the driver presses down on the
accelerator pedal, any braking action by
the system is interrupted and the distance indi-
cator goes out until the pedal is fully released.
As soon as you fully release the accelerator, the
system will again control your cruising speed
and distance setting. While driving with the sys-
tem activated, resting your foot on the acceler-
ator pedal will cause the system not to brake
even when necessary. Be certain that floormats
or other objects on the vehicle floor do not inter-
fere with movement of the accelerator pedal.<
While active cruise control is capable of
braking your vehicle automatically when
you approach a slower vehicle ahead, it is
important to be aware that the ability of the sys-
tem to apply the brakes is also limited, e. g.
when you reduce your desired speed sharply. It
uses only a portion of braking system capacity
and does not utilize the full capacity of the vehi-
cle braking system. Therefore, the system can-
not decrease your speed due to large differ-
ences in speed between your vehicle and the
vehicle ahead. Example: when you approach a
vehicle traveling at a much lower speed than
your own speed such as approaching a toll
booth or when a much slower vehicle cuts in
front of you at close range.<
Page 83 of 294

Controls
81Reference
At a glance
Driving tips
Communications
Navigation
Entertainment
Mobility
To reset average fuel consumption: press BC
button on turn signal lever for approx. 2 sec-
onds.
For different routes
You can display the average speed and average
consumption for two different routes on the
Control Display, refer to the following and to
Trip computer
*.
Displays on Control Display
You can also call up the computer via iDrive.
For operating principle refer to page16.
1.Press the button.
This opens the start menu.
2.Move the controller to the right to open
"Navigation".
Without navigation system
*:
Open "Car Data".
3.Select "Car Data" and press the controller.
4.Select "Onboard info" and press the con-
troller.>Estimated time of arrival at destination and
remaining distance:
>Entering a distance manually in the com-
puter, see below.
>Entering a destination in the navigation
system
*, refer to page144.
>Cruising range
>Average speed
>Average fuel consumption
Resetting values
You can reset the values for the average speed
and average fuel consumption:
1.Select the respective menu item and press
the controller.
2.To confirm your selection, press the con-
troller again.
Entering a distance manually
1.Select "Distance to dest." and press the
controller.
2.Turn the controller to select the distance to
your destination.
3.Press the controller to apply the setting.
The distance is automatically preset during the
destination guidance of the navigation sys-
tem
*.
Trip computer*
The trip computer is suitable, for example, for a
vacation trip.
1.Open the start menu.
2.Open "Navigation".
Without navigation system
*:
Open "Car Data".