2009 BMW 525I TOURING radio controls
[x] Cancel search: radio controlsPage 65 of 294

Controls
63Reference
At a glance
Driving tips
Communications
Navigation
Entertainment
Mobility
Radio readiness and ignition switched
off
All indicator and warning lamps in the instru-
ment cluster go out.
Starting the engine
Do not run the engine in closed rooms,
otherwise the inhalation of toxic exhaust
gases can cause unconsciousness and death.
The exhaust gases contain carbon monoxide,
an odorless and colorless, but highly toxic gas.
Never leave an unattended vehicle with the
engine running, as such a vehicle represents a
potential safety hazard.
Before leaving the vehicle with the engine run-
ning, select the idling position, or shift the trans-
mission into position P and firmly apply the
handbrake, otherwise the vehicle can begin to
roll.<
Avoid frequent starting in quick succes-
sion or repeated starting attempts in
which the engine does not start. Otherwise, the
fuel is not burned or inadequately burned and
there is a danger of overheating and damaging
the catalytic converter.<
Do not allow the engine to warm up by leaving it
running while the vehicle remains stationary.
Instead, begin to drive at a moderate engine
speed.
Manual transmission
Remote control in ignition lock or with comfort
access in vehicle, refer to page40.
1.Depress brake pedal.
2.Depress the clutch pedal and shift into
idling position.3.Press the Start/Stop button.
Automatic and sport automatic
transmission*
Remote control in ignition lock or with comfort
access in vehicle, refer to page40.
1.Depress brake pedal.
2.Press the Start/Stop button.
Switching off engine
When leaving the vehicle, always take the
remote control with you.
When parking, firmly apply the handbrake, as
otherwise the vehicle could roll.<
Manual transmission
1.Press the Start/Stop button with the vehicle
stopped.
2.Shift into first gear or reverse.
3.Firmly apply the handbrake.
4.Remove the remote control from the igni-
tion lock, refer to page62.
Automatic and sport automatic
transmission*
1.Shift transmission into position P with the
vehicle stopped.
2.Press the Start/Stop button.
3.Firmly apply the handbrake.
4.Remove the remote control from the igni-
tion lock, refer to page62.
Before driving into a car wash
The vehicle can roll if you proceed according to
the following steps:
1.With comfort access: insert the remote con-
trol into the ignition lock.
2.Depress brake pedal.
3.Shift into transmission position N.
4.Switch off the engine.
Transmission position P will be engaged:
>after approx. 30 seconds
Page 81 of 294

Controls
79Reference
At a glance
Driving tips
Communications
Navigation
Entertainment
Mobility
Everything under control
Odometer, outside
temperature display, clock,
date
1Time, outside temperature and date
2Odometer and trip odometer
3Press button:
>with ignition switched on, trip odometer
is reset
>with ignition switched off, time, outside
temperature, and odometer are briefly
displayed.
From radio readiness the outside temperature
and the time are displayed.
Date retrieval:
Press CHECK button on turn signal lever, refer
to page85.
Time and date setting, refer to page87.
You can set the unit of measure 7 or 6 on the
Control Display, refer to Units of measure on
page89.
Outside temperature warning
If the display drops to +377/+36, a signal
sounds and a warning lamp lights up. A mes-
sage appears on the Control Display. There is
an increased danger of ice.
Even at temperatures above +377/
+36 ice can form. Therefore, drive care-
fully, e.g. on bridges and sections of road in the
shade, otherwise there is an increased accident
risk.<
Tachometer
Avoid engine speeds in the white-striped
advance warning field, arrow1, if possible.
Be sure to avoid engine speeds in the red warn-
ing field, arrow2. At high revs in this range, the
flow of fuel is interrupted to protect the engine.
Coolant temperature
Should the coolant, and with it the engine
become too hot, a warning lamp lights up. In
addition, a message appears on the Control
Display.
Checking coolant level, refer to page235.
Page 99 of 294

Controls
97Reference
At a glance
Driving tips
Communications
Navigation
Entertainment
Mobility
TPM Tire Pressure Monitor*
The concept
TPM checks the tire inflation pressure in the
four mounted tires. The system reports when
the tire inflation pressure has dropped consid-
erably in one or several tires.
Functional requirement
In order to assure the reliable reporting of a flat
tire, the system must be reset at the correct tire
inflation pressure.
Always use wheels with TPM electronics, oth-
erwise fault-free operation of the system is not
ensured.
Reset the system again after each correc-
tion of the tire inflation pressure and after
every tire or wheel change.<
System limits
TPM cannot announce sudden serious tire
damage caused by external influences.
The system does not function properly if it has
n o t b e e n r e s e t , e . g . a f l a t t i r e i s r e p o r t e d d e s p i t e
correct tire inflation pressures.
The system is inactive and cannot display a flat
tire if a wheel has been mounted without TPM
electronics, e.g. a compact wheel, or if TPM is
temporarily interfered with by other systems or
devices which use the same radio frequency.
Status display on Control Display
The tire and system status is indicated by the
color of the tires.
TPM takes the fact that the tire pressure
changes during driving into account. A correc-
tion is only required if requested by TPM with
the color.
Green
The tire pressure matches the learned set state.
"TPM active" appears on the Control Display.
One wheel is yellow
Flat tire or a major drop in inflation pressure in
the indicated tire. A message appears on the
Control Display.
All wheels are yellow
Flat tire or a major drop in inflation pressure in
several tires. A message appears on the Control
Display.
Gray
The system cannot detect a flat tire.
Reasons for this can be:
>TPM is being reset
>Temporary interference due to systems or
devices which use the same radio fre-
quency
>Malfunction
Resetting system
Reset the system again after each correc-
tion of the tire inflation pressure and after
every tire or wheel change.<
Resetting finishes during driving, which can be
interrupted at any time. When driving resumes,
resetting is continued automatically. Do not
reset the system when driving with a compact
wheel
*.
iDrive, for operating principle refer to page16.
1.Press the button.
This opens the start menu.
2.Press the controller to open the menu.
3.Select "Settings" and press the controller.
4.Select "Vehicle / Tires" and press the con-
troller.
Page 101 of 294

Controls
99Reference
At a glance
Driving tips
Communications
Navigation
Entertainment
Mobility
4 persons without luggage:
approx. 95 miles/150 km
>With a full load:
4 or more persons, cargo bay full:
approx. 30 miles/50 km
Drive reservedly and do not exceed a
speed of 50 mph/80 km/h. In the event of
pressure loss, vehicle handling changes. This
includes reduced tracking stability in braking,
extended braking distance and altered natural
steering characteristics.
If unusual vibrations or loud noises occur while
the vehicle is being driven, this can indicate final
failure of the damaged tire. Reduce speed and
stop at a suitable location as soon as possible,
otherwise pieces of the tire could become
detached and cause an accident. Do not con-
tinue driving, but instead contact your BMW
center.<
Malfunction
The yellow warning lamp flashes and
then lights up continuously. The tires
are shown in gray on the Control Dis-
play and a message is displayed. No flat tire can
be detected.
A message like this is displayed in the following
situations:
>In case of a malfunction;
have the system checked.
>If a wheel is mounted without TPM elec-
tronics.
>If TPM is temporarily interfered with by
other systems or devices which use the
same radio frequency.
Declaration according to NHTSA/
FMVSS 138 Tire Pressure Monitoring
Systems
Each tire, including the spare, should be
checked monthly when cold and inflated to the
inflation pressure recommended by the vehicle
manufacturer on the vehicle placard or tire infla-
tion pressure label. If your vehicle has tires of a
different size than the size indicated on the
vehicle placard or tire inflation pressure label,
you should determine the proper tire inflation pressure for those tires. As an added safety fea-
ture, your vehicle has been equipped with a tire
pressure monitoring system, TPMS, that illumi-
nates a low tire pressure telltale when one or
more of your tires are significantly underin-
flated. Accordingly, when the low tire pressure
telltale illuminates, you should stop and check
your tires as soon as possible, and inflate them
to the proper pressure. Driving on a significantly
underinflated tire causes the tire to overheat
and can lead to tire failure. Underinflation also
reduces fuel efficiency and tire tread life, and
may affect the vehicle's handling and stopping
ability. Please note that the TPMS is not a sub-
stitute for proper tire maintenance, and it is the
driver's responsibility to maintain correct tire
pressure, even if underinflation has not reached
the level to trigger illumination of the TPMS low
tire pressure telltale.
The TPMS malfunction indicator is combined
with the low tire pressure telltale. When the sys-
tem detects a malfunction, the telltale will flash
for approximately one minute and then remain
continuously illuminated. This sequence will
continue upon subsequent vehicle startups as
long as the malfunction exists. When the mal-
function indicator lights up, the system may not
be able to detect or signal low tire pressure as
intended. TPMS malfunctions may occur for a
variety of reasons, including the installation of
replacement or alternate tires or wheels on the
vehicle that prevent the TPMS from functioning
properly. Always check the TPMS malfunction
telltale after replacing one or more tires or
wheels on your vehicle to ensure that the
replacement or alternate tires and wheels allow
the TPMS to continue to function properly.
Active steering*
The concept
The active steering is a system that actively var-
ies the steering angle of the front wheels in rela-
tion to the steering wheel movements.
When you are driving in the low road speed
range, e. g. in a town or when parking, the steer-
ing angle increases, i.e. the steering becomes
Page 170 of 294

On/off and tone
168
On/off and tone
The following audio sources have shared con-
trols and setting options:
>Professional
* radio or
Business radio
>CD player
>CD changer
*
Controls
The audio sources can be operated using:
>Buttons in the area of the CD player
>iDrive
>Buttons on steering wheel, refer to page11
>Programmable memory buttons, refer to
page22
Buttons in area of CD player
The layout of the buttons can vary depending
on your vehicle's equipment.
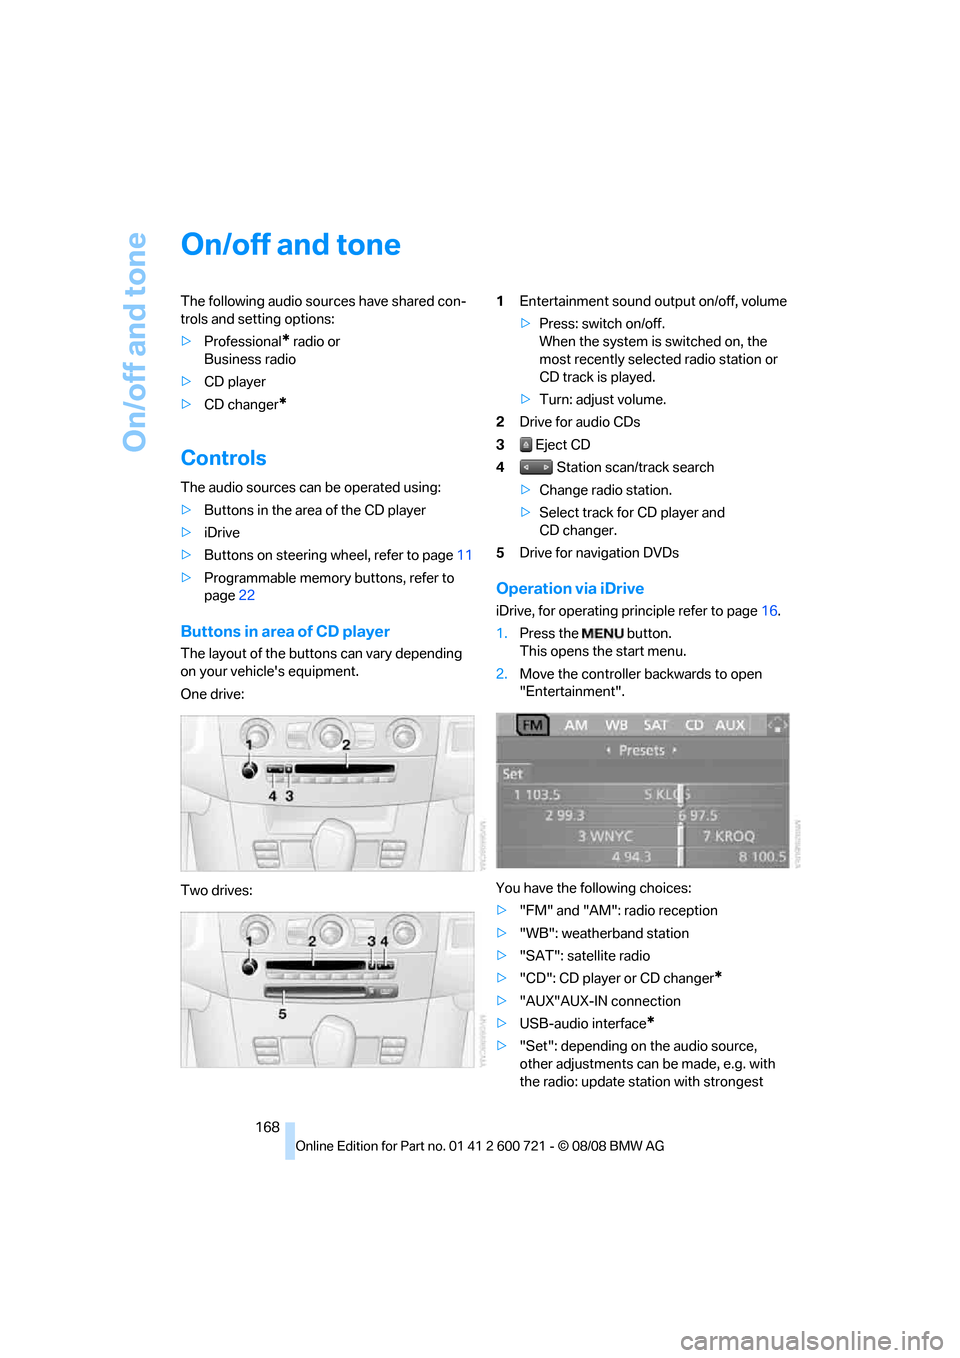
One drive:
Two drives:1Entertainment sound output on/off, volume
>Press: switch on/off.
When the system is switched on, the
most recently selected radio station or
CD track is played.
>Turn: adjust volume.
2Drive for audio CDs
3 Eject CD
4 Station scan/track search
>Change radio station.
>Select track for CD player and
CD changer.
5Drive for navigation DVDs
Operation via iDrive
iDrive, for operating principle refer to page16.
1.Press the button.
This opens the start menu.
2.Move the controller backwards to open
"Entertainment".
You have the following choices:
>"FM" and "AM": radio reception
>"WB": weatherband station
>"SAT": satellite radio
>"CD": CD player or CD changer
*
>"AUX"AUX-IN connection
>USB-audio interface
*
>"Set": depending on the audio source,
other adjustments can be made, e.g. with
the radio: update station with strongest
Page 171 of 294

Navigation
Entertainment
Driving tips
169Reference
At a glance
Controls
Communications
Mobility
reception, store station, tone control, sam-
ple stations.
From another menu, you can change
directly to the screen last displayed,
refer to Comfort opening of menu items,
page19.<
From radio readiness, the selected audio
source is stored for the remote control currently
in use.
Switching on/off
To switch the Entertainment sound output on
and off:
Press knob1 next to the CD player.
This symbol on the Control Display indi-
cates that sound output is switched off.
For a single drive, the sound output is available
for approx. 20 minutes with the ignition
switched off.
Switch on the sound output again for this pur-
pose.
Adjusting volume
Turn knob1 next to the CD player until the
desired volume is set.
You can also adjust the volume with the buttons
on the steering wheel, refer to page11.
From radio readiness, the setting is stored for
the remote control currently in use.
Tone control
You can alter various tone settings, e. g. treble
and bass, or the speed-dependent volume
increase.
The tone settings are set for all audio sources at
once.
From radio readiness, the settings are stored
for the remote control currently in use.
Changing tone settings
1.Press the button.
This opens the start menu.
2.Press the controller to open the menu.
3.Turn the controller until "Settings" is
selected and press the controller.
4. "Audio" and press the controller.
The tone settings can also be selected if you
have called up "Entertainment" in the start
menu:
Select "Set" and then "Tone", pressing the
controller after each selection.
Treble and bass
1.Change to upper field if necessary. Turn the
controller until "Treble / Bass" is selected
and press the controller.
Page 175 of 294

Navigation
Entertainment
Driving tips
173Reference
At a glance
Controls
Communications
Mobility
>"Manual":
To set stations that can be received in addi-
tion to those displayed, refer to Selecting
frequency manually on page173.
Changing selection criteria
In addition to the stations currently displayed,
you can have stations with another selection
criterion displayed.
You can choose from the following selection
criteria:
>"All stations":
Stations that can currently be received in
the "FM" waveband.
>"Autostore":
Stations with the best reception on the
"AM" waveband.
>"Presets":
Stations you have previously stored, refer to
page174.
>"Manual":
To set stations that can be received in addi-
tion to those displayed, refer to Selecting
frequency manually on page173.
1.Change into the second field from the top.
2.Turn the controller until the desired selec-
tion criterion is selected and press the con-
troller.
Buttons next to CD player
Press the button for the corresponding
direction.
The system changes to the next displayed sta-
tion.
You can also change stations with the buttons
on the steering wheel, refer to page11.
Sampling stations, scan
The system plays a brief sample from each of
the stations on the current waveband.
1.Select "FM" or "AM" and press the control-
ler.
"Set" is selected.
2.Press the controller.
Other menu items are displayed.
3.Select "Scan" and press the controller.
The stations are sampled.
To end sampling:
1.Press the controller.
2.Select "Scan" and press the controller.
This cancels sampling of the stations, and the
radio remains on the current station.
Buttons next to CD player
To sample the stations, press and hold the
button for the corresponding direction.
To stop scanning, press the button again.
Selecting frequency manually
With "Manual" you can select stations that are
received in addition to those displayed.
1.Select "FM" or "AM" and press the control-
ler.
2.Change into the second field from the top.
Page 177 of 294

Navigation
Entertainment
Driving tips
175Reference
At a glance
Controls
Communications
Mobility
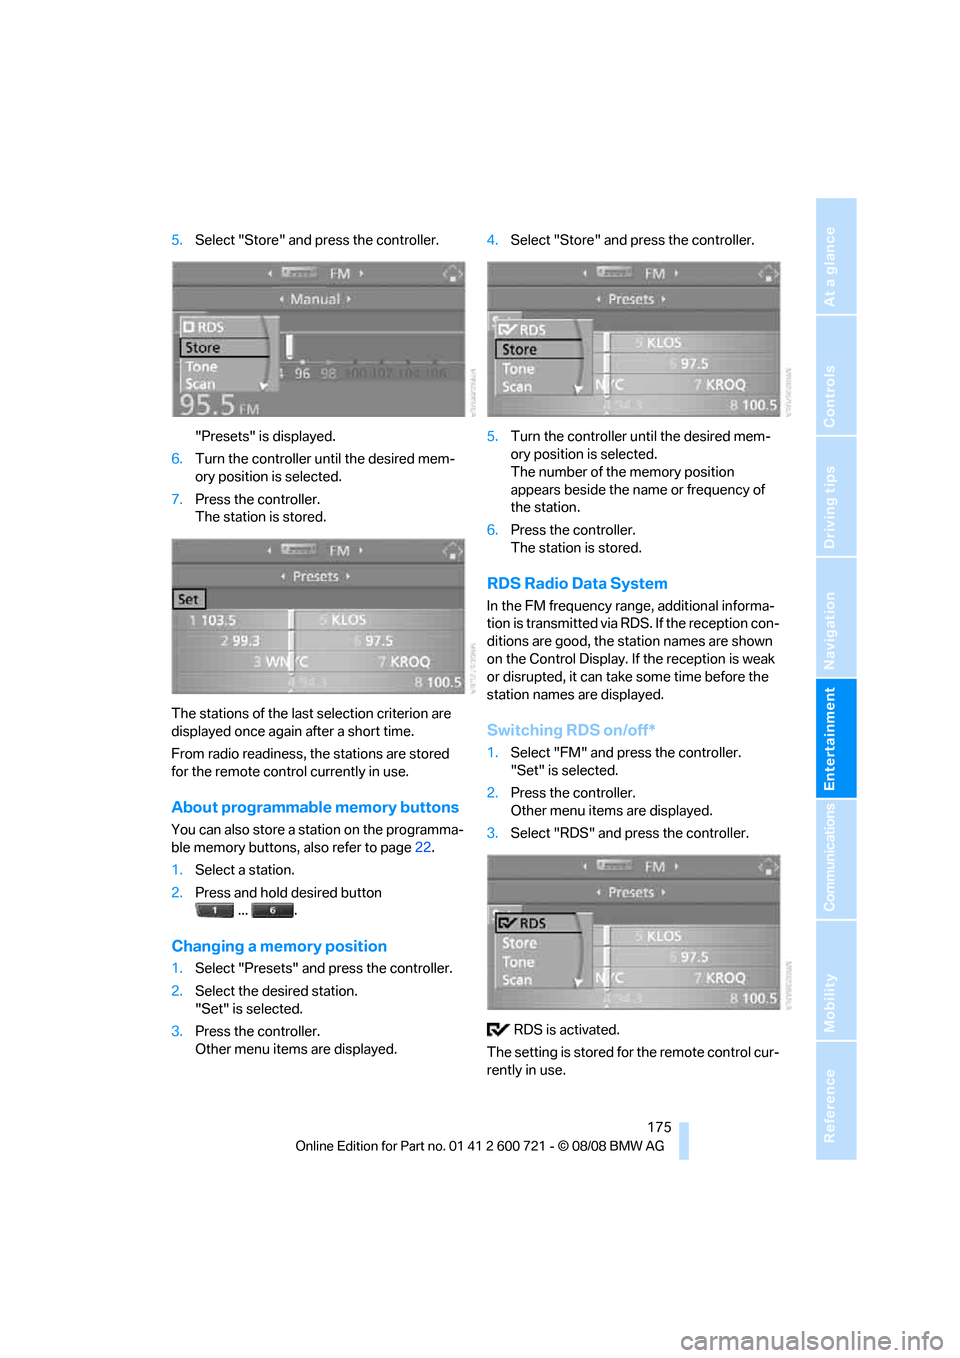
5.Select "Store" and press the controller.
"Presets" is displayed.
6.Turn the controller until the desired mem-
ory position is selected.
7.Press the controller.
The station is stored.
The stations of the last selection criterion are
displayed once again after a short time.
From radio readiness, the stations are stored
for the remote control currently in use.
About programmable memory buttons
You can also store a station on the programma-
ble memory buttons, also refer to page22.
1.Select a station.
2.Press and hold desired button
... .
Changing a memory position
1.Select "Presets" and press the controller.
2.Select the desired station.
"Set" is selected.
3.Press the controller.
Other menu items are displayed.4.Select "Store" and press the controller.
5.Turn the controller until the desired mem-
ory position is selected.
The number of the memory position
appears beside the name or frequency of
the station.
6.Press the controller.
The station is stored.
RDS Radio Data System
In the FM frequency range, additional informa-
tion is transmitted via RDS. If the reception con-
ditions are good, the station names are shown
on the Control Display. If the reception is weak
or disrupted, it can take some time before the
station names are displayed.
Switching RDS on/off*
1.Select "FM" and press the controller.
"Set" is selected.
2.Press the controller.
Other menu items are displayed.
3.Select "RDS" and press the controller.
RDS is activated.
The setting is stored for the remote control cur-
rently in use.