2009 BMW 330D radio
[x] Cancel search: radioPage 99 of 268
Controls
97Reference
At a glance
Driving tips
Communications
Navigation
Entertainment
Mobility
Rear window defroster
The defroster is switched off auto-
matically after a certain time.
Depending on your vehicle's
equipment, the upper wires serve as an antenna
and are not part of the rear window defroster.
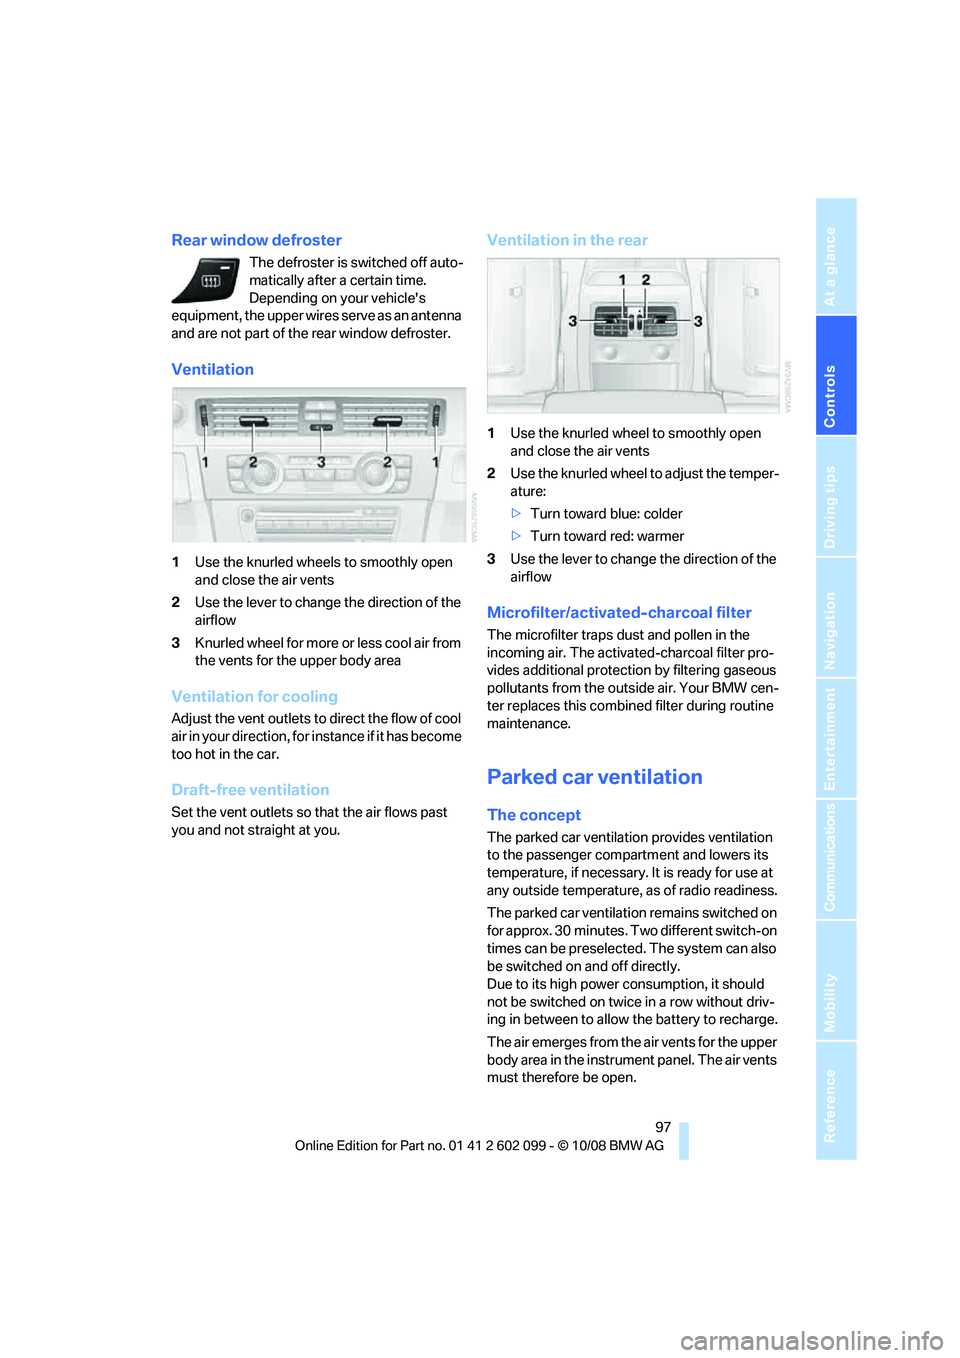
Ventilation
1 Use the knurled wheels to smoothly open
and close the air vents
2 Use the lever to change the direction of the
airflow
3 Knurled wheel for more or less cool air from
the vents for the upper body area
Ventilation for cooling
Adjust the vent outlets to direct the flow of cool
air in your direction, for instance if it has become
too hot in the car.
Draft-free ventilation
Set the vent outlets so that the air flows past
you and not straight at you.
Ventilation in the rear
1Use the knurled wheel to smoothly open
and close the air vents
2 Use the knurled wheel to adjust the temper-
ature:
>Turn toward blue: colder
> Turn toward red: warmer
3 Use the lever to change the direction of the
airflow
Microfilter/activated-charcoal filter
The microfilter traps dust and pollen in the
incoming air. The activated-charcoal filter pro-
vides additional protection by filtering gaseous
pollutants from the outs ide air. Your BMW cen-
ter replaces this combined filter during routine
maintenance.
Parked car ventilation
The concept
The parked car ventilation provides ventilation
to the passenger compartment and lowers its
temperature, if necessary. It is ready for use at
any outside temperature, as of radio readiness.
The parked car ventilation remains switched on
for approx. 30 minutes. Two different switch-on
times can be preselected. The system can also
be switched on and off directly.
Due to its high power consumption, it should
not be switched on twice in a row without driv-
ing in between to allow the battery to recharge.
The air emerges from the air vents for the upper
body area in the instrume nt panel. The air vents
must therefore be open.
ba8_E9091_cic.book Seite 97 Mittwoch, 29. Oktober 2008 2:59 14
Page 101 of 268
Controls
99Reference
At a glance
Driving tips
Communications
Navigation
Entertainment
Mobility
Practical interior accessories
Integrated universal remote
control*
The concept
The integrated universal remote control can
replace as many as three hand-held transmit-
ters for various remote -controlled devices,
such as garage doors and gates or lighting sys-
tems. The integrated universal remote control
registers and stores sign als from the original
hand-held transmitters.
The signal of an original hand-held transmitter
can be programmed on one of the three mem-
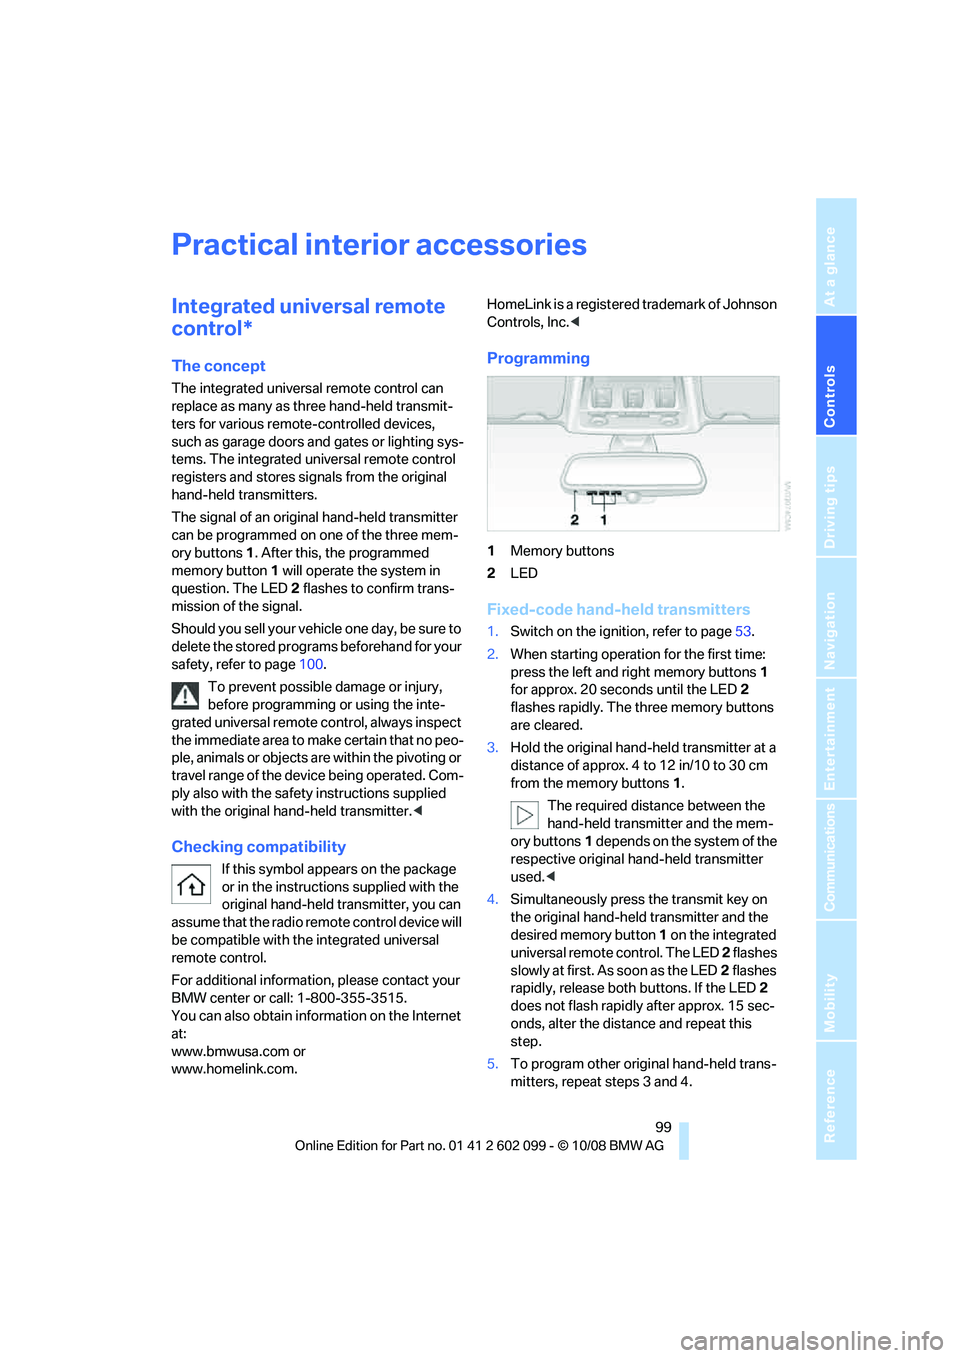
ory buttons 1. After this, the programmed
memory button 1 will operate the system in
question. The LED 2 flashes to confirm trans-
mission of the signal.
Should you sell your vehicl e one day, be sure to
delete the stored progra ms beforehand for your
safety, refer to page 100.
To prevent possible damage or injury,
before programming or using the inte-
grated universal remote control, always inspect
the immediate area to make certain that no peo-
ple, animals or objects are within the pivoting or
travel range of the device being operated. Com-
ply also with the safety instructions supplied
with the original hand-held transmitter. <
Checking compatibility
If this symbol appears on the package
or in the instructions supplied with the
original hand-held transmitter, you can
assume that the radio remote control device will
be compatible with the integrated universal
remote control.
For additional information, please contact your
BMW center or call: 1-800-355-3515.
You can also obtain information on the Internet
at:
www.bmwusa.com or
www.homelink.com. HomeLink is a registered trademark of Johnson
Controls, Inc.
<
Programming
1Memory buttons
2 LED
Fixed-code hand-held transmitters
1.Switch on the ignition, refer to page 53.
2. When starting operation for the first time:
press the left and right memory buttons 1
for approx. 20 seconds until the LED 2
flashes rapidly. The three memory buttons
are cleared.
3. Hold the original hand-held transmitter at a
distance of approx. 4 to 12 in/10 to 30 cm
from the memory buttons 1.
The required distance between the
hand-held transmitter and the mem-
ory buttons 1 depends on the system of the
respective original hand-held transmitter
used. <
4. Simultaneously press the transmit key on
the original hand-held transmitter and the
desired memory button 1 on the integrated
universal remote control. The LED 2 flashes
slowly at first. As soon as the LED 2 flashes
rapidly, release both buttons. If the LED 2
does not flash rapidly after approx. 15 sec-
onds, alter the distance and repeat this
step.
5. To program other original hand-held trans-
mitters, repeat steps 3 and 4.
ba8_E9091_cic.book Seite 99 Mittwoch, 29. Oktober 2008 2:59 14
Page 138 of 268
Destination guidance
136
Automatic scaling of the map
In the map display facing north, turn the control-
ler in any direction until AUTO is displayed as
the map scale.
The map shows the entire range from your loca-
tion to the destination.
Settings for the map display
1. "Navigation"
2. "Map"
3. Open "Options".
4. "Settings"
>Optimized view "Night mode"
> Optimized view with spatial display:
"Perspective view in 3D" prominent
areas are shown in the map.
Split screen settings
The map settings for the split screen can be
created separately fr om the main screen.
1. Open "Options".
2. "Split screen"
3. Move the controller to the right until the
split screen is selected.
4. Press the controller.
5. Select the settings:
>"View facing north"
> "View in direction of travel"
> "Perspective view"
6. To change the scale:
>Move the controller: change the scale.
Traffic bulletins*
You can display the traffi c bulletins from radio
stations that broadcast the TMC (Traffic Mes-
sage Channel) of a traffic information service.
This information from the traffic information
service is continuously updated on the basis of
measurement data from traffic control centers
and information on traffic congestion.
During destination guid ance, traffic bulletins
that are relevant to areas along the route are automatically displayed
and taken into account
in the route planning. You can open all traffic
bulletins manually via iDrive.
The traffic bulletins are shown in the map dis-
play.
Activating/deactivating reception
1. "Navigation"
2. Open "Options".
3. "Receive Traffic Info"
In many metropolitan areas you can receive
traffic information broadcast by radio stations.
The traffic conditions ar e monitored by traffic
control centers and the traffic information is
updated periodically.
During destination guid ance, the traffic bulle-
tins relevant to your planned route are automat-
ically shown. Whether de stination guidance is
active or not, you can ha ve the traffic bulletins
displayed in the map view or in the traffic bulle-
tin list.
Traffic bulletins in a list
A list of the traffic bulle tins can be opened via
the menu or map display.
Opening the traffic bulletins
1. "Navigation"
2. "Traffic Info"
First, the traffic bulle tins on the planned
route are displayed. The traffic bulletins are
sorted in the order of their distance from the
current vehicle position.
3. Select a traffic bulletin.
Additional information can be displayed for
some traffic bulletins:
1. Select the symbol.
2. Additional information is displayed.
ba8_E9091_cic.book Seite 136 Mittwoch, 29. Oktober 2008 2:59 14
Page 143 of 268
Entertainment
Operation of the radio, CD equipment and
external audio devices as well as their tone settings are described in this chapter.
Entertainment
ba8_E9091_cic.book Seite 141 Mittwoch, 29. Oktober 2008 2:59 14
Page 144 of 268

On/off and tone
142
On/off and tone
The following audio and video sources share
the same control elements and adjustments:
>Radio
> CD player
> CD changer
*
>Video
> External devices, e.g. MP3 player
Controls
The audio and video sources can be controlled
using the:
>Buttons near the CD player
> iDrive
> Buttons on the steeri ng wheel, refer to
page 11
> Programmable memory keys, refer to
page 20
> Voice activation system
Buttons near the CD player
1Sound output for entertainment on/off, vol-
ume
>Press: switch on/off.
When you switch on the unit, the last set
radio station or track is played.
> Turn: adjust volume.
2 Eject the CD
3 CD/DVD drive
4FM/AM: change the radio station wave-
band 5MODE
: change the audio and video
sources
6 Station scan/track search
> Change radio station.
> Select track for CD player and CD
changer.
Switching on/off
In order to switch the entertainment sound out-
put on and off:
Press button 1 next to the CD player.
This symbol on the Control Display indi-
cates that sound output is switched off.
If equipped with a single drive, the sound output
is available for approx. 20 minutes after the igni-
tion is switched off.
For sound output, switch the unit back on.
Adjusting volume
Turn button 1 next to the CD player until the
desired volume is obtained.
You can also adjust the volume with buttons on
the steering wheel, refer to page 11.
With the ignition at ra dio readiness or beyond,
the setting is stored fo r the remote control cur-
rently in use.
Tone control
You can alter various tone settings, e.g. treble
and bass or the speed-dependent volume
increase.
The tone settings are applied to all audio
sources.
With the ignition at ra dio readiness or beyond,
the settings are stored for the remote control
currently in use.
ba8_E9091_cic.book Seite 142 Mittwoch, 29. Oktober 2008 2:59 14
Page 145 of 268
Navigation
Entertainment
Driving tips
143Reference
At a glance
Controls
Communications
Mobility
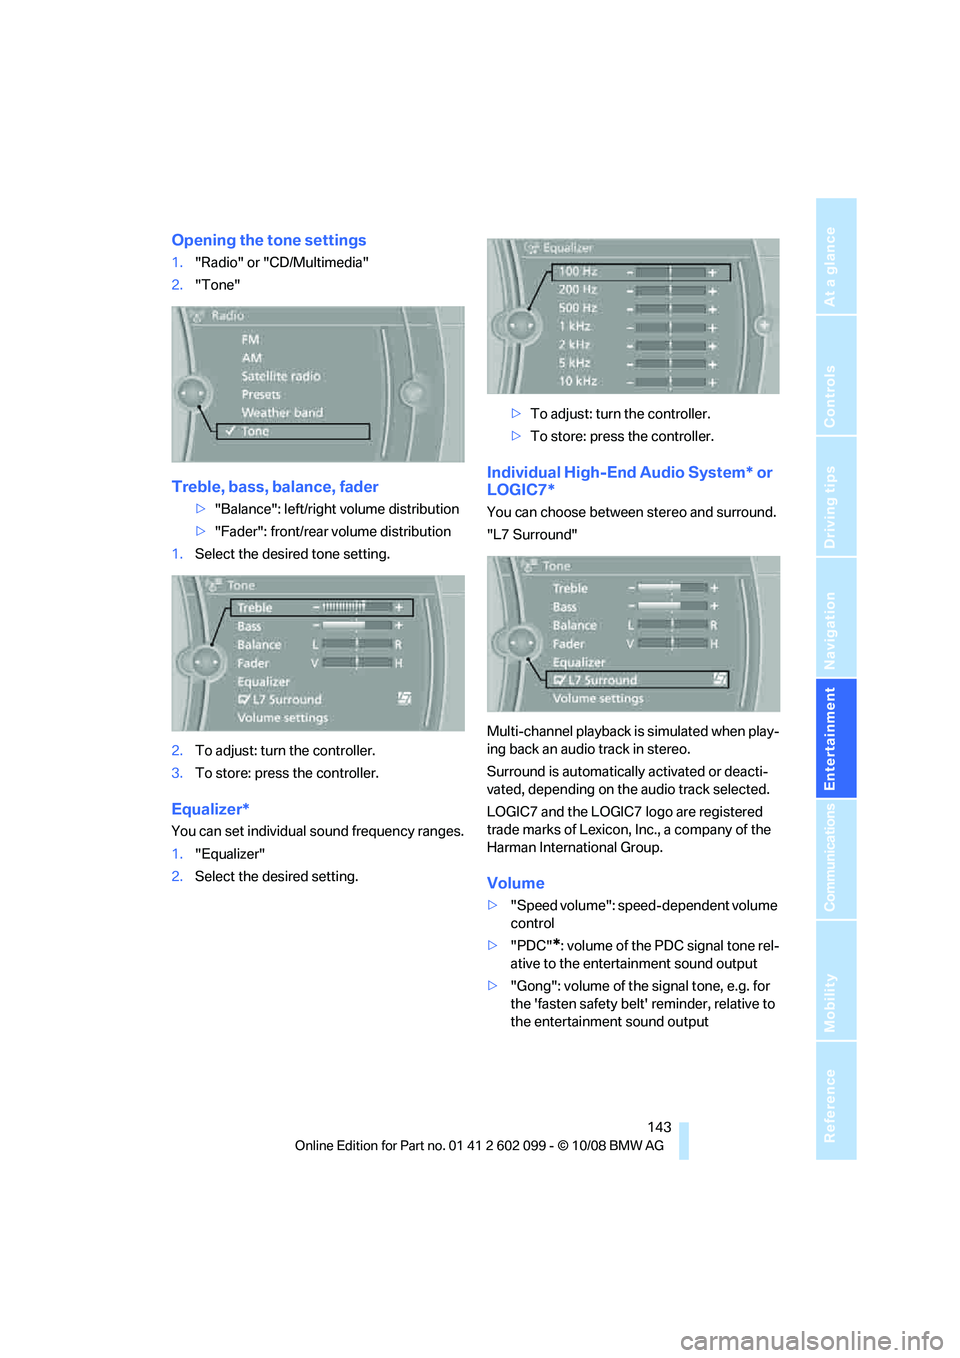
Opening the tone settings
1."Radio" or "CD/Multimedia"
2. "Tone"
Treble, bass, balance, fader
>"Balance": left/right volume distribution
> "Fader": front/rear volume distribution
1. Select the desired tone setting.
2. To adjust: turn the controller.
3. To store: press the controller.
Equalizer*
You can set individual sound frequency ranges.
1."Equalizer"
2. Select the desired setting. >
To adjust: turn the controller.
> To store: press the controller.
Individual High-End Audio System* or
LOGIC7*
You can choose between stereo and surround.
"L7 Surround"
Multi-channel playback is simulated when play-
ing back an audio track in stereo.
Surround is automatically activated or deacti-
vated, depending on the audio track selected.
LOGIC7 and the LOGIC7 logo are registered
trade marks of Lexicon, Inc., a company of the
Harman International Group.
Volume
> "Speed volume": speed-dependent volume
control
> "PDC"
*: volume of the PDC signal tone rel-
ative to the entertainment sound output
> "Gong": volume of the signal tone, e.g. for
the 'fasten safety belt' reminder, relative to
the entertainment sound output
ba8_E9091_cic.book Seite 143 Mittwoch, 29. Oktober 2008 2:59 14
Page 147 of 268
Navigation
Entertainment
Driving tips
145Reference
At a glance
Controls
Communications
Mobility
Radio
Your radio provides reception of the FM and AM
wavebands.
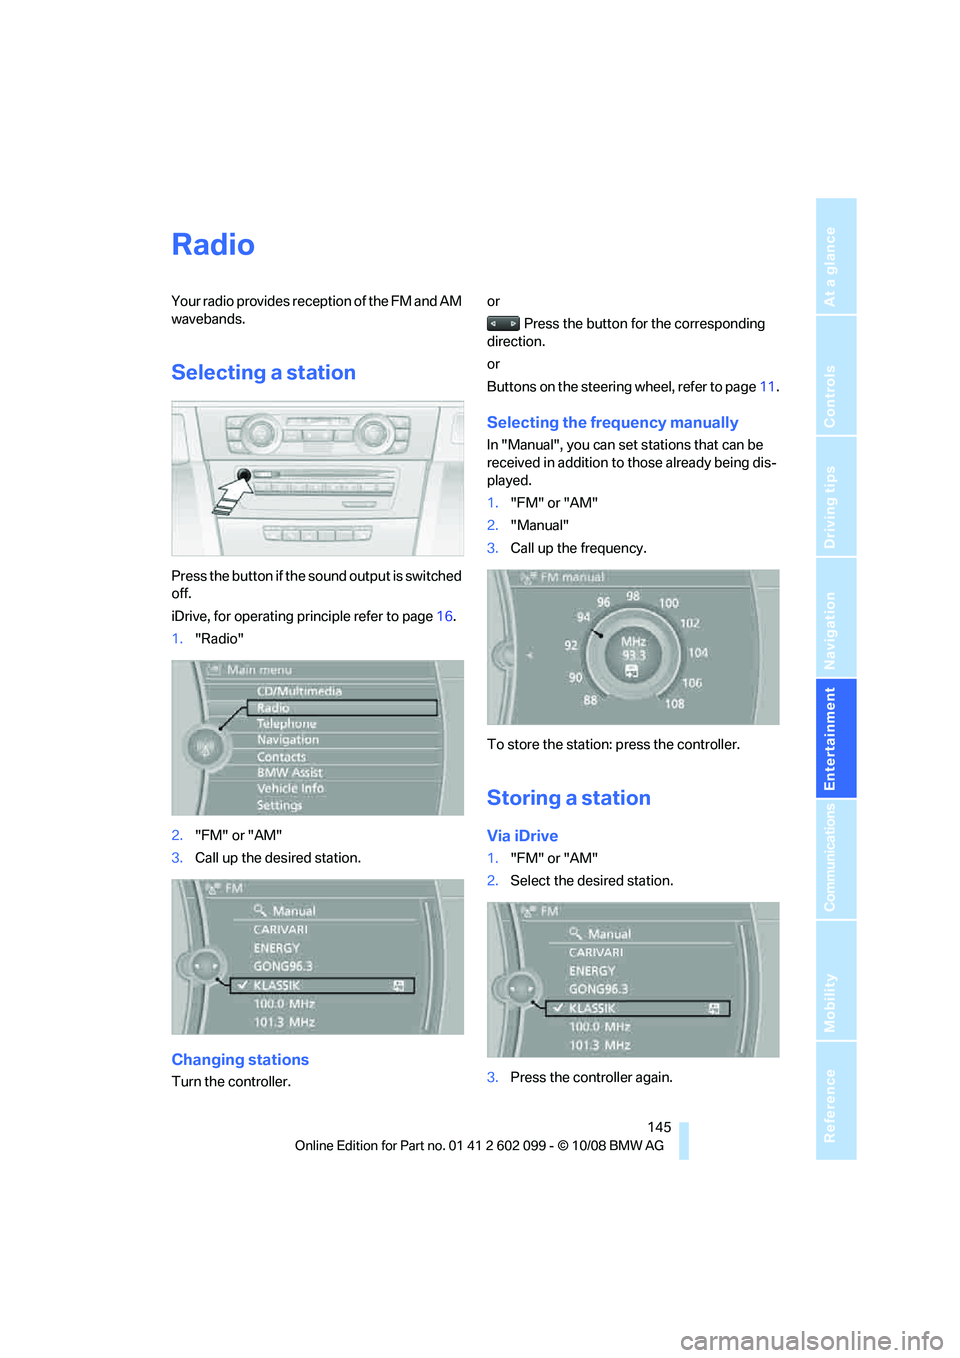
Selecting a station
Press the button if the sound output is switched
off.
iDrive, for operating principle refer to page16.
1. "Radio"
2. "FM" or "AM"
3. Call up the desired station.
Changing stations
Turn the controller. or
Press the button for the corresponding
direction.
or
Buttons on the steering wheel, refer to page11.
Selecting the frequency manually
In "Manual", you can set stations that can be
received in addition to those already being dis-
played.
1."FM" or "AM"
2. "Manual"
3. Call up the frequency.
To store the station: press the controller.
Storing a station
Via iDrive
1. "FM" or "AM"
2. Select the desired station.
3. Press the controller again.
ba8_E9091_cic.book Seite 145 Mittwoch, 29. Oktober 2008 2:59 14
Page 148 of 268
Radio
146
4.
Select the desired memory location.
The station is stored.
The stations are stored for the remote control
currently in use.
Via programmable memory keys
You can store a station on the programmable
memory keys, refe r also to page20.
1. Select a station.
2. ... Press the desired button
for a longer period.
Radio Data System RDS
On the FM waveband, additional information is
broadcast via RDS. If the reception conditions
are good, the station names are shown on the
Control Display. Where re ception is poor or in
the event of interference, it may take some time
before the station names will appear in the dis-
play.
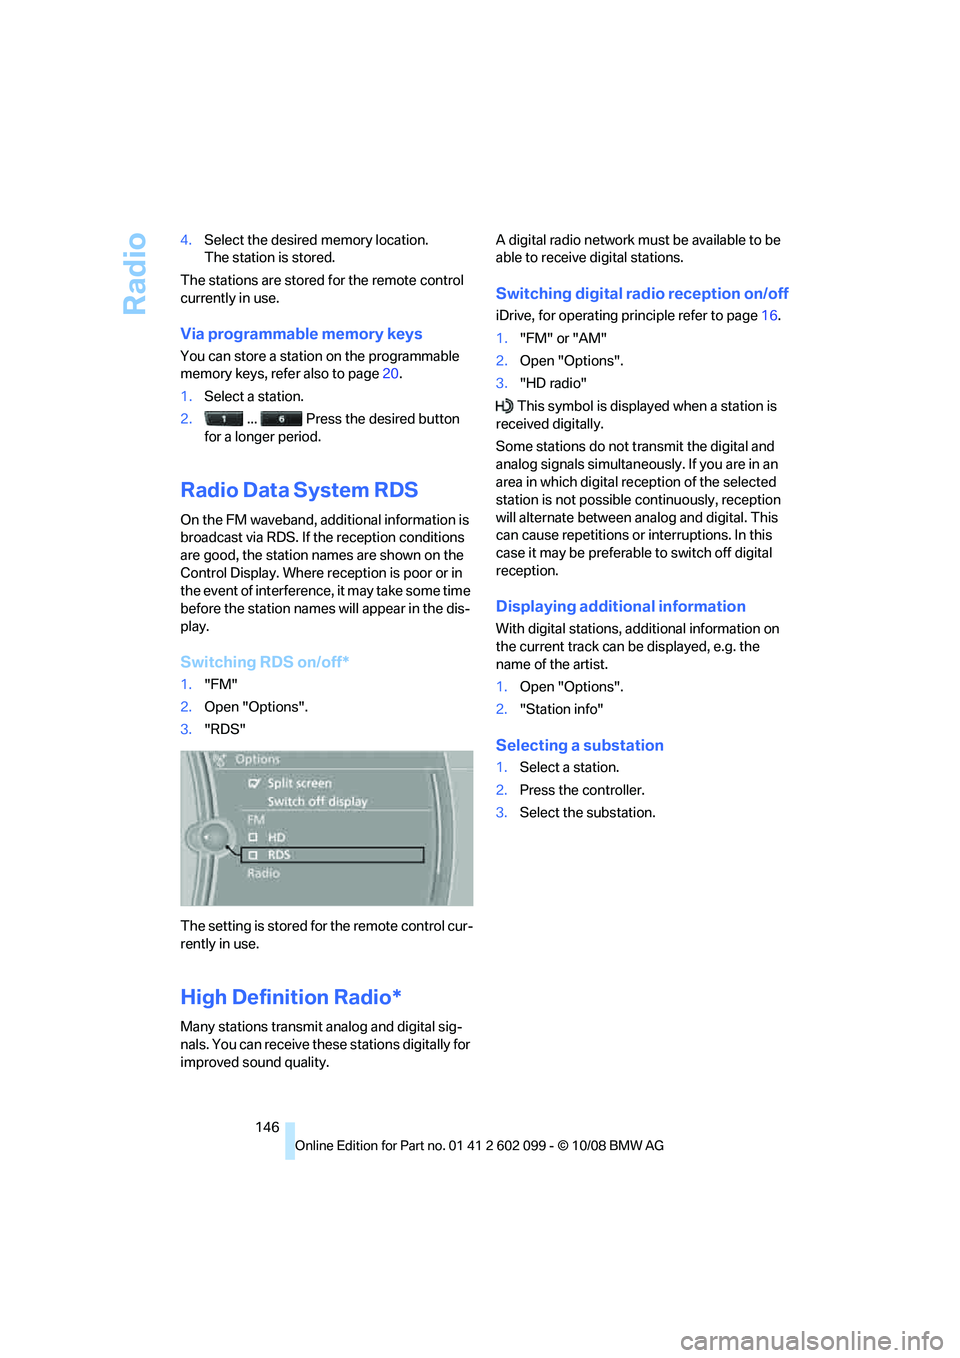
Switching RDS on/off*
1. "FM"
2. Open "Options".
3. "RDS"
The setting is stored fo r the remote control cur-
rently in use.
High Definition Radio*
Many stations transmit analog and digital sig-
nals. You can receive these stations digitally for
improved sound quality. A digital radio network mu
st be available to be
able to receive digital stations.
Switching digital radio reception on/off
iDrive, for operating pr inciple refer to page16.
1. "FM" or "AM"
2. Open "Options".
3. "HD radio"
This symbol is displa yed when a station is
received digitally.
Some stations do not transmit the digital and
analog signals simultaneously. If you are in an
area in which digital re ception of the selected
station is not possible continuously, reception
will alternate between analog and digital. This
can cause repetitions or interruptions. In this
case it may be preferable to switch off digital
reception.
Displaying additional information
With digital stations, a dditional information on
the current track can be displayed, e.g. the
name of the artist.
1. Open "Options".
2. "Station info"
Selecting a substation
1.Select a station.
2. Press the controller.
3. Select the substation.
ba8_E9091_cic.book Seite 146 Mittwoch, 29. Oktober 2008 2:59 14