2009 BMW 328I XDRIVE steering wheel
[x] Cancel search: steering wheelPage 83 of 268
Controls
81Reference
At a glance
Driving tips
Communications
Navigation
Entertainment
Mobility
can drown out the PDC signal. Therefore,
always drive cautiously, otherwise there is a risk
of personal injury or property damage.<
Driving stability control
systems
Your BMW has a number of systems that help
to maintain the vehicle's stability even in
adverse driving conditions.
Antilock Brake System ABS
ABS prevents locking of the wheels during
braking. Safe steering response is maintained
even during full braking. Active safety is thus
increased.
The ABS is operational every time you start the
engine. Braking safely, refer to page 116.
Electronic brake-force distribution
The system controls the brake pressure in the
rear wheels to ensure stable braking behavior.
Dynamic Brake Control DBC
When you apply the brakes rapidly, this system
automatically produces the maximum braking
force boost and thus help s to achieve the short-
est possible braking distance during full brak-
ing. This system exploits all of the benefits pro-
vided by ABS.
Do not reduce the pressure on the brake for the
duration of the full braking application.
Dynamic Stability Control DSC
DSC prevents the driving wheels from losing
traction when you pull away from rest or accel-
erate. The system also recognizes unstable
driving conditions, for example if the rear of the
car is about to swerve or if momentum is acting
at an angle past the front wheels. In these
cases, DSC helps the ve hicle maintain a safe
course within physical lim its by reducing engine
output and through braking actions at the indi-
vidual wheels.
The laws of physics cannot be repealed,
even with DSC. An appropriate driving style always remains the responsibility of the
driver. Therefore, do not reduce the additional
s a f e t y m a r g i n a g a i n b y t a k i n g r i s k s , a s t h i s c o u l d
result in an accident.
<
Deactivating DSC
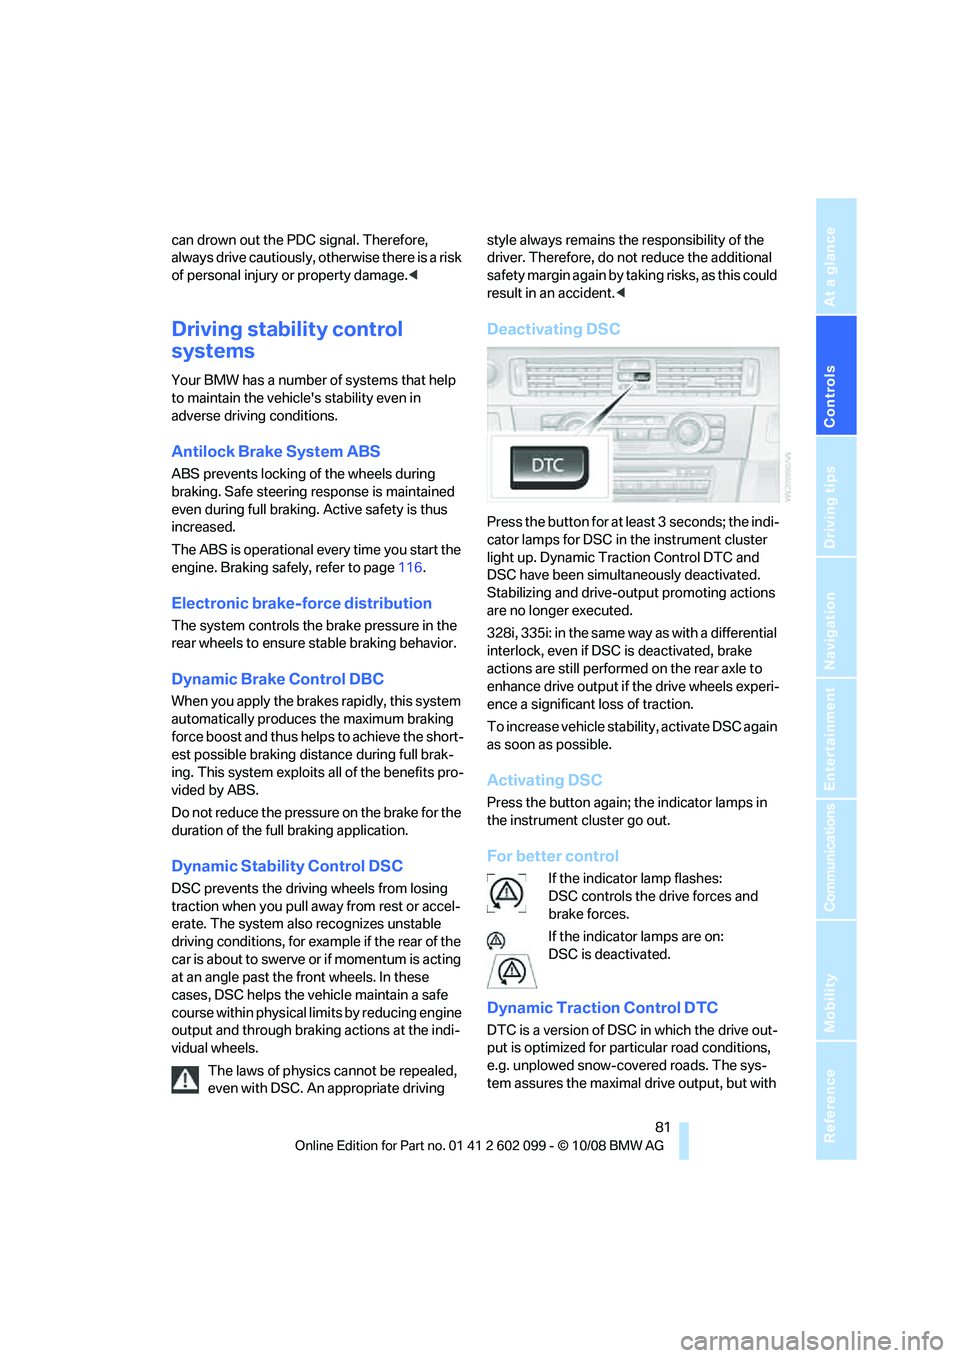
Press the button for at least 3 seconds; the indi-
cator lamps for DSC in the instrument cluster
light up. Dynamic Traction Control DTC and
DSC have been simultaneously deactivated.
Stabilizing and drive-output promoting actions
are no longer executed.
328i, 335i: in the same way as with a differential
interlock, even if DSC is deactivated, brake
actions are still performed on the rear axle to
enhance drive output if the drive wheels experi-
ence a significant loss of traction.
To increase vehicle stability, activate DSC again
as soon as possible.
Activating DSC
Press the button again; the indicator lamps in
the instrument cluster go out.
For better control
If the indicator lamp flashes:
DSC controls the drive forces and
brake forces.
If the indicator lamps are on:
DSC is deactivated.
Dynamic Traction Control DTC
DTC is a version of DSC in which the drive out-
put is optimized for particular road conditions,
e.g. unplowed snow-covered roads. The sys-
tem assures the maximal drive output, but with
ba8_E9091_cic.book Seite 81 Mittwoch, 29. Oktober 2008 2:59 14
Page 84 of 268
Technology for driving comfort and safety
82
reduced driving stability. It is therefore neces-
sary to drive with appropriate caution.
You may find it useful
to briefly activate DTC
under the following sp ecial circumstances:
> When driving uphill on snow-covered roads,
in slush or on unplowed, snow-covered
roads
> When rocking a stuck vehicle free or start-
ing off in deep snow or on loose ground
> When driving with snow chains
Activating DTC
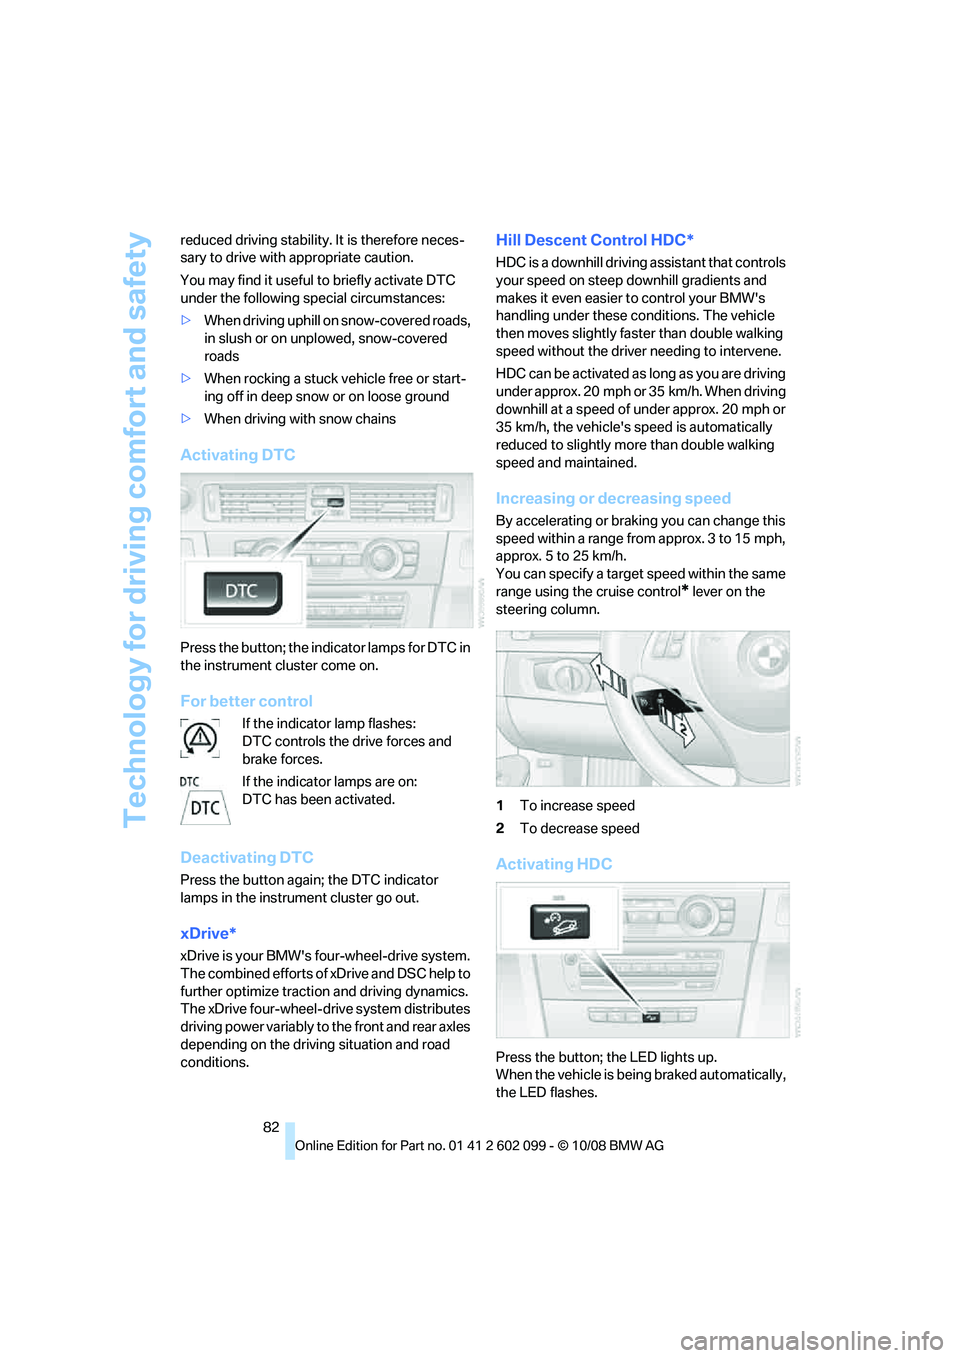
Press the button; the indicator lamps for DTC in
the instrument cluster come on.
For better control
If the indicator lamp flashes:
DTC controls the drive forces and
brake forces.
If the indicator lamps are on:
DTC has been activated.
Deactivating DTC
Press the button again; the DTC indicator
lamps in the instrument cluster go out.
xDrive*
xDrive is your BMW's four-wheel-drive system.
The combined efforts of xDrive and DSC help to
further optimize traction and driving dynamics.
The xDrive four-wheel-drive system distributes
driving power variably to the front and rear axles
depending on the driving situation and road
conditions.
Hill Descent Control HDC*
HDC is a downhill driving assistant that controls
your speed on steep downhill gradients and
makes it even easier to control your BMW's
handling under these conditions. The vehicle
then moves slightly faster than double walking
speed without the driver needing to intervene.
HDC can be activated as long as you are driving
under approx. 20 mph or 35 km/h. When driving
downhill at a speed of under approx. 20 mph or
35 km/h, the vehicle's speed is automatically
reduced to slightly more than double walking
speed and maintained.
Increasing or decreasing speed
By accelerating or brak ing you can change this
speed within a range from approx. 3 to 15 mph,
approx. 5 to 25 km/h.
You can specify a target speed within the same
range using the cruise control
* lever on the
steering column.
1 To increase speed
2 To decrease speed
Activating HDC
Press the button; the LED lights up.
When the vehicle is being braked automatically,
the LED flashes.
ba8_E9091_cic.book Seite 82 Mittwoch, 29. Oktober 2008 2:59 14
Page 88 of 268

Technology for driving comfort and safety
86
If a flat tire is detect
ed while the system is
resetting and determining the inflation
pressures, all tires on the Control Display are
displayed in yellow. The message "Tire low!" is
shown. <
Message for low tire inflation pressure
The warning lamps come on in yellow
and red. A message appears on the
Control Display. In addition, a signal
sounds. There is a flat tire or substan-
tial loss of tire pressure.
1. Cautiously reduce sp eed to below 50 mph/
80 km/h. Avoid sudden braking and steer-
ing maneuvers. Do not exceed a speed of
50 mph/80 km/h.
If the car is not equipped with Run-
Flat Tires, refer to page 209, the stan-
dard equipment by design, do not continue
driving. Otherwise a se vere accident could
result after a tire punc ture if you continue
driving. <
2. In the event of complete pressure loss,
0 psi/0 kPa, you can estimate the possible
distance for continued driving on the basis
of the following guidelines:
>With a light load:
1 to 2 persons without luggage:
approx. 155 miles/250 km
> With a medium load:
2 persons, cargo bay full, or 4 persons
without luggage:
approx. 95 miles/150 km
> With a full load:
4 or more persons, cargo bay full:
approx. 30 miles/50 km
Drive cautiously and do not exceed a
speed of 50 mph/80 km/h. In the event of
pressure loss, vehicle handling changes. This
includes reduced tracking stability in braking,
extended braking distance and altered natural
steering characteristics.
If unusual vibration or lo ud noises occur during
the journey, this may be an indication that the
damaged tire has finally failed. Reduce your
speed and pull over as soon as possible at a
suitable location. Otherw ise parts of the tire could come loose, resulting in an accident. Do
not continue driving. Instead, contact your
BMW center.
<
Malfunction
The small warning lamp flashes in
yellow and then lights up continu-
ously; the larger warning lamp comes
on in yellow. On the Control Display,
the tires are shown in gray and a message
appears. No punctures can be detected.
his type of message is shown in the following
situations:
> If there is a malfunction
Have the system checked.
> If a wheel without TPM electronics has
been mounted
> If TPM is temporarily malfunctioning due to
other systems or devices using the same
radio frequency.
Message for unsuccessful system
reset
The warning lamp lights up yellow. A
message will appear on the Control
Display. The system is not reset after
a tire has been changed, for example.
Check the tire inflation pressure and reset the
system, refer to page 85.
Declaration according to NHTSA/
FMVSS 138
Tire Pressure Monitoring Systems
Each tire should be checked monthly when cold
and inflated to the inflation pressure recom-
mended by the vehicle manufacturer on the
vehicle placard or tire infl ation pressure label. If
your vehicle has tires of a different size than the
size indicated on the vehicle placard or tire infla-
tion pressure label, yo u should determine the
proper tire inflation pressure for those tires. As
an added safety feature, your vehicle has been
equipped with a tire pressure monitoring sys-
tem, TPMS, that illuminates a low tire pressure
telltale when one or more of your tires are signif-
icantly under-inflated. Accordingly, when the
low tire pressure telltale illuminates, you should
ba8_E9091_cic.book Seite 86 Mittwoch, 29. Oktober 2008 2:59 14
Page 89 of 268
Controls
87Reference
At a glance
Driving tips
Communications
Navigation
Entertainment
Mobility
stop and check your tires as soon as possible,
and inflate them to the proper pressure. Driving
on a significantly underinflated tire causes the
tire to overheat and can lead to tire failure.
Underinflation also redu ces fuel efficiency and
tire tread life, and may affect the vehicle’s han-
dling and stopping ability. Please note that the
TPMS is not a substitute for proper tire mainte-
nance, and it is the driver’s responsibility to
maintain correct tire pressure, even if underin-
flation has not reached the level at which the
TPMS low tire pressure telltale illuminates.
The TPMS malfunction indicator is combined
with the low tire pressure telltale. When the sys-
tem detects a malfunction, the telltale will flash
for approximately one minute and then remain
continuously lit. This sequence will continue
upon subsequent vehicle startups as long as
the malfunction exists. When the malfunction
indicator is illuminated, the system may not be
able to detect or signal low tire pressure as
intended. TPMS malfunctions may occur for a
variety of reasons, including the installation of
replacement or alternate tires or wheels on the
vehicle that prevent the TPMS from functioning
properly. Always check the TPMS malfunction
telltale after replacing one or more tires or
wheels on your vehicle to ensure that the
replacement or alternate tires and wheels allow
the TPMS to continue to function properly.
Active steering*
The concept
Active steering varies the turning angle of the
front wheels in relation to steering wheel move-
ments. It also varies the steering force required
to turn the wheels depending on the speed at
which you are driving.
When you are driving in the low road-speed
range, e.g. in a town or when parking, the steer-
ing angle increases, i.e. the steering becomes
very direct, and less effort is required to turn the
wheels. In the higher speed range, on the other
hand, the steering angle is reduced more and
more. This improves the handling capability of
your BMW over the entire speed range. In critical situations,
the system can make tar-
geted corrections to the steering angle pro-
vided by the driver and thus stabilize the vehicle
before the driver inte rvenes. This stabilizing
intervention is simult aneously deactivated
when DSC is switched off, refer to page 81.
Malfunction
The warning lamps come on. Active
steering is no longer operational. At
low speeds, greater steering wheel
movements are required, whereas at
higher speeds the vehicle reacts more sensi-
tively to steering wheel movements. The stabil-
ity-enhancing feature may also be deactivated.
Drive cautiously and thin k well ahead. Have the
system checked.
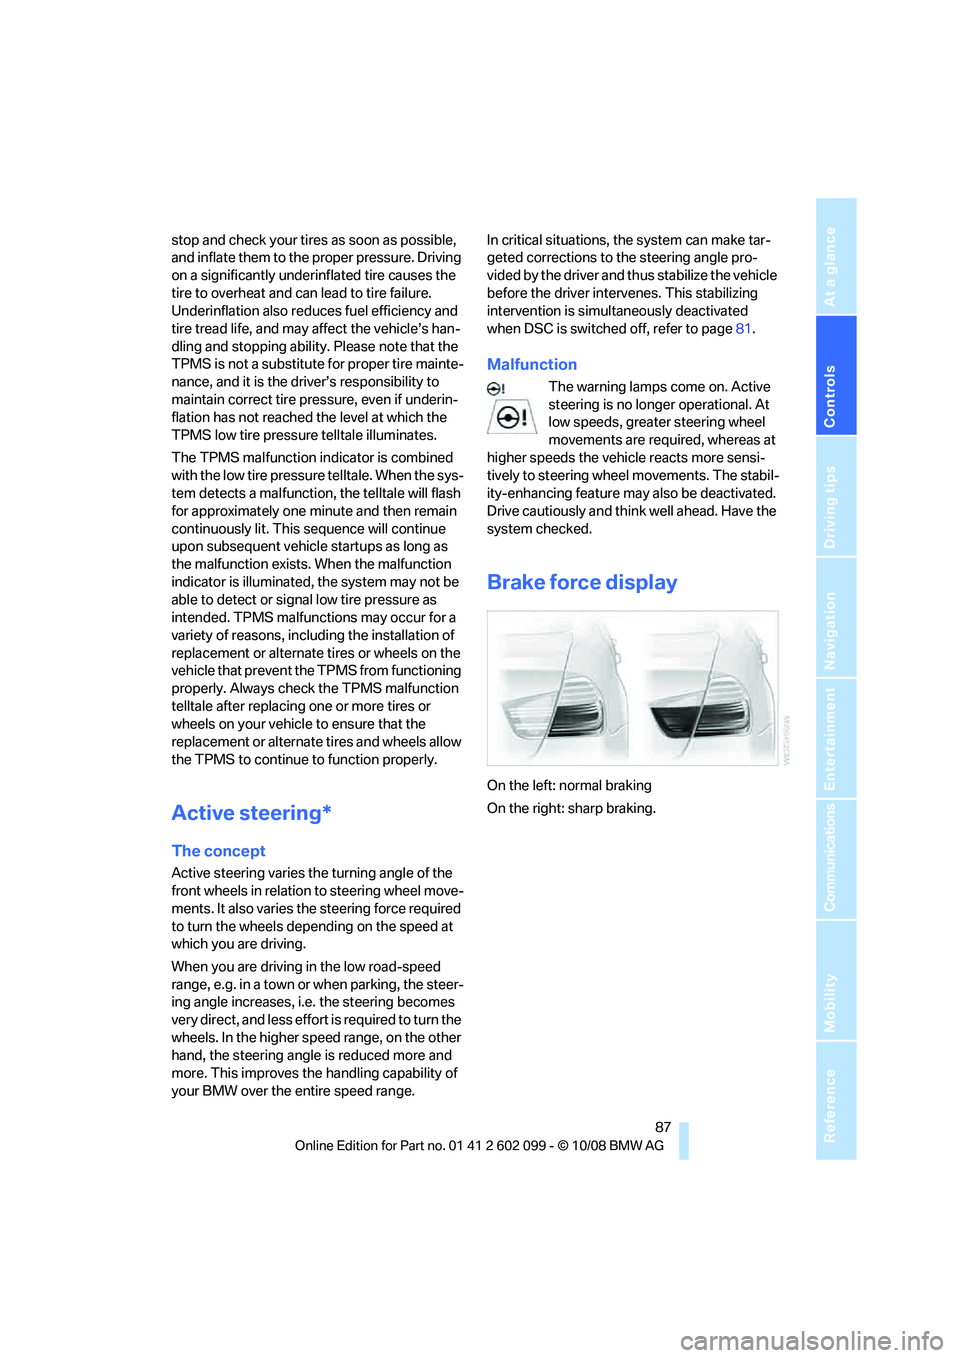
Brake force display
On the left: normal braking
On the right: sharp braking.
ba8_E9091_cic.book Seite 87 Mittwoch, 29. Oktober 2008 2:59 14
Page 90 of 268
Technology for driving comfort and safety
88
Airbags
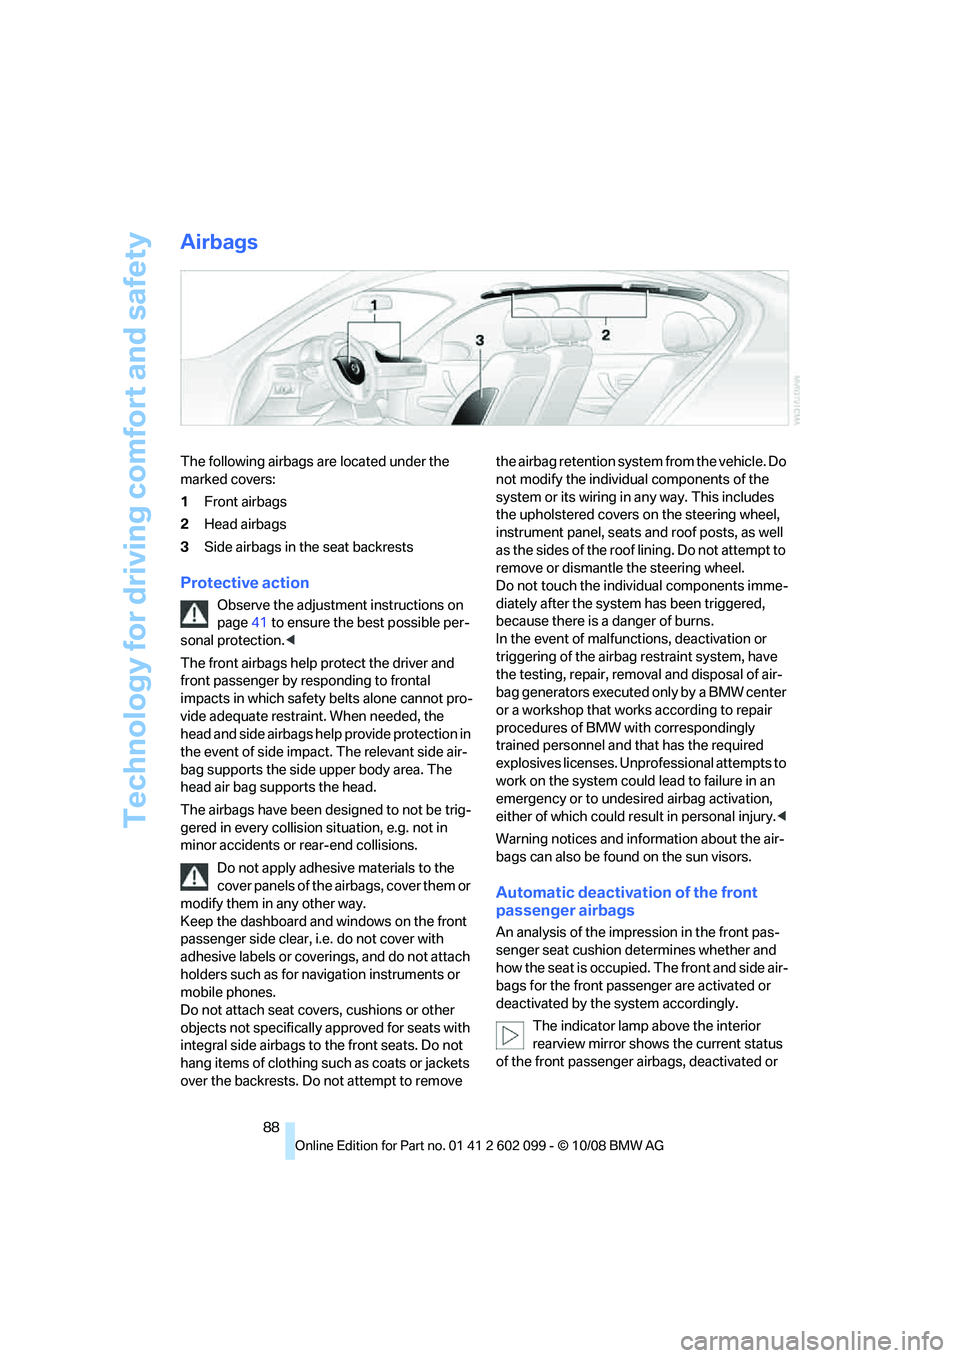
The following airbags are located under the
marked covers:
1Front airbags
2 Head airbags
3 Side airbags in the seat backrests
Protective action
Observe the adjustment instructions on
page 41 to ensure the best possible per-
sonal protection. <
The front airbags help protect the driver and
front passenger by re sponding to frontal
impacts in which safety belts alone cannot pro-
vide adequate restrain t. When needed, the
head and side airbags help provide protection in
the event of side impact. The relevant side air-
bag supports the side upper body area. The
head air bag supports the head.
The airbags have been designed to not be trig-
gered in every collision situation, e.g. not in
minor accidents or rear-end collisions.
Do not apply adhesive materials to the
cover panels of the airbags, cover them or
modify them in any other way.
Keep the dashboard and windows on the front
passenger side clear, i.e. do not cover with
adhesive labels or coveri ngs, and do not attach
holders such as for navigation instruments or
mobile phones.
Do not attach seat cove rs, cushions or other
objects not specifically approved for seats with
integral side airbags to the front seats. Do not
hang items of clothing such as coats or jackets
over the backrests. Do not attempt to remove the airbag retention system from the vehicle. Do
not modify the individual components of the
system or its wiring in any way. This includes
the upholstered covers
on the steering wheel,
instrument panel, seats and roof posts, as well
as the sides of the roof lining. Do not attempt to
remove or dismantle the steering wheel.
Do not touch the individual components imme-
diately after the system has been triggered,
because there is a danger of burns.
In the event of malfunctions, deactivation or
triggering of the airbag restraint system, have
the testing, repair, removal and disposal of air-
bag generators executed only by a BMW center
or a workshop that works according to repair
procedures of BMW with correspondingly
trained personnel and that has the required
explosives licenses. Unprofessional attempts to
work on the system could lead to failure in an
emergency or to undesi red airbag activation,
either of which could resu lt in personal injury.<
Warning notices and information about the air-
bags can also be found on the sun visors.
Automatic deactivation of the front
passenger airbags
An analysis of the impr ession in the front pas-
senger seat cushion determines whether and
how the seat is occupied. The front and side air-
bags for the front passenger are activated or
deactivated by the system accordingly.
The indicator lamp above the interior
rearview mirror shows the current status
of the front passenger ai rbags, deactivated or
ba8_E9091_cic.book Seite 88 Mittwoch, 29. Oktober 2008 2:59 14
Page 131 of 268
Navigation
Driving tips
129Reference
At a glance
Controls
Communications
Entertainment
Mobility
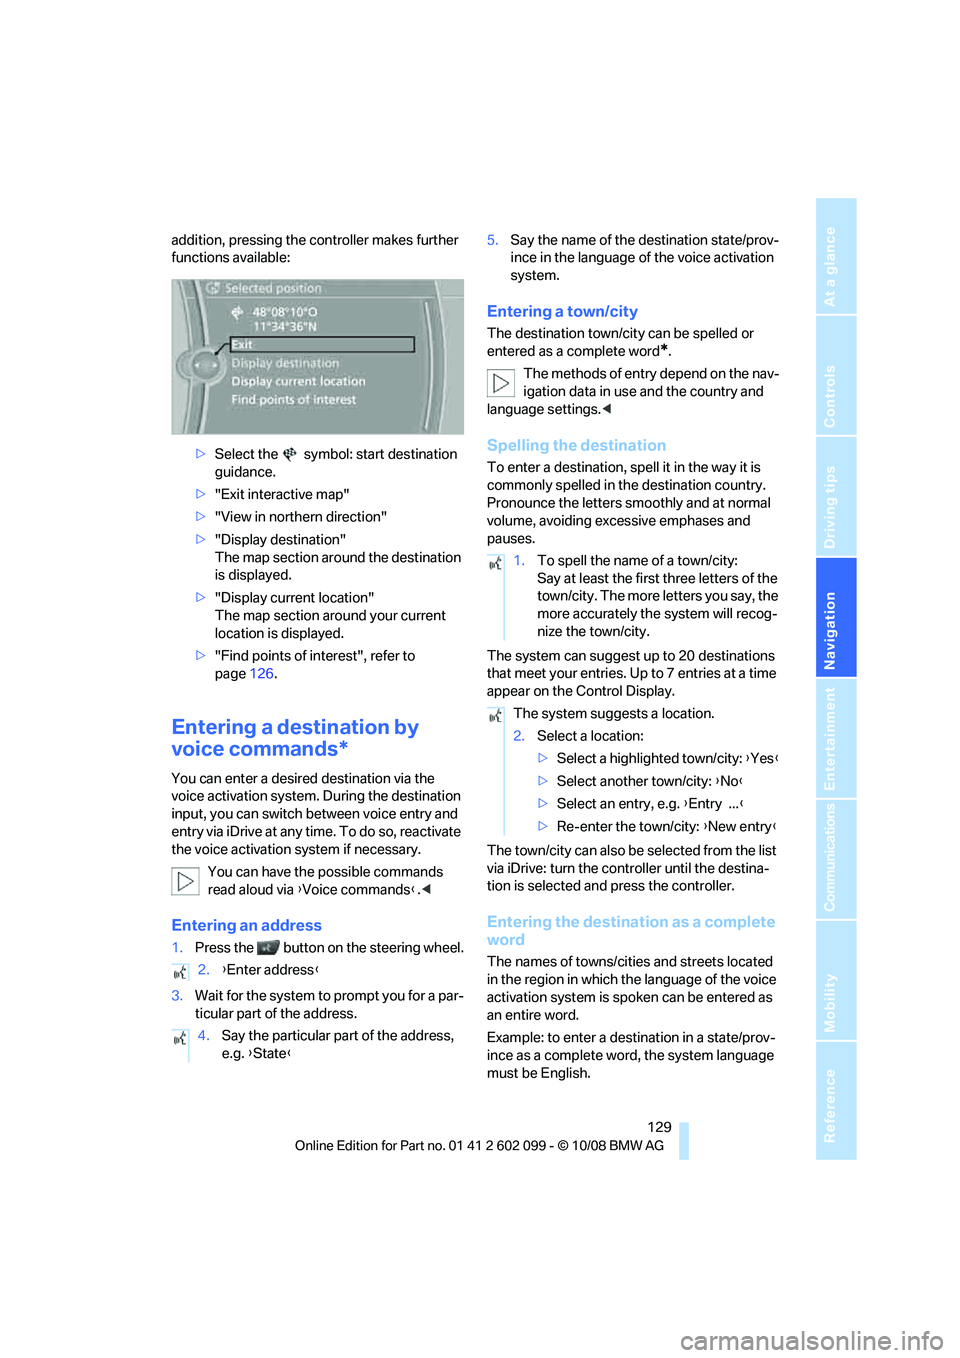
addition, pressing the controller makes further
functions available:>Select the symbol: start destination
guidance.
> "Exit interactive map"
> "View in northern direction"
> "Display destination"
The map section around the destination
is displayed.
> "Display current location"
The map section around your current
location is displayed.
> "Find points of interest", refer to
page 126.
Entering a destination by
voice commands*
You can enter a desired destination via the
voice activation system. During the destination
input, you can switch between voice entry and
entry via iDrive at any ti me. To do so, reactivate
the voice activation system if necessary.
You can have the possible commands
read aloud via {Voice commands }.<
Entering an address
1. Press the button on the steering wheel.
3. Wait for the system to prompt you for a par-
ticular part of the address. 5.
Say the name of the destination state/prov-
ince in the language of the voice activation
system.
Entering a town/city
The destination town/cit y can be spelled or
entered as a complete word
*.
The methods of entry depend on the nav-
igation data in use and the country and
language settings. <
Spelling the destination
To enter a destination, spell it in the way it is
commonly spelled in th e destination country.
Pronounce the letters smoothly and at normal
volume, avoiding excessive emphases and
pauses.
The system can suggest up to 20 destinations
that meet your entries. Up to 7 entries at a time
appear on the Control Display.
The town/city can also be selected from the list
via iDrive: turn the controller until the destina-
tion is selected and press the controller.
Entering the destination as a complete
word
The names of towns/cities and streets located
in the region in which th e language of the voice
activation system is spoken can be entered as
an entire word.
Example: to enter a destination in a state/prov-
ince as a complete word , the system language
must be English.
2.
{Enter address }
4. Say the particular part of the address,
e.g. {State }
1.To spell the name of a town/city:
Say at least the first three letters of the
town/city. The more letters you say, the
more accurately th e system will recog-
nize the town/city.
The system suggests a location.
2. Select a location:
>Select a highlighted town/city: {Yes }
> Select another town/city: {No }
> Select an entry, e.g. {Entry ... }
> Re-enter the town/city: {New entry }
ba8_E9091_cic.book Seite 129 Mittwoch, 29. Oktober 2008 2:59 14
Page 144 of 268
On/off and tone
142
On/off and tone
The following audio and video sources share
the same control elements and adjustments:
>Radio
> CD player
> CD changer
*
>Video
> External devices, e.g. MP3 player
Controls
The audio and video sources can be controlled
using the:
>Buttons near the CD player
> iDrive
> Buttons on the steeri ng wheel, refer to
page 11
> Programmable memory keys, refer to
page 20
> Voice activation system
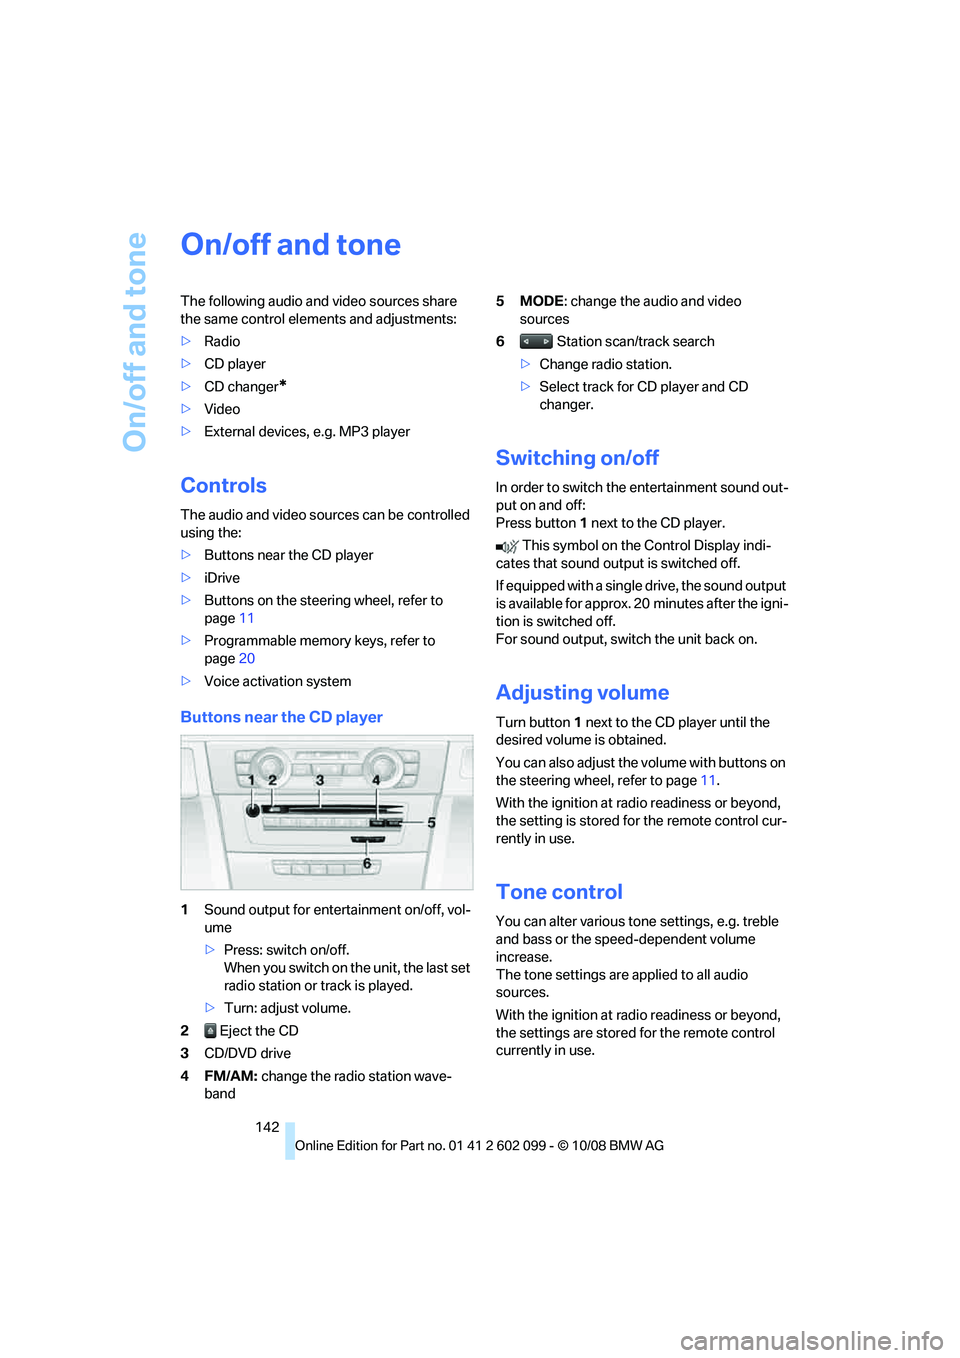
Buttons near the CD player
1Sound output for entertainment on/off, vol-
ume
>Press: switch on/off.
When you switch on the unit, the last set
radio station or track is played.
> Turn: adjust volume.
2 Eject the CD
3 CD/DVD drive
4FM/AM: change the radio station wave-
band 5MODE
: change the audio and video
sources
6 Station scan/track search
> Change radio station.
> Select track for CD player and CD
changer.
Switching on/off
In order to switch the entertainment sound out-
put on and off:
Press button 1 next to the CD player.
This symbol on the Control Display indi-
cates that sound output is switched off.
If equipped with a single drive, the sound output
is available for approx. 20 minutes after the igni-
tion is switched off.
For sound output, switch the unit back on.
Adjusting volume
Turn button 1 next to the CD player until the
desired volume is obtained.
You can also adjust the volume with buttons on
the steering wheel, refer to page 11.
With the ignition at ra dio readiness or beyond,
the setting is stored fo r the remote control cur-
rently in use.
Tone control
You can alter various tone settings, e.g. treble
and bass or the speed-dependent volume
increase.
The tone settings are applied to all audio
sources.
With the ignition at ra dio readiness or beyond,
the settings are stored for the remote control
currently in use.
ba8_E9091_cic.book Seite 142 Mittwoch, 29. Oktober 2008 2:59 14
Page 147 of 268
Navigation
Entertainment
Driving tips
145Reference
At a glance
Controls
Communications
Mobility
Radio
Your radio provides reception of the FM and AM
wavebands.
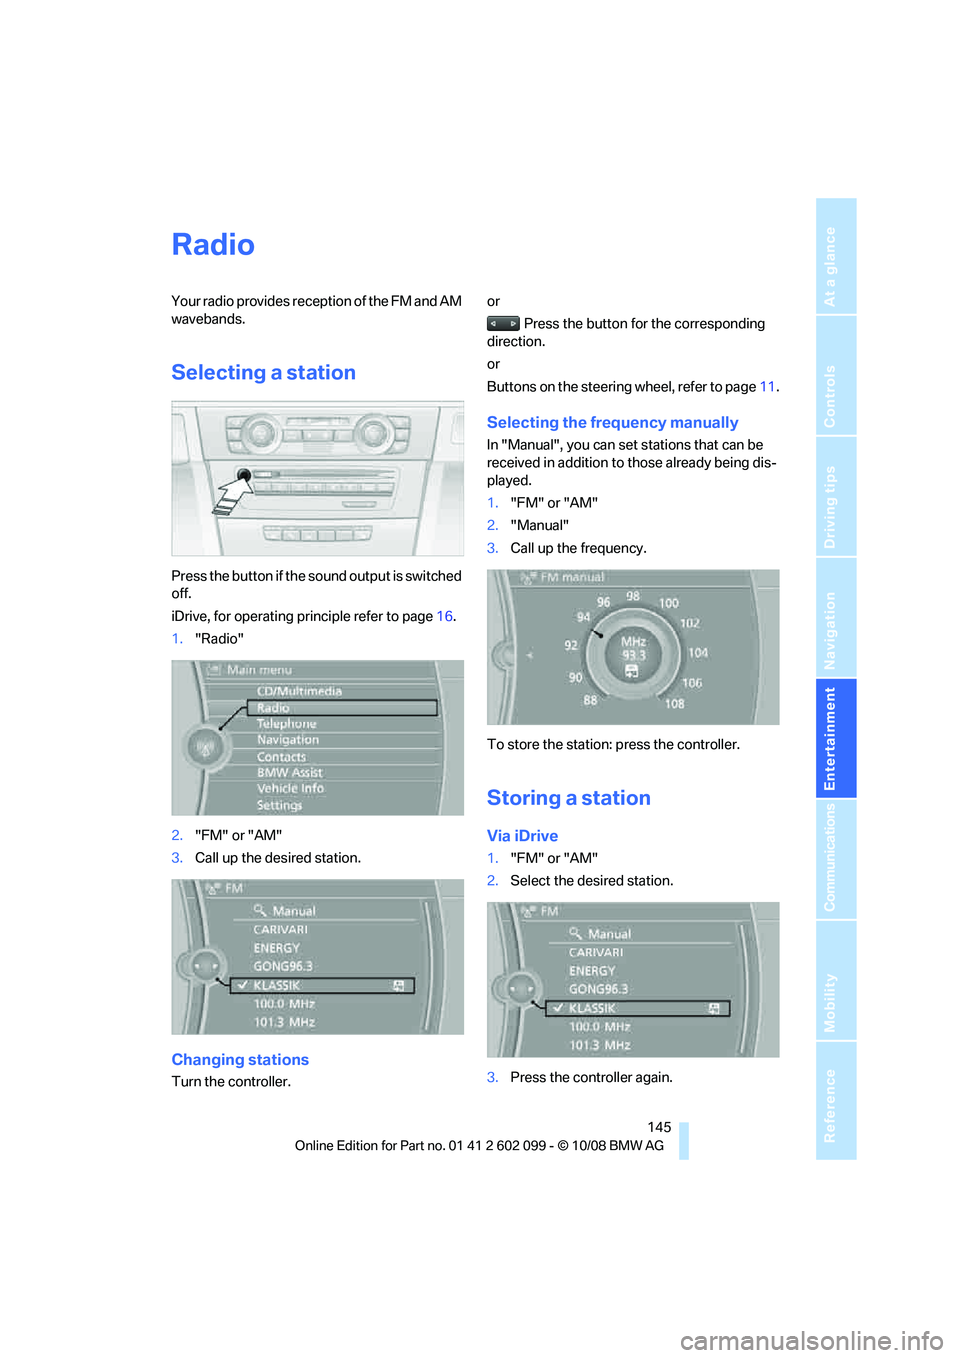
Selecting a station
Press the button if the sound output is switched
off.
iDrive, for operating principle refer to page16.
1. "Radio"
2. "FM" or "AM"
3. Call up the desired station.
Changing stations
Turn the controller. or
Press the button for the corresponding
direction.
or
Buttons on the steering wheel, refer to page11.
Selecting the frequency manually
In "Manual", you can set stations that can be
received in addition to those already being dis-
played.
1."FM" or "AM"
2. "Manual"
3. Call up the frequency.
To store the station: press the controller.
Storing a station
Via iDrive
1. "FM" or "AM"
2. Select the desired station.
3. Press the controller again.
ba8_E9091_cic.book Seite 145 Mittwoch, 29. Oktober 2008 2:59 14