Page 154 of 194
Navigation (NAV)149
General operation
RADIO, CD
NAME, TEL
NAV, INFO
CAR, SETUP
Move map
A new destination or stopover can be set using the
map by moving the crosshairs horizontally and verti-
cally.Fig. 158 Navigation: Moving the crosshairs horizontallyFig. 159 Navigation: Moving the crosshairs vertically
–Press the Map control button in the navigation menu.
– Press the control knob to switch to the side menu.
– Rotate the control knob to the fourth menu item.
– Press the control knob, the horizontal line in the
crosshairs is highlighted in white �fig.158.
– Rotate the control knob to the desired point.
– Press the control knob, the ver tical line in the crosshairs
is highlighted in white �fig.159.
– By pressing the control knob you can switch back and
forth between horizontal and vertical movement.If the crosshairs remain in a new position, detailed information
(street or city name) is displayed for the current position .
Page 157 of 194
Navigation (NAV) 152�
Intersection map
�page 158
�
Auto intersection zoom
�page 159
�
Compass
�page 160
�
Version information
�page 160
�
Demo mode
�page 161
�
Set position/direction
�page 161
The sound and tuning settings and the brightness of the display can
be entered using the control buttons
�page 169.
Tips
We recommend that you enter these settings when the vehicle is
stationary. Please note
�page 9.
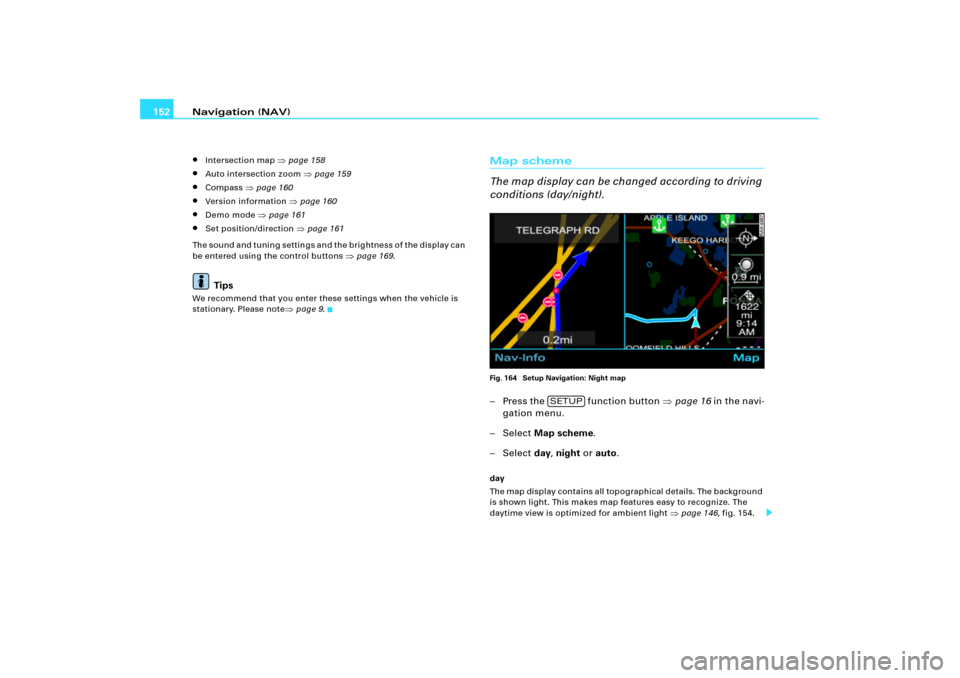
Map scheme
The map display can be changed according to driving
conditions (day/night).Fig. 164 Setup Navigation: Night map– Press the function button �page 16 in the navi-
gation menu.
– Select Map scheme.
– Select day, night or auto.day
Th e m a p d i s p l a y c o n t a i n s a ll to p o g ra p h i c a l d e t a i l s . The b a ckg ro u n d
is shown light. This makes map features easy to recognize. The
daytime view is optimized for ambient light
�page 146, fig.154.
SETUP
Page 158 of 194
153
General operation
RADIO, CD
NAME, TEL
NAV, INFO
CAR, SETUP night
The map display contains all topographical details. The background
is shown dark
�page 152, fig.164. This provide")
Navigation (NAV)153
General operation
RADIO, CD
NAME, TEL
NAV, INFO
CAR, SETUP night
The map display contains all topographical details. The background
is shown dark
�page 152, fig.164. This provides a glare-free view
o f t h e m a p . T h e s t r e e t n a m e s a n d t h e i r l a y o u t , p l a c e n a m e s a n d m a p
contents are in contrasting light colors
auto
The map scheme changes automatically from day to night display
when the low-beam lights are turned on.
Map orientationFig. 165 Setup Navigation: Map orientation North– Press the function button �page 16 in the navi-
gation menu.
–Select Orientation.– Select north, dir. of travel or auto.
north
The map display is always oriented north, the directional arrow on
the vehicle symbol rotates accordingly
�fig.165.
dir. of travel
The vehicle symbol points to the top. The map rotates accordingly
when vehicle direction changes.
auto
The map is oriented automatically depending on the selected scale.
Less than 1.5 miles oriented to dir. of travel and greater than 1.5
miles oriented to north.
SETUP
Page 161 of 194
Navigation (NAV) 156Yo u c a n m o d i fy t h e m a p c o n t e n t s d i s p la ye d to s ui t yo u r w is he s . Th e
map contents are shown according to the scale selected.Vo i c e i n fo r m a t i o nFig. 168 Setup Navigation: Active voice commands–Press the �page 16 function button in the navi-
gation menu.
– Highlight Voice information with a check mark
�
�fig.168. The voice commands are given during route
guidance.
Delete previous destinations– Press the function button �page 16 in the navi-
gation menu.
– Select Delete previous destinations �fig.168.
– Bestätigen Sie Are you sure you that want to delete the
previous destinations? with Ye s. The entire list of
previous destinations is deleted.Tu rn l i s t
During route guidance upcoming changes of direction
are shown with the estimated distance.Fig. 169 Setup Navigation: Map display with active turn list
SETUP
SETUP
Page 162 of 194
157
General operation
RADIO, CD
NAME, TEL
NAV, INFO
CAR, SETUP
– Press the function button �page 16 in the navi-
gation menu.
– Highlight Turn list with a check mark
� �page 151")
Navigation (NAV)157
General operation
RADIO, CD
NAME, TEL
NAV, INFO
CAR, SETUP
– Press the function button �page 16 in the navi-
gation menu.
– Highlight Turn list with a check mark
� �page 151,
fig.163 to activate the function.
Th e n e x t th re e up c o mi n g t u rn s
�page 156, fi g .1 6 9 a r e s h o wn in
the Turn list.
The immediate upcoming turn is shown in the bottom section of the
table.
If you pass a turn, it is deleted from the three-part table. The next
turn drops down into the list.
The following information is shown in the Turn list:
�
Recommended direction shown as an arrow, traffic circulars or
freeway entrances and exits, stopovers and destination
�
Names of streets, secondary roads and freeways you should be
driving on following the turn
�
Estimated distance to each recommended turn or to destination
The name underneath the three-line Turn list shows you the road
you are presently driving on.Tips
If you have activated the Turn list and freeway information �page 157, you are shown the list of freeway information on free-
ways
�fig.170 and the Turn list on other roads
�page 156,
fig.169.
Highway info
When driving on freeways, additional information is
sh o w n , f o r e x a m p l e f o r p a r ki ng a re as , f re e w a y e x i t s o r
rest areas.Fig. 170 Setup Navigation: Map display with active freeway information– Press the function button �page 16 in the navi-
gation menu.
– Highlight Highway info w i t h a ch e ck m a r k
� �page 151,
fig.163 to activate the function.
Freeway information
�fig.170 is shown for the route you are
traveling.
If you have activated freeway information, you are shown a list of
the next three items of freeway information.
SETUP
A1
A2
A;
SETUP
A2
Page 164 of 194
159
General operation
RADIO, CD
NAME, TEL
NAV, INFO
CAR, SETUP
– Press the function button �page 16 in the navi-
gation menu.
– Highlight the Intersection map with a check mark")
Navigation (NAV)159
General operation
RADIO, CD
NAME, TEL
NAV, INFO
CAR, SETUP
– Press the function button �page 16 in the navi-
gation menu.
– Highlight the Intersection map with a check mark
�
�page 158, fig.171 to activate the function.
The map is divided into two parts at intersections. The right half of
the display continues to show you the map display you selected.
Th e l e ft h a l f o f t he d i s p l a y s h o w s y o u a p a ra l l e l e n l a r g e d v i e w o f t h e
intersection area
�page 158, fig.172.
Next to the enlarged view, you are shown the changes in distance
until the turn-off point. At the same you are shown the name of the
street onto which you want to turn.
If you have activated the Auto intersection zoom function, the
Intersection map function cannot be activated.
If you would like to activate the Intersection map function, you first
have to deactivate the Auto intersection zoom function. These two
functions are mutually exclusive.
Tips
The map is oriented to driving direction
�page 153 when switching
to zoom mode.
Auto intersection zoom
The map displays in zoom mode at intersections.Fig. 173 Setup Navigation: Auto intersection zoom activated– Press the function button �page 16 in the navi-
gation menu.
– Highlight the Auto intersection zoom with a check mark
� �fig.173 to activate the function.
For a detailed display, the map automatically zooms in at street
intersections, enhancing the view of the route from street to street.
If you have activated the Itersection map function, the Auto
intersection zoom function cannot be activated.
If you would like to activate the Auto intersection zoom function,
you first have to deactivate the Intersection map function. These
two functions are mutually exclusive.
SETUP
SETUP
Page 165 of 194
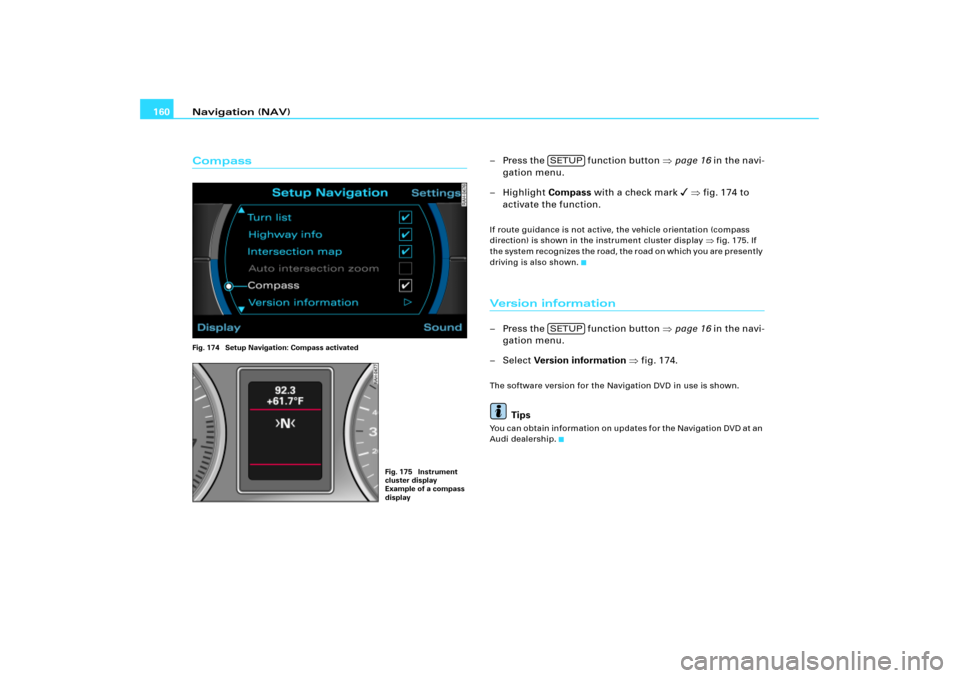
Navigation (NAV) 160CompassFig. 174 Setup Navigation: Compass activated
– Press the function button �page 16 in the navi-
gation menu.
– Highlight Compass with a check mark
� �fig.174 to
activate the function.
If route guidance is not active, the vehicle orientation (compass
direction) is shown in the instrument cluster display
�fig.175. If
the system recognizes the road, the road on which you are presently
driving is also shown.
Version information– Press the function button �page 16 in the navi-
gation menu.
– Select Version information �fig.174.The software version for the Navigation DVD in use is shown.
Tips
You can obtain information on updates for the Navigation DVD at an
Audi dealership.
Fig. 175 Instrument
cluster display
Example of a compass
display
SETUPSETUP
Page 166 of 194
Navigation (NAV)161
General operation
RADIO, CD
NAME, TEL
NAV, INFO
CAR, SETUP
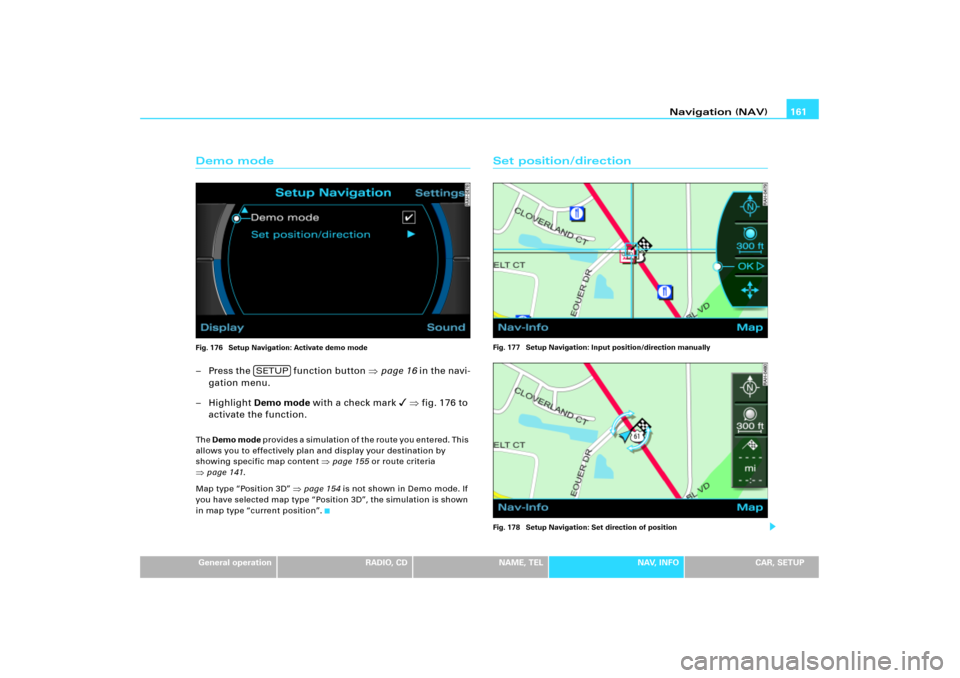
Demo modeFig. 176 Setup Navigation: Activate demo mode– Press the function button �page 16 in the navi-
gation menu.
– Highlight Demo mode with a check mark
� �fig.176 to
activate the function.
The Demo mode provides a simulation of the route you entered. This
allows you to effectively plan and display your destination by
showing specific map content
�page 155 or route criteria
�page 141.
Map type “Position 3D”
�page 154 is not shown in Demo mode. If
you have selected map type “Position 3D”, the simulation is shown
in map type “current position”.
Set position/directionFig. 177 Setup Navigation: Input position/direction manually
Fig. 178 Setup Navigation: Set direction of position
SETUP
149
General operation
RADIO, CD
NAME, TEL
NAV, INFO
CAR, SETUP
Move map
A new destination or stopover can be set using the
map by moving the crosshairs horizontally and verti-
cally.F")
 156Yo u c a n m o d i fy t h e m a p c o n t e n t s d i s p la ye d to s ui t yo u r w is he s . Th e
map contents are shown according to the scale selected.Vo i c e i n")