2009 Acura TSX lock
[x] Cancel search: lockPage 3 of 170

Navigation System3
Table of Contents
Edit Waypoint Search Area ...........107
Guidance Mode.......... ....................108
Clock Adjustment ........................109
Auto Daylight.................................109
Auto Time Zone..............................110
Daylight Savings Time (DST) Selection
(Change DST Schedul e) .............110
Time Adjustment ............................110
Vehicle.........................................111
Off-road Tracking ...... ....................111
Correct Vehicle Position ...............111
Verbal Reminder ............................112
Color ............................................112
Map Color......................................113
Menu Color ....................................113
Switching Display Mode Manually .......... ..........................113
Switching Display Mode Automatically .............................114
AcuraLink/Messages ...................115
Traffic & Weather Status.............115
System Information .....................116
Rearview Camera .......................116
Rearview Camera Brightness Adjustment ..................................116
System Initialization .................117
System Initialization ....................117 Entering the Secur
ity Code ..........117
GPS Initialization ........................118
Map Matching..............................118
System Limitations ..................119
Database Limitations...............121
Client Assistance ......................123
Reporting Errors ..........................123
Acura Automobile Client Services.....................................123
Visiting Your Dealer ...................124
Obtaining a Navigation Update DVD .........................................124
Changing the DVD ......................125
PC Card........................................125
Coverage Areas ........................126
Map Coverage..............................126
U.S. Detailed Cover age Areas .......126
Canada Detailed Coverage Areas...........................................131
Operation in Alaska and Hawaii.......................................138
Alaska ............................................138
Hawaii............................................138
Information Screen Differences .....139 Shipping a Vehicle To or From
Hawaii ........................................140
Frequently Asked Questions ...141
Troubleshooting .......................149
Glossary ....................................150
Glossary .......................................150
Voice Command Index ............153
Global Commands .......................153
Navigation General Commands...153
Navigation Display Commands ...154
Find Place Commands .................155
Climate Control Commands ........156
Temperature Voice Commands ...157
Radio Voice Commands ..............157
CD Voice Commands ..................158
DVD Voice Commands ...............159
AUX Voice Commands ...............159
INFO Screen Voice Commands ................................160
SETUP Screen (Main Setup) Commands ................................160
On-Screen Commands .................161
On-Screen Spelling Assist ..............161
Index .........................................165
2009 TSX
Page 11 of 170

Navigation System11
Getting Started
Display Mode button
Switches the display between Day
mode, Night mode, and OFF. See
page113.
AUDIO button
Press to display the audio screen.
For more information on audio system
features, see the Audio section of the
vehicle Owner’s manual.
Other buttons
See the vehicle Owner’s manual. Interface Dial/ENTER
button
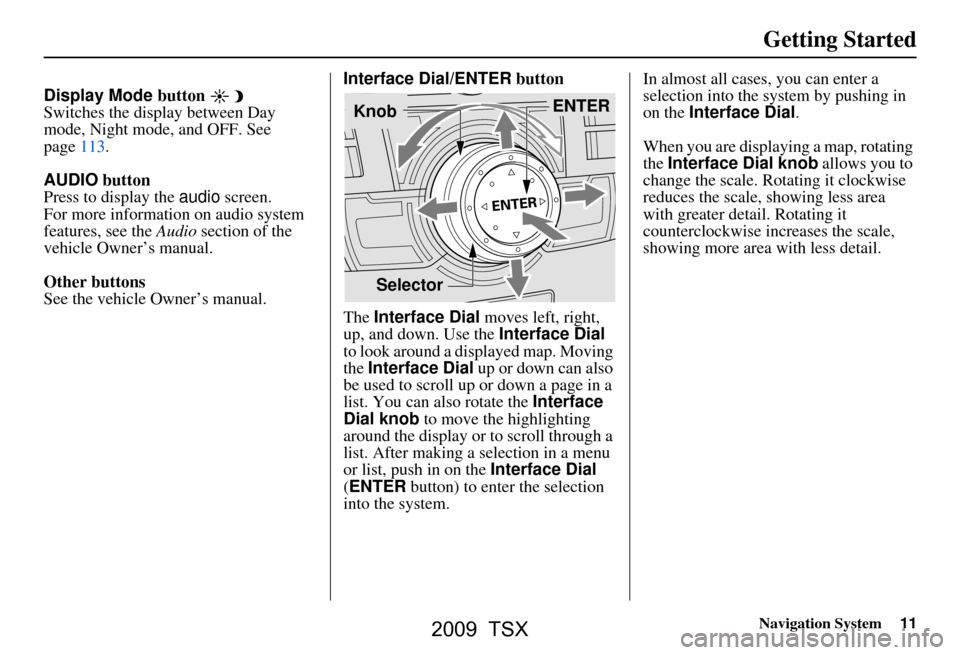
The Interface Dial moves left, right,
up, and down. Use the Interface Dial
to look around a displayed map. Moving
the Interface Dial up or down can also
be used to scroll up or down a page in a
list. You can also rotate the Interface
Dial knob to move the highlighting
around the display or to scroll through a
list. After making a selection in a menu
or list, push in on the Interface Dial
(ENTER button) to enter the selection
into the system. In almost all cases
, you can enter a
selection into the system by pushing in
on the Interface Dial .
When you are displaying a map, rotating
the Interface Dial knob allows you to
change the scale. Rotating it clockwise
reduces the scale, showing less area
with greater detail. Rotating it
counterclockwise increases the scale,
showing more area with less detail.
Selector ENTER
Knob
2009 TSX
Page 26 of 170

26Navigation System
Getting Started
System Function Diagram
This diagram shows the navigation
system features, starting at the center
and working outward in layers. The
navigation program starts at “Key ON,”
and then displays the globe screen
(blue). If OK is selected on the
Disclaimer screen, the functions in the
yellow segments of the diagram become
available in the SETUP and INFO
screens. The white segments of the
diagram are available anytime, even if
you do not select OK.
The items above the map screen show
various methods to begin driving to
your destination (orange). You are
provided with map/voice guidance,
routing cautions, and a direction list.
While driving to your destination, use
the voice control system as much as
possible to interact with the navigation,
audio, and climat e control systems
(green).
REMINDERS(pg.17)CALENDAR
-THEMAPSCREEN(pg.19)-
(MAP/VOICEGUIDANCE,ROUTINGCAUTIONS,DIRECTIONSLIST)
-DRIVINGTOYOURDESTINATION-
VOI CE:
"HELP" (ALL)
(pg. 153)
VOICE:
"INFORMA TION
SCREEN" (pg. 79)
VOICE:
"MENU" (to
change route) (pg. 73)
VOICE:
"HOW FAR OR LONG
TO THE
DESTIN ATION?"
(pg. 154)
VOI CE:
"DISPLAY (OR SAV E )
CURRENT LOCA TION"
(pg.
70)VOICE:
"WHAT TIME
IS IT?"
(pg. 153)
VOI CE:
"AUDIO"
(pg. 157 - 159)
VOI CE:
CLIMA TE
F
AN, TEMP
(pg. 156, 157)
ENTER
WAY POINTS
(pg. 74)
VIEW
TRAFFIC(pg. 21)
VOI CE:
"ZOOM IN/ZOOM O UT"
(pg. 61, 154)
VOI CE:
"HIDE/DISPLA Y ICONS"
(pg. 65, 154)
VIEW TRAFFIC (pg. 22)
ADD BOOK (pg. 93)PINs (pg. 97)UNITS MI/KM (pg. 99)AUTO VOL. (pg. 99)UNVERIFIED (pg. 101)TFC REROUTING (pg. 105)AVOID AREAS ( pg. 105)TIME ZONE (pg. 110)ADJ. TI ME (pg. 110)DAYLIGHT SAV. (pg. 110)OFF-RO AD TRACKING
(pg. 69, 111)CORRECT VEHICLE POSITION (pg. 111)MAP COLOR (pg. 113)MENU COLOR (pg. 113)
GUIDE. PR OMPTS (pg. 92)VERSION (pg. 116)RECEPTION (pg. 115)MESSAGES (pg. 115)
BRIGHTNESS (pg. 91)VOLUME (pg. 92)INTERFA CE DIAL (pg. 92)
VIEW CURRENT (pg. 83)INPORT , SEARCH, DELETE (pg. 84)
INCIDENT LIST (pg. 79)SELECT CATEGORY(pg. 79)
ENTER (pg. 85)LIST (pg. 84)MATH (pg. 86)CONVERT (pg. 86)
MAP LEGEND (pg. 89)V
OICE HELP (pg. 88)
CALL (pg. 87)
KEY T O ZAGAT RA TINGS (pg. 89)
PRESS
OK
NOT
SELECTEDOK
NOTSELECTED
OK
MESSAGETRAFFICWEATHERCALENDAR
CALCULA TOR
TRIP COMPUTER
INFO SCREEN
(OTHER)
PHONEBOOKROADSIDE ASSISTANCESELECT BAND/FREQUENCYVOL BALANCECD
FUNCTIONSOTHER AUD IOBRIGHTNESS
ZOOM IN/OUT
REAR CAMERA(R EVERSE)
SET UP
BUT TO N
(pg. 91)AUDIO
BUT TO N
(pg. 11)
INFO
BUT TO N
(pg. 79)THEDISCLAIMERSCREEN(pg.17)
VOI CE: "FIND
NEARES T..."
AT M
, ETC .
(pg.
155)
SELECT A
DESTINATION
WITH
INTERFA CE DIAL
(pg. 76)
V OICE:
"GO HOME" (pg. 50)
VOICE:
"MENU" FOR ENTER
DESTINATION
SCREEN (pg. 27)
CONTINUE TO THE
DESTINATION
(RESUME)
AFTER REST
ART
(pg. 77)
GLOBESCREENKEYONPERSONALBASICROUTING
GUIDANCE
CLOCK
ADJUSTMENT
VEHICLECOLORACU RALINKTFC & WTHR ST AT USSYSTEM INFO.
VOICECOMMANDSINFO SCREEN (pg. 160)
AUD IO (pg. 157 - 159)
CLIMATE CONTR OL
(pg. 156, 157 )
Formoreinformation,see
thevehicleOwner'smanual.
BLACK LEVEL (pg. 91)CONTRAST (pg. 91)
SETUP
SCREEN
(MAIN)
FORECAST W ARNING (pg. 80)
2009 TSX
Page 63 of 170

Navigation System63
Destination Icon
The destination icon only shows the
approximate location of the destination.
This occurs because a city block can
have as many as 100 possible addresses
(for example, the 1400 block is followed
by the 1500 block). Most cities use only
a portion of the 100 possible addresses
(for example, in the 1400 block, the
addresses may only go up to 1425
before the 1500 block starts). Therefore,
the address 1425 will be shown a
quarter of the way down the block by
the system instead of near the end of the
block where the destination is actually
located.
Tip:
When en route, you can view a map
showing your destination. Using voice
control, say “Display destination map.”
Various Other Icons
Landmark Icons
Landmark icons are shown in the map
screen on the 1/20 and 1/8 mile scales or
80 and 200 meter scales. The Freeway
Exit information is displayed on the 1/4,
1/2, and 1 mile scales. The icons are:
Incident Icons
Incident icons are displayed on the 1/20
through 5 mile scales. The icons are:
NOTE:
The Congestion icon is not displayed on
the map screen. This icon is displayed
on the Traffic Incident screen (see
Listing Traffic Incidents by Voice
Control on page24).
One-Way Traffic Icon
The one-way traffic icons (see Map
Screen Legend on page55) are only
shown on the 1/20 mile scale and only
when turned on in ICON OPTIONS
(see page67).
Acura Dealer
School
Restaurant
AT M
Parking Lot
Post OfficeHonda Dealer
Hospital
Grocery Store
Gas Station
Hotel/Lodging
Parking Garage
Freeway Exit Information
Weather
Road ClosedAccident/Incident
Construction
Congestion
Driving to Your Destination
2009 TSX
Page 109 of 170

Navigation System109
System Setup
Clock Adjustment
From the SETUP screen ( Other), say
or select Clock Adjustment and the
following screen appears:
This screen allows you to set or adjust
the following:
Auto Daylight (Default = ON)
Auto Time Zone (Default = ON)
DST (Daylight Savings Time) Selection (change DST schedule)
Time Adjustment (adjust your clock)
RESET (resets this screen’s settings to factory defaults)
Auto Daylight
Sets automatic daylight savings time
ON or OFF . If set to ON , the clock will
automatically “spring ahead” or “fall
behind” by one hour when a daylight
savings time change occurs. If you
reside in a state or area where daylight
savings time is not used, then you may
want to turn this feature off.
NOTE:
If you set Auto Daylight to ON , the Auto
Daylight function is activated even in an
area that does not use daylight savings
time.
The federal government has mandated
that, starting in 2007, daylight savings
time will begin in March and end in
November instead of the old schedule
from April to October. The new
schedule is subject to review and
possible cancellation in 2008. The schedules for the time changes are
stored in the software and can be
selected in the
DST schedule
selection screen. Therefore, your clock
will change based on the daylight
savings time schedule.
NOTE:
The automatic clock setting feature
relies on a satellite signal. It will not
work correctly in Hawaii and Alaska.
2009 TSX
Page 111 of 170

Navigation System111
System Setup
Vehicle
From the SETUP screen ( Other), say
or select Vehicle and the following
screen appears:
Off-road Tracking
With this ON, the system will provide
white off-road tracking dots
(“breadcrumbs”) on the map screen
whenever you drive into an area where
the map does not show any roads. See
Map Screen Legend on page19. After you have traveled approximately
1/2 mile away from a mapped road, the
system will display a series of white
dots on the
map screen to show the path
you have traveled. This is provided so
you can follow the dots to backtrack to
the mapped road you originally left.
Tracking continues until you reach a
mapped road. See Off-road Tracking on
page69.
Tracking is shown only in the 1/20, 1/8,
1/4, and 1/2 mile, or the 80, 200, 400,
and 800 meter scales. Rotate the
Interface Dial knob to change the
scales if necessary.
NOTE:
To clear existing dots, turn this feature
off and exit SETUP. To re-enable this
feature, return to SETUP and turn it on
again.
Correct Vehicle Position
The system relies on satellites for
positioning inform ation. Buildings,
tunnels, and other objects can block or
reflect these signals, requiring the
system to use “dea d reckoning” to
determine your location and direction.
This can sometimes lead to small errors
in positioning, such as showing you on
an adjacent street.
NOTE:
Using this function to adjust vehicle
position is not recommended. When the
system acquires a GPS signal, it will
automatically place the vehicle in the
correct location.
If you choose to do this, follow these
steps:
1. Stop the vehicle.
2009 TSX
Page 116 of 170

116Navigation System
System Setup
System Information
From the SETUP screen ( Other), say
or select System Information and the
following screen appears:
Displays the information on the
navigation system software. This
information is for de aler use only. For
ordering updates, use the version
number stamped on the label (as Ver.
X.XX) of the navigation DVD. See
Obtaining a Navigation Update DVD on
page124.
When finished, say or select Return to
return to the previous screen.
Rearview Camera
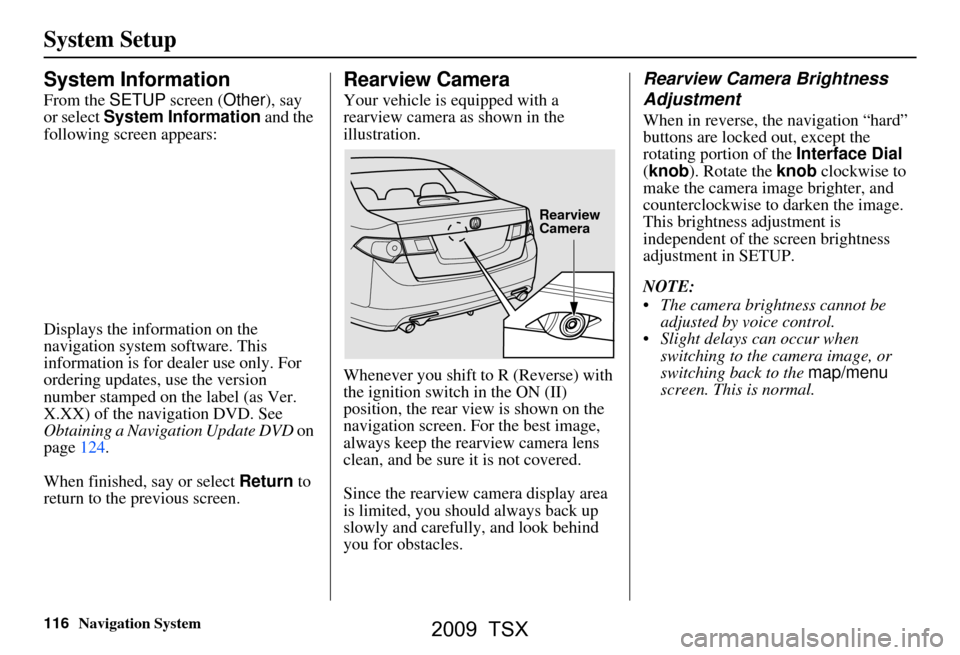
Your vehicle is equipped with a
rearview camera as shown in the
illustration.
Whenever you shift to R (Reverse) with
the ignition switch in the ON (II)
position, the rear view is shown on the
navigation screen. For the best image,
always keep the rearview camera lens
clean, and be sure it is not covered.
Since the rearview camera display area
is limited, you should always back up
slowly and carefully, and look behind
you for obstacles.
Rearview Camera Brightness
Adjustment
When in reverse, the navigation “hard”
buttons are locked out, except the
rotating portion of the Interface Dial
(knob ). Rotate the knob clockwise to
make the camera im age brighter, and
counterclockwise to darken the image.
This brightness adjustment is
independent of the screen brightness
adjustment in SETUP.
NOTE:
The camera brightness cannot be adjusted by voice control.
Slight delays can occur when switching to the ca mera image, or
switching back to the map/menu
screen. This is normal.
Rearview
Camera
2009 TSX
Page 120 of 170

120Navigation System
System Limitations
The destination icon shows the
approximate location of the destination.
This occurs because a city block can
have as many as 100 possible addresses
(for example, the 1400 block is followed
by the 1500 block). Since most cities
use only a portion of the 100 possible
addresses (for example, in the 1400
block, the addresses may only go up to
1425 before the 1500 block starts), the
address 1425 will be shown a quarter of
the way down the block by the system
instead of at the end of the block where
the destination is actually located.
You may find that the system
occasionally reboots. This is indicated
by the display returning to the globe
screen. A reboot can be caused by a
number of things, such as extreme
temperatures or shock from bumpy
roads. It does not necessarily indicate a
problem that requires service. If this
happens frequently, please see your
dealer.
2009 TSX