Page 51 of 560
Place the child seat on the vehicle
seat, then attach the seat to the
lower anchors according to the
child seat maker’s instructions.
Some LATCH-compatible seats
have a rigid-type connector as
shown above.Other LATCH-compatible seats
have a f lexible-type connector as
shown above.
Whatever type you have, f ollow
the child seat maker’s instructions
f or adjusting or tightening the f it.
Route the tether strap over the
head restraint, then attach the
tether strap hook to the anchor,
making sure the strap is not
twisted.
Tighten the strap according to the
seat maker’s instructions.
Pushandpullthechildseat
f orward and f rom side-to-side to
verify that it is secure.
4.
5.6.
7.
8.
Installing a Child Seat
48
RIGID TYPE FLEXIBLE TYPE TETHER STRAP HOOK
ANCHOR
2009 RL
Page 52 of 560
CONT INUED
When not using the LATCH system,
all child seats must be secured to the
vehicle with the lap part of a lap/
shoulder belt.With the child seat in the desired
seating position, route the belt
through the child seat according
to the seat maker’s instructions,
then insert the latch plate into the
buckle.To activate the lockable retractor,
slowly pull the shoulder part of the
belt all the way out until it stops,
then let the belt feed back into the
retractor.
Af ter the belt has retracted, tug on
it. If the belt is locked, you will not
be able to pull it out. If you can pull
thebeltout,itisnotlocked,and
you will need to repeat these steps.
In addition, the lap/shoulder belts in
all seating positions except the
driver’s have a lockable retractor
that must be activated to secure a
child seat.
1. 2.
3.
Installing a Child Seat
Installing a Child Seat with a L ap/
Shoulder Belt
Driver and Passenger Saf ety
49
2009 RL
Page 56 of 560

Does the shoulder belt cross
between the child’s neck and arm?
Is the lap part of the belt as low as
possible, touching the child’s
thighs?
Will the child be able to stay
seated like this f or the whole trip?
If you answer yes to all these
questions, the child is ready to wear
the lap/shoulder belt correctly. If
you answer no to any question, the
child needs to ride on a booster seat. A child who has outgrown a f orward- f acing child seat should ride in a
back seat and use a booster seat
until the lap/shoulder belt f its them
properly without the booster.If a child who uses a booster seat
must ride in f ront, move the vehicle
seat as far back as possible and be
sure the child is wearing the seat
belt properly.
A child may continue using a booster
seat until the tops of their ears are
even with the top of the vehicle’s or
booster’s seat-back. A child of this
height should be tall enough to use
the lap/shoulder belt without a
booster seat.
Some states and Canadian provinces
also require children to use a booster
seat until they reach a given age or
weight (e.g., 6 years or 60 lbs). Be
sure to check current laws in the
states or provinces where you intend to drive.
Booster seats can be high-back or
low-back. Whichever style you select,
make sure the booster seat meets
f ederal saf ety standards (see page
) and that you f ollow the booster
seat maker’s instructions.
3.
4.
5.
45
Using a Booster Seat
Protecting L arger Children
Driver and Passenger Saf ety
53
2009 RL
Page 62 of 560

This section gives inf ormation about
the controls and displays that
contribute to the daily operation of
your vehicle. All the essential
controls are within easy reach............................
Control Locations .60
............................
Instrument Panel .61 ..........
Instrument Panel Indicators .62
.............................................
Gauges .70
...................
Temperature Gauge .70
..................................
Fuel Gauge .70
.............
Multi-Inf ormation Display .71
Controls Near the Steering
.........................................
Wheel .136
Windshield Wipers and
.....................................
Washers .137
.......
Turn Signals and Headlights .140
.................................
Fog Lights .142
.........
Daytime Running Lights .142
Automatic Lighting Off
...................................
Feature .143
Adaptive Front Lighting System ..........................................
(AFS) .144
...............
Hazard Warning Button .146
......
Instrument Panel Brightness .146
...............
Rear Window Def ogger .147
......
Steering Wheel Adjustments .148
.............................
Keys and Locks .150
......................
Immobilizer System .151
..............................
Ignition Switch .152
....................................
Door Locks .153
..............................................
Trunk .154
......
Emergency Trunk Opener .155 ................
Childproof Door Locks .155
...............................................
Seats .156
...........................................
Mirrors .161
Driving Position Memory
........................................
System .163
................
Keyless Access System .166
.......................
Front Seat Heaters .181
Front Seat Heaters and Seat
.................................
Ventilation .182
Rear Seat Heaters ...................
(Canadian models) .184
............................
Power Windows .185
.......................................
Moonroof .188
...............................
Parking Brake .191
.........
Interior Convenience Items .192
..................................
Glove Box .193
.....................
Beverage Holders .194
.............
Console Compartment .195
..................................
Sun Visors .196
............................
Vanity Mirror .196
........
Accessory Power Sockets .197
..................
Front Door Pockets .197
..............
Power Rear Sunshade .198
..............
Integrated Sunshades .199
...............................
Interior Lights .200
Instruments and Controls
Inst rument s and Cont rols
59
2009 RL
Page 159 of 560
�µ
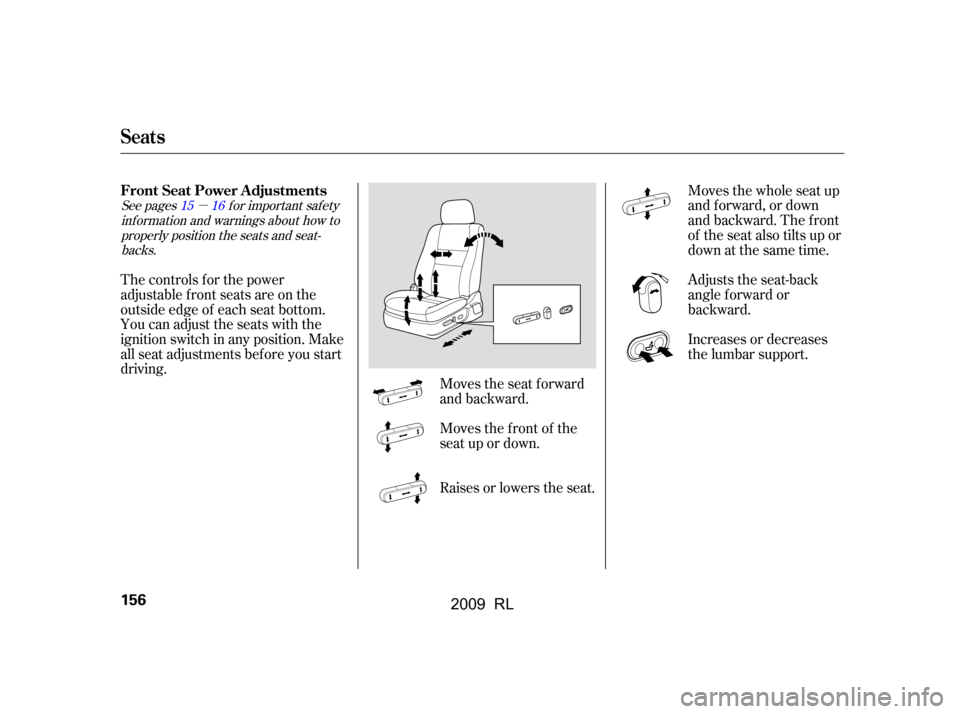
Moves the seat forward
and backward.
The controls f or the power
adjustable front seats are on the
outside edge of each seat bottom.
You can adjust the seats with the
ignition switch in any position. Make
all seat adjustments bef ore you start
driving.
Moves the f ront of the
seat up or down.
Raises or lowers the seat.Moves the whole seat up
and f orward, or down
and backward. The front
of the seat also tilts up or
down at the same time.
Adjusts the seat-back
angle f orward or
backward.
Increases or decreases
the lumbar support.
See pages f or important saf ety
inf ormation and warnings about how toproperly position the seats and seat-backs. 1516
Front Seat Power A djustments
Seats
156
2009 RL
Page 160 of 560
See pagef or important saf etyinf ormation and a warning aboutimproperly positioning head restraints. 16
CONT INUED
Your vehicle has adjustable head
restraints on the f ront seats. The f ront head restraints adjust f or
height. You need both hands to
adjust a restraint. Do not attempt to
adjust it while driving. To raise it,
pull upward. To lower the restraint,
push the release button sideways,
and push the restraint down.
Your vehicle is equipped with head
restraints in all seating positions to
help protect you and your
passengers f rom whiplash and other
injuries.
They are most ef f ective when you
adjust them so the center of the back
of the occupant’s head rests against
the center of the restraint.
Head Restraints
Seats
A djust ing t he Head Rest raint
Inst rument s and Cont rols
157
FRONT
RELEASE
BUTTON
CUSHION
LEGS SEAT-BACK
2009 RL
Page 161 of 560
To remove a head restraint f or
cleaning or repair, pull it up as f ar as
it will go. Push the release button,
then pull the restraint out of the seat-
back.When reinstalling a head restraint,
put the legs back in place. Then
adjust it to the appropriate height
while pressing the release button.
Make sure the head restraint locks
in position when you reinstall it.You can raise the rear head
restraints by hand.
To lower the rear head restraints f or
better visibility, press the rear head
restraint tilt button on the ceiling
console with the ignition switch in
the ON (II) position.
Seats
Removing t he Head Rest raint
158
REAR HEAD RESTRAINT
TILT BUTTON
REAR
Failure to reinstall the head
restraints can result in severe
injury during a crash.
Always replace the head
restraints before driving.
2009 RL
Page 162 of 560

The driver’s and f ront passenger’s
seats have active head restraints. If
the vehicle is struck severely f rom
the rear, the occupant properly
secured with the seat belt will be
pushed against the seat-back and the
head restraint will automatically
move forward.
This reduces the distance between
the restraint and the occupant’s head.
It also helps protect the occupantsagainst whiplash and injuries to the
neck and upper spine.
Af ter a collision, the activated
restraint should return to its normal
position.
For a head restraint system to work
properly:
Do not hang any items on the head
restraints, or f rom the restraint
legs.
Do not place any object between
an occupant and the seat-back.
Install each restraint in its proper
location.
If the restraints do not return to their
normal position, or in the event of a
severe collision, have the vehicle
inspected by an Acura dealer.
Only use genuine Acura
replacement head restraints.
A ct ive Head Rest raint s
Seats
Inst rument s and Cont rols
159
2009 RL