Page 355 of 433
CONT INUED
Use a Phillips-head screwdriver to
remove the screw and use a flat-
tipped screwdriver to remove the
holding clip located under the
f ront bumper.
Push up the undercover.
Your vehicle uses halogen light
bulbs. When replacing a bulb, handle
it by its plastic case, and protect the
glass from contact with your skin or
hard objects. If you touch the glass,
clean it with denatured alcohol and a
clean cloth.
Turn on the lights to make sure
the new bulb is working.
Put the socket back into the light
assembly, and turn it clockwise to
lock it in place.
Install the rear light assembly in
the rear pillar. Tighten the two
bolts. Snap the bolt covers into
position.
1.
2.
6.
7.
8.
Lights
Replacing a Front Fog L ight Bulb
Maint enance
351
HOLDING CLIP
SCREWHalogen bulbs get very hot when lit.
Oil, perspiration, or a scratch on the
glass can cause the bulb to overheat
and shatter.
�\f���—�\f���—�
�
�y�
�������������y���
�(�)� �����\f�y�\f�������y
2009 RDX
Page 356 of 433
Remove the two screw covers on
the light assembly by prying on
the side edge with a flat-tip
screwdriver.
Remove the screws with a Phillips-
head screwdriver, then remove
the light assembly f rom the
tailgate.
Install the new bulb into the hole
and turn it one-quarter turn
clockwise to lock it in place.
Push the electrical connector back
onto the bulb. Make sure it is on
all the way.
Turn on the f og lights to test the
new bulb.
Put the undercover in place.
Reinstall the clip, and tighten the
screw securely.
Remove the electrical connector
f rom the bulb by pushing on the
tab and pulling the connector
down.
Remove the bulb f rom the f og
light assembly by turning it one-
quarter turn counterclockwise. 5.
6.
7.
8.
1.
2.
3.
4.
Lights
Replacing a High-mount Brake
Light Bulb
352
COVERS
SCREWS
CONNECTOR
BULB
�\f���—�\f���—�
�
�y�
�������������y���
�(�)� �����\f�y�\f�������y
2009 RDX
Page 357 of 433
Each outside mirror has side turn
signal lights. The lights should be
replaced by your dealer.
The license plate has two lights
above it. The bulbs should be
replaced by your dealer.
Press the brake pedal to make
sure the new bulb is working.
Put the socket back into the light
assembly, and turn it clockwise to
lock it in place.
Reinstall the high-mount brake
light assembly into the tailgate.
Tighten the two screws and
reinstall the covers.
Pull the bulb straight out of its
socket. Push the new bulb straight
into the socket until it bottoms.
Remove the socket f rom the light
assembly by turning it one-quarter
turn counterclockwise. 6.
5.
7.
3.
4.
Lights
Side T urn Signal L ights
Replacing a Rear License Plate
Light Bulb
Maint enance
353
SOCKET
BULB
�\f���—�\f���—�
�
�y�
�������������y���
�(�)� �����\f�y�\f�������y
2009 RDX
Page 358 of 433

If your seat belts get dirty, use a sof t
brush with a mixture of mild soap
and warm water to clean them. Do
not use bleach, dye, or cleaning
solvents. Let the belts air-dry bef ore
you use the vehicle.
Dirt build-up in the loops of the seat
belt anchors can cause the belts to
retract slowly. Wipe the insides of
the loops with a clean cloth
dampened in mild soap and warm
water or isopropyl alcohol.The driver’s and f ront passenger’s
floor mats that came with your
vehicle hook over the f loor mat
anchors. To lock each anchor, turn
theknobclockwise.Thiskeepsthe
f loor mats f rom sliding f orward
(possibly interf ering with the pedals),
or backwards (making the f ront
passenger’s weight sensors
inef f ective). If you remove a f loor
mat, make sure to re-anchor it when
you put it back in your vehicle.If you use a non-Acura f loor mat,
make sure it f its properly and that it
canbeusedwiththefloormat
anchors. Do not put additional f loor
mats on top of the anchored mats.
Cleaning the Seat Belts Floor Mats
Cleaning the Seat Belts, Floor Mats
354
LOOP
FLOOR MAT ANCHORS
�\f���—�\f���—�
�
�y�
�������������y���
�(�)� �����\f�y�\f�������y
2009 RDX
Page 360 of 433
To replace a f ront wiper blade: Disconnect the blade assemblyfrom the wiper arm:
Raise each wiper arm of f the
windshield, lif ting the driver’s side
first, then the passenger’s side.
Check the condition of the wiper
blades at least every six months.
Replace them if you f ind signs of
cracking in the rubber, areas that are
getting hard, or if they leave streaks
and unwiped areas when used.
Press and hold the lock tab.
Slide the blade assembly toward
the lock tab until it releases
from the wiper arm.
When replacing a wiper blade,
make sure not to drop the wiper
blade or wiper arm down on the
windshield.
2.
1.
Wiper Blades
356
WIPER ARMS
Do not open the hood when the wiper
arms are raised, or you will damage the
hood and the wiper arms.
�\f���—�\f���—�
�
�y�
������\f��
���y���
�(�)� �����\f�y�\f�����
�y
2009 RDX
Page 361 of 433
�á�á �á
CONT INUED
Examine the new wiper blades. If
they have no plastic or metal
reinf orcement along the back
edge, remove the metal
reinf orcement strips f rom the old
wiper blade, and install them in
the slots along the edge of the new
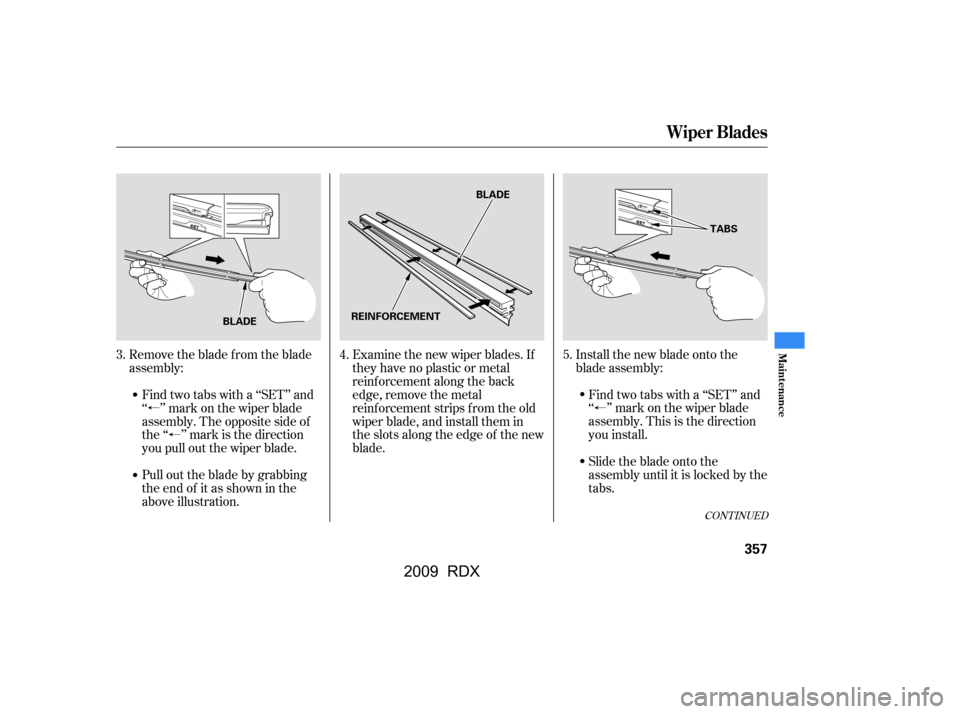
blade.Install the new blade onto the
blade assembly:
Remove the blade from the blade
assembly:
Pull out the blade by grabbing
the end of it as shown in the
above illustration.
Find two tabs with a ‘‘SET’’ and
‘‘ ’’ mark on the wiper blade
assembly. The opposite side of
the ‘‘ ’’ mark is the direction
you pull out the wiper blade. Find two tabs with a ‘‘SET’’ and
‘‘ ’’ mark on the wiper blade
assembly.Thisisthedirection
you install.
Slide the blade onto the
assembly until it is locked by the
tabs.
5.
3. 4.
Wiper Blades
Maint enance
357
REINFORCEMENT BLADE
BLADE TABS
�\f���—�\f���—�
�
�y�
������\f������y���
�(�)� �����\f�y�\f�������y
2009 RDX
Page 362 of 433
Slide the wiper blade assembly
onto the wiper arm. Make sure it
locks in place.
Make sure the blade is completely
installed and that its edge is not
bunched up.
Lower the wiper arm down against
the windshield, the passenger’s
side first, then the driver’s side.To replace the rear wiper blade:Raise the wiper arm of f the rear
window. Slidethebladeoutof thewiper
arm.
6.
7.
1.2.
8.
Wiper Blades
358
BLADE
WIPER ARM
�\f���—�\f���—�
�
�y�
������\f������y���
�(�)� �����\f�y�\f�������y
2009 RDX
Page 372 of 433

Fill the f uel tank.Block the rear wheels.
If the vehicle is to be stored f or a
longer period, it should be
supported on jackstands so the
tires are of f the ground.
Cover the vehicle with a
‘‘breathable’’ cover, one made
f rom a porous material such as
cotton. Non-porous materials, such
as plastic sheeting, trap moisture,
which can damage the paint.
If you need to park your vehicle f or
an extended period (more than 1
month), there are several things you
should do to prepare it f or storage.
Proper preparation helps prevent
deterioration and makes it easier to
get your vehicle back on the road. If
possible, store your vehicle indoors. Leave one window open slightly (if
the vehicle is being stored
indoors).
Disconnect the battery.
Support the f ront and rear wiper
blade arms with a f olded towel or
ragsotheydonottouchthe
windshield.
To minimize sticking, apply a
silicone spray lubricant to all door
and tailgate seals. Also, apply a
vehiclebodywaxtothepainted
surfaces that mate with the door
and tailgate seals.If possible, periodically run the
engine until it reaches f ull
operating temperature (the
cooling f ans cycle on and of f
twice). Pref erably, do this once a
month.
Wash and dry the exterior
completely.
Cleantheinterior.Makesurethe
carpeting, floor mats, etc., are
completely dry.
Leave the parking brake off. Put
the transmission in Park.
Vehicle Storage
368
�\f���—�\f���—�
�
�y�
������
������y���
�(�)� �����\f�y�\f�������y
2009 RDX