2009 Acura MDX set clock
[x] Cancel search: set clockPage 173 of 489

The climate control system in your
vehicle provides a comfortable
driving environment in all weather
conditions.
The standard audio system has many
features. This section describes
those features and how to use them.
Your vehicle has an anti-theft audio
system that requires a code number
to enable it.Climate Control System
..............
170
Rear Climate Controls
.............
175
Audio System
..............................
180
Playing the AM/FM Radio
(Models without navigationsystem)
...............................
181
Playing the XM
®Satellite Radio
(Models without navigation system)
...............................
185
Playing Discs (Models without navigation system)
..................
190
Disc Changer Error Message (Models without navigation
system)
...............................
199
Audio System (Models with
navigation system)
..................
200
Playing the AM/FM Radio (Models with navigation
system)
...............................
201
AM/FM Radio Reception
............
205
Playing the AM/FM Radio (Models with navigation
system)
...............................
207 Playing the XM
®Satellite Radio
(Models with navigation
system)
...............................
210
Playing Discs (Models with
navigation system)
..................
218
Disc Changer Error
Messages
................................
228
Protecting Your Discs
.................
229
Auxiliary Input Jack
....................
232
Remote Audio Controls
...............
233
Radio Theft Protection
................
235
Setting the Clock and Calendar
.................................
236
Rear Entertainment System
........
237
Security System
..........................
269
Cruise Control
............................
270
Compass
.....................................
273
HomeLink
®Universal
Transceiver
.............................
276
Bluetooth
®HandsFreeLink
®.......
278
AcuraLink
®(U.S. models
only)
.......................................
307
Rearview Camera and Monitor
...................................
319
Features
169
Feat ures
08/06/06 16:58:07 09 ACURA MDX MMC North America Owner's M 50 31STX620 enu
2009 MDX
Page 240 of 489

On models without navigation systemYou can see the clock and calendar
information on the upper display.
To set the clock and the calendar:1. Press and hold the SET button until the clock display begins to
blink. 2. Press and release the SET button
repeatedly. The mode switches
from hours, minutes, AM/PM,
year, month, then to day as shown
above.
3. Select the desired mode by pressing the SET button, then
press either ▼or▲ button to
change the setting. 4. After you set the day information,
pressing the SET button again will
cancel this setting mode and the
system shows the adjusted display.
The system will also automatically
return to the normal display about 10
seconds after you stop adjusting a
mode.
On models with navigation systemThe navigation system receives
signals from the global positioning
system (GPS), and the displayed
time is updated automatically by the
GPS. Refer to the navigation system
manual for how to adjust the time.
U.S. model is shown : Press SETSetting the Clock and Calendar23608/06/06 16:58:07 09 ACURA MDX MMC North America Owner's M 50 31STX620 enu
2009 MDX
Page 277 of 489

Compass OperationCanadian MDX modelCompass operation can be affected
by driving near power lines or
stations, across bridges, through
tunnels, over railroad crossings, past
large vehicles, or driving near large
objects that can cause a magnetic
disturbance. It can also be affected
by accessories such as antennas and
roof racks that are mounted by
magnets.
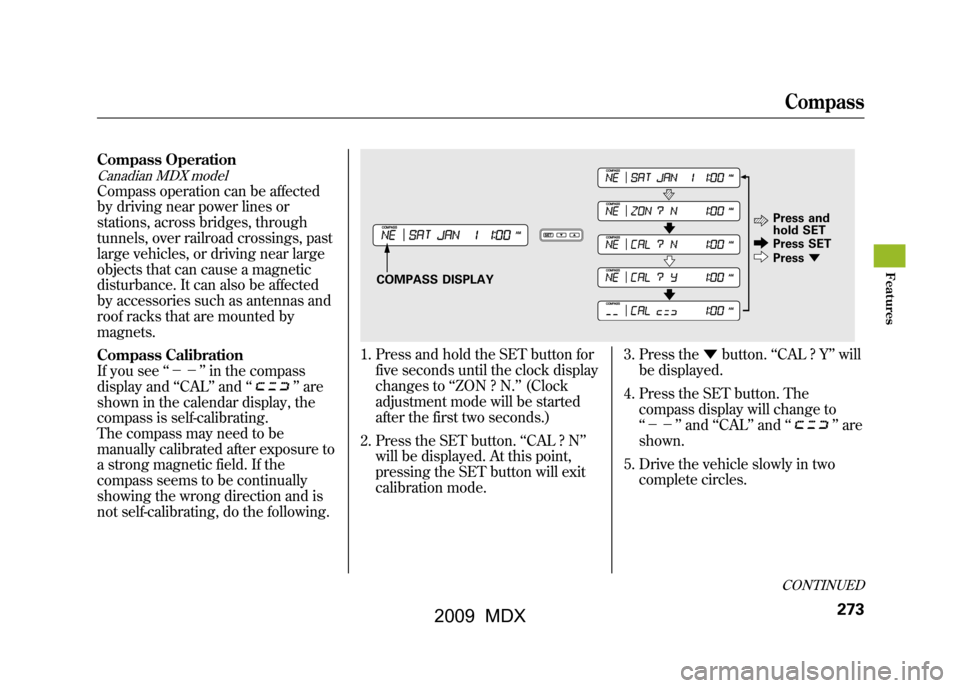
Compass Calibration
If you see‘‘-- ’’in the compass
display and ‘‘CAL ’’and ‘‘
’’are
shown in the calendar display, the
compass is self-calibrating.
The compass may need to be
manually calibrated after exposure to
a strong magnetic field. If the
compass seems to be continually
showing the wrong direction and is
not self-calibrating, do the following.
1. Press and hold the SET button for
five seconds until the clock display
changes to ‘‘ZON ? N. ’’(Clock
adjustment mode will be started
after the first two seconds.)
2. Press the SET button. ‘‘CAL ? N ’’
will be displayed. At this point,
pressing the SET button will exit
calibration mode. 3. Press the
▼button. ‘‘CAL ? Y ’’will
be displayed.
4. Press the SET button. The compass display will change to
‘‘-- ’’and ‘‘CAL ’’and ‘‘
’’are
shown.
5. Drive the vehicle slowly in two complete circles.
COMPASS DISPLAY Press and
hold SET
Press SET
Press
▼
CONTINUEDCompass
273
Feat ures
08/06/06 16:58:07 09 ACURA MDX MMC North America Owner's M 50 31STX620 enu
2009 MDX
Page 278 of 489

6. When the display goes from‘‘-- ’’to an actual heading, the
unit is calibrated and the display
returns to normal.
NOTE: Do this procedure in an open
area, away from buildings, power
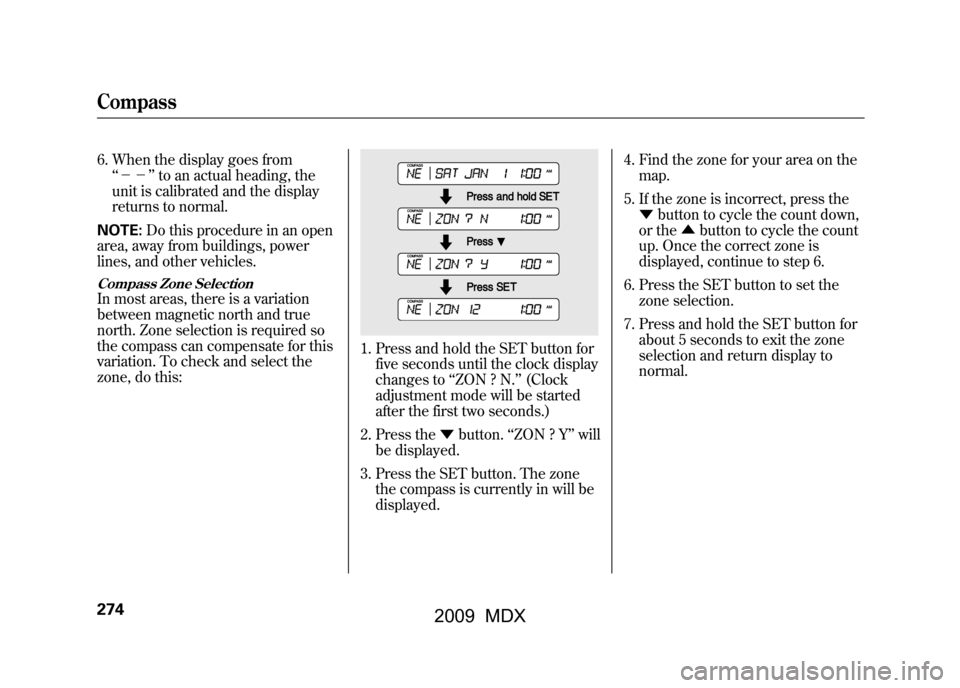
lines, and other vehicles.Compass Zone SelectionIn most areas, there is a variation
between magnetic north and true
north. Zone selection is required so
the compass can compensate for this
variation. To check and select the
zone, do this:
1. Press and hold the SET button for five seconds until the clock display
changes to ‘‘ZON ? N. ’’(Clock
adjustment mode will be started
after the first two seconds.)
2. Press the ▼button. ‘‘ZON ? Y’’ will
be displayed.
3. Press the SET button. The zone the compass is currently in will be
displayed. 4. Find the zone for your area on the
map.
5. If the zone is incorrect, press the ▼ button to cycle the count down,
or the ▲button to cycle the count
up. Once the correct zone is
displayed, continue to step 6.
6. Press the SET button to set the zone selection.
7. Press and hold the SET button for about 5 seconds to exit the zone
selection and return display to
normal.
Compass27408/06/06 16:58:07 09 ACURA MDX MMC North America Owner's M 50 31STX620 enu
2009 MDX
Page 439 of 489

4. If the temperature gauge stays atthe red mark, turn off the engine.
5. Look for any obvious coolant leaks, such as a split radiator hose.
Everything is still extremely hot,
so use caution. If you find a leak, it
must be repaired before you
continue driving (see Emergency
Towing on page446).
6. If you do not find an obvious leak, check the coolant level in the
radiator reserve tank. Add coolant
if the level is below the MIN mark.
7. If there was no coolant in the reserve tank, you may need to add
coolant to the radiator. Let the
engine cool down until the pointer
reaches the middle of the
temperature gauge, or lower,
before checking the radiator.
Removing the radiator cap
while the engine is hot can
cause the coolant to spray out,
seriously scalding you.
Always let the engine and
radiator cool down before
removing the radiator cap.
8. Using gloves or a large heavy cloth, turn the radiator cap
counterclockwise, without pushing
down, to the first stop. After the
pressure releases, push down on
the cap, and turn it until it comes
off. 9. Start the engine and set the
climate control to AUTO at ‘‘Hi. ’’
Add coolant to the radiator up to
the base of the filler neck. If you
do not have the proper coolant
mixture available, you can add
plain water. Remember to have the
cooling system drained and refilled
with the proper mixture as soon as
you can.
10. Put the radiator cap back on tightly. Run the engine, and check
the temperature gauge. If it goes
back to the red mark, the engine
needs repair (see Emergency
Towing on page446).
11. If the temperature stays normal, check the coolant level in the
radiator reserve tank. If it has gone
down, add coolant to the MAX
mark. Put the cap back on tightly.
If the Engine Overheats
435
T aking Care of t he Unexpect ed
08/06/06 16:58:07 09 ACURA MDX MMC North America Owner's M 50 31STX620 enu
2009 MDX
Page 476 of 489

Bulb ReplacementBack-up Lights
........................
407
Brake Lights
...........................
406
Front Parking Lights
...............
404
Front Side Marker Lights
........
404
Headlights
..............................
403
Rear Bulbs
..............................
406
Specifications
..........................
453
Taillights
.................................
406
Turn Signal Lights
..........
404, 406
Bulbs, Halogen
..........................
403
C
Cancel Button
............................
272
Capacities Chart
.........................
452
Carbon Monoxide Hazard
...... ......
58
Cargo
.........................................
332
Cargo Area Light
........................
161
Cargo Hook
................................
336
Cargo, How to Carry
..................
332
Carrying Cargo
..........................
332
CAUTION, Explanation of
...... .......
iii
CD Care
.....................................
229
Certification Label
......................
450 Chains, Tires
..............................
420
Changing a Flat Tire
..................
425
Changing Oil How to
....................................
394
When to
..................................
383
Charging System Indicator
...........................
65, 436
Checklist, Before Driving
...........
338
Childproof Door Locks
...............
131
Child Safety
..................................
37
Booster Seats
...........................
55
Child Seats
..........................
42, 45
Important Safety Reminders.....
41
Infants
......................................
42
Large Children
.........................
54
LATCH
.....................................
47
Risks with Airbags
...................
38
Small Children
.........................
43
Tethers
....................................
51
Where Should a Child Sit?
........
38
Child Seats
.............................
37, 45
LATCH Anchorage Points
........
47
Tether Anchorage Points
.........
51
Cleaning the Seat Belts
..............
409
Client Services
...........................
466
Climate Control System
.............
170 Clock
..........................................
236
Code, Audio System
...................
235
CO in the Exhaust
................
58, 460
Cold Weather, Starting in
...........
339
Compact Spare Tire
....................
424
Console Compartment
...............
164
Consumer Information (U.S. only)
.......................................
466
Controls, Instruments and
............
61
Coolant Adding
....................................
396
Checking
................................
326
Proper Solution
.......................
396
Temperature Gauge
.................
72
Crankcase Emissions Control System
...................................
460
Cruise Control Indicator
...............
70
Cruise Control Operation
...........
270
Cup Holders
...............................
163
Customize Settings
.. ....................
83
Door/Window Setup
...............
105
Lighting Setup
.........................
100
Meter Setup
.............................
89
Position Setup
..........................
97
Setting to Default
.....................
86
Wiper Setup
............................
113
IndexII08/06/06 16:58:07 09 ACURA MDX MMC North America Owner's M 50 31STX620 enu
2009 MDX