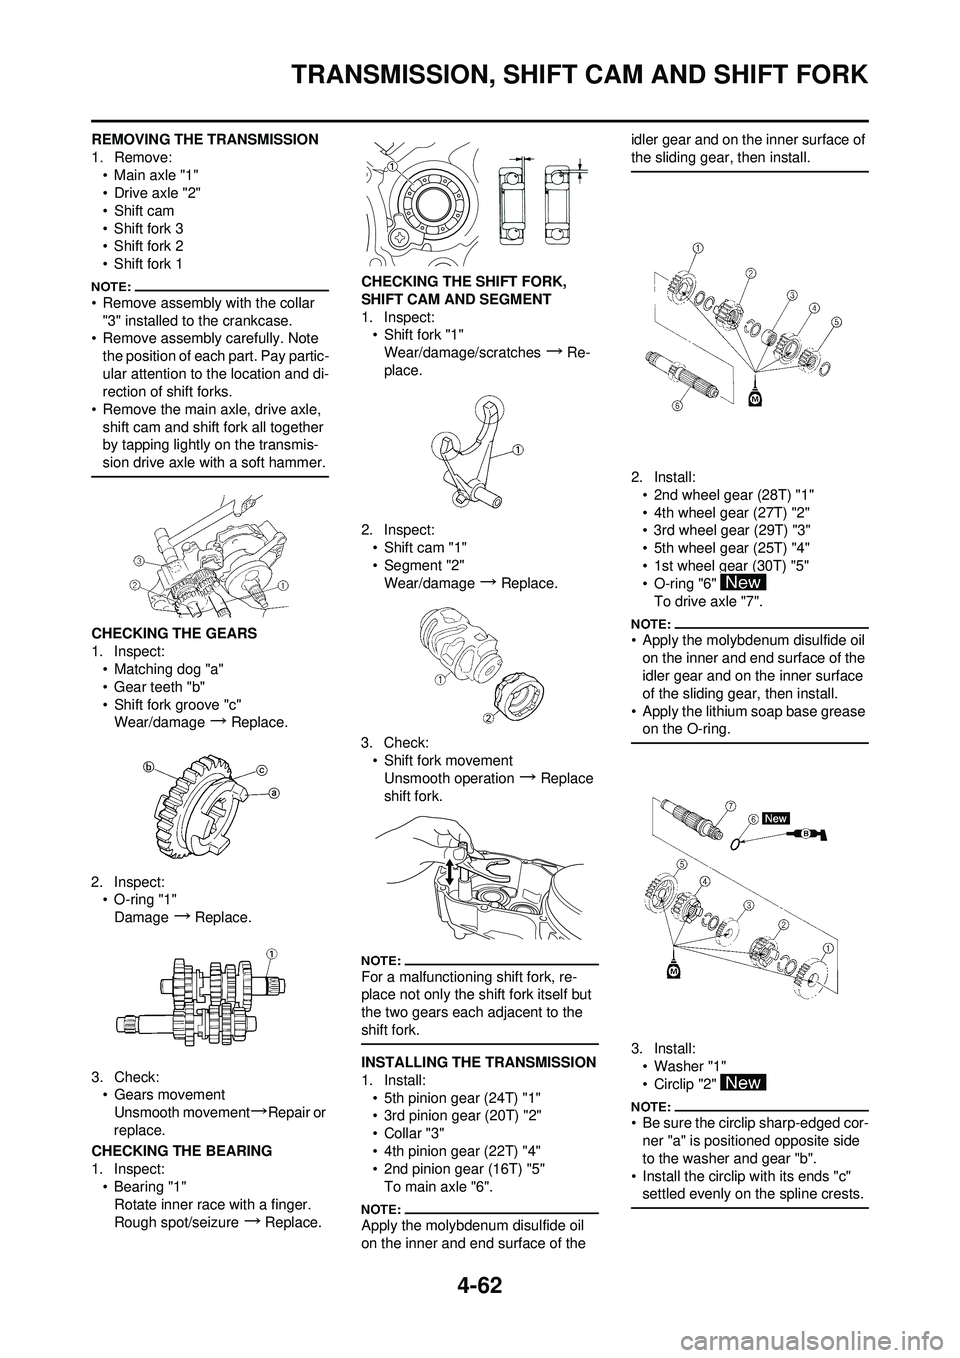
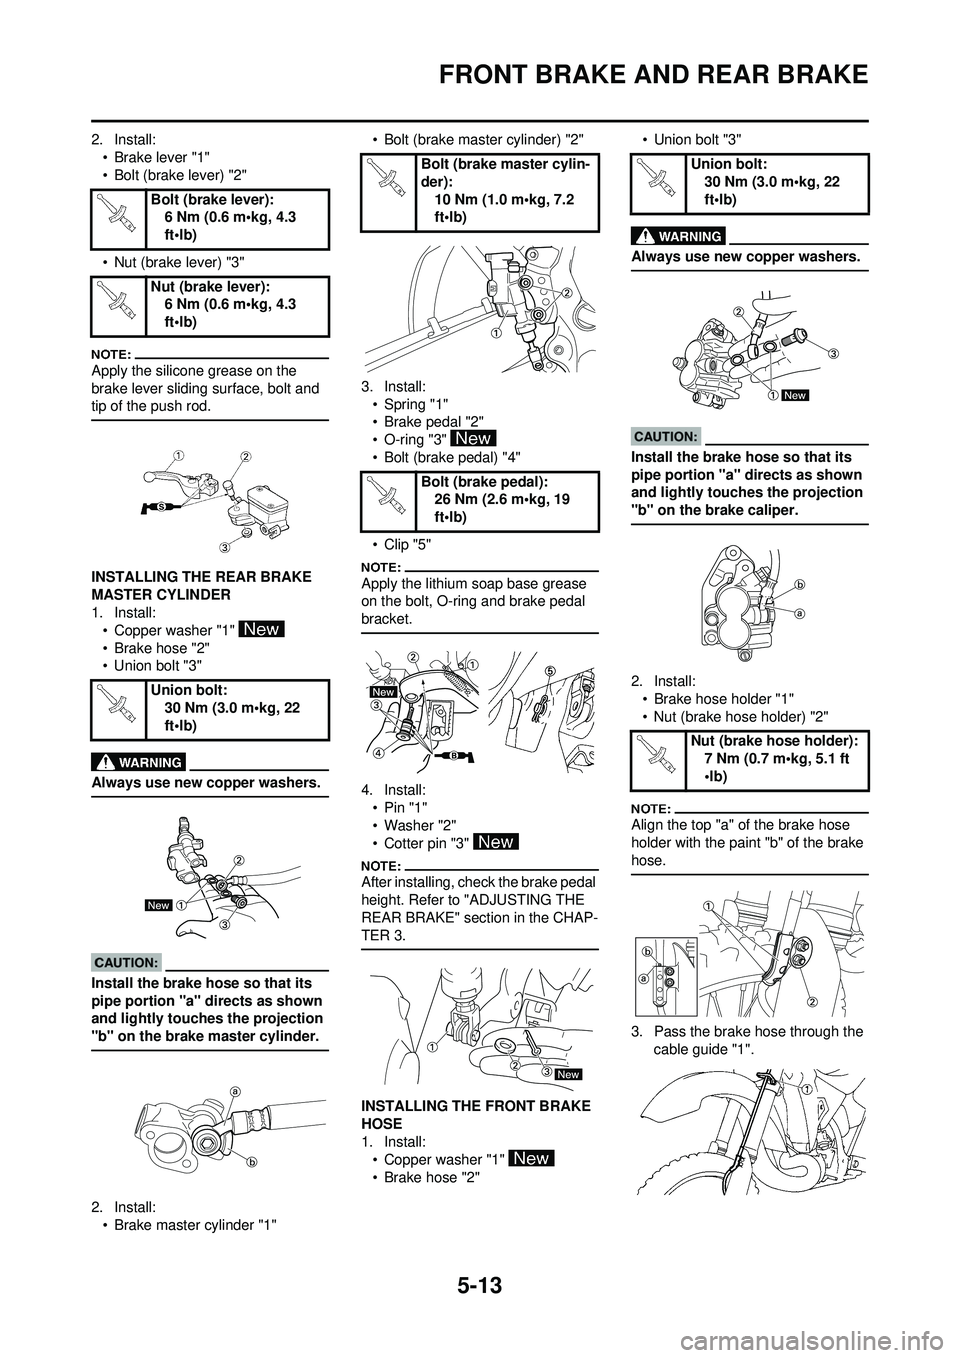
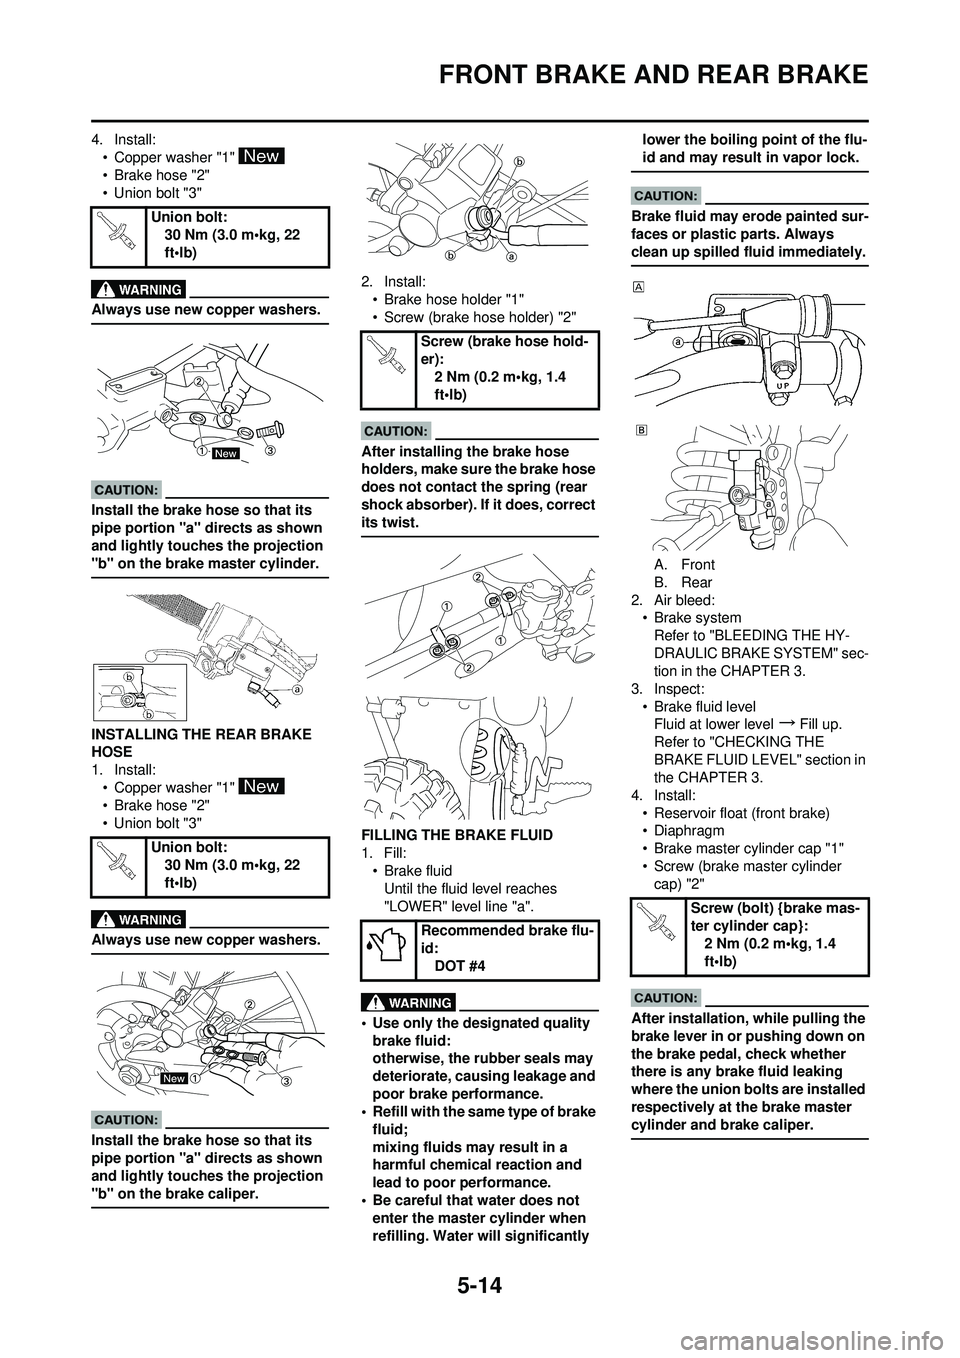
2008 YAMAHA YZ250F light
[x] Cancel search: lightPage 93 of 192

4-24
VALVES AND VALVE SPRINGS
2. Measure:• Compressed spring force "a"Out of specification
→Replace.
b. Installed length
3. Measure:
• Spring tilt "a"Out of specification
→Replace.
CHECKING THE VALVE LIFTERS
1. Inspect: • Valve lifterScratches/damage
→Replace
both lifters and cylinder head. INSTALLING THE VALVES
1. Apply:
• Molybdenum disulfide oilOnto the valve stem and valve
stem seal.
2. Install: •Valve "1"
• Valve spring seat "2"
• Valve stem seal "3"
• Valve spring "4"
• Valve spring retainer "5"
To cylinder head.
• Make sure that each valve is in-stalled in its original place, also re-
ferring to the painted color as
follows.
Intake (middle) "a": Orange
Intake (right/left) "b": Green
Exhaust "c": Purple
• Install the valve springs with the
larger pitch "d" facing upward.
e. Smaller pitch
3. Install:
• Valve cotter
While compressing the valve spring
with a valve spring compressor "1" in-
stall the valve cotters.
4. To secure the valve cotters onto the valve stem, lightly tap the
valve tip with a piece of wood.
Hitting the valve tip with excessive
force could damage the valve.
5. Install:• Adjusting pad "1"
• Valve lifter "2"
• Apply the molybdenum disulfide oil on the valve stem end.
• Apply the engine oil on the valve lift- ers.
• Valve lifter must turn smoothly when rotated with a finger.
• Be careful to reinstall valve lifters
and pads in their original place.
Compressed spring
force: Intake:99–114 N at 29.13 mm
(9.9–11.4 kg at 29.13
mm, 22.27–25.57 lb at
1.15 in)
Exhaust:
126–144 N at 29.30
mm (12.6–14.4 kg at
29.30 mm, 28.44–
32.41 lb at 1.15 in)
Spring tilt limit: Intake:
2.5°/1.7 mm (0.067 in)
Exhaust: 2.5°/1.6 mm (0.063 in)
Valve spring compres-
sor:
YM-4019/90890-04019
Page 127 of 192

4-58
CRANKCASE AND CRANKSHAFT
DISASSEMBLING THE
CRANKCASE
1. Separate:• Right crankcase
• Left crankcase
Separation steps:
a. Remove the crankcase bolts "1", hose guide "2" and clutch cable
holder "3".
Loosen each bolt 1/4 of a turn at a
time and after all the bolts are loos-
ened, remove them.
b. Remove the right crankcase "4".
• Place the crankcase with its left half
downward and split the right half
apart while lifting it horizontally by
lightly tapping the projection "a" on
it using a soft hammer.
• When splitting it, leave the crank-
shaft and transmission with the left
half.
Use soft hammer to tap on the
case half. Tap only on reinforced
portions of case. Do not tap on
gasket mating surface. Work slow-
ly and carefully. Make sure the
case halves separate evenly. If the
cases do not separate, check for a
remaining case bolt or fitting. Do
not force.
c. Remove the dowel pins and O- ring.
REMOVING THE CRANKSHAFT
1. Remove:• Crankshaft "1"Use the crankcase separating
tool "2".
Do not use a hammer to drive out
the crankshaft.
REMOVING THE CRANKCASE
BEARING
1. Remove:• Bearing "1"
• Remove the bearing from the
crankcase by pressing its inner
race.
• Do not use the removed bearing.
CHECKING THE TIMING CHAIN
AND TIMING CHAIN GUIDE
1. Inspect:
•Timing chainCracks/stiff
→Replace the timing
chain and camshaft sprocket as a
set.
2. Inspect: • Timing chain guide
Wear/damage
→Replace.
CHECKING THE CRANKCASE
1. Inspect: • Contacting surface "a"Scratches
→Replace.
• Engine mounting boss "b", crank- case
Cracks/damage
→Replace. 2. Inspect:
• BearingRotate inner race with a finger.
Rough spot/seizure
→Replace.
3. Inspect: •Oil seal
Damage
→Replace.
CHECKING THE CRANKSHAFT
1. Measure: • Runout limit "a"
• Small end free play limit "b"
• Connecting rod big end side clearance "c"
• Crank width "d" Out of specification
→Replace.
Use the dial gauge and a thick-
ness gauge.
Crankcase separating
tool: YU-1135-A/90890-
01135
Dial gauge and stand:YU-3097/90890-01252
Standard
Runou
t limit: 0.03 mm (0.0012
in) 0.05
mm
(0.002
in)
Small
end
free
play: 0.4–1.0 mm
(0.016–0.039 in) 2.0 mm
(0.08 in)
Side
clear-
ance: 0.15–0.45 mm
(0.0059–0.0177 in) 0.50
mm
(0.02 in)
Crack
width: 55.95–56.00
mm (2.203– 2.205 in) —
Page 129 of 192

4-60
CRANKCASE AND CRANKSHAFT
5. Install:• Dowel pin "1"
• O-ring "2"
• Right crankcaseTo left crankcase.
• Apply the lithium soap base grease on the O-ring.
• Fit the right crankcase onto the left
crankcase. Tap lightly on the case
with soft hammer.
• When installing the crankcase, the
connecting rod should be posi-
tioned at TDC (top dead center).
6. Tighten:• Hose guide "1"
• Clutch cable holder "2"
• Bolt (crankcase) "3"
Tighten the crankcase tightening
bolts in stage, using a crisscross pat-
tern.
7. Install:• Oil delivery pipe 2 "1"
• O-ring "2"
• Bolt (oil delivery pipe 2) "3"
Apply the lithium soap base grease
on the Orings.
8. Install:
• Timing chain "1"
• Timing chain guide (intake side) "2"
• Bolt (timing chain guide) "3"
9. Remove: •Sealant
Forced out on the cylinder mating
surface.
10. Apply:
• Engine oilTo the crank pin, bearing and oil
delivery hole.
11. Check: • Crankshaft and transmission op-eration.
Unsmooth operation
→Repair.
Bolt (crankcase):
12 Nm (1.2 m•kg, 8.7
ft•lb)
Bolt (oil delivery pipe 2): 10 Nm (1.0 m•kg, 7.2
ft•lb)
Bolt (timing chain guide):10 Nm (1.0 m•kg, 7.2
ft•lb)
Page 131 of 192

4-62
TRANSMISSION, SHIFT CAM AND SHIFT FORK
REMOVING THE TRANSMISSION
1. Remove:• Main axle "1"
•Drive axle "2"
•Shift cam
• Shift fork 3
• Shift fork 2
• Shift fork 1
• Remove assembly with the collar "3" installed to the crankcase.
• Remove assembly carefully. Note
the position of each part. Pay partic-
ular attention to the location and di-
rection of shift forks.
• Remove the main axle, drive axle, shift cam and shift fork all together
by tapping lightly on the transmis-
sion drive axle with a soft hammer.
CHECKING THE GEARS
1. Inspect:• Matching dog "a"
• Gear teeth "b"
• Shift fork groove "c"Wear/damage
→Replace.
2. Inspect: • O-ring "1"
Damage
→Replace.
3. Check: • Gears movement
Unsmooth movement
→Repair or
replace.
CHECKING THE BEARING
1. Inspect: • Bearing "1"
Rotate inner race with a finger.
Rough spot/seizure
→Replace. CHECKING THE SHIFT FORK,
SHIFT CAM AND SEGMENT
1. Inspect:
• Shift fork "1"
Wear/damage/scratches
→Re-
place.
2. Inspect: • Shift cam "1"
• Segment "2"Wear/damage
→Replace.
3. Check: • Shift fork movement
Unsmooth operation
→Replace
shift fork.
For a malfunctioning shift fork, re-
place not only the shift fork itself but
the two gears each adjacent to the
shift fork.
INSTALLING THE TRANSMISSION
1. Install: • 5th pinion gear (24T) "1"
• 3rd pinion gear (20T) "2"
•Collar "3"
• 4th pinion gear (22T) "4"
• 2nd pinion gear (16T) "5"To main axle "6".
Apply the molybdenum disulfide oil
on the inner and end surface of the idler gear and on the inner surface of
the sliding gear, then install.
2. Install:
• 2nd wheel gear (28T) "1"
• 4th wheel gear (27T) "2"
• 3rd wheel gear (29T) "3"
• 5th wheel gear (25T) "4"
• 1st wheel gear (30T) "5"
• O-ring "6" To drive axle "7".
• Apply the molybdenum disulfide oil on the inner and end surface of the
idler gear and on the inner surface
of the sliding gear, then install.
• Apply the lithium soap base grease on the O-ring.
3. Install:
• Washer "1"
• Circlip "2"
• Be sure the circlip sharp-edged cor-ner "a" is positioned opposite side
to the washer and gear "b".
• Install the circlip with its ends "c" settled evenly on the spline crests.
Page 145 of 192

5-13
FRONT BRAKE AND REAR BRAKE
2. Install:• Brake lever "1"
• Bolt (brake lever) "2"
• Nut (brake lever) "3"
Apply the silicone grease on the
brake lever sliding surface, bolt and
tip of the push rod.
INSTALLING THE REAR BRAKE
MASTER CYLINDER
1. Install:• Copper washer "1"
•Brake hose "2"
• Union bolt "3"
Always use new copper washers.
Install the brake hose so that its
pipe portion "a" directs as shown
and lightly touches the projection
"b" on the brake master cylinder.
2. Install:• Brake master cylinder "1" • Bolt (brake master cylinder) "2"
3. Install: • Spring "1"
• Brake pedal "2"
• O-ring "3"
• Bolt (brake pedal) "4"
•Clip "5"
Apply the lithium soap base grease
on the bolt, O-ring and brake pedal
bracket.
4. Install:•Pin "1"
•Washer "2"
• Cotter pin "3"
After installing, check the brake pedal
height. Refer to "ADJUSTING THE
REAR BRAKE" section in the CHAP-
TER 3.
INSTALLING THE FRONT BRAKE
HOSE
1. Install:• Copper washer "1"
• Brake hose "2" • Union bolt "3"
Always use new copper washers.
Install the brake hose so that its
pipe portion "a" directs as shown
and lightly touches the projection
"b" on the brake caliper.
2. Install:
• Brake hose holder "1"
• Nut (brake hose holder) "2"
Align the top "a" of the brake hose
holder with the paint "b" of the brake
hose.
3. Pass the brake hose through the
cable guide "1".
Bolt (brake lever):
6 Nm (0.6 m•kg, 4.3
ft•lb)
Nut (brake lever): 6 Nm (0.6 m•kg, 4.3
ft•lb)
Union bolt: 30 Nm (3.0 m•kg, 22
ft•lb)
Bolt (brake master cylin-
der):
10 Nm (1.0 m•kg, 7.2
ft•lb)
Bolt (brake pedal): 26 Nm (2.6 m•kg, 19
ft•lb)Union bolt:
30 Nm (3.0 m•kg, 22
ft•lb)
Nut (brake hose holder): 7 Nm (0.7 m•kg, 5.1 ft
•lb)
Page 146 of 192

5-14
FRONT BRAKE AND REAR BRAKE
4. Install:• Copper washer "1"
•Brake hose "2"
• Union bolt "3"
Always use new copper washers.
Install the brake hose so that its
pipe portion "a" directs as shown
and lightly touches the projection
"b" on the brake master cylinder.
INSTALLING THE REAR BRAKE
HOSE
1. Install:• Copper washer "1"
•Brake hose "2"
• Union bolt "3"
Always use new copper washers.
Install the brake hose so that its
pipe portion "a" directs as shown
and lightly touches the projection
"b" on the brake caliper.
2. Install:• Brake hose holder "1"
• Screw (brake hose holder) "2"
After installing the brake hose
holders, make sure the brake hose
does not contact the spring (rear
shock absorber). If it does, correct
its twist.
FILLING THE BRAKE FLUID
1. Fill:•Brake fluid
Until the fluid level reaches
"LOWER" level line "a".
• Use only the designated quality brake fluid:
otherwise, the rubber seals may
deteriorate, causing leakage and
poor brake performance.
• Refill with the same type of brake
fluid;
mixing fluids may result in a
harmful chemical reaction and
lead to poor performance.
• Be careful that water does not enter the master cylinder when
refilling. Water will significantly lower the boiling point of the flu-
id and may result in vapor lock.
Brake fluid may erode painted sur-
faces or plastic parts. Always
clean up spilled fluid immediately.
A. Front
B. Rear
2. Air bleed: • Brake system
Refer to "BLEEDING THE HY-
DRAULIC BRAKE SYSTEM" sec-
tion in the CHAPTER 3.
3. Inspect: • Brake fluid levelFluid at lower level
→Fill up.
Refer to "CHECKING THE
BRAKE FLUID LEVEL" section in
the CHAPTER 3.
4. Install: • Reservoir float (front brake)
• Diaphragm
• Brake master cylinder cap "1"
• Screw (brake master cylinder cap) "2"
After installation, while pulling the
brake lever in or pushing down on
the brake pedal, check whether
there is any brake fluid leaking
where the union bolts are installed
respectively at the brake master
cylinder and brake caliper.
Union bolt:
30 Nm (3.0 m•kg, 22
ft•lb)
Union bolt: 30 Nm (3.0 m•kg, 22
ft•lb)
Screw (brake hose hold-
er):2 Nm (0.2 m•kg, 1.4
ft•lb)
Recommended brake flu-
id: DOT #4
Screw (bolt) {brake mas-
ter cylinder cap}:2 Nm (0.2 m•kg, 1.4
ft•lb)
Page 181 of 192

7-1
ENGINE
TUNING
ENGINE
CARBURETOR SETTING
• The air/fuel mixture will vary de-pending on atmospheric conditions.
Therefore, it is necessary to take
into consideration the air pressure,
ambient temperature, humidity,
etc., when adjusting the carburetor.
• Perform a test run to check for prop- er engine performance (e.g., throt-
tle response) and spark plug(-s)
discoloration or fouling. Use these
readings to determine the best pos-
sible carburetor setting.
It is recommended to keep a record of
all carburetor settings and external
conditions (e.g., atmospheric condi-
tions, track/surface conditions, lap
times) to make future carburetor set-
ting easier.
• The carburetor is a part of the fuel line. Therefore, be sure to in-
stall it in a wellventilated area,
away from flammable objects
and any sources of fire.
• Never look into the carburetor in- take. Flames may shoot out from
the pipe if the engine backfires
while it is being started. Gasoline
may be discharged from the ac-
celerator pump nozzle when the
carburetor has been removed.
• The carburetor is extremely sen-sitive to foreign matter (dirt,
sand, water, etc.). During instal-
lation, do not allow foreign mat-
ter to get into the carburetor.
• Always handle the carburetor and its components carefully.
Even slight scratches, bends or
damage to carburetor parts may
prevent the carburetor from
functioning correctly. Carefully
perform all servicing with the ap-
propriate tools and without ap-
plying excessive force.
• When the engine is stopped or when riding at no load, do not
open and close the throttle un-
necessarily. Otherwise, too
much fuel may be discharged,
starting may become difficult or
the engine may not run well.
• After installing the carburetor,
check that the throttle operates correctly and opens and closes
smoothly.
ATMOSPHERIC CONDITIONS AND
CARBURETOR SETTINGS
The air density (i.e., concentration of
oxygen in the air) determines the rich-
ness or leanness of the air/fuel mix-
ture.
• Higher temperature expands the air
with its resultant reduced density.
• Higher humidity reduces the amount of oxygen in the air by so
much of the water vapor in the
same air.
• Lower atmospheric pressure (at a high altitude) reduces the density of
the air.
EFFECT OF SETTING PARTS IN
RELATION TO THROTTLE VALVE
OPENING
A. Closed
B. Fully open
1. Pilot screw/pilot jet
2. Throttle valve cutaway
3. Jet needle
4. Main jet CONSTRUCTION OF
CARBURETOR AND SETTING
PARTS
The FLATCR carburetor has a prima-
ry main jet. This type of main jet is
perfect for racing machines since it
supplies an even flow of fuel, even at
full load. Use the main jet and the jet
needle to set the carburetor.
The FLATCR carburetor is manufac-
tured with a pilot screw. The pilot
screw adjustment ranges from fully
closed throttle to 1/4 open throttle.
1. Jet needle
2. Pilot air jet
3. Needle jet
4. Main jet
5. Pilot jet
6. Pilot screw
ADJUSTING THE MAIN JET
The richness of the air-fuel mixture at
full throttle can be set by changing the
main jet "1".
If the air-fuel mixture is too rich or too
lean, the engine power will drop, re-
sulting in poor acceleration.
Effects of changing the main jet
(reference)
A. Idle
B. Fully open
1. #180
2. #175
3. #178
Air
tem p. Hu-
midi- ty Air
pres-
sure
(alti-
tude) Mix-
ture Set-
ting
High High Low
(high) Rich-
er Lean-
er
Low Low High
(low) Lean-
er Rich-
er
Standard main jet #178
7