2008 YAMAHA YZ250F check oil
[x] Cancel search: check oilPage 129 of 192

4-60
CRANKCASE AND CRANKSHAFT
5. Install:• Dowel pin "1"
• O-ring "2"
• Right crankcaseTo left crankcase.
• Apply the lithium soap base grease on the O-ring.
• Fit the right crankcase onto the left
crankcase. Tap lightly on the case
with soft hammer.
• When installing the crankcase, the
connecting rod should be posi-
tioned at TDC (top dead center).
6. Tighten:• Hose guide "1"
• Clutch cable holder "2"
• Bolt (crankcase) "3"
Tighten the crankcase tightening
bolts in stage, using a crisscross pat-
tern.
7. Install:• Oil delivery pipe 2 "1"
• O-ring "2"
• Bolt (oil delivery pipe 2) "3"
Apply the lithium soap base grease
on the Orings.
8. Install:
• Timing chain "1"
• Timing chain guide (intake side) "2"
• Bolt (timing chain guide) "3"
9. Remove: •Sealant
Forced out on the cylinder mating
surface.
10. Apply:
• Engine oilTo the crank pin, bearing and oil
delivery hole.
11. Check: • Crankshaft and transmission op-eration.
Unsmooth operation
→Repair.
Bolt (crankcase):
12 Nm (1.2 m•kg, 8.7
ft•lb)
Bolt (oil delivery pipe 2): 10 Nm (1.0 m•kg, 7.2
ft•lb)
Bolt (timing chain guide):10 Nm (1.0 m•kg, 7.2
ft•lb)
Page 131 of 192
4-62
TRANSMISSION, SHIFT CAM AND SHIFT FORK
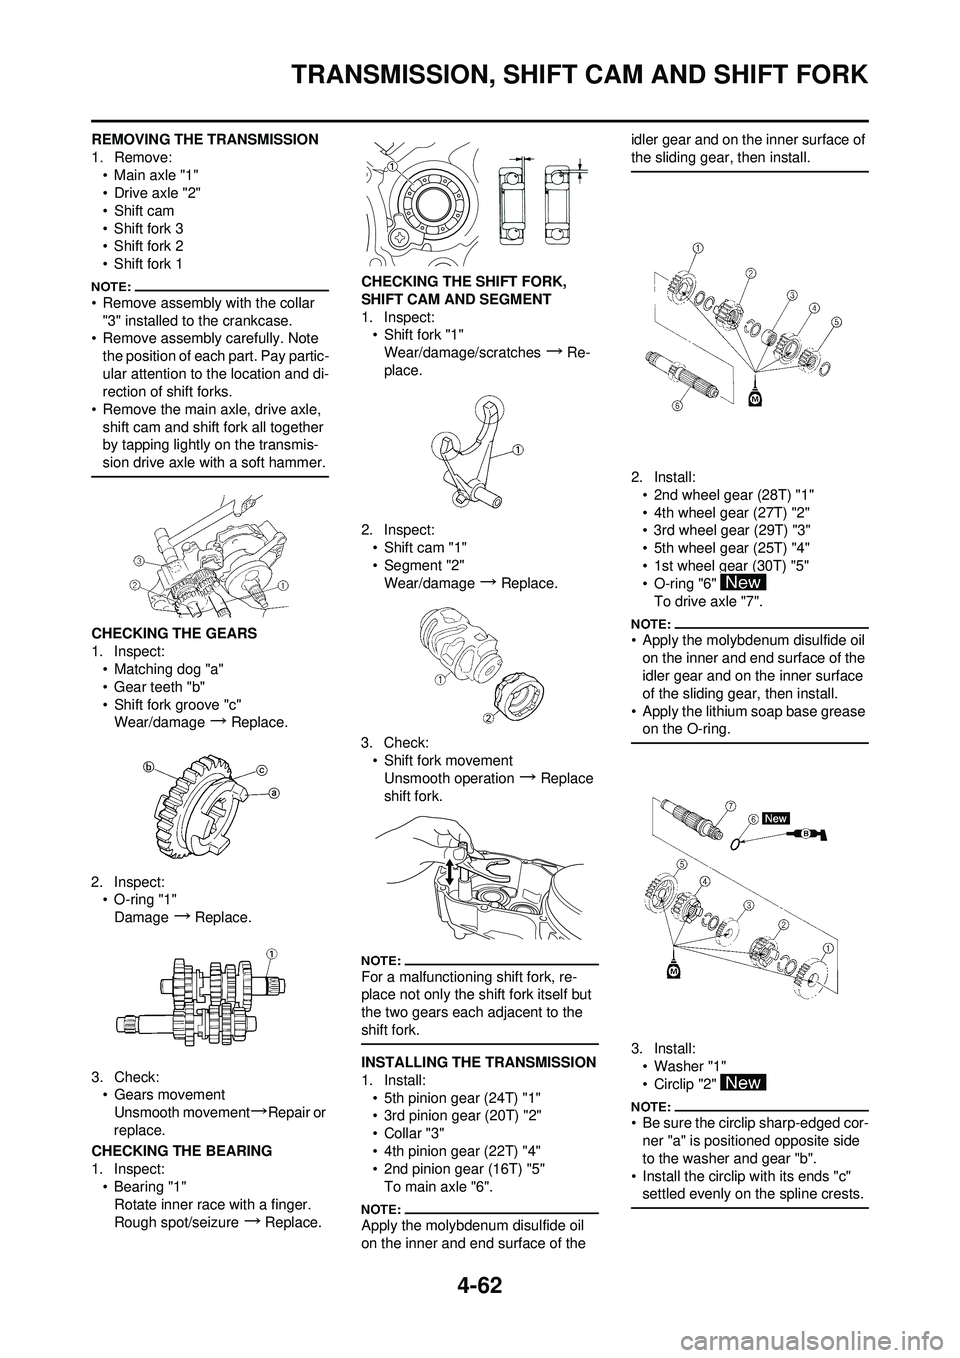
REMOVING THE TRANSMISSION
1. Remove:• Main axle "1"
•Drive axle "2"
•Shift cam
• Shift fork 3
• Shift fork 2
• Shift fork 1
• Remove assembly with the collar "3" installed to the crankcase.
• Remove assembly carefully. Note
the position of each part. Pay partic-
ular attention to the location and di-
rection of shift forks.
• Remove the main axle, drive axle, shift cam and shift fork all together
by tapping lightly on the transmis-
sion drive axle with a soft hammer.
CHECKING THE GEARS
1. Inspect:• Matching dog "a"
• Gear teeth "b"
• Shift fork groove "c"Wear/damage
→Replace.
2. Inspect: • O-ring "1"
Damage
→Replace.
3. Check: • Gears movement
Unsmooth movement
→Repair or
replace.
CHECKING THE BEARING
1. Inspect: • Bearing "1"
Rotate inner race with a finger.
Rough spot/seizure
→Replace. CHECKING THE SHIFT FORK,
SHIFT CAM AND SEGMENT
1. Inspect:
• Shift fork "1"
Wear/damage/scratches
→Re-
place.
2. Inspect: • Shift cam "1"
• Segment "2"Wear/damage
→Replace.
3. Check: • Shift fork movement
Unsmooth operation
→Replace
shift fork.
For a malfunctioning shift fork, re-
place not only the shift fork itself but
the two gears each adjacent to the
shift fork.
INSTALLING THE TRANSMISSION
1. Install: • 5th pinion gear (24T) "1"
• 3rd pinion gear (20T) "2"
•Collar "3"
• 4th pinion gear (22T) "4"
• 2nd pinion gear (16T) "5"To main axle "6".
Apply the molybdenum disulfide oil
on the inner and end surface of the idler gear and on the inner surface of
the sliding gear, then install.
2. Install:
• 2nd wheel gear (28T) "1"
• 4th wheel gear (27T) "2"
• 3rd wheel gear (29T) "3"
• 5th wheel gear (25T) "4"
• 1st wheel gear (30T) "5"
• O-ring "6" To drive axle "7".
• Apply the molybdenum disulfide oil on the inner and end surface of the
idler gear and on the inner surface
of the sliding gear, then install.
• Apply the lithium soap base grease on the O-ring.
3. Install:
• Washer "1"
• Circlip "2"
• Be sure the circlip sharp-edged cor-ner "a" is positioned opposite side
to the washer and gear "b".
• Install the circlip with its ends "c" settled evenly on the spline crests.
Page 132 of 192

4-63
TRANSMISSION, SHIFT CAM AND SHIFT FORK
4. Install:•Collar "1"
• Apply the lithium soap base grease on the oil seal lip.
• When installing the collar into the crankcase, pay careful attention to
the crankcase oil seal lip.
5. Install:• Shift fork 1 (L) "1"
• Shift fork 2 (C) "2"
• Shift fork 3 (R) "3"
•Shift cam "4"To main axle and drive axle.
• Apply the molybdenum disulfide oil on the shift fork grooves.
• Mesh the shift fork #1 (L) with the 4th wheel gear "5" and #3 (R) with
the 5th wheel gear "7" on the drive
axle.
• Mesh the shift fork #2 (C) with the 3rd pinion gear "6" on the main ax-
le.
6. Install:• Transmission assembly "1"
To left crankcase "2".
Apply the engine oil on the bearings
and guide bars.
7. Check:• Shifter operation
• Transmission operationUnsmooth operation
→Repair.
Page 135 of 192
5-3
FRONT WHEEL AND REAR WHEEL
HANDLING NOTE
Support the machine securely so
there is no danger of it falling over.
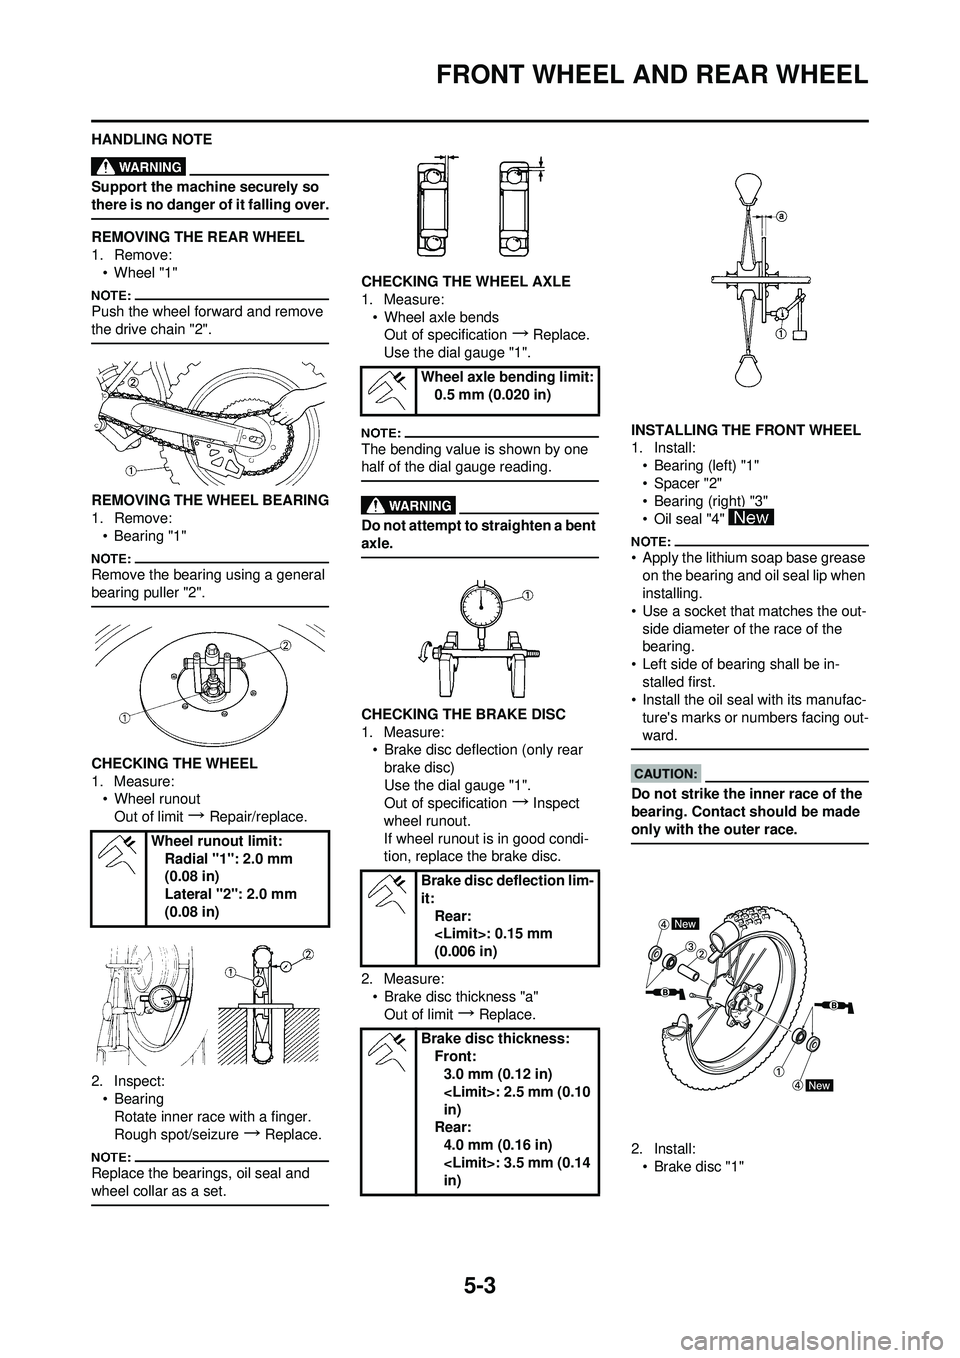
REMOVING THE REAR WHEEL
1. Remove:• Wheel "1"
Push the wheel forward and remove
the drive chain "2".
REMOVING THE WHEEL BEARING
1. Remove:• Bearing "1"
Remove the bearing using a general
bearing puller "2".
CHECKING THE WHEEL
1. Measure:• Wheel runout
Out of limit
→ Repair/replace.
2. Inspect: • BearingRotate inner race with a finger.
Rough spot/seizure
→ Replace.
Replace the bearings, oil seal and
wheel collar as a set.
CHECKING THE WHEEL AXLE
1. Measure:• Wheel axle bendsOut of specification
→ Replace.
Use the dial gauge "1".
The bending value is shown by one
half of the dial gauge reading.
Do not attempt to straighten a bent
axle.
CHECKING THE BRAKE DISC
1. Measure: • Brake disc deflection (only rear
brake disc)
Use the dial gauge "1".
Out of specification
→ Inspect
wheel runout.
If wheel runout is in good condi-
tion, replace the brake disc.
2. Measure: • Brake disc thickness "a"
Out of limit
→ Replace. INSTALLING THE FRONT WHEEL
1. Install:
• Bearing (left) "1"
•Spacer "2"
• Bearing (right) "3"
•Oil seal "4"
• Apply the lithium soap base grease on the bearing and oil seal lip when
installing.
• Use a socket that matches the out- side diameter of the race of the
bearing.
• Left side of bearing shall be in- stalled first.
• Install the oil seal with its manufac-
ture's marks or numbers facing out-
ward.
Do not strike the inner race of the
bearing. Contact should be made
only with the outer race.
2. Install:• Brake disc "1"
Wheel runout limit:
Radial "1": 2.0 mm
(0.08 in)
Lateral "2": 2.0 mm
(0.08 in)
Wheel axle bending limit:0.5 mm (0.020 in)
Brake disc deflection lim-
it: Rear:
(0.006 in)
Brake disc thickness: Front:3.0 mm (0.12 in)
in)
Rear:
4.0 mm (0.16 in)
in)
Page 146 of 192
5-14
FRONT BRAKE AND REAR BRAKE
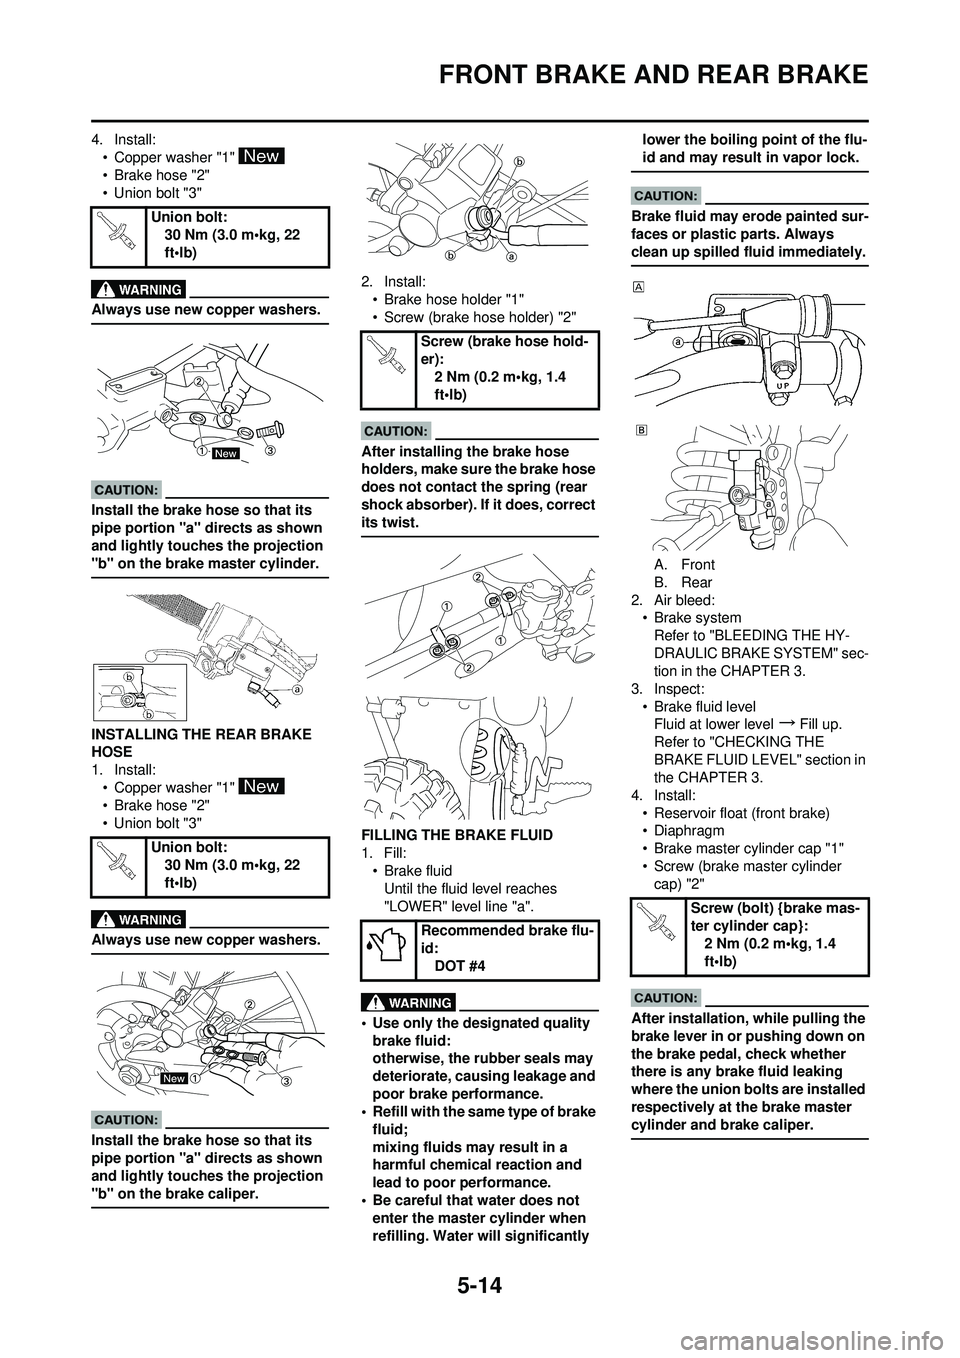
4. Install:• Copper washer "1"
•Brake hose "2"
• Union bolt "3"
Always use new copper washers.
Install the brake hose so that its
pipe portion "a" directs as shown
and lightly touches the projection
"b" on the brake master cylinder.
INSTALLING THE REAR BRAKE
HOSE
1. Install:• Copper washer "1"
•Brake hose "2"
• Union bolt "3"
Always use new copper washers.
Install the brake hose so that its
pipe portion "a" directs as shown
and lightly touches the projection
"b" on the brake caliper.
2. Install:• Brake hose holder "1"
• Screw (brake hose holder) "2"
After installing the brake hose
holders, make sure the brake hose
does not contact the spring (rear
shock absorber). If it does, correct
its twist.
FILLING THE BRAKE FLUID
1. Fill:•Brake fluid
Until the fluid level reaches
"LOWER" level line "a".
• Use only the designated quality brake fluid:
otherwise, the rubber seals may
deteriorate, causing leakage and
poor brake performance.
• Refill with the same type of brake
fluid;
mixing fluids may result in a
harmful chemical reaction and
lead to poor performance.
• Be careful that water does not enter the master cylinder when
refilling. Water will significantly lower the boiling point of the flu-
id and may result in vapor lock.
Brake fluid may erode painted sur-
faces or plastic parts. Always
clean up spilled fluid immediately.
A. Front
B. Rear
2. Air bleed: • Brake system
Refer to "BLEEDING THE HY-
DRAULIC BRAKE SYSTEM" sec-
tion in the CHAPTER 3.
3. Inspect: • Brake fluid levelFluid at lower level
→Fill up.
Refer to "CHECKING THE
BRAKE FLUID LEVEL" section in
the CHAPTER 3.
4. Install: • Reservoir float (front brake)
• Diaphragm
• Brake master cylinder cap "1"
• Screw (brake master cylinder cap) "2"
After installation, while pulling the
brake lever in or pushing down on
the brake pedal, check whether
there is any brake fluid leaking
where the union bolts are installed
respectively at the brake master
cylinder and brake caliper.
Union bolt:
30 Nm (3.0 m•kg, 22
ft•lb)
Union bolt: 30 Nm (3.0 m•kg, 22
ft•lb)
Screw (brake hose hold-
er):2 Nm (0.2 m•kg, 1.4
ft•lb)
Recommended brake flu-
id: DOT #4
Screw (bolt) {brake mas-
ter cylinder cap}:2 Nm (0.2 m•kg, 1.4
ft•lb)
Page 150 of 192
5-18
FRONT FORK
HANDLING NOTE
Support the machine securely so
there is no danger of it falling over.
The front fork requires careful atten-
tion. So it is recommended that the
front fork be maintained at the deal-
ers.
To prevent an accidental explosion
of air, the following instructions
should be observed:
• The front fork with a built-in pis-ton rod has a very sophisticated
internal construction and is par-
ticularly sensitive to foreign ma-
terial. Use enough care not to
allow any foreign material to
come in when the oil is replaced
or when the front fork is disas-
sembled and reassembled.
• Before removing the base valves or front forks, be sure to extract
the air from the air chamber com-
pletely.
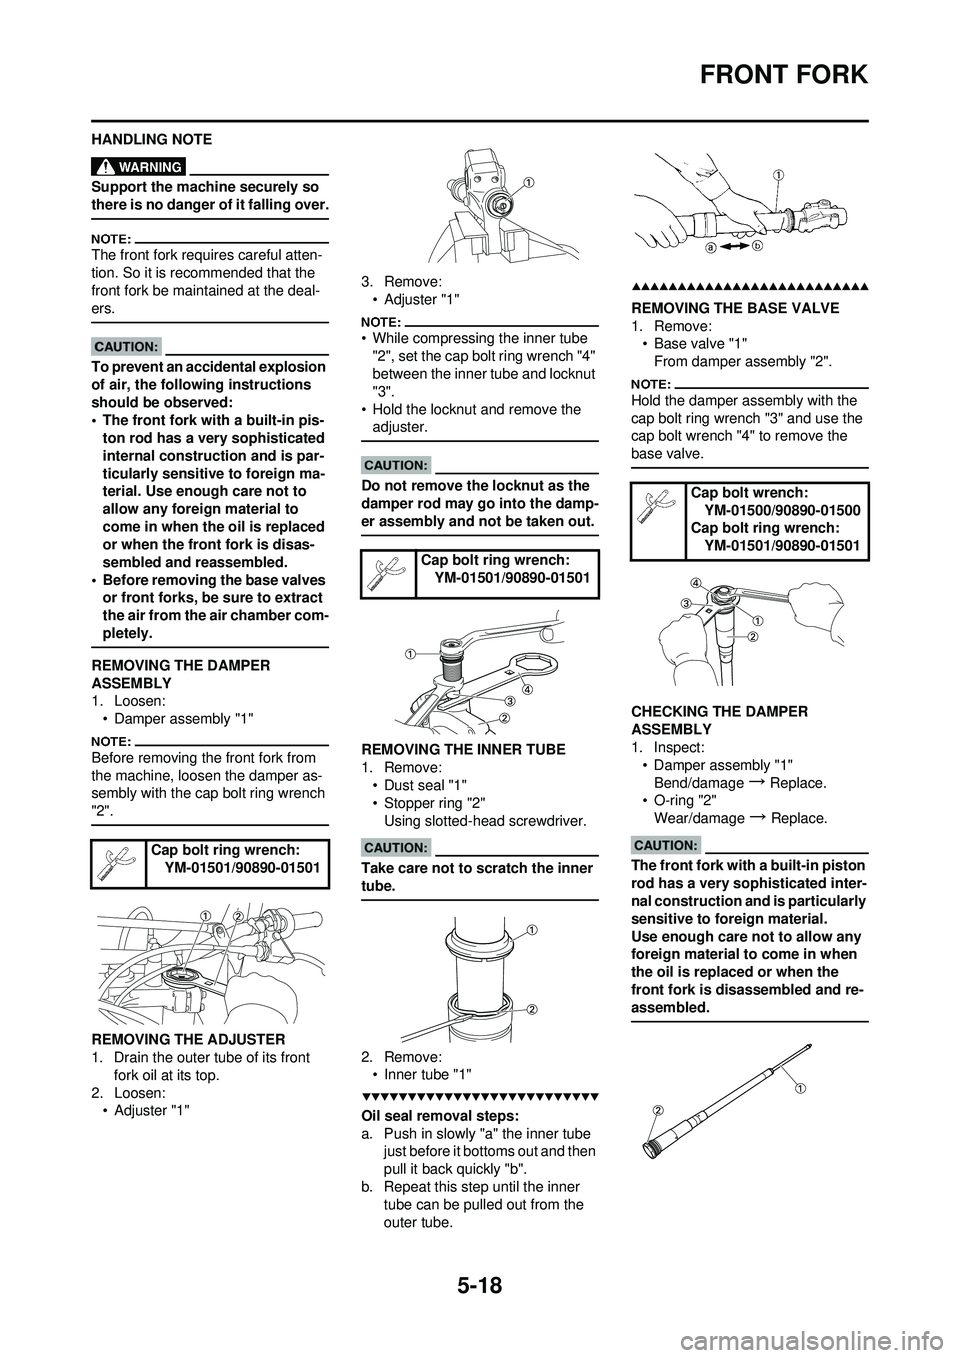
REMOVING THE DAMPER
ASSEMBLY
1. Loosen:
• Damper assembly "1"
Before removing the front fork from
the machine, loosen the damper as-
sembly with the cap bolt ring wrench
"2".
REMOVING THE ADJUSTER
1. Drain the outer tube of its front fork oil at its top.
2. Loosen: •Adjuster "1" 3. Remove:
• Adjuster "1"
• While compressing the inner tube "2", set the cap bolt ring wrench "4"
between the inner tube and locknut
"3".
• Hold the locknut and remove the adjuster.
Do not remove the locknut as the
damper rod may go into the damp-
er assembly and not be taken out.
REMOVING THE INNER TUBE
1. Remove:
• Dust seal "1"
• Stopper ring "2"Using slotted-head screwdriver.
Take care not to scratch the inner
tube.
2. Remove:• Inner tube "1"
Oil seal removal steps:
a. Push in slowly "a" the inner tube just before it bottoms out and then
pull it back quickly "b".
b. Repeat this step until the inner tube can be pulled out from the
outer tube.
REMOVING THE BASE VALVE
1. Remove:• Base valve "1"
From damper assembly "2".
Hold the damper assembly with the
cap bolt ring wrench "3" and use the
cap bolt wrench "4" to remove the
base valve.
CHECKING THE DAMPER
ASSEMBLY
1. Inspect:• Damper assembly "1"Bend/damage
→ Replace.
• O-ring "2"
Wear/damage
→ Replace.
The front fork with a built-in piston
rod has a very sophisticated inter-
nal construction and is particularly
sensitive to foreign material.
Use enough care not to allow any
foreign material to come in when
the oil is replaced or when the
front fork is disassembled and re-
assembled.Cap bolt ring wrench: YM-01501/90890-01501
Cap bolt ring wrench:YM-01501/90890-01501
Cap bolt wrench:
YM-01500/90890-01500
Cap bolt ring wrench:
YM-01501/90890-01501
Page 151 of 192

5-19
FRONT FORK
CHECKING THE BASE VALVE
1. Inspect:• Base valve "1"Wear/damage
→Replace.
Contamination
→Clean.
• O-ring "2" Wear/damage
→Replace.
• Piston metal "3" Wear/damage
→Replace.
• Spring "4"
Damage/fatigue
→Replace base
valve.
• Air bleed screw "5"
Wear/damage
→Replace.
CHECKING THE COLLAR
1. Inspect: • Piston metal "1"Wear/damage
→Replace.
CHECKING THE FORK SPRING
1. Measure: • Fork spring free length "a"Out of specification
→Replace.
CHECKING THE INNER TUBE
1. Inspect: • Inner tube surface "a"Score marks
→Repair or replace.
Use #1,000 grit wet sandpaper.
Damaged oil lock piece
→Re-
place.
• Inner tube bends
Out of specification
→Replace. Use the dial gauge "1".
The bending value is shown by one
half of the dial gauge reading.
Do not attempt to straighten a bent
inner tube as this may dangerous-
ly weaken the tube.
CHECKING THE OUTER TUBE
1. Inspect:
• Outer tube "1"
Score marks/wear/damage
→Re-
place.
CHECKING THE ADJUSTER
1. Inspect: • Adjuster "1"
• O-ring "2"Wear/damage
→Replace.
ASSEMBLING THE FRONT FORK
1. Wash the all parts in a clean sol- vent.
2. Stretch the damper assembly ful- ly.
3. Fill: • Front fork oil "1"To damper assembly.
• Be sure to use recommended fork oil. If other oils are used,
they may have an excessively ad-
verse effect on the front fork per-
formance.
• Never allow foreign materials to enter the front fork.
4. After filling, pump the damper as- sembly "1" slowly up and down
(about 200 mm (7.9 in) stroke)
several times to bleed the damper
assembly of air.
Be careful not to excessive full stroke.
A stroke of 200 mm (7.9 in) or more
will cause air to enter. In this case, re-
peat the steps 2 to 4.
5. Measure:
• Oil level (left and right) "a"Out of specification
→ Adjust.
Fork spring free length:
454 mm (17.9 in)
in)
Inner tube bending limit:0.2 mm (0.008 in)
Recommended oil: Suspension oil "S1"
Oil capacity: 199 cm
3 (7.00 Imp oz,
6.73 US oz)
Standard oil level: 145-148 mm (5.71-5.83
in)
From top of fully
stretched damper as-
sembly.
Page 152 of 192
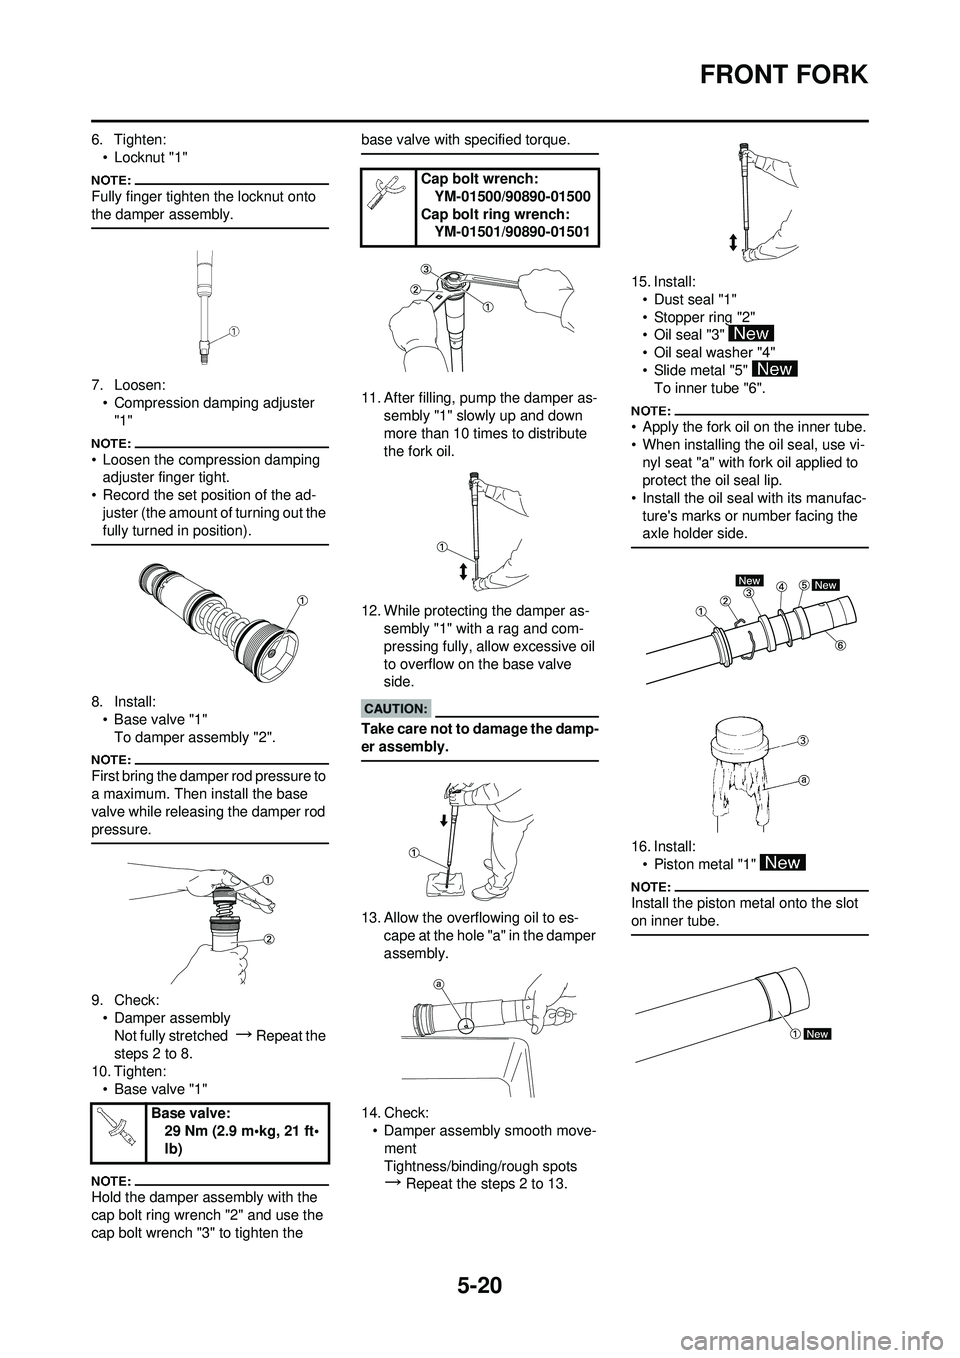
5-20
FRONT FORK
6. Tighten:• Locknut "1"
Fully finger tighten the locknut onto
the damper assembly.
7. Loosen:• Compression damping adjuster "1"
• Loosen the compression damping adjuster finger tight.
• Record the set position of the ad- juster (the amount of turning out the
fully turned in position).
8. Install:• Base valve "1"To damper assembly "2".
First bring the damper rod pressure to
a maximum. Then install the base
valve while releasing the damper rod
pressure.
9. Check:• Damper assemblyNot fully stretched
→ Repeat the
steps 2 to 8.
10. Tighten: • Base valve "1"
Hold the damper assembly with the
cap bolt ring wrench "2" and use the
cap bolt wrench "3" to tighten the base valve with specified torque.
11. After filling, pump the damper as-
sembly "1" slowly up and down
more than 10 times to distribute
the fork oil.
12. While protecting the damper as- sembly "1" with a rag and com-
pressing fully, allow excessive oil
to overflow on the base valve
side.
Take care not to damage the damp-
er assembly.
13. Allow the overflowing oil to es-
cape at the hole "a" in the damper
assembly.
14. Check: • Damper assembly smooth move-
ment
Tightness/binding/rough spots
→
Repeat the steps 2 to 13. 15. Install:
• Dust seal "1"
• Stopper ring "2"
•Oil seal "3"
• Oil seal washer "4"
• Slide metal "5" To inner tube "6".
• Apply the fork oil on the inner tube.
• When installing the oil seal, use vi-
nyl seat "a" with fork oil applied to
protect the oil seal lip.
• Install the oil seal with its manufac- ture's marks or number facing the
axle holder side.
16. Install:• Piston metal "1"
Install the piston metal onto the slot
on inner tube.
Base valve: 29 Nm (2.9 m•kg, 21 ft•
lb)
Cap bolt wrench:
YM-01500/90890-01500
Cap bolt ring wrench: YM-01501/90890-01501