Page 111 of 148
8-28
1
2
3
4
5
6
78
9
10
11
EBU27701
Cleaning the spark arrester
Select a well-ventilated area free of combustible
materials and make sure the exhaust and muffler
are cool.
1. Remove the bolt.
2. Remove the tailpipe by pulling it out of the
muffler.
3. Tap the tailpipe lightly, and then use a wire
brush to remove any carbon deposits from the
spark arrester portion of the tailpipe and inside
of the tailpipe housing.4. Insert the tailpipe into the muffler and align the
bolt holes.
5. Install the bolt and tighten it to the specified
torque.
6. Remove the purging bolt.
1. Bolt
1
1. Tailpipe
2. Spark arrester
Tightening torque:
Tailpipe bolt:
10 Nm (1.0 m·kgf, 7.2 ft·lbf)
1
2
Page 112 of 148

8-29
1
2
3
4
5
6
78
9
10
11
7. Start the engine and rev it up approximately
twenty times while momentarily creating ex-
haust system back pressure by blocking the
end of the muffler with a shop towel.
8. Stop the engine and allow the exhaust pipe to
cool.
9. Install the purging bolt and tighten it to the
specified torque.
WARNING
EWB02380
Never run the engine in an enclosed area when
purging the spark arrester, otherwise it could
cause injury to the eyes, burns, carbon monox-
ide poisoning, possibly leading to death, and
start a fire.
�
Always let the exhaust system cool prior to
touching exhaust components.
�
Always wear eye protection, and make sure
no one is behind the ATV.
�
Make sure there are no combustible materi-
als in the area.
EBU23940
Adjusting the carburetor
The carburetor should be checked and, if neces-
sary, adjusted at the intervals specified in the peri-
odic maintenance and lubrication chart. The
carburetor is an important part of the engine and
requires very sophisticated adjustment. Therefore,
most carburetor adjustments should be left to a
Yamaha dealer, who has the necessary profes-
sional knowledge and experience. The adjustment
described in the following section, however, may
be performed by the owner as part of routine main-
1. Purging bolt
2. Gasket
Tightening torque:
Purging bolt:
27 Nm (2.7 m·kgf, 20 ft·lbf)
1 2
Page 121 of 148

8-38
1
2
3
4
5
6
78
9
10
11
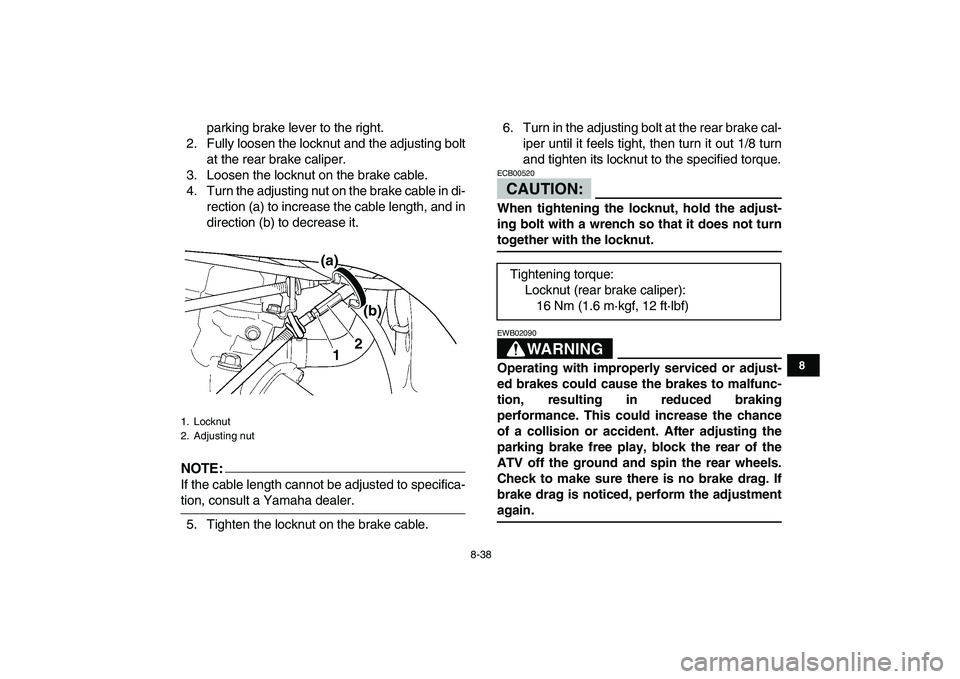
parking brake lever to the right.
2. Fully loosen the locknut and the adjusting bolt
at the rear brake caliper.
3. Loosen the locknut on the brake cable.
4. Turn the adjusting nut on the brake cable in di-
rection (a) to increase the cable length, and in
direction (b) to decrease it.
NOTE:
If the cable length cannot be adjusted to specifica-
tion, consult a Yamaha dealer.
5. Tighten the locknut on the brake cable.6. Turn in the adjusting bolt at the rear brake cal-
iper until it feels tight, then turn it out 1/8 turn
and tighten its locknut to the specified torque.CAUTION:
ECB00520
When tightening the locknut, hold the adjust-
ing bolt with a wrench so that it does not turn
together with the locknut.WARNING
EWB02090
Operating with improperly serviced or adjust-
ed brakes could cause the brakes to malfunc-
tion, resulting in reduced braking
performance. This could increase the chance
of a collision or accident. After adjusting the
parking brake free play, block the rear of the
ATV off the ground and spin the rear wheels.
Check to make sure there is no brake drag. If
brake drag is noticed, perform the adjustment
again.
1. Locknut
2. Adjusting nut
(a)
(b)
12
Tightening torque:
Locknut (rear brake caliper):
16 Nm (1.6 m·kgf, 12 ft·lbf)
Page 134 of 148

8-51
1
2
3
4
5
6
78
9
10
11
Front
2. Lower the ATV to the ground.
3. Tighten the wheel nuts to the specified
torques.
EBU25740
Troubleshooting
Although Yamaha ATVs receive a thorough in-spection before shipment from the factory, trouble
may occur during operation. Any problem in the fu-
el, compression, or ignition systems, for example,
can cause poor starting and loss of power.
The following troubleshooting charts represent
quick and easy procedures for checking these vital
systems yourself. However, should your ATV re-
quire any repair, take it to a Yamaha dealer, whose
skilled technicians have the necessary tools, expe-
rience, and know-how to service the ATV properly.
Use only genuine Yamaha replacement parts. Im-
itation parts may look like Yamaha parts, but they
are often inferior, have a shorter service life and
can lead to expensive repair bills.
WARNING
EWB02280
Do not smoke when checking the fuel system.
Fuel can ignite or explode, causing severe inju-
ry or property damage. Make sure there are no
open flames or sparks in the area, including pi-
lot lights from water heaters or furnaces.
1. Arrow mark
Tightening torques:
Front wheel nut:
45 Nm (4.5 m·kgf, 33 ft·lbf)
Rear wheel nut:
45 Nm (4.5 m·kgf, 33 ft·lbf)