Page 87 of 148
8-4
1
2
3
4
5
6
78
9
10
11
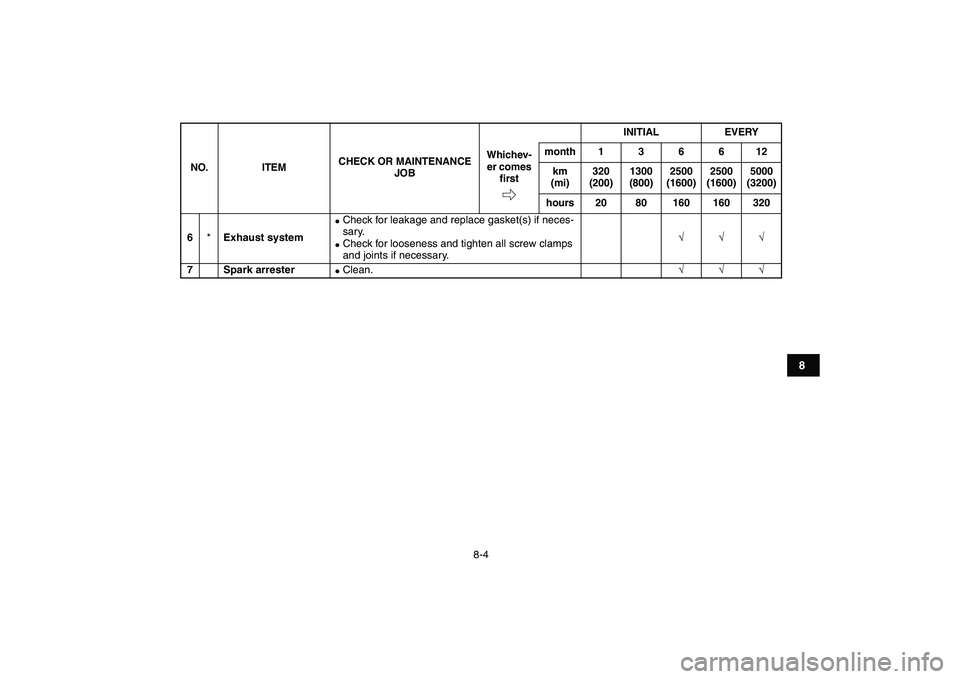
6
*
Exhaust system
�
Check for leakage and replace gasket(s) if neces-
sary.
�
Check for looseness and tighten all screw clamps
and joints if necessary.
√√√
7 Spark arrester
�
Clean.
√√√
NO. ITEMCHECK OR MAINTENANCE
JOBINITIAL EVERY
Whichev-
er comes
firstmonth136612
km
(mi)320
(200)1300
(800)2500
(1600)2500
(1600)5000
(3200)
hours 20 80 160 160 320
Page 88 of 148
320
(200)1300
(")
8-5
1
2
3
4
5
6
78
9
10
11
EBU21864
General maintenance and lubrication chart
NO. ITEMCHECK OR MAINTENANCE
JOBINITIAL EVERY
Whichev-
er comes
firstmonth 1 3 6 6 12
km
(mi)320
(200)1300
(800)2500
(1600)2500
(1600)5000
(3200)
hours 20 80 160 160 3201 Air filter element
�
Clean and replace if necessary.Every 20–40 hours (more often in wet or
dusty areas)
2
*
Clutch
�
Check operation and adjust if necessary.
√ √√√
3
*
Front brake
�
Check operation and correct if necessary.
�
Check fluid level and ATV for fluid leakage, and
correct if necessary.
√√√√√
�
Replace brake pads. Whenever worn to the limit
4
*
Rear brake
�
Check operation and correct if necessary.
�
Check fluid level and ATV for fluid leakage, and
correct if necessary.
√√√√√
�
Replace brake pads. Whenever worn to the limit
5
*
Brake hoses
�
Check for cracks or other damage, and replace if
necessary.
√√√√
�
Replace. Every 4 years
6
*
Parking brake
�
Check operation and adjust if necessary.
√√√√√
7
*
Wheels
�
Check runout and for damage, and replace if nec-
essary.
√ √√√
8
*
Tires
�
Check tread depth and for damage, and replace if
necessary.
�
Check air pressure and balance, and correct if
necessary.
√ √√√
9
*
Wheel hub bearings
�
Check for looseness or damage, and replace if
necessary.
√ √√√
Page 89 of 148

8-6
1
2
3
4
5
6
78
9
10
11
10
*
Swingarm pivots
�
Check operation and for excessive play, and
replace bearings if necessary.
�
Lubricate with molybdenum disulfide grease.
√√√
11
*
Upper and lower
arm pivots
�
Lubricate with lithium-soap-based grease.
√√√
12 Drive chain
�
Check chain slack and adjust if necessary.
�
Check rear wheel alignment and correct if necess-
sary.
�
Clean and lubricate.
√√√√√
13
*
Drive chain rollers
�
Check for wear and replace if necessary.
√√√
14
*
Chassis fasteners
�
Make sure that all nuts, bolts, and screws are
properly tightened.
√√√√√
15
*
Shock absorber
assemblies
�
Check operation and correct if necessary.
�
Check for oil leakage and replace if necessary.
√√√
16
*
Rear suspension
relay arm and con-
necting arm pivot-
ing points
�
Check operation and correct if necessary.
�
Lubricate with lithium-soap-based grease.
√√√√
17
*
Steering shaft
�
Lubricate with lithium-soap-based grease.
√√√
18
*
Steering system
�
Check operation and repair or replace if damaged.
�
Check toe-in and adjust if necessary.
√√√√√
19
*
Engine mount
�
Check for cracks or other damage, and replace if
necessary.
√√√
NO. ITEMCHECK OR MAINTENANCE
JOBINITIAL EVERY
Whichev-
er comes
firstmonth136612
km
(mi)320
(200)1300
(800)2500
(1600)2500
(1600)5000
(3200)
hours 20 80 160 160 320
Page 90 of 148
8-7
1
2
3
4
5
6
78
9
10
11
20 Engine oil
�
Change.
�
Check ATV for oil leakage, and correct if neces-
sary.
√ √√√
21Engine oil filter ele-
ment
�
Clean or replace if necessary.
√√√
22 Cooling system
�
Check coolant level and ATV for coolant leakage,
and correct if necessary.
√√√√√
�
Replace coolant. Every 2 years
23
*
Moving parts and
cables
�
Lubricate.
√√√√
24
*
Throttle lever hous-
ing and cable
�
Check operation and correct if necessary.
�
Check throttle cable free play and adjust if neces-
sary.
�
Lubricate throttle lever housing and cable.
√√√√√
25
*
Front and rear brake
switches
�
Check operation and correct if necessary.
√√√√√
26
*
Lights and switches
�
Check operation and correct if necessary.
�
Adjust headlight beams.
√√√√√
NO. ITEMCHECK OR MAINTENANCE
JOBINITIAL EVERY
Whichev-
er comes
firstmonth 1 3 6 6 12
km
(mi)320
(200)1300
(800)2500
(1600)2500
(1600)5000
(3200)
hours 20 80 160 160 320
Page 92 of 148
8-9
1
2
3
4
5
6
78
9
10
11
EBU23080
Removing and installing the panel
The panel shown needs to be removed to perform
some of the maintenance jobs described in this
chapter. Refer to this section each time the panel
needs to be removed and installed.
EBU23180
Panel A
To remove the panel
1. Remove the seat. (See page 4-11.)
2. Remove the quick fastener screw and the
bolts, and then remove the panel by pulling it
out from the front of the ATV.
1. Panel A
1
1. Quick fastener screw
2. Bolt
1
2
Page 94 of 148

8-11
1
2
3
4
5
6
78
9
10
11
dance with the periodic maintenance and lubrica-
tion chart. In addition, the condition of the spark
plug can reveal the condition of the engine.
To remove the spark plug
1. Remove the seat. (See page 4-11.)
2. Remove the bolts and the quick fastener
screws shown.
3. Remove the fuel tank cap by turning it coun-
terclockwise.
WARNING
EWB01870
�
Always turn off the engine before removing
the fuel tank cap.
�
Do not remove the fuel tank cap immediately
after the engine has been running and is still
very hot.
�
Do not spill gasoline on the engine, exhaust
pipe or muffler.
�
Never remove the fuel tank cap while smok-
ing, or in the vicinity of sparks, open flames,
or other sources of ignition such as the pilot
lights of water heaters and clothes dryers.
4. Pull the panel backward, and then remove the
panel.
5. Install the fuel tank cap by turning it clockwise.
6. Remove the bolt, lift the rear of the fuel tank,
and then tilt it back.
1. Panel
2. Bolt
3. Quick fastener screw
4. Fuel tank cap
2
4
3
1
Page 97 of 148

8-14
1
2
3
4
5
6
78
9
10
11
2. Clean the surface of the spark plug gasket
and its mating surface, and then wipe off any
grime from the spark plug threads.
3. Install the spark plug with the spark plug
wrench, and then tighten it to the specified
torque.
NOTE:
If a torque wrench is not available when installing
a spark plug, a good estimate of the correct torque
is 1/4–1/2 turn past finger tight. However, the spark
plug should be tightened to the specified torque as
soon as possible.
4. Install the spark plug cap.
5. Place the fuel tank in the original position, and
then install the bolt.
6. Remove the fuel tank cap by turning it coun-
terclockwise.
7. Place the panel in the original position.8. Install the fuel tank cap by turning it clockwise.
9. Install the bolts and the quick fastener screws.
10. Install the seat.
EBU23304
Engine oil and oil filter element
The engine oil level should be checked before
each ride. In addition, the oil must be changed and
the oil filter element replaced at the intervals spec-
ified in the periodic maintenance and lubrication
chart. Tightening torque:
Spark plug:
12.5 Nm (1.25 m·kgf, 9.0 ft·lbf)
1. Projection
2. Slot
21
Page 103 of 148

8-20
1
2
3
4
5
6
78
9
10
11
do not use oils labeled “ENERGY CONSERV-
ING II” or higher.
�
Make sure that no foreign material enters the
crankcase.
15. Start the engine, and then let it idle for several
minutes while checking it for oil leakage. If oil
is leaking, immediately turn the engine off and
check for the cause.
16. Turn the engine off, and then check the oil lev-
el and correct it if necessary.
17. Install the engine guard by installing the bolts,
and then tighten them to the specified torque.
CAUTION:
ECB00370
Be sure to apply LOCTITE® to the engine
guard bolts before installing them.
EBU23470
Coolant
The coolant level should be checked before each
ride. In addition, the coolant must be changed atthe intervals specified in the periodic maintenance
and lubrication chart.
EBU23490
To check the coolant level
1. Place the ATV on a level surface.
NOTE:
The coolant level must be checked on a cold en-
gine since the level varies with engine tempera-
ture.
2. Check the coolant level in the coolant reser-
voir.
NOTE:
The coolant should be between the minimum and
maximum level marks. Tightening torque:
Engine guard bolt:
7 Nm (0.7 m·kgf, 5.1 ft·lbf)