Page 26 of 134

4-4
4eration of the throttle lever before you start the
engine. If the throttle does not work smoothly,
check for the cause. Correct the problem be-
fore riding the ATV or consult a Yamaha dealer.EBU18321Speed limiter Your ATV was delivered with an adjustable speed
limiter. The speed limiter keeps the throttle from
fully opening, even when the throttle lever is
pushed to the maximum.
1. Loosen the locknut.
2. To increase the maximum engine power avail-
able and the maximum speed of the ATV, turn
the adjusting screw in direction (a). To de-
crease the maximum engine power available
and the maximum speed of the ATV, turn the
adjusting screw in direction (b).3. Tighten the locknut.
WARNING
EWB00240Improper adjustment of the speed limiter and
throttle could cause throttle cable damage or
improper throttle operation. You could lose
control, have an accident or be injured. Do not
turn the adjusting screw out more than 12 mm
(0.47 in) or the throttle cable could be dam-
aged. Always make sure the throttle lever free
play is adjusted to 2.0–4.0 mm (0.08–0.16 in).(See page 8-21.)1. Locknut
2. Adjusting screw
3. No more than 12 mm (0.47 in)
U5YT64E0.book Page 4 Monday, April 9, 2007 1:03 PM
Page 29 of 134
4-7
4
WARNING
EWB00220�Always set the parking brake before starting
the engine. The ATV could start moving un-
expectedly if the parking brake is not ap-
plied. This could cause loss of control or a
collision.�Always be sure you have released the park-
ing brake before you begin to ride. The brake
could overheat if you ride the ATV without re-
leasing the parking brake. You could lose
braking performance which could cause an
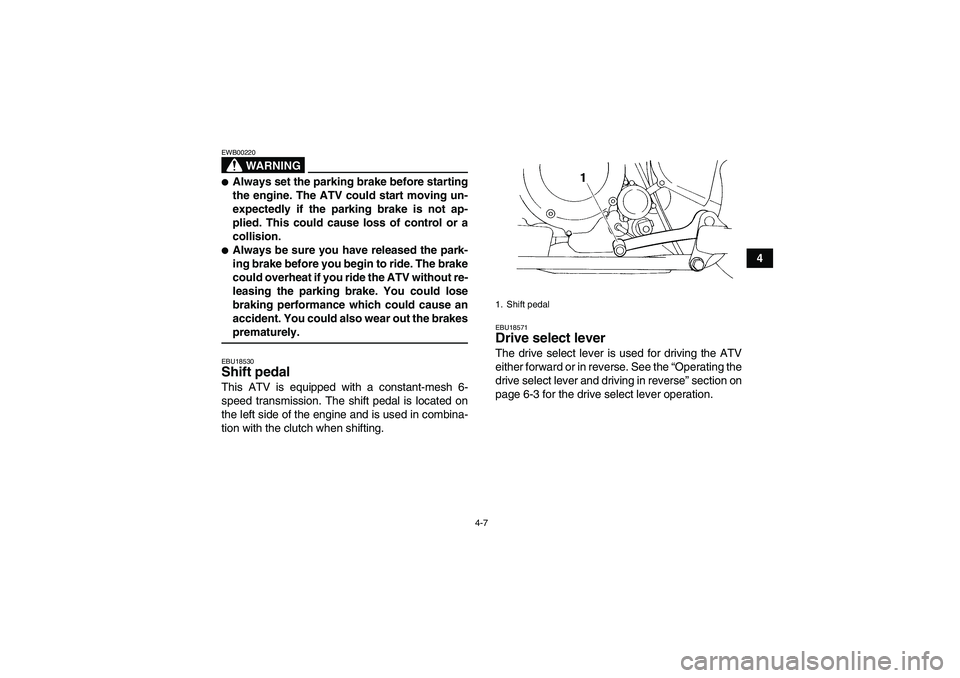
accident. You could also wear out the brakesprematurely.EBU18530Shift pedal This ATV is equipped with a constant-mesh 6-
speed transmission. The shift pedal is located on
the left side of the engine and is used in combina-
tion with the clutch when shifting.
EBU18571Drive select lever The drive select lever is used for driving the ATV
either forward or in reverse. See the “Operating the
drive select lever and driving in reverse” section on
page 6-3 for the drive select lever operation.1. Shift pedal
U5YT64E0.book Page 7 Monday, April 9, 2007 1:03 PM
Page 31 of 134

4-9
4
NOTE:If knocking or pinging occurs, use a different brandof gasoline or higher octane grade.
CAUTION:ECB00070Use only unleaded gasoline. The use of leaded
gasoline will cause severe damage to internal
engine parts, such as the valves and pistonrings, as well as to the exhaust system.
WARNING
EWB00310�Do not overfill the fuel tank. Fuel expands
when it heats up. If the fuel tank is overfilled,
fuel could spill out due to heat from the en-
gine or the sun.�Be careful not to spill fuel, especially on the
engine or exhaust pipe which can cause a
fire and severe injury. Wipe up any spilled
fuel immediately.�Do not refuel right after the engine has been
running and is still very hot.�Be sure the fuel tank cap is closed securely.EBU18820Fuel cock The fuel cock supplies fuel from the tank to the car-
buretor while also filtering it.
The fuel cock lever positions are explained as fol-
lows and shown in the illustrations.
1. Fuel tank filler tube
2. Fuel levelRecommended fuel:
UNLEADED GASOLINE ONLY
For Europe: Regular unleaded gasoline only
with a research octane number of 91 or high-
er
Fuel tank capacity:
9.0 L (2.38 US gal) (1.98 Imp.gal)
Fuel reserve amount:
2.7 L (0.71 US gal) (0.59 Imp.gal)
U5YT64E0.book Page 9 Monday, April 9, 2007 1:03 PM
Page 36 of 134

4-14
4
WARNING
EWB00400Always adjust the shock absorber assemblies
on the left and right side to the same setting.
Uneven adjustment can cause poor handling
and loss of stability, which could lead to an ac-cident.EBU19040Adjusting the rear shock absorber as-
sembly The spring preload can be adjusted to suit the rid-
er’s weight and the riding conditions.
Adjust the spring preload as follows.
1. Loosen the locknut.
2. Turn the adjusting nut in direction (a) to in-
crease the spring preload and thereby harden
the suspension, and in direction (b) to de-
crease the spring preload and thereby soften
the suspension.
NOTE:�A special wrench can be obtained at a Yamaha
dealer to make this adjustment.�The spring preload setting is determined by
measuring distance A, shown in the illustration.
The shorter distance A is, the higher the spring
preload; the longer distance A is, the lower the
spring preload. With each complete turn of the
adjusting nut, distance A is changed by 1.5 mm(0.06 in).1. Locknut
2. Spring preload adjusting nut
U5YT64E0.book Page 14 Monday, April 9, 2007 1:03 PM
Page 38 of 134
4-16
4
WARNING
EWB00450This shock absorber assembly contains highly
pressurized nitrogen gas. If the shock absorb-
er assembly is damaged, it could explode
causing injury or property damage. Shock ab-
sorber cylinder damage could also result in
poor handling which could cause an accident.�Do not tamper with or attempt to open the
cylinder assembly.�Do not subject the shock absorber assembly
to an open flame or other high heat.�Do not deform or damage the cylinder in any
way.�Do not dispose of a damaged or worn out
shock absorber assembly yourself. Take the
shock absorber assembly to a Yamaha deal-er for any service.
U5YT64E0.book Page 16 Monday, April 9, 2007 1:03 PM
Page 39 of 134

5-1
5
EBU19200
PRE-OPERATION CHECKS
EBU19222Pre-operation check list Before operating this ATV, be sure to check the items listed in the following table.
WARNING
EWB00480Always inspect your ATV each time you use it to make sure it is in safe operating condition.
Always follow the inspection and maintenance procedures and schedules described in the Owner’sManual. Failure to inspect increases the possibility of an accident or equipment damage.NOTE:The maintenance of some items in the table has to be performed by a Yamaha dealer. Refer to the periodicmaintenance charts on page 8-3 to determine which service should be performed by a Yamaha dealer.
ITEM ROUTINE PAGE
FuelCheck fuel level in fuel tank, and add recommended fuel if neces-
sary.
Check fuel line for leakage. Correct if necessary.4-8, 5-3
Engine oilCheck oil level in engine, and add recommended oil to specified lev-
el if necessary.
Check ATV for oil leakage. Correct if necessary.5-3, 8-11
Front brakeCheck operation. If soft or spongy, have Yamaha dealer bleed hy-
draulic system.
Check brake pads for wear, and replace if necessary.
Check brake fluid level in reservoir, and add recommended brake
fluid to specified level if necessary.
Check hydraulic system for leakage. Correct if necessary.5-3, 8-22, 8-23, 8-24
U5YT64E0.book Page 1 Monday, April 9, 2007 1:03 PM
Page 41 of 134

WARNING
EWB00520�Do not overfill the fuel tank. Fuel expands
when it heats up. If the fuel tank is overfilled,
f")
5-3
5
EBU19540Fuel Make sure that there is sufficient fuel in the tank.
(See page 4-8.)
WARNING
EWB00520�Do not overfill the fuel tank. Fuel expands
when it heats up. If the fuel tank is overfilled,
fuel could spill out due to heat from the en-
gine or the sun.�Be careful not to spill fuel, especially on the
engine or exhaust pipe which can cause a
fire and severe injury. Wipe up any spilled
fuel immediately.�Do not refuel right after the engine has been
running and is still very hot.�Be sure the fuel tank cap is closed securely.EBU19560Engine oil Make sure that the engine oil is at the specified lev-
el. Add oil as necessary. (See page 8-11.)
EBU19710Front and rear brakes Brake lever and brake pedal�Check that there is no free play in the brake le-
ver. If there is free play, have a Yamaha dealer
check the brake system.�Check for correct brake pedal height. (See page
8-25.) If the pedal height is incorrect, have a
Yamaha dealer adjust it.�Check the operation of the lever and pedal. They
should move smoothly and there should be a
firm feeling when the brakes are applied. If not,
have a Yamaha dealer check the brake system.
Brake fluid level
Check the brake fluid level. Add fluid if necessary.
(See page 8-23.)
Recommended brake fluid:
DOT 4
U5YT64E0.book Page 3 Monday, April 9, 2007 1:03 PM
Page 42 of 134

5-4
5Brake fluid leakage
Check to see if any brake fluid is leaking out of the
pipe joints or brake fluid reservoirs. Apply the
brakes firmly for one minute. If there is any leak-
age, have a Yamaha dealer check the brake sys-
tem.
Brake operation
Test the brakes at slow speed after starting out to
make sure they are working properly. If the brakes
do not provide proper braking performance, check
the brake pads for wear. (See page 8-22.)
WARNING
EWB00580Always check the brakes at the start of every
ride. Do not ride the ATV if you find any prob-
lem with the brakes or you could lose braking
ability, which could lead to an accident. If a
problem cannot be corrected by the adjust-
ment procedures provided in this manual, havea Yamaha dealer check for the cause.
EBU19761Throttle lever Check the operation of the throttle lever. It must
open smoothly and spring back to the idle position
when released. Have a Yamaha dealer correct if
necessary.EBU19770Drive chain Check the condition of the drive chain and check
the drive chain slack. Lubricate and adjust the
drive chain as necessary. (See page 8-29.)EBU19791Tires
WARNING
EWB00601Use of improper tires on this ATV, or operation
of this ATV with improper or uneven tire pres-
sure, may cause loss of control, increasing
your risk of accident.
Pay attention to the following.�The tires listed below have been approved
by Yamaha Motor Co., Ltd. for this model.
Other tire combinations are not recommend-
ed.
U5YT64E0.book Page 4 Monday, April 9, 2007 1:03 PM