2008 YAMAHA XMAX 250 ignition
[x] Cancel search: ignitionPage 6 of 88

SAFETY INFORMATION.....................1-1
Further safe-riding points .................1-4
DESCRIPTION.....................................2-1
Left view ...........................................2-1
Right view .........................................2-2
Controls and instruments .................2-3
INSTRUMENT AND CONTROL
FUNCTIONS........................................3-1
Immobilizer system ...........................3-1
Main switch/steering lock .................3-2
Indicator and warning lights .............3-3
Self-diagnosis device .......................3-3
Speedometer ....................................3-4
Fuel gauge ........................................3-5
Coolant temperature gauge..............3-5
Multi-function display .......................3-6
Anti-theft alarm (optional) .................3-9
Handlebar switches ..........................3-9
Front brake lever.............................3-10
Rear brake lever..............................3-10
Fuel tank cap ..................................3-11
Fuel .................................................3-12
Catalytic converters ........................3-13
Seat.................................................3-13
Storage compartments ...................3-14
Front storage compartment............3-15
Rear storage compartment.............3-16
Adjusting the shock absorber
assemblies...................................3-17
Sidestand ........................................3-17Ignition circuit cut-off system .........3-18
PRE-OPERATION CHECKS...............4-1
Pre-operation check list....................4-2
OPERATION AND IMPORTANT
RIDING POINTS..................................5-1
Starting the engine ...........................5-1
Starting off ........................................5-2
Acceleration and deceleration ..........5-2
Braking..............................................5-3
Tips for reducing fuel
consumption..................................5-3
Engine break-in.................................5-4
Parking ..............................................5-4
PERIODIC MAINTENANCE AND
MINOR REPAIR...................................6-1
Owner’s tool kit .................................6-1
Periodic maintenance and
lubrication chart ............................6-3
Removing and installing the
cowlings and panel .......................6-6
Checking the spark plug ..................6-8
Engine oil ..........................................6-9
Final transmission oil ......................6-11
Coolant ...........................................6-12
Air filter and V-belt case air filter
elements ......................................6-13
Adjusting the throttle cable free
play ..............................................6-15
Valve clearance ...............................6-15Tires ................................................6-16
Cast wheels ....................................6-18
Front and rear brake lever free
play ..............................................6-18
Checking the front and rear brake
pads.............................................6-19
Checking the brake fluid level ........6-19
Changing the brake fluid ................6-20
Checking and lubricating the
cables ..........................................6-21
Checking and lubricating the t
hrottle grip and cable ..................6-21
Lubricating the front and rear
brake levers .................................6-21
Checking and lubricating the
centerstand and sidestand .........6-22
Checking the front fork ...................6-22
Checking the steering.....................6-23
Checking the wheel bearings .........6-24
Battery ............................................6-24
Replacing the fuses ........................6-25
Replacing a headlight bulb .............6-27
Replacing a front turn signal light
bulb .............................................6-28
Replacing a tail/brake light bulb
or a rear turn signal light bulb .....6-28
Replacing the license plate light
bulb .............................................6-30
Replacing an auxiliary light bulb.....6-30
Troubleshooting ..............................6-30
Troubleshooting charts ...................6-31
TABLE OF CONTENTS
1C0-F8199-E4.qxd 22/11/07 05:41 Página 6
Page 17 of 88

EAU10471
Main switch/steering lock
The main switch/steering lock con-
trols the ignition and lighting systems,
and is used to lock the steering.
NOTE:
Be sure to use the standard key
(black bow) for regular use of the
vehicle. To minimize the risk of losing
the code re-registering key (red bow),
keep it in a safe place and only use it
for code re-registering.
EAU34121
ON
All electrical circuits are supplied with
power; the meter lighting, taillight,
license plate light and auxiliary lights
come on, and the engine can be star-
ted. The key cannot be removed.
NOTE:
The headlights come on automatically
when the engine is started and stay
on until the key is turned to “OFF” or
the sidestand is moved down.
EAU10660
OFF
All electrical systems are off. The key
can be removed.
EAU10680
LOCK
The steering is locked, and all electri-
cal systems are off. The key can be
removed.T
o lock the steering
1. Push
2. Turn
1. Turn the handlebars all the way to
the left.
2. Push the key in from the “OFF”
position, and then turn it to
“LOCK” while still pushing it.
3. Remove the key.
INSTRUMENT AND CONTROL FUNCTIONS
3-2
3
1C0-F8199-E4.qxd 22/11/07 05:41 Página 17
Page 32 of 88

EAU14880
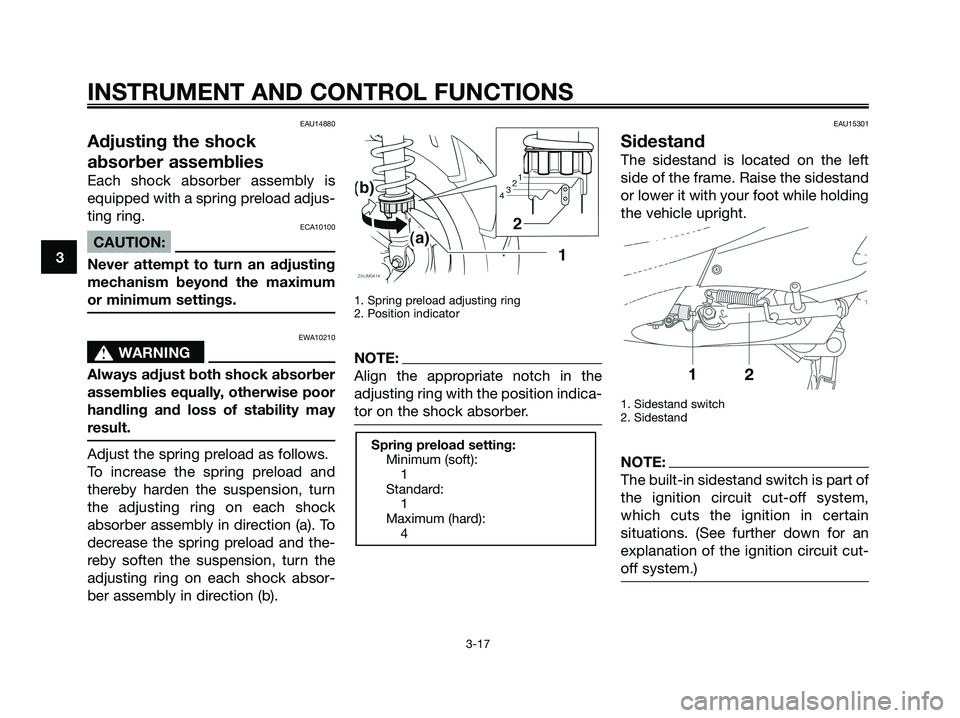
Adjusting the shock
absorber assemblies
Each shock absorber assembly is
equipped with a spring preload adjus-
ting ring.
ECA10100
CAUTION:
Never attempt to turn an adjusting
mechanism beyond the maximum
or minimum settings.
EWA10210
s s
WARNING
Always adjust both shock absorber
assemblies equally, otherwise poor
handling and loss of stability may
result.
Adjust the spring preload as follows.
To increase the spring preload and
thereby harden the suspension, turn
the adjusting ring on each shock
absorber assembly in direction (a). To
decrease the spring preload and the-
reby soften the suspension, turn the
adjusting ring on each shock absor-
ber assembly in direction (b).
1. Spring preload adjusting ring
2. Position indicator
NOTE:
Align the appropriate notch in the
adjusting ring with the position indica-
tor on the shock absorber.
EAU15301
Sidestand
The sidestand is located on the left
side of the frame. Raise the sidestand
or lower it with your foot while holding
the vehicle upright.
1. Sidestand switch
2. Sidestand
NOTE:
The built-in sidestand switch is part of
the ignition circuit cut-off system,
which cuts the ignition in certain
situations. (See further down for an
explanation of the ignition circuit cut-
off system.)
Spring preload setting:
Minimum (soft):
1
Standard:
1
Maximum (hard):
4
INSTRUMENT AND CONTROL FUNCTIONS
3-17
3
1C0-F8199-E4.qxd 22/11/07 05:41 Página 32
Page 33 of 88

EWA10240
s s
WARNING
The vehicle must not be ridden with
the sidestand down, or if the sides-
tand cannot be properly moved up
(or does not stay up), otherwise the
sidestand could contact the ground
and distract the operator, resulting
in a possible loss of control. Yama-
ha’s ignition circuit cut-off system
has been designed to assist the
operator in fulfilling the responsibi-
lity of raising the sidestand before
starting off. Therefore, check this
system regularly as described
below and have a Yamaha dealer
repair it if it does not function pro-
perly.
EAU15372
Ignition circuit cut-off
system
The ignition circuit cut-off system
(comprising the sidestand switch and
brake light switches) has the following
functions.
●It prevents starting when the
sidestand is up, but neither brake
is applied.
●It prevents starting when either
brake is applied, but the sides-
tand is still down.
●It cuts the running engine when
the sidestand is moved down.
Periodically check the operation of
the ignition circuit cut-off system
according to the following procedure.
EWA10250
s s
WARNING
If a malfunction is noted, have a
Yamaha dealer check the system
before riding.
INSTRUMENT AND CONTROL FUNCTIONS
3-18
3
1C0-F8199-E4.qxd 22/11/07 05:41 Página 33
Page 37 of 88

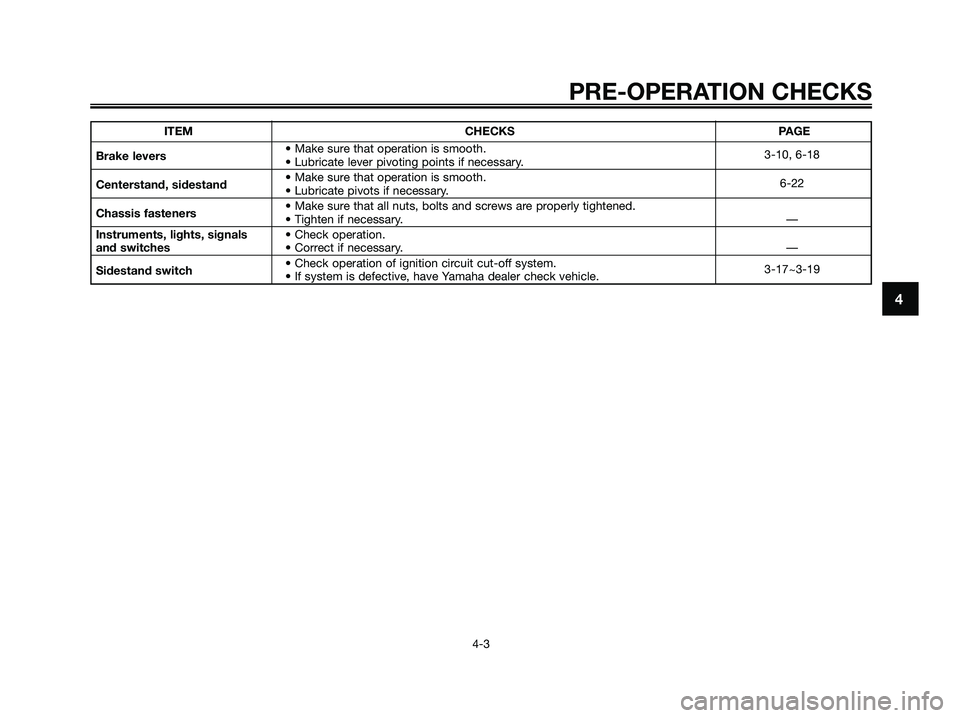
ITEM CHECKS PAGE
Brake levers• Make sure that operation is smooth.
• Lubricate lever pivoting points if necessary.3-10, 6-18
Centerstand, sidestand• Make sure that operation is smooth.
• Lubricate pivots if necessary.6-22
Chassis fasteners• Make sure that all nuts, bolts and screws are properly tightened.
• Tighten if necessary.—
Instruments, lights, signals • Check operation.
and switches• Correct if necessary.—
Sidestand switch• Check operation of ignition circuit cut-off system.
• If system is defective, have Yamaha dealer check vehicle.3-17~3-19
PRE-OPERATION CHECKS
4-3
4
1C0-F8199-E4.qxd 22/11/07 05:41 Página 37
Page 38 of 88

EAU15980
EWA10870
s s
WARNING
●Become thoroughly familiar
with all operating controls and
their functions before riding.
Consult a Yamaha dealer
regarding any control or func-
tion that you do not thoroughly
understand.
●Never start the engine or ope-
rate it in a closed area for any
length of time. Exhaust fumes
are poisonous, and inhaling
them can cause loss of cons-
ciousness and death within a
short time. Always make sure
that there is adequate ventila-
tion.
●For safety, always start the
engine with the centerstand
down.
EAUM2230
Starting the engineECA10250
CAUTION:
See page 5-4 for engine break-in
instructions prior to operating the
vehicle for the first time.
In order for the ignition circuit cut-off
system to enable starting, the sides-
tand must be up.
EWA10290
s s
WARNING
●Before starting the engine,
check the function of the igni-
tion circuit cut-off system
according to the procedure
described on page 3-18.
●Never ride with the sidestand
down.
1. Turn the key to “ON”.ECAM1080
CAUTION:
The following warning lights and
indicator light should come on for a
few seconds, then go off.
●Fuel level warning light
●Engine trouble warning light
●Immobilizer system indicator
lightIf a warning or indicator light does
not go off, see page 3-3 for the
corresponding warning and indica-
tor light circuit check.
2. Close the throttle completely.
3. Start the engine by pushing the
start switch while applying the
front or rear brake.
1. Rear brake lever
2. Start switch
3. Front brake lever
NOTE:
If the engine does not start, release
the start switch, wait a few seconds,
and then try again. Each starting
attempt should be as short as possi-
ble to preserve the battery. Do not
123
ZAUM0649
OPERATION AND IMPORTANT RIDING POINTS
5-1
5
1C0-F8199-E4.qxd 22/11/07 05:41 Página 38
Page 67 of 88

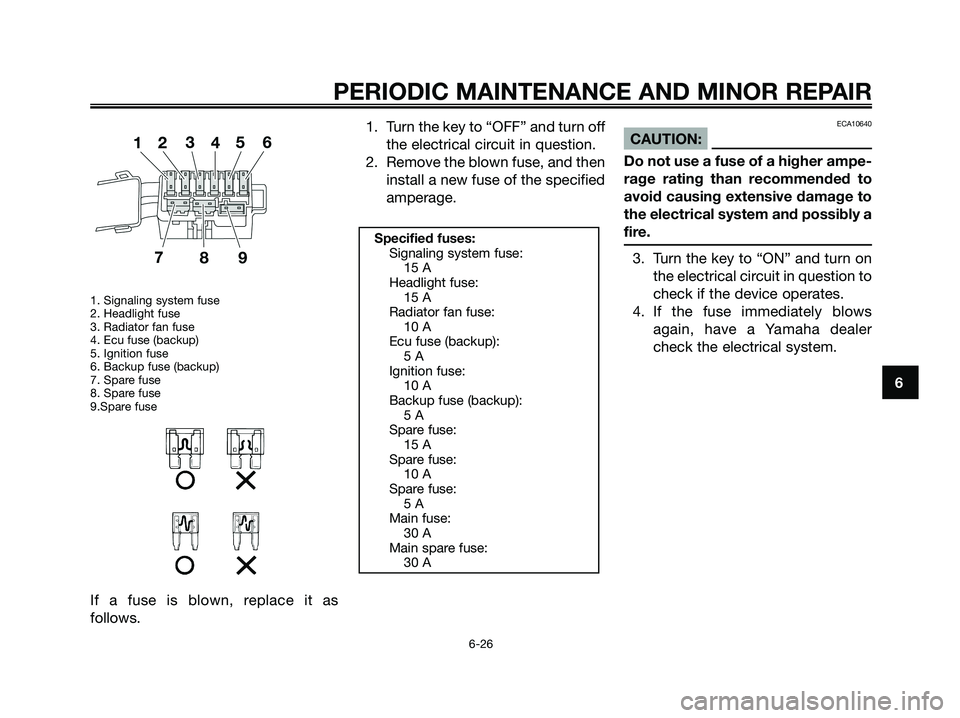
1. Signaling system fuse
2. Headlight fuse
3. Radiator fan fuse
4. Ecu fuse (backup)
5. Ignition fuse
6. Backup fuse (backup)
7. Spare fuse
8. Spare fuse
9.Spare fuse
If a fuse is blown, replace it as
follows.1. Turn the key to “OFF” and turn off
the electrical circuit in question.
2. Remove the blown fuse, and then
install a new fuse of the specified
amperage.
ECA10640
CAUTION:
Do not use a fuse of a higher ampe-
rage rating than recommended to
avoid causing extensive damage to
the electrical system and possibly a
fire.
3. Turn the key to “ON” and turn on
the electrical circuit in question to
check if the device operates.
4. If the fuse immediately blows
again, have a Yamaha dealer
check the electrical system.
Specified fuses:
Signaling system fuse:
15 A
Headlight fuse:
15 A
Radiator fan fuse:
10 A
Ecu fuse (backup):
5 A
Ignition fuse:
10 A
Backup fuse (backup):
5 A
Spare fuse:
15 A
Spare fuse:
10 A
Spare fuse:
5 A
Main fuse:
30 A
Main spare fuse:
30 A
PERIODIC MAINTENANCE AND MINOR REPAIR
6-26
6
1C0-F8199-E4.qxd 22/11/07 05:41 Página 67
Page 71 of 88

EAUM2200
Replacing the license plate
light bulb
1. Remove the socket (together
with the bulb) by pulling it out.
1. License plate light unit
2. Remove the defective bulb by
pulling it out.
3. Insert a new bulb into the socket.
4. Install the socket (together with
the bulb) by pushing it in.
EAUM2211
Replacing an auxiliary light
bulb
This model is equipped with two auxi-
liary lights. If an auxiliary light bulb
burns out, replace it as follows.
1. Remove the cowling B.
2. Remove the socket (together
with the bulb) by pulling it out.
1. Auxiliary light bulb socket
3. Remove the defective bulb by
pulling it out.
4. Insert a new bulb into the socket.
5. Install the socket (together with
the bulb) by pushing it in.
6. Install the cowling B.
EAU25880
Troubleshooting
Although Yamaha scooters receive a
thorough inspection before shipment
from the factory, trouble may occur
during operation. Any problem in the
fuel, compression, or ignition sys-
tems, for example, can cause poor
starting and loss of power.
The following troubleshooting charts
represent quick and easy procedures
for checking these vital systems your-
self. However, should your scooter
require any repair, take it to a Yamaha
dealer, whose skilled technicians
have the necessary tools, experience,
and know-how to service the scooter
properly.
Use only genuine Yamaha replace-
ment parts. Imitation parts may look
like Yamaha parts, but they are often
inferior, have a shorter service life and
can lead to expensive repair bills.
PERIODIC MAINTENANCE AND MINOR REPAIR
6-30
6
1C0-F8199-E4.qxd 22/11/07 05:41 Página 71